Table of Contents
Advertisement
Advertisement
Table of Contents

Related Manuals for Denon MC6000MK2


Summary of Contents for Denon MC6000MK2
- Page 1 Professional Digital Mixer and Controller MC6000MK2 Owner’s Manual...
-
Page 2: Fcc Information
This product, when installed as indicated in the instructions contained in this manual, 3. Do not place anything inside meets FCC requirements. Modification not expressly approved by DENON may void your Do not place metal objects or spill liquid inside the system. -
Page 3: Important Safety Instructions
IMPORTANT SAFETY INSTRUCTIONS CAUTION: (English) To completely disconnect this product from the mains, disconnect the plug from the READ BEFORE OPERATING EQUIPMENT wall socket outlet. The mains plug is used to completely interrupt the power supply to the unit and must This product was designed and manufactured to meet strict quality and safety standards. - Page 4 n NOTE ON USE / HINWEISE ZUM GEBRAUCH / OBSERVATIONS RELATIVES A L’UTILISATION / NOTE SULL’USO / NOTAS SOBRE EL USO / OBSERVERA WARNINGS WARNHINWEISE AVERTISSEMENTS AVVERTENZE ADVERTENCIAS VARNINGAR • Avoid high temperatures. • Vermeiden Sie hohe Temperaturen. • Eviter des températures • Evitate di esporre l’unità a • Evite altas temperaturas.
- Page 5 • D ECLARATION OF CONFORMITY (English) Our products following the provisions of EC/EU directives, that as follows; LV: 2006/95/EC EMC: 2004/108/EC RoHS: 2011/65/EU ErP: EC regulation 1275/2008 and its frame work directive 2009/125/EC • Ü BEREINSTIMMUNGSERKLÄRUNG (Deutsch) Unsere Produkte unterliegen den Bestimmungen der folgenden EG/EU-Richtlinien: LV: 2006/95/EC EMC: 2004/108/EC RoHS: 2011/65/EU...
- Page 6 n CAUTIONS ON INSTALLATION A NOTE ABOUT RECYCLING: VORSICHTSHINWEISE ZUR AUFSTELLUNG This product’s packaging materials are recyclable and can be reused. Please dispose of any PRÉCAUTIONS D’INSTALLATION materials in accordance with the local recycling regulations. When discarding the unit, comply with local rules or regulations. PRECAUZIONI SULL’INSTALLAZIONE Batteries should never be thrown away or incinerated but disposed of in accordance with the EMPLAZAMIENTO DE LA INSTALACIÓN...
-
Page 7: Table Of Contents
Before use Contents Accessories ····················································································2 Basic operation Troubleshooting ·····································································12 ···································································25 Main features ·················································································2 About this manual ········································································3 Basic operation ············································································12 Cautions on handling ····································································3 MIC (Mic input) ···········································································13 Specifications ········································································26 Headphone monitor ···································································13 Connections ·············································································4 Index ··························································································27 Preparations ··················································································4 USB settings ··········································································14 Cables used for connection ··························································4 Setting up USB audio output·····················································14... -
Page 8: Accessories
• Each input channel includes a 3-band isolator EQ. USB cable ................1 Input CD-ROM 2. USB MIDI controller • LINE/PHONO x 2 • MC6000MK2 Resource Disc ..........1 • Equipped with a physical controller function that controls DJ • LINE x 2 software. • MIC input x 2 • Layout design optimized for Serato DJ Intro operation. -
Page 9: About This Manual
About this manual Cautions on handling • Before turning the power switch on n Attaching 19-inch rack mount brackets n Symbols Check once again that all connections are correct and that there are An EIA standard 19” rack can be attached to this unit by attaching This symbol indicates a reference page on no problems with the connection cables. -
Page 10: Connections
Connections NOTE Input terminal connection • Do not plug in the power cord until all connections have been completed. • When making connections, also refer to the operating instructions of the other components. Connecting external devices and MIC • Insert the plugs securely. Loose connections will result in the generation of noise. • Be sure to connect the left and right channels properly (left with left, right with right). -
Page 11: Output Terminal Connections
Output terminal connections Outputting to amps Connecting of the booth output terminal Balanced monitor amp Balanced Unbalanced main amp main amp BALANCED AUDIO AUDIO Switch the output audio. STEREO : Outputs stereo audio. : Outputs monaural mixed MONO audio. -
Page 12: Connection To A Computer
Connection to a computer Connecting the power cord Use the supplied USB cable to connect the unit with a computer so n Compatible computers Insert the supplied AC adapter DC plug into the DC IN jack of the unit that USB MIDI and USB audio signals can be sent and received. and then insert the power plug to the outlet. -
Page 13: Installing And Setting Up Supplied Software (Be Sure To Follow These Instructions)
There is no need to install drivers on a Mac computer. Proceed to page 11. Use the following steps to install the supplied ASIO drivers. When installing or uninstalling the driver software, the administrative authorization of the computer is required. Log on as an administrator of the computer, and execute the installation. The supplied ASIO drivers are for the exclusive use on DENON DJ controllers. Available on DN-MC6000/MC3000/MC2000/MC6000MK2 models. Insert the supplied “MC6000MK2 Resource Disc” If you agree, select “I accept the terms in the license Click “Next >”. - Page 14 Installing DENON DJ ASIO for DJ Controller The program features you selected are being installed. NOTE Please wait while the InstallShield Wizard installs DENON DJ ASIO for DJ Controller, This may take several minutes. • When installing this software on Windows XP, the “Install Software”...
-
Page 15: Starting
This window is used for automatically displaying all connected DENON DJ devices in a list. (Example: MC6000MK2) When the DENON DJ ASIO driver “ASIO Control Panel” is opened from the DJ software or desktop icon, • When you select a device you want to set from this list, the current settings of the selected device the MC6000MK2 appears in the ASIO Control Panel. - Page 16 Sampling Rate Software Version: 88.2kHz The sampling rate selection is displayed here. Audio input channels: 96.0kHz The frequencies with which the DENON DJ ASIO driver is compatible are as follows: Audio output channels: Sampling frequency: 44.1 kHz • 44.1 kHz/48 kHz/88.2 kHz/96 kHz Bit Resolution...
-
Page 17: Installing Serato Dj Intro
• Denon shall not be responsible for any problems with your computer and other software that may arise • Serato DJ Intro is a SERATO application. To install and use the software, you have to accept the software from the installation and use of Serato DJ Intro. -
Page 18: Basic Operation
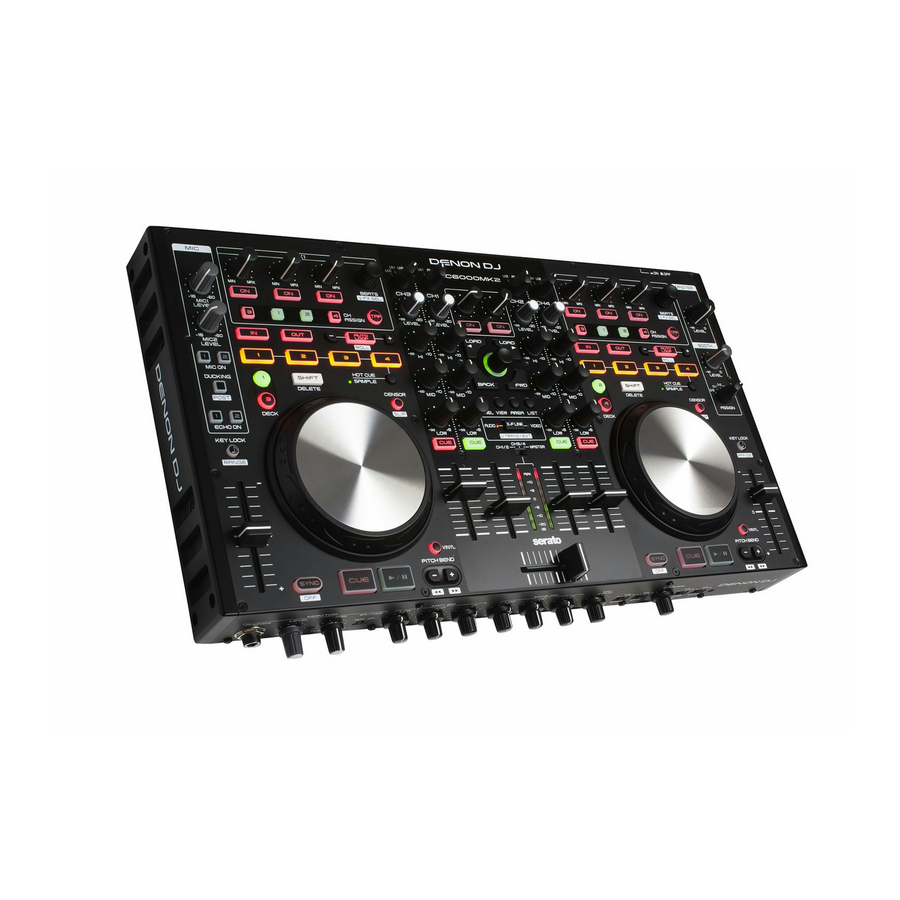
Basic operation This section describes operations of the unit without using the DJ software. Top panel • For information about how to operate the DJ software, see the instruction manual for the DJ software or the help menu. チャンネル入力ソース Channel input source • For information about the buttons on the unit for operating the DJ software and their functions, see “Top panel”... -
Page 19: Mic (Mic Input)
MIC (Mic input) Headphone monitor Top panel MIC1 LEVEL MIC ON 1 MIC1 MIC ON 2 There are two methods for headphone monitoring. Switch between Press to use to use MIC2 LEVEL the two as desired for use. MIC2 Make sure that your headphone plug is already inserted in the SHIFT MIC ON 1/2 DUCKING... -
Page 20: Usb Settings
USB settings Setting up USB audio output Rear panel You can select one of three modes for audio signals from the USB audio output. Use the USB audio output source select switch on the チャンネル入力ソース切り替えつまみ rear panel to select the mode. Channel input source select knob LN3/4 THRU TO PC output mode Audio signals input to LINE3/4 are output directly to the PC without... -
Page 21: Other Functions
Other functions フィルター/ビデオON/OFF切り替えボタン Fader lock function Adjusting the touch sense Filter/Video ON/OFF switching button フィルター/ビデオ調節つまみ トラック選択つまみ Filter/Video adjustment knob Track select knob sensitivity If the pitch fader position does not match the value stored in the KEY LOCK LOOP IN/OUT memory of the unit during the DECK change operation, MIDI The unit can control the sensitivity of the touch sensor for the Jog KEY LOCK... -
Page 22: Midi Command Input/Output
チャンネル入力ソース Channel input source MIDI command input/output 選択つまみ BOOTH ASSIGN select knob MIC1/2 LEVEL 電源スイッチ Power operation switch トラック This unit supports USB MIDI output. Almost all MIDI control functions are supported. Track select 選択つまみ SHIFT SHIFT knob Setting the MIDI command transmission MIDI control function interval time Input channels on deck control and mixer parts support the USB MIDI... - Page 23 MIDI command input/output n MIDI command list Send command MIDI command MIDI command Items Command Number Value Items Command Number Value EVENT Note# EVENT Note# CUE MIXER CH1 0x01 C#-1 X FADER ASSIGN (CH4) L 0x3D CUE MIXER CH2 0x02 X FADER ASSIGN (CH4) THRU 0x3E DECK CHG.
- Page 24 MIDI command input/output MIDI command MIDI command Items Command Number Value Items Command Number Value EVENT Note# EVENT Note# Reverse Reverse INPUT LEVEL (CH1) 0x01 0x3F – 0x01 0x3F – 0x01 EQ HIGH VR (CH1) 0x02 Foward Foward EQ MID VR (CH1) 0x03 JOG WHEEL FWD/REV 0x41 –...
- Page 25 MIDI command input/output Reception commands MIDI command MIDI command Items Command Number Value Items Command Number Value EVENT EVENT VINYL MODE 0x06 MON CUE CH1 0x45 KEY LOCK 0x08 MON CUE CH1 Dimmer 0x46 SYNC 0x09 MON CUE CH2 0x4B HOT CUE1 0x11 MON CUE CH2 Dimmer...
-
Page 26: Part Names And Functions
Part names and functions Top panel The top panel is explained for Serato DJ Intro. Beats select knob (BEATS) Auto loop/loop size adjustment buttons For buttons not explained here, see the page indicated in parentheses ( ). Rotate the knob to select the effect beats. (AUTO LOOP, –/+) ······································... - Page 27 Top panel Key lock button (KEY LOCK) ····················· (15) Censor ON/OFF switching button (CENSOR) With this ON, the key does not change even if Pitch bend adjustment buttons you adjust the tempo during playback. (PITCH BEND –/+) Sample mode switching button (SAMPLE) Adjust the pitch temporarily.
- Page 28 Top panel Load button (LOAD 0 1) ·························· (15) Window switching button (BACK/FWD) Moves the cursor position. Loads the file selected with the track select SHIFT • Press while holding down knob to the currently selected left DECK (1) or register the selected file to the PREPARE list. right DECK (2).
- Page 29 Top panel Level meter display select switch Cross fader knob ········································ (12) R4 R3 (CH1/2, CH3/4, MASTER) ··························· (12) Adjusts the output balance at the channel level. Selects the channel displayed for the channel/ Channel/master level meter ················ (12, 16) master level meter from three display modes.
-
Page 30: Front Panel
Front panel Rear panel For buttons not explained here, see the page indicated in parentheses ( ). For buttons not explained here, see the page indicated in parentheses ( ). Q6 Q 7 Q8 Q9 Headphone jack (PHONES) ························ (13) MIC echo adjustment knob Theft protection lock hole Master output terminals... -
Page 31: Troubleshooting
Troubleshooting If a problem should arise, first check the following: 1. Are the connections correct? 2. Is the set being operated as described in this owner's manual? 3. Is the external device (player or effects processor) operating correctly? If this unit does not operate properly, check the items listed in the table below. If the symptom is not covered on the check list, contact your dealer or service centers. -
Page 32: Specifications
Specifications n Audio (0 dBu=0.775 Vrms, 0 dBV =1 Vrms) • BOOTH Output Stereo balanced 1/4 inch TRS terminal Load impedance: Over 600 Ω/ohms • PHONO inputs 2 Stereo Level: + 4 dBu (Max + 24 dBu) Unbalanced RCA terminal When RL=100 kΩ/kohms Input impedance: 50 kΩ/kohms • Headphone output... -
Page 33: Index
Index AC adapter ··························································· 6 MIC ···································································· 13 MIDI command ·················································· 16 Accessories ·························································· 2 MIDI command list ······································· 17 , 19 ASIO driver ··························································· 7 MIDI control ······················································· 16 Cable ···································································· 4 Power on/off ······················································ 12 Connection ··························································· 4 Amp ···································································... -
Page 34: System Diagram
System diagram... - Page 35 The following are not covered by the Warranty: If your product does not require service, but you have questions regarding its operation, please contact our (1) Any product which is not distributed in the U.S.A. by Denon Professional div. D&M Professional. Technical Services Department as listed below.
- Page 36 n Dimensions Unit : in. (mm) 18 11/32 (460.0) Weight : 9 lbs 8 oz (4.3 kg)
- Page 37 3520 10300 00AP...