
Related Manuals for Clarion NX606AU


Summary of Contents for Clarion NX606AU
- Page 1 Owner’s manual NX606AU DVD MULTIMEDIA STATION WITH BUILT-IN NAVIGATION & 6.0’’ TOUCH PANEL CONTROL...
-
Page 2: Table Of Contents
Audio Simple Control Mode Screen ............30 iPod Video Menu Operations ................30 iPod Video ID3 Mode Screen ................30 iPod Video List Mode Screen ................31 iPod Video Simple Control Mode Screen ............31 iPod Video Play Mode Screen ................31 iPod Audio Bluetooth Mode ................32 NX606AU... - Page 3 Others Setup Menu .....................48 Set the Anti-Theft Code ..................49 21. TROUBLESHOOTING ..................50 General ........................50 DVD Player ......................50 USB Device ......................51 Bluetooth ......................51 TFT Screen ......................52 22. ERROR DISPLAY.....................53 DVD Player ......................53 23. SPECIFICATIONS ....................54 24. WIRE CONNECTION GUIDE ................56 NX606AU...
-
Page 4: Features
Expanding Audio Features Expanding Visual Features External Power Rear Monitor Rear Vision Camera Amplifier iPod ® Memory iPhone ® iPhone/Smartphone via HDMI Bluetooth Telephone NOTE: The items listed outside of the frames are the commercial products generally sold. • NX606AU... -
Page 5: Precautions
Using it in that condition may cause an accident, fire, or electric shock. • Use a fuse with the same specification only when replacing the fuse. Using a fuse with a different specification may causes a fire. • For the installation of this unit or a change in the installation, ask your authorized dealer or a nearest Clarion service center for safety. Professional skills and experiences are required to do • This navigation system should not be used to replace your own judgment. No itinerary suggested by this navigation system should ever override any highway regulations, your own judgment, or a knowledge of safe driving practices. Do not follow the navigation system’s suggested itinerary if it would cause you to perform a dangerous or illegal act, place you in a dangerous situation, or take you into an area you consider unsafe. - Page 6 -- Increase the separation between the equipment and receiver. -- Connect the equipment into an outlet on a circuit different from that to which the receiver is connected. -- Consult the dealer or an experienced radio/TV technician for help. NX606AU...
- Page 7 技术说明: 1、大小65x75mm,红色外框线为刀模线。 to skip. 2、材质,80g铜版纸,过哑胶。 机 3、内容印刷黑色:PANTONE Black C。 4、要求内容印刷正确、清晰,贴纸表面干净、整洁,不得有脏污、斑点、折痕; 切边务必整齐,不得歪斜。 3.This unit uses a precision mechanism. Even 邱腾萱 20150821 NX606AU in the event that trouble arises, never open the case, disassemble the unit, or lubricate the rotating parts. NX606AU...
-
Page 8: Cautions On Handling
When affected by static electricity or When the memorized data is lost or electric noise. Connect/disconnect the USB damaged by any chance, Clarion shall not memory stick when it is not accessed. be liable for any damage. • Connecting with the computer is not When using an USB memory stick, we supported. -
Page 9: Handling Discs
Use of such discs may cause misoperation or damage. • To remove a disc from its storage case, press down on the center of the case and lift the disc out, holding it carefully by the edges. • Do not use commercially available disc protection sheets or discs equipped with stabilizers, etc. These may damage the disc or cause breakdown of the internal mechanism. NX606AU... - Page 10 Other trademarks and trade names are those of their respective owners. • Pandora, the Pandora logo, and the Pandora trade dress are trademarks or registered trademarks of Pandora Media, Inc. used with permission. Pandora is only available in certain countries. Please visit http://www.pandora.com/legal for more information. NX606AU...
-
Page 11: Operation Panel
Press any place of the screen to turn on the monitor again. [RESET] Button • Press this button to hardware reset the unit. Note: When the [RESET] button is pressed, frequencies of radio stations, titles, etc. stored in memory are cleared. NX606AU... -
Page 12: Remote Control
• Batteries (battery pack or batteries installed) the same direction that you removed it. must not be exposed to excessive heat such as Please ensure the tray is inserted in the sunshine, fire or the like. correct direction. NX606AU... -
Page 13: Remote Control Functions
• If the battery leaks, wipe the remote control completely clean and install a new battery. Remote Control Functions You can use the remote control to operate the NX606AU. Note: • The wireless remote control operation may not be optimal in direct sunlight. - Page 14 • Press to manually select the next lower or higher station in Tuner modes. • Press to perform fast-backward or fast-forward searching. Press again to change the speed to 2x, 4x, 8x or 16x. • Press for movement of background source in Navigation mode. NX606AU...
-
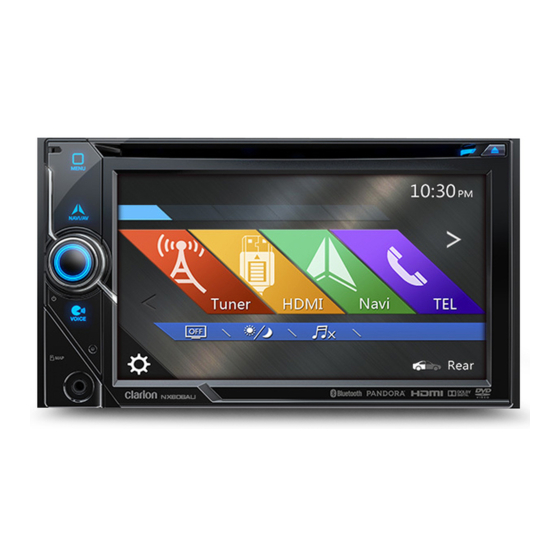
Page 15: Main Menu
20 - Rear---Touch the button to display the Rear mode. Scrolling the menu Flicking to right or left it will switch to next or previous page of main menu. Moving the menu position 1. Touch any quadrate icon on main menu more than 2 seconds, the icon will float on main menu. 2. Scrolling the floating icon to any position you want. NX606AU... -
Page 16: Dvd Video Player Operations
The CD player is not supported even if it is a hybrid disc. About MP3/WMA/AAC playback This unit can play back CD-R/CD-RW, DVD-R/ RW and DVD+R/RW discs on which MP3/WMA/ AAC music data have been recorded. For a detailed information, see the section entitled “Listening to compressed audio”. NX606AU... -
Page 17: Change Dvd System Settings
When a disc with view restrictions is inserted, you will Note: be prompted to input this password. The disc will not be viewable until the correct password is entered. If you force a disc into before auto reloading, it may damage a disc. NX606AU... -
Page 18: Showing Dvd Player Mode Screen
8 - Total time 2. Input the number of the title/chapter that you want 9 - Menu List button to play with the [0] to [9] key. 10 - System time 3. Touch the [ ] button. 11 - Bluetooth status indicator NX606AU... -
Page 19: Showing Video Files Player Mode Screen
The display will return to 4. Touch [ ] button to fix on the selected item. the playback screen, if you do not touch the screen 5. Touch [ ] button. for 10 seconds. NX606AU... -
Page 20: Operate The Video Files Player Menu
• Picture size: 720 x 480 Skip using seek bar • Audio format: MP3 Touch the ball on seek bar and drag it to any position • Audio sampling frequency: 32/44.1/48 KHz where you want to start playback. NX606AU... - Page 21 • format: MPEG4 Visual Simple @L1 • Picture size: 720 x 405 • Audio format: AAC • Audio sampling frequency: 32/44.1/48 KHz *.mpg files • format: MPEG2 • Picture size: 720 x 480 • Audio format: MP3 • Audio sampling frequency: 32/44.1/48 KHz NX606AU...
-
Page 22: Cd Player Operations
9 - Shortcut button. 3. Touch the desired track title button. The 10 - Play/Pause button corresponding track is started playback. 11 - Next Track/Fast Forward button 12 - Shuffle button 13 - Direct Searching button 14 - Scan Start/Stop button NX606AU... -
Page 23: Listening To Compressed Audio
PC). 1.1 and 1.0. • Some noise may occur depending on the type of In displaying, this unit gives priority to the Version 2.3 encoder software used while recording. and 2.4 TAGs. NX606AU... -
Page 24: Playback Mp3/Wma/Aac Menu
1. Touch [ ] button to stop playback. 2. Touch [ ] button again to resume playback. Playback resumes from start of the folder which playing track is in. •Other operations about playing MP3/WMA/AAC are almost same as CD Player mode. NX606AU... -
Page 25: Usb Audio Operations
• The maximum allowable number of folders is 65535 (including root directory and folders with no MP3/ WMA/AAC/FLAC file). • The maximum allowable number of files in a folder is 65535. • You can store the MP3/WMA/AAC/FLAC files together in a folder. 1 - Option button NX606AU... -
Page 26: Playing Audio Files In Usb Memory
2. Touch this button again to turn off the feature. Alphabet Search Touch [ ] button to search with alphabet in current list. Album Art work If MP3 audio file contains album art image in ID3, the picture will be displayed in this area. NX606AU... -
Page 27: Usb Video Operations
* The display will return to the playback screen, if you 5 - Menu List do not touch the screen for 10 seconds. 6 - Repeat button 7 - System time 8 - Bluetooth status indicator 9 - Playback information 10 - Shortcut button NX606AU... - Page 28 This operation is same as this in USB Audio mode. 5 - Repeat button Searching with the Track Number 6 - Shuffle button This operation is same as this in USB Audio mode. 7 - Video files in list 8 - System time NX606AU...
-
Page 29: Ipod Operations
• This system will not operate or may operate improperly with unsupported versions. • For detailed information on the playable iPod/iPhone models, see our home page: www.clarion.com Notes on Using iPod/iPhone • Do not connect an iPod/iPhone to this unit with a headphone connected to the iPod/iPhone. -
Page 30: Ipod Audio Playlist Mode Screen
If he list is in root, touch it to close the list. Category List • Touch the button[ ] to search with alphabet in Select different category songs to play. The current list category is same as the iPod/iPhone. NX606AU... -
Page 31: Ipod Audio Simple Control Mode Screen
] button to starts playback from the beginning of the next track. • Touch the [ ] button to starts playback from the beginning of the current track. When this button is touched again within about 5 seconds, playback starts from the beginning of the NX606AU... -
Page 32: Ipod Video List Mode Screen
] button to pause during playback. 2. Touch [ ] button again to resume playback. Switch to Previous/Next Track This operation is same as this in iPod Audio mode. • Touch [ ] or [ ] button during playback to play previous/next track. NX606AU... -
Page 33: Ipod Audio Bluetooth Mode
Audio mode. Please refer to the iPod Audio Mode operation. Note: Video playback is not available on all iPod/iPhone devices. Please contact your Clarion dealer for details. An optional connection cable or accessory may be required for this feature. Note: •... -
Page 34: Operations
13 - Current album name • Skipping a track (Pandora mode) Touch [ ] button during playback, tracks are skipped and starts playback from the beginning of the next track. Note: • Some track are not able to be skipped. NX606AU... -
Page 35: Pandora Bluetooth Mode
Pandora doesn’t playback correctly. Please don’t operate the audio player or internet radio other than Pandora when the Pandora mode. 5. During Pandora playback in the Pandora mode with the Bluetooth connection, the volume level is controlled also the mobile phone side. (Both iOS device and Android) NX606AU... -
Page 36: Bluetooth Audio Player Operations
2. Touch the Device button [ ] to display the Device • For detailed information on the playable Bluetooth Select screen. audio players, see our home page: www.clarion.com Selecting the Bluetooth Audio Mode 1. Touch the [BT Audio] button to select the Bluetooth Audio mode. -
Page 37: Selecting The Bluetooth Audio Player
3. Touch the desired Device button you wish to use. Touch [ ] button to select it as your active device. The corresponding cellular phone is set as current telephone. 4. Touch the [ ] button to return to the previous screen. NX606AU... -
Page 38: Bluetooth Telephone Operations
Adjust the level if the person on the other end of the telephone has a reception problem. Bluetooth Telephone Settings You can confirm various information concerning about the Bluetooth Interface features. NX606AU... -
Page 39: Registering Your Cellular Phone (Pairing)
5. If entering the Pass Key code is prompted on your cellular phone, enter the Pass Key code set in this unit. • You can change the Pass key setting of this unit from the Bluetooth Info screen under the Telephone Settings screen. NX606AU... -
Page 40: Answering An Incoming Call
2. When the call is finished, touch the [ ] button Note: to hang up. • Depending on some special cellular phone, the Telephone Interrupt screen may be closed and the connection with this system may be disconnected when entering the Private mode. NX606AU... -
Page 41: Using Siri Eyes Free Function
The indicator change as follows. 3. Talk to Siri the same way as using it on the iPhone. 4. To finish Siri Eyes Free function, touch the [ button. Notes: Siri Eyes Free is available on iOS 6.1 or higher. Please use external mic when you use the Siri Eyes Free function. NX606AU... -
Page 42: Tuner Operations
Recalling a preset station order to separate closely spaced stations. This feature 1. Touch the [FM1/2/3/AM] button to select the desire is useful in areas that have many radio stations in band (FM or AM) on the tuner. close proximity. NX606AU... -
Page 43: Hdmi Mode
(1) Connection with the iPhone 4 and iPhone 4s iPhone 4 and iPhone 4s HDMI cable sold in the market 30pin cable 30pin-Digital AV adapter NX606AU (2) Connection with the iPhone 5, iPhone 5s, iPhone 5c, iPhone 6 and iPhone 6 Plus iPhone 5, iPhone 5s, iPhone 5c, iPhone 5, iPhone 5s, iPhone 5c, HDMI cable sold in the market... -
Page 44: Select Hdmi Source
This HDMI mode is only indicative or a mirror image the screen of the iPhone, Android. You cannot operate by the touch screen of NX606AU Note: Depending on the application and model of the mobile phone, there is the case that black frame appears around the screen. -
Page 45: Aux
If the reverse cable is connected correctly to the car, the unit goes to camera mode automatically when the car is in reverses. As an additional safety feature, the audio from camera with built-in microphones can be heard through the NX606AU. NX606AU... -
Page 46: Rear Source Operations
DVD Video Rear Source Control Direct 3. Touch the Front button to access the main menu but Mode. not close the Rear Source. DVD Video in Rear NOTE: More detail please refer to DVD Video Front source. NX606AU... -
Page 47: Ipod Video Rear Source Control Play Mode
6 - Repeat button: Same as iPod function of front source 7 - Front/Rear button If the screen displays Rear Source, touch to switch to Front Source. If the screen displays Front Source, touch to switch to Rear Source. NX606AU... -
Page 48: Setting Operations
Shortcut menu and drag it to lower side area. Mute. Version: Display the software version information. Note: • Time and 24-Hour Format can be adjusted when set the system time not to be synchronized with GPS local time. Video Setup Menu NX606AU... -
Page 49: Audio Setup Menu
Magna Bass EX: Choose the loudness On or Off. Note: Optional cable (sold separately) is necessary when you use Audio line out. Set Password: Set the password for DVD parental control. Parental Control: Set the rating of the age. It contains Kid Safe/G/PG/PG-13/PG-R/R/NC-17/Adult. NX606AU... -
Page 50: Set The Anti-Theft Code
The numerical keypad is displayed, enter the right code to unlock. Note: If the anti-theft code is lost or forgotten, a charge will be incurred at the owner’s expense by a Clarion service station to unlock the NX606AU. NX606AU... -
Page 51: Troubleshooting
Check that the parking brake is displayed. engaged. engaged. Disc cannot play with Feature exceeds set parental Release the view limitation or the display “PARENTAL level. change the parental level. VIOLATION” shown. See the subsection “Setting up the parental level” NX606AU... -
Page 52: Usb Device
The audio quality is poor after The Bluetooth reception is Move the device closer to the connection with a Bluetooth poor. car audio system or remove enabled device. any obstacle between the device and the system. NX606AU... -
Page 53: Tft Screen
(The liquid crystal panel is produced according to technology with very high precision. Note that, though there are effective pixels of 99.99% or more, pixel missing or normally lit pixels account for 0.01%). NX606AU... -
Page 54: Error Display
Eject the disc then reload it inside the DVD deck and does properly. not play. PARENTAL VIOLATION Parental level error. Set the correct Parental level. Region code error Region code error. Eject the disc, and replace correct region code disc. NX606AU... -
Page 55: Specifications
Screen Size: 6.0” wide type Pixels: 1,152,000 Resolution: 800 x 480 x 3 (RGB) Bluetooth Specification: Bluetooth Ver 4.0 Profile: HFP1.5(Hands Free Profile) HSP1.0 (Headset Profile) A2DP (Advanced Audio Distribution Profile) AVRCP1.2,1.3,1.4 (AV Remote Control Profile) PBAP (Phone Book Access Profile) NX606AU... - Page 56 NX606AU dimensions: NX606AU weight: 2.3 kg NX606AU...
-
Page 57: Wire Connection Guide
• Before installing, be sure to disconnect the negative cable of the car battery. • In the optional devices, the RCA cables and the Connector cables are separately-sold items. • When connect the HDMI and USB cable, be sure to fix with the clamp. NX606AU GPS Antenna Radio Antenna Refer to next page... - Page 58 Note: *1: Connecting the PHONE INTERRUPT terminal The phone interrupt will mute the audio if the lead receives a negative or ground signal. NX606AU...
- Page 59 Clarion Co., Ltd. 2015/9 All Rights Reserved. Copyright © 2015: Clarion Co., Ltd.
- Page 60 Navigation Manual NX606AU ADVANCED NAVIGATION...
- Page 61 3.1.3.4 Finding help nearby ............................38 3.1.4 Selecting a Saved Location ......................... 39 3.1.5 Selecting a History item ........................40 3.1.6 Selecting a saved route ........................41 3.1.7 Entering coordinates ........................... 42 3.1.8 Selecting a location on the map ......................43 NX606AU English...
- Page 62 4.2.2 Trip Monitor ............................62 4.3 Settings menu ..........................63 4.3.1 Route preferences settings ........................64 4.3.1.1 Route Planning Method types ........................64 4.3.1.2 Navigation Mode ............................65 4.3.1.3 Road types ..............................65 4.3.2 Sound settings ............................. 66 NX606AU English 3...
- Page 63 5.4 Disabling the speed limit warning ....................73 5.5 Keyboard buttons are greyed out ....................73 5.6 The map is hidden behind an image of a junction ............... 74 6 Index ............................. 75 7 Copyright note ........................77 NX606AU English...
-
Page 64: Warnings And Safety Information
Plan the route before your departure and stop if you need to change the route. You must follow the traffic rules. If you deviate from the planned route, Clarion Navigation changes the instructions accordingly. -
Page 65: Getting Started
2 Getting started Clarion Navigation is optimised for in-car use. You can use it easily by tapping the screen buttons and the map with your fingertips. Free Map updates The NX606AU includes map updates for 3 years from first use. -
Page 66: Screen Controls
Preferences (page 64). Tap to continue. The initial set-up is now complete, tap to enter the Navigation view. 2.2 Screen controls The following sections describe the functionality and use of buttons, sliders, and other screen controls in Clarion Navigation. NX606AU English 7... -
Page 67: Using The Buttons And Other Controls
You need to confirm selections or changes only if the application needs to be restarted, if it needs to perform a major reconfiguration, or if you are about to lose some of your data or settings. Otherwise, Clarion Navigation saves your selections and applies the new settings without confirmation as soon as you use the controls. -
Page 68: Using Touch Gestures
Tap and hold any of the following buttons on the Navigation view to rotate, tilt, or scale the map continuously: • Tap and hold the following button on keyboard screens to quickly delete several characters: • Tap and hold the following buttons in long lists to scroll pages continuously: NX606AU English 9... -
Page 69: Manipulating The Map
Zooming in and Change how much of the map is displayed on the screen. Clarion Navigation uses maps that let you examine the locations at various zoom levels, always with optimised content. It always displays street names and other text with the same font size, never upside-down, and you only see the streets and objects that you need. - Page 70 Selecting Open a list of additional features like saving a location, or additional searching for Places around the cursor. options Selecting a Select the cursor location as a new destination. The route is destination automatically calculated. NX606AU English 11...
-
Page 71: Navigation View
2.3 Navigation view The navigation view is the main screen of Clarion Navigation that shows the planned route on a map. Clarion Navigation works with digital maps which are not simply the computerised versions of traditional paper maps. Similarly to paper road maps, the 2D mode of digital maps shows you streets and roads. - Page 72 Navigation By tapping it, you can open the Navigation menu, where you can reach menu other parts of Clarion Navigation. Street name It shows the current street name. By tapping it, you can open the Where Am I screen. See page 61.
-
Page 73: Streets And Roads
2.3.2 GPS position markers When your GPS position is available, Clarion Navigation marks your current position. By default, this marker is a red arrow arrow. The dot near the arrow shows the GPS position as perceived by the GPS receiver. -
Page 74: Turn Preview And Next Street
Streets and roads that You can choose whether you want to use or avoid certain road are excluded from the types (page 64). However, when Clarion Navigation cannot avoid navigation such roads, the route includes them and shows them in a colour that is different from the route colour. -
Page 75: Lane Information And Signposts
When navigating on multi-lane roads, it is important to take the appropriate lane in order to follow the planned route. If lane information is available in the map data, Clarion Navigation displays the lanes and their directions using small arrows at the bottom of the map. Highlighted arrows represent the lanes and the direction you need to take. -
Page 76: Junction View
Tap any of them to display the exit area on the map. You can now easily add this service station as a waypoint to your route if necessary. If you want to display other types of Places at the next few service stations, you can change the icons . See page 68. NX606AU English 17... -
Page 77: Object Types
Clarion Navigation supports the following 3D object types: Type Description 3D terrain NX606AU displays 3D hills and mountains in the Navigation view, and illustrates them by colouring and shading on the 2D map. Elevated roads Elevated roads are complex intersections and vertically isolated roads (such as overpasses or bridges) displayed in 3D. - Page 78 The Menu button appears when the Navigation view is displayed. Tap it to open the Navigation menu. The More button appears on the screen to display additional features. Tap it to open the list of additional features on certain screens. NX606AU English 19...
- Page 79 Tap it to return to the map from any menu screen. Tap the Back button to return to the previous screen. You can also press and hold this button to quickly return to the Navigation view from any other screen. NX606AU English...
-
Page 80: Using The Navigation
3 Using the navigation By default, Clarion Navigation calculates routes using the road network of the maps provided with the product. You can select the destination and start navigating to it right away (normal navigation) if you need a route for immediate navigation. - Page 81 Addresses, Places, Place categories, Saved locations, and recent destinations are mixed in one list. You can immediately select the result you want to use as your destination or narrow the list of results for only one type (for example, Places). NX606AU English...
- Page 82 If necessary, tap the map somewhere else to modify the destination. The cursor ( ) appears in the new location. Check the settings for road types and change them if necessary. to confirm the destination, or tap to select a different destination. NX606AU English 23...
-
Page 83: Selecting An Address
Navigation view to access the Navigation menu. By default, the Clarion Navigation proposes the country and state where you are or in case there is no valid GPS position, the country and state of the last known position. If needed, change the country. - Page 84 (optional) On the Select Street screen, you can immediately select a street from the list of suggestions. c. Otherwise, start entering the street name on the keyboard, the names that match the string appear in a list. NX606AU English 25...
- Page 85 ) appears at the new location. Check the settings for road types and change them if necessary. to confirm the destination. You can also select a nearby point on the map or tap to select a different destination. NX606AU English...
-
Page 86: Entering An Address Starting With The Street Name
Navigation view to access the Navigation menu. By default, Clarion Navigation proposes the country and state where you are. If needed, change the country. Tap In the Select Country screen, you can immediately select a country from the list below... - Page 87 If available, enter the street number by performing the following steps: Tap the Street number or crossing street field. Enter the street number on the keyboard. (To enter letters, tap c. Tap the selected address to finish the address search. NX606AU English...
-
Page 88: Selecting A Town Centre
, and modify the country and state as described earlier (page 24), if necessary. If necessary, select a new town by performing the following steps: Tap the Town or Postcode field. (optional) On the Town of Postcode screen, you can select a town from the list of suggestions. NX606AU English 29... -
Page 89: Selecting The Midpoint Of A Street
(optional) On the Select Street screen, you can immediately select a street from the list of suggestions. c. Otherwise, start entering the street name on the keyboard. The names that match the string appear in a list. to open the list of results. Select the street from the list. NX606AU English... -
Page 90: Selecting An Intersection In A Town
Select the street from the list. Tap the Street number or crossing street field and browse the list of crossing streets or start entering the street name in the field. Select one from the list. NX606AU English 31... -
Page 91: Using The Postcode To Select A Destination
Finding frequently searched types of Places with the Quick search categories, see page 33 • Searching for a Place by its name, see page 36 • Searching for a Place by its category, see page 34 In case of emergency, you can also find help nearby, see page 38 NX606AU English... -
Page 92: Using Quick Search Categories
If you need to reorder the list, . To filter the list of results by providers, tap and then the provider logo on the right side of the screen. (optional) If needed, tap to further filter the list of results. NX606AU English 33... -
Page 93: Searching By Category
Select the area around which you would like to search for the Place by tapping . By default, the search area is around the current position (or if it is not available, around the last known position). In this case, the following result list is ordered by the distance from this position. NX606AU English... - Page 94 You can turn the Category View off at any level to list all Places around the selected location or along the route. (optional) The Places in the list can be ordered by the following criteria: • Name • Their distance from the current or last known position NX606AU English 35...
-
Page 95: Searching By Name
This is useful when you search for a later stopover that results in a minimal detour only, such as searching for upcoming petrol stations or restaurants. (The result list is ordered by the length of the necessary detour.) NX606AU English... - Page 96 Browse the list, if necessary, and tap the desired list item. A full screen map appears with the selected point in the middle. The process continues the same way as in case of any other Places search. See page 33. NX606AU English 37...
-
Page 97: Finding Help Nearby
Browse the list and tap one of the list items. A full screen map appears with the selected point in the middle. The process continues the same way as in case of any other Places search. See page 33. NX606AU English... -
Page 98: Selecting A Saved Location
Check the settings for road types and change them if necessary. to confirm the destination. You can also select a nearby point on the map or tap to select a different destination. NX606AU English 39... -
Page 99: Selecting A History Item
Select a destination from the list. A full screen map appears with the selected point in the middle. If necessary, tap the map somewhere else to modify the destination. The cursor ( ) appears at the new location. NX606AU English... -
Page 100: Selecting A Saved Route
Navigation view to access the Navigation menu. The list of saved routes appears. If necessary, scroll the list to see earlier routes. Select a route and the Multipoint Route screen appears. If necessary, modify the saved route. Otherwise, tap NX606AU English 41... -
Page 101: Entering Coordinates
UTM format. Tip! A full screen map appears with the selected point in the middle. If necessary, tap the map somewhere else to modify the destination. The cursor ( ) appears at the new location. NX606AU English... -
Page 102: Selecting A Location On The Map
Places near the selected point or to save this location. Tip! If you already have a planned route, tap to add the selected location to your route. to select the cursor as the destination. NX606AU English 43... -
Page 103: Planning A Multipoint Route
There is only one line in the list of route points, the starting point of the route, which is normally the current GPS position. to select the destination. The New Route to... screen appears, where you can select the destination of the route the same way as described in the previous sections. NX606AU English... -
Page 104: Checking Route Information And Alternatives
Navigation view to access the Navigation menu. In the Navigation menu, tap The planned route is displayed in its full length on the map with the following additional information: • The total length of route • The total time of route. NX606AU English 45... -
Page 105: Editing The Route
• Deleting the planned route, see page 50 • Selecting a route alternative when planning the route, see page 50 • Selecting a route alternative for an existing route, see page 51 • Pausing guidance, see page 52. NX606AU English... -
Page 106: Setting A New Starting Point
The Change Start to... screen appears. Select the starting point of the route the same way you select a destination. You can see the new starting point on the map. Tap and the Multipoint Route screen appears where you can continue adding a destination to your route. NX606AU English 47... -
Page 107: Adding An Additional Destination
. Add a destination to your route as described on page 44. 3.3.3 Modifying the list of destinations To edit your route, perform the following steps: on the Navigation view to access the Navigation menu. In the Navigation menu, tap NX606AU English... -
Page 108: Saving The Planned Route
Select a destination as described earlier and tap Type in a name and tap The route is saved and it is available in By selecting a previously saved route, Clarion Navigation recalculates the route using the saved destination and/or the waypoints. NX606AU... -
Page 109: Deleting The Planned Route
Select a destination as explained earlier, and go to the route confirmation screen. You can see the basic details of route alternatives. Tap any of them to see it on the map. To view more suggestions, tap and scroll down for other alternative routes with different route planning methods. NX606AU English... -
Page 110: Selecting A Route Alternative For An Existing Route
Select one of the route alternatives and tap to return to the previous screen. Clarion Navigation recalculates the route. Tap to start your journey. The orange line line now shows the new planned route. 3.3.7 Selecting a route alternative for an existing route... -
Page 111: Pausing Guidance
Select one of the route alternatives and tap to return to the previous screen. Clarion Navigation replaces the original route. Tap to start your journey. The orange line line now shows the new planned route. 3.3.8 Pausing guidance When you are driving a planned route but you do not need guidance for a certain part of the route, you can suspend it and continue when it is needed again. -
Page 112: Editing A Saved Location
Tap the location you want to edit, tap and enter the name of the location on the keyboard, then tap In Saved Locations, Home and Work cannot be renamed. To change your home or Note! work location, tap , and confirm the address change. NX606AU English 53... -
Page 113: Adding An Alert Point
Scroll down the list and tap Select the type of the Alert Point, the direction from which you expect the alert, and (if applicable) the speed limit for this Alert Point. to save the location as a new Alert Point. NX606AU English... -
Page 114: Running A Simulation
• : Jump to the previous route event (manoeuvre). • : Tap to increase the speed of the simulation to 4, 8 or 16 times faster. Tap again to return to normal speed. to stop the simulation. NX606AU English 55... -
Page 115: Off-Road Navigation
3.7 Off-road navigation When first started, Clarion Navigation calculates routes using the road network of the maps provided with the product. If you want to disregard roads during navigation, you can switch to off-road mode, for example when driving in a desert. -
Page 116: Reference Guide
4 Reference guide The following sections describe the different concepts and menu screens of Clarion Navigation. 4.1 Concepts The following sections describe and explain navigation-related concepts. 4.1.1 2D/3D GPS reception The GPS receiver uses satellite signals to calculate its (your) position and needs at least four signals to give a three-dimensional position, including elevation. -
Page 117: Route Calculation And Recalculation
4.1.6 Speed limit warning Maps may contain information about the speed limits of the road segments. Clarion Navigation is able to warn you if you exceed the current limit. This information may not be available for your region, or may not be fully correct for all roads on the map. -
Page 118: Intelligent Navigation
The following sections describe these features. 4.1.7.1 Congestion detour on highways Clarion Navigation may offer a detour when you slow down on a highway due to a traffic jam. The Potential congestion detour window appears and shows the length and duration of the detour. -
Page 119: Parking Around Destination
4.1.7.3 Parking around destination If you leave the planned route by exiting a motorway, Clarion Navigation tries to guess the reason for making a detour. By tapping , you can open a top-down map with the recommended parking Places around the destination. -
Page 120: Useful Information Menu
This screen contains information about the current position (or about the last known position if GPS reception is not available). You can access it the following two ways: • By going to the Navigation menu and tapping NX606AU English 61... -
Page 121: Trip Monitor
You can export all logs into the sdmmc folder. You can access the Trip Monitor Settings, where you can enable saving the trip logs automatically or you can save the trip logs manually. See page 71. NX606AU English... -
Page 122: Settings Menu
4.3 Settings menu You can configure the navigation settings, and modify the behaviour of Clarion Navigation, by tapping Tap the arrows to view the content of other pages. The Settings menu provides the following options:... -
Page 123: Route Preferences Settings
Usually, the best selection for fast and normal cars. Results in a route with fewer turns and no difficult manoeuvres. With this option, you can make Clarion Navigation take, for example, the motorway instead of a series of smaller roads or streets. -
Page 124: Navigation Mode
Per-use toll roads are pay roads where there is a per-use charge in the routes by default. If you disable toll roads, Clarion Navigation plans the best toll-free route. Clarion Navigation includes ferries in a planned route by default. However, a map does not necessarily contain information about the accessibility of temporary ferries. -
Page 125: Sound Settings
• Announce the road numbers only. • Announce the manoeuvre only. Set whether you want an immediate announcement for the next manoeuvre after each turn, or it is enough to receive the information when the turn is near. NX606AU English... -
Page 126: Warnings Settings
You can enable and modify the following settings: Button Description Clarion Navigation is able to warn you if you exceed the current speed limit. This information may not be available in your region, or may not be fully correct for all roads on the map. -
Page 127: Navigation View Settings
3D buildings, landmarks, and manage your Place visibility sets (which Places to show on the map). NX606AU English... - Page 128 Places categories. Zoom out and show an overview of the surrounding area if the next manoeuvre is far and you are driving on a motorway. When you get close to the event, the normal map view returns. NX606AU English 69...
-
Page 129: Regional Settings
3D view of the junction. Tap it to turn this feature on or let the map be displayed for the whole route. In certain situations, Clarion Navigation offers a detour when there is a traffic jam on a highway. See page 59. -
Page 130: Display Settings
Understanding how different people use the application can help us improve the user interface and the program workflow. Anonymous track logs are sometimes used for providing real-time information service. Your trips can also help us improve the quality and coverage of maps. NX606AU English 71... -
Page 131: Troubleshooting
Cause: The digital map data may not include every single address. Solution 1: If the street number is not known or Clarion Navigation cannot find it, select only the street name. This way, Clarion Navigation will navigate you to the midpoint of the street, where you can find the exact address more easily. -
Page 132: Disabling The Speed Limit Warning
Issue: Some keyboard buttons are greyed out and cannot be used. Cause: Clarion Navigation has a smart keyboard for address search, which means that only those buttons are active that can be used to type a name that is available on the map. -
Page 133: The Map Is Hidden Behind An Image Of A Junction
3D view of the junction. The lanes you need to take are displayed with arrows. Solution: If you want to hide the currently displayed junction and return to the Navigation view, tap the picture. To turn off this feature, perform the following steps: • Tap , and NX606AU English... -
Page 134: Index
New Route, 18, 21 Editing the route, 46 Off-road navigation, 56, 65 Fast route, 64 Favourites (Saved Locations), 39, 52, 53 Parking, 60 Places of Interest, 32 GPS Information, 61 POI (Places), 32 Green route, 65 Possible alternative route, 59 NX606AU English 75... - Page 135 Warning settings, 67 Warning settings, 67 Waypoint, 19, 48 Short route, 65 Where Am I, 61 Simulation, 55 Work address, 39, 52 Smart zoom, 58 Sound settings, 66 Speed camera, 57, 68, 73 Zooming, 10, 58 Speed limit, 67, 73 NX606AU English...
-
Page 136: Copyright Note
This manual may not, in whole or in part, be reproduced or transmitted in any form either electronically or mechanically, including photocopying and recording, without the express written consent of Clarion. © 2015 - Clarion Map data: © 1987 - 2015 HERE. All rights reserved. http://corporate.navteq.com/supplier_terms.html. - Page 137 Map Update Instructions NX606AU ADVANCED NAVIGATION...
- Page 138 Thank you for choosing Clarion. Please take extra care when following these map update instructions. Data corruption is not covered by warranty. 1: How to create a Naviextras user account ............... P. 3 2: How to install Naviextras Toolbox ................P. 5 3: How to start using Naviextras Toolbox (connecting SD card and log-in) ...
-
Page 139: 1: How To Create A Naviextras User Account
1: How to create a Naviextras user account. Please visit clarion.naviextras.com and click on “Create a user profile”. From the drop-down list, select “Clarion” and “ ” Once you have successfully specified your navigation device type, please click “Register” to... - Page 140 Please fill in all details in the required fields. Be sure to keep your username and password in a secure location for future reference. Once all details are entered correctly, click on “create my account”. You will then receive a message that you have successfully created a new user account. An email will automatically be sent to the email address you entered.
-
Page 141: 2: How To Install Naviextras Toolbox
2: How to install Naviextras Toolbox Before downloading the installer from the Downloads page, please make sure that your PC meets minimum technical requirements (operating system, enough free space on your local hard disk). Installation of Naviextras Toolbox is quick and easy. After downloading the installer file, simply double-click the file to start the installation. -
Page 142: 3: How To Start Using Naviextras Toolbox (Connecting Sd Card And Log-In)
3: How to start using Naviextras Toolbox (connecting SD and log-in)? This Guide explains the very first steps of using Toolbox: how to connect your navigation MicroSD to your PC and how to log in with your username and password. After Naviextras Toolbox has been started, you will see the main page. - Page 143 Some navigation devices are capable of collecting strictly anonymous usage statistics and GPS logs. These logs can be used by the developers to improve the quality of maps and the navigation software. If your device can collect such information, Naviextras Toolbox will ask you to allow the upload of that information for anonymous processing.
- Page 144 When you have successfully logged in, your username will be shown on the top of all Naviextras Toolbox screens.
-
Page 145: 4: How To Browse And Select Updates In Naviextras Toolbox
4: How to browse and select updates in Naviextras Toolbox If you already purchased update(s) on the Naviextras.com portal, you can skip these steps and continue with reading the How to download and install updates guide. After successfully connecting your device and logging in, you can start browsing updates and extra maps in Naviextras Toolbox. - Page 146 After you have purchased an update or added a free item to your cart, it is added to the installation queue, and the number of updates awaiting installation is shown on the Updates button. Click the “Updates” button to continue with the download and installation of updates.
-
Page 147: 5: How To Buy Updates And Extras In Naviextras Toolbox
5: How to buy updates and extras in Naviextras Toolbox Instead of buying updates and extras on the Naviextras.com site, you can decide to buy them conveniently in Toolbox. This Guide explains the simple Toolbox purchase and checkout procedure. Buying updates and extras is very similar to buying on the Naviextras.com site, so this Guide will mainly explain the few differences. - Page 148 If you would like to buy additional updates too, simply close this window and click the shopping cart icon for another item, then click the Add to cart button to add the next item to your cart. When all items are in the cart, click on the Go to Checkout button and go through the same checkout process as on the Naviextras.com site.
-
Page 149: 6: How To Download And Install Updates
6: How to download and install updates If you added free updates and/or added purchased updates to the installation queue, please click on the Updates button in the menu bar on the left hand side. This is the last step to update your navigation device or software. - Page 150 After creating a backup, Toolbox will start downloading and installing the selected updates. A double status bar shows you the progress: the one on top shows the total ratio of the job already done, and the one at the bottom shows progress with the current file. Please wait until you receive a message that the operation is completed.
- Page 151 have on your device. Clicking on a region on the map will have the same effect as clicking a button in the Action column of the table: In case of a region for which updates are available, you can choose whether you want to Upgrade the region, Keep the current content or Remove all content belonging to that region entirely.
- Page 152 selected actions. The installation process is then the same as in the case of simple installation.
- Page 153 7: How to make or restore a backup of the navigation SD card. It is suggested to make a backup in at least the following cases: right after you acquire a device or navigation software; before using Naviextras Toolbox to update your navigation software and its content; after updating your device or software.
- Page 154 A warning is displayed that if you choose to continue with restoring a backup, all changes and updates will be lost that have been made after the backup date. Accept the warning only if you are sure that no harm will be done to your important data. The time needed to restore a backup is similar to the time needed to create a backup.
- Page 155 8: How to transfer contents between the PC and the navigation MicroSD. This guide explains how to transfer your contents between your navigation MicroSD card with navigation software and your PC if you need to free up some space. In some cases you might need to free up some space on your device or SD card to make room for new navigation content or media files.
- Page 156 During the transfer, a status window shows the progress. Do not switch off or disconnect your device during the process. When the transfer is finished, you can see the newly transferred contents in the table on the right side. You can transfer your contents back to your device or SD card any time by clicking the arrow button that points to the 'Device' table.