Table of Contents
Advertisement
EN
USER INSTRUCTIONS AND SAFETY
Congratulations on your purchase of an N-Com product.
N-Com B5 was made using the most advanced technologies and the best
materials. Long-running tests and thorough system development have allowed
the highest audio quality to be achieved.
For additional information about B5, and to download high-definition
instructions as well as the latest Firmware version, visit the website www.n-com.it
Firmware version: 1.0x
REFERENCE STANDARDS
The products of the N-Com line are in compliance with standards as per the table
below:
B5
Battery
charger
Battery
The Declarations of Compliance can be downloaded from the website www.n-
com.it (Download section).
FccID: Y6MNCOM8
Bluetooth is a registered trademark property of Bluetooth SIG, Inc.
The
Bluetooth
requirements and other applicable provisions of Directive
99/5/CE, Directive 2009/65/EC, Directive 2011/65/CE, Directive
2012/19/EU
Directive
2006/95,
2012/19/EU, 2009/125/CE
Directive 2006/66/CE
system
complies
2004/108,
with
the
main
2009/65/EC,
2011/65/CE,
R-NZ
B5 - 18/11/2015 12:01:00
B5
safety
Advertisement
Table of Contents

Related Manuals for N-Com B5

Summary of Contents for N-Com B5
- Page 1 For additional information about B5, and to download high-definition instructions as well as the latest Firmware version, visit the website www.n-com.it Firmware version: 1.0x REFERENCE STANDARDS The products of the N-Com line are in compliance with standards as per the table below: Bluetooth system...
-
Page 3: Table Of Contents
1.6.Accessories and batteries ............................ 5 1.7. Disposal ..................................5 CONTENT OF THE PACKAGING ..................6 INSTALLATION........................7 3.1.Removing the B5 system from the helmet....................10 BASIC FUNCTIONS......................11 4.1.Auto On / Off function ............................11 4.2.N-Com Wizard and N-Com App........................11 4.3.Pairing up with Bluetooth devices.........................12 MOBILE PHONE........................12... -
Page 4: Warnings And Safety
Caution: Adjusting the volume to very high levels may cause damage to your hearing. Caution: Adjust the volume of the N-Com system (where provided) and of the audio sources connected to it so as to avoid audio reproduction at high volumes. Constant exposure to high audio volumes may damage your hearing. -
Page 5: Qualified Personnel
1.7. Disposal Refer to this user manual and to manuals related to other parts of the N-Com system in order to disassemble the system from the helmet. Once the system has been disassembled, dispose of it according to the following... -
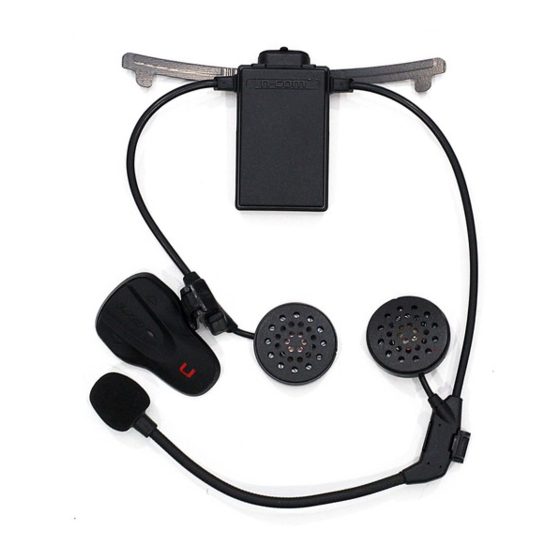
Page 6: Content Of The Packaging
CONTENT OF THE PACKAGING The N-Com B5 package contains: N-Com B5 system Mini USB wire Battery charger Microphone foam... -
Page 7: Installation
N-Com / Download section. Before you install the B5 system on the helmet, make sure it turns on properly. Press the “on” key for about 2 seconds, until the LED lights up and you hear a beep in the headset. Proceed with the installation. - Page 8 (Fig. 4). Caution: make sure that the side of the microphone support with the writing “N-Com” is facing inward. Fig. 4 Fix the cable inside the helmet and make sure the left fixing clip snaps into its housing.
- Page 9 FOR THE N87 HELMENT ONLY – positioning the keypad Insert the support specific for your helmet in the flex cable of the keypad (Fig. 6); Rotate the keypad support so as to position it like in Fig. 7, then hook it to the keypad; Fix the cable inside the helmet and make sure the left fixing clip snaps into its housing (Fig.
-
Page 10: Removing The B5 System From The Helmet
3.1. Removing the B5 system from the helmet Proceed as follows to remove the B5 system from the helmet: Remove the cheek padding and the shell gasket; Remove the keypad from the shell, as shown in fig. 12. -
Page 11: Basic Functions
The system does not have to be turned on and off every time you use the motorcycle: thanks to the triaxial accelerometer, if the helmet does no move for more than 30 seconds, the B5 system goes into “deep sleep” mode. The system is completely turned on as soon as movement is detected. -
Page 12: Pairing Up With Bluetooth Devices
Conference call function When a call comes in on a mobile phone connected via Bluetooth to B5, the Rider-Pillion Passenger intercom is temporarily turned off. However, if you wish to share the phone call with the other helmet, simply turn on the intercom manually during the phone call. -
Page 13: Friend Number
5.2. Managing two mobile phones (or Bluetooth devices) The B5 system can be hooked up to two phones (or Bluetooth) devices at the same time. The second phone (secondary device) can receive calls but not make them. To pair up the second Bluetooth phone (secondary device): Make sure the B5 is turned off;... -
Page 14: Satellite Navigator For Motorcycles
B5 system is compatible with the most common satellite navigators for motorcycles. For a list of compatible models and additional details, visit the website www.n-com.it To pair up a satellite navigator to the B5 system, follow the same procedure illustrated in Chapter 4.3. GPS Conference Call Function The Conference function allows you to keep the “Rider-Pillion Passenger”... -
Page 15: Rider-Passenger Intercom
Rider-Passenger intercom function After carrying out the proper pair up procedure, turn on the two helmets. To activate the intercom connection, starting from an N-Com system that has already been turned on, briefly press key "n". Manual intercom connection With B5 turned on, briefly press “n”. -
Page 16: Bike To Bike Intercom
The N-Com system is used for bike-to-bike communication up to a distance of about 500 m (open terrain, no obstacles). The B5 system entails the use of a default “STANDARD” commands configuration, or the use of a “FRIENDS” configuration that can be turned on from the N-Com Wizard or dedicated App. -
Page 17: Bike To Bike Intercom Function
11.2. Bike to bike intercom function How the Bike-to-Bike call works (Standard Configuration) Connection CHANNEL 1 Briefly press “n”. Call CHANNEL 2 Press the “n” key twice. Call CHANNEL 3 Press the “n” key three times. Disconnection of active intercom Briefly press “n”. -
Page 18: Universal Intercom" Intercom
12.1. Pairing up the UNIVERSAL INTERCOM The N-Com system can be paired up to an intercom of a different brand (from now on referred to as Intercom B) as if it was a mobile phone. Make sure the B5 is turned off;... -
Page 19: Setting Mode
The charge will take place as follows: B5 system When the B5 system is connected to the battery charger, the blue LED starts to flash turned off quickly. When the battery is charged, the blue LED becomes steady. -
Page 20: Summary Table Of Controls - Standard Configuration
15. SUMMARY TABLE OF CONTROLS – STANDARD CONFIGURATION Button Turning on 2 sec Turning off 6 sec Increase Volume Decrease Volume Answer phone call Voice call 2 sec Redial last number Dial Friend Number 2 sec Hang up/reject a phone call 2 sec Call transfer... - Page 21 Button Turning on the Radio Turning off the Radio Automatic search for new 2 sec station Change station 2 sec (pre-set stations) Pre-set station 4 sec Pairing up mode (system 4 sec turned off) Turning on/off the RDS Turning on/off the Smart 2 sec Navi System...
-
Page 22: Limited Warranty
Any damage caused by an accident; Any change or modification made to the helmet or to the N-Com system by the user or by third parties. Colour changes or damages caused by exposure to harmful chemical products. -
Page 23: Validity Of This Limited Warranty
16.5. Product identification N-Com products are identified by means of a code that allows product traceability and identification. The identification code is listed on the adhesive label applied to the B5 system and on the outside of the sales package. -
Page 24: Warranty Registration Form
17. WARRANTY REGISTRATION FORM Product name Identification code Buyer’s Information Name Last name Address Phone e-mail Dealer’s stamp Date of purchase...