
Related Manuals for Sylvania SRCD838


Summary of Contents for Sylvania SRCD838
- Page 1 Nostalgia 5 in 1 Turntable Radio MODEL:SRCD838 INSTRUCTION MANUAL PLEASE READ CAREFULLY BEFORE OPERATION...
-
Page 2: Important Safety Instructions
IMPORTANT SAFETY INSTRUCTIONS The lightning flash with arrowhead symbol within an equilateral triangle is intended to alert the user to the presence of uninsulated dangerous voltage within the product`s enclosure that may be of sufficient magnitude to constitute a risk of electric shock to persons. CAUTION: TO REDUCE THE RISK OF ELECTRIC SHOCK, DO NOT The exclamation point within an equilateral REMOVE COVER (OR BACK). - Page 3 IMPORTANT SAFETY INSTRUCTIONS Before using the unit, be sure to read all operating instructions carefully. Please note that these are general precautions and may not pertain to your unit. For example, this unit may not have the capability to be connected to an outdoor antenna. 1) Read these instructions.
- Page 4 IMPORTANT SAFETY INSTRUCTIONS 17) Overloading Do not overload wall outlets and extension cords as this can result in a risk of fire or electric shock. 18) Object and liquid entry Never push objects of any kind into the product through openings as they may touch dangerous voltage points or short out parts that could result in fire or electric shock.
-
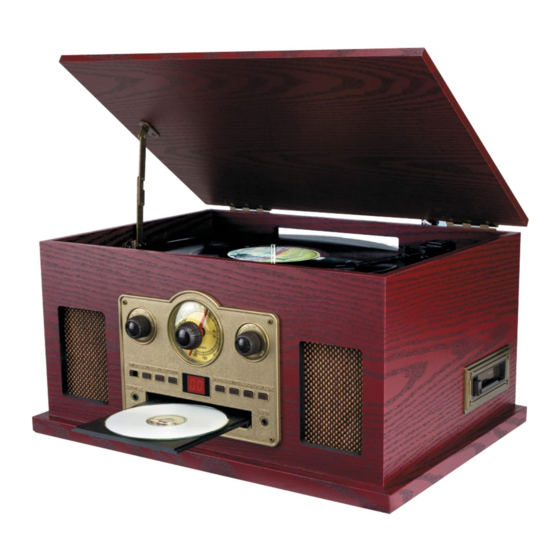
Page 5: Location Of Controls
Location of Controls Turntable Before use, take out the stylus guard ( white plastic cover ) by pull it out. Turntable Screw fixing the turntable for transportation Before use, completely loosen the screw by turning it clockwise. When transport the unit again, turn the screw counterclockwise to secure the turntable. Lever Tone arm holder Tone arm... -
Page 6: Side View
Location of Controls Side View Front View VOLUME AUX IN STOP button Cassette Eject button PLAY/PAUSE button REPEAT button Speakers LED display for CD Function selector Disc tray Tuning knob PROGRAM button Radio dial scale Power ON/OFF-Volume knob B.SKIP and F.SKIP (Backward and Forward skip) buttons OPEN/CLOSE button AM/FM BAND Switch... -
Page 7: Back View
Location of Controls Back View AC~120V 60Hz LINE OUT jacks LINE OUT jacks AC Power Cord AC Power Cord FM antenna FM antenna Open/close the turntable cover 1.Lift the turntable cover. 2.Pull the arms to front to lock it as the figure on left. 1. -
Page 8: Listening To A Record
Listening to a Record Transportation screw VOLUME AUX IN Before use, completely loosen the transportation screw by Select the speed. turn it clockwise. Take out the stylus guard (white plastic cover). Turn the Power ON/OFF-VOLUME knob clockwise until a sound click was heard to turn on the unit. - Page 9 Listening to a Record Raise the lever to lift the tone arm as the figure Turn the Power ON/OFF-VOLUME knob to adjust below. the volume. VOLUME tone arm lever Move the tone arm to the top of the record. When finished listening, replace the tone arm to the rest and lock it as previous The turntable will start to turn.
-
Page 10: Listening To A Cd
Listening to a CD VOLUME AUX IN CD Playback: Turn the POWER ON/OFF-VOLUME knob clockwise Press the OPEN/CLOSE button to close the tray. until a click sound was heard to turn on the unit. " " VOLUME A few seconds later, the total number of tracks will appear on the LED display and play will start automatically. - Page 11 Listening to a CD Programme Playback: Repeat Playback: Up to 20 tracks can be programmed playback as follows: During playback: 1. Press the REPEAT button once, the Repeate indicator 1. In CD STOP mode, press the PROGRAM button. “01” will appear on the LED display and blinking .
-
Page 12: Listening To The Radio
Listening to the Radio , VOLUME AUX IN Turn the Power ON/OFF-VOLUME knob clockwise until a click " " Turn the TUNING knob to receive the desired radio station. sound was heard to turn on the unit. VOLUME Turn the Function selector to the RADIO position. Turn the Power ON/OFF-VOLUME knob to adjust the volume level. -
Page 13: Listening To A Cassette Tape
Listening to a Cassette Tape VOLUME AUX IN Turn the Power ON/OFF-VOLUME knob clockwise until a Turn the Power ON/OFF-VOLUME knob to adjust volume level. sound was heard to turn on the unit. click " " VOLUME VOLUME Fast forward Turn the Function selector to the TAPE/AUX position. - Page 14 Others Connection LINE OUT: AUX IN: 1. Connected the external audio device by an audio connection 1. Connected the external audio device to the unit by an audio cable with RCA plugs ( cable not included ) as: connection cable with 3.5mm stereo mini jacks (cable not ~ Insert one end to the Line IN or AUX IN jacks on the external included) as: audio Amplifier.
-
Page 15: About Disc
About Disc Discs which can be played on this unit: Do not expose discs to direct sunlight or high humidity and temperature for extended periods. Long exposure to high • Conventional audio CDs bearing the CD-DA logo on the temperatures will warp the disc. label: Do not play any disc that is warped, deformed or damaged. - Page 16 Records Handling Cassette Tape...
-
Page 17: How To Replace The Stylus
How to replace the stylus Replace the stylus 1. Use a screwdriver to push the stylus off then pull it out as 2. Install the new stylus as figures below: the figures below:... -
Page 18: Troubleshooting
Troubleshooting CD Player If you experience any problems with the unit, please take a Not playing monent to look through this chart and see if you can solve the problem yourself before you call your dealer. The Function selector is in wrong position, turn it to CD position. Load the disc with the label side face up. -
Page 19: Specifications
Specifications AC 120V~, 60Hz ..................................................................20 W Audio: Impedance of speakers: ................................2 x 2W; 4Ohm Radio: Frequency range (FM) 88MHz~108MHz ..............................Frequency range (AM) ..............................530 kHz to 1710 kHz Cassette: ..................................4 track, stereo ....................................4.8 cm/sec ................................. 0.15%(WRMS) ................................ - Page 21 PLATINE Nostalgia 5 en 1 MODÈLE : SRCD838 MODE D’EMPLOI VEUILLEZ LIRE ATTENTIVEMENT AVANT LA MISE EN SERVICE...
- Page 22 CONSIGNES DE SÉCURITÉ IMPORTANTES ATTENTION RISQUE DE CHOC ELECTRIQUE NE PAS OUVRIR ATTENTION : AFIN DE RÉDUIRE LES RISQUES DE CHOC ÉLECTRIQUE, NE PAS RETIRER L E COUVERCLE (OU LE CAPOT ARRIÈRE). NE CONTIENT AUCUNE PIÈCE REMPLAÇABLE PAR L'UTILISATEUR. CONTACTEZ L E PERSONNEL QUALIFIÉ...
- Page 23 DÉCLARATION DE LA FCC : Cet équipement a été testé et jugé conforme aux limites établies pour un dispositif numérique de classe B, conformément à la partie 15 de la réglementation FCC. Ces limites ont étés mises en place pour offrir une protection raisonnable contre les interférences dans un complexe résidentiel.
- Page 24 CONSIGNES DE SÉCURITÉ IMPORTANTES Avant d’utiliser l’appareil, veuillez vous assurer de lire attentivement les instructions. Veuillez remarquer que ce sont des précautions générales et pourraient ne pas s’appliquer à votre appareil. Par exemple, cet appareil pourrait ne pas avoir la capacité d’être branché à une antenne extérieure.
- Page 25 période de temps, le débrancher de la prise murale et débrancher l’antenne ou le système de câble. Cela préviendra tout dommage au produit causé par les éclairs et les surtensions. 14) Référer tout entretien à des techniciens expérimentés. Une réparation est nécessaire lorsque l’appareil a été...
- Page 26 20) Entretien Ne pas essayer d’effectuer vous-même l’entretien de ce produit puisque l’ouverture ou le retrait des couvercles pourrait vous exposer à des tensions dangereuses et autres risques. Référer tout entretien à des techniciens expérimentés. 21) Pièces de remplacement Lorsque des pièces de remplacement sont requises, s’assurer que le technicien utilise des pièces de remplacement spécifiées par le fabricant ou que celles-ci possèdent les mêmes caractéristiques que la pièce originale.
-
Page 27: Emplacement Des Composants
Emplacement des composants Platine Avant l’utilisation, veuillez enlever la protection de la tête de lecture (enveloppe blanche en plastique) en le tirant. Platine Fixation de la vis par vis pour le transport. Avant la première utilisation, desserrez complètement la vis en la tournant dans le sens horaire. - Page 28 Emplacement des composants Vue de côté Vue de face Cassette Bouton LECTURE/PAUSE Touche d’éjection Bouton RÉPÉTER Haut-parleurs Affichage DEL pour CD Sélecteur de fonctions Plateau porte-disques Bouton de syntonisation Bouton PROGRAMME Bascule à cadran de la radio Boutons B.SKIP et F.SKIP Bouton MARCHE/ARRÊT-V0lume (Sauter en avant et sauter en arrière) Bouton OVRIR/FERMER...
- Page 29 Emplacement des composants Vue arrière Antenne FM Prises LINE OUT (sortie de ligne) Câble d’alimentation CA Ouverture/fermeture du couvercle de la platine Pour ouvrir : 1. Soulevez le couvercle de la platine. 2. Tirez les bras vers l’avant pour le fermer comme l’indique la figure à...
-
Page 30: Écoute D'un Disque
Écoute d’un disque Vis de transport Avant de procéder au transport, desserrez complètement la vis en la tournant dans le sens horaire. Enlevez la protection de la tête de lecture (enveloppe blanche en plastique) 1. Pour allumer l’unité, tournez le bouton MARCHE/ARRÊT-VOLUME dans le sens horaire jusqu’à... - Page 31 6. Déverrouillez le clip pour relâcher le bras de lecture tel qu’illustré sur la figure ci- dessous. clip Écoute d’un disque 7. Soulevez le levier clip pour lever le bras 10. Tournez le bouton MARCHE/ARRÊT- de lecture tel qu’illustré sur la figure ci- VOLUME pour ajuster le volume.
-
Page 32: Écoute D'un Cd
Écoute d’un CD Lecture de CD : 1. Pour allumer l’unité, tournez le bouton MARCHE/ARRÊT-VOLUME dans le sens horaire jusqu’à entendre un « clic ». 2. Basculez le sélecteur de fonctions à la position CD. 3. Appuyez sur le bouton OUVRIR/FERMER pour ouvrir le plateau porte disques. 4. - Page 33 5. Appuyez sur le bouton OUVRIR/FERMER pour fermer le plateau porte disques. Quelques secondes après, le nombe total de pistes apparaîtra sur l’affichage DEL et la lecture débutera automatiquement. 6. Tournez le bouton MARCHE/ARRÊT-VOLUME pour ajuster le niveau de volume désiré. 7.
-
Page 34: Écoute De La Radio
Lecture programmée : Jusqu’à 20 pistes peuvent être programmées à la lecture comme suit : 1. En mode CD STOP (ARRÊTER CD), appuyez sur le bouton PROGRAMME. « 01 » apparaîtra sur l’affichage DEL et clignotera. 2. Sélectionnez la première piste à programmer en appuyant sur les boutons B.SKIP ou F.SKIP. 3. - Page 35 6. À la fin de l’écoute, éteignez l’unité en tournant le bouton MARCHE/ARRÊT-VOLUME dans le sens antihoraire jusqu’à entendre un « clic ». Antennes : AM- Cette unité dispose d’une antenne à tige de ferrite intégrée, laquelle assure une réception adéquate dans la plupart des zones.
-
Page 36: Autres Connexions
5. Avance rapide 6. Arrêter la lecture et éjecter la cassette Pour effectuer une avance rapide jusqu’au À la fin de l’écoute, appuyez sur le bouton point désiré, appuyez de moitié sur le Éjecter pour arrêter la lecture et retirer la bouton Éjecter. - Page 37 3. Basculez le sélecteur de fonctions à la position TAPE/AUX. 4. Joue la musique sur le périphérique externe connecté, comme d’habitude. 5. À la fin de l’écoute, éteignez l’unité en tournant le bouton MARCHE/ARRÊT - VOLUME dans le sens antihoraire jusqu’à entendre un « clic ». Remarques : ●...
-
Page 38: À Propos Des Disques
À propos des disques Disques pouvant être lus à l’aide de cet appareil : ● CD audio standard portant le logo CD-DA sur l’étiquette. ● Disques CD-R et CD-RW correctement gravés. ● Placer toujours le disque sur le plateau à disque avec l’étiquette vers le haut. (Les disques compacts ne peuvent être lus ou gravés que d’un seul côté). -
Page 39: Manipulation Des Disques
Bande de cassette Sélection de la bande Les bandes de métal et chrome (cobalt) ont des trous d’identification. Manipulation des bandes Utilisez vos doigts ou un crayon pour faire tourner le moyeu de la cassette et ainsi bien tendre la bande. -
Page 40: Comment Remplacer Le Stylet
● Conservez vos disques vinyle loin de la poussière. Conservez-les dans un endroit frais et sec. ● Pour éviter la poussière et des rayures, gardez les disques vinyle dans leurs enveloppes et leurs pochettes lorsqu’ils ne sont pas utilisés. ● Rangez les disques vinyle en position debout sur leurs bords. -
Page 41: Dépannage
Dépannage En cas de problème avec l’appareil, veuillez parcourir cette représentation graphique et voir si vous pouvez résoudre le problème vous-même avant de contacter votre concessionnaire. Pas d’alimentation → Vérifiez la connexion de la prise de courant murale. Pas de son → Augmentez le volume en tournant le bouton MARCHE/ARRÊT - VOLUME dans le sens horaire Son bruyant :... -
Page 42: Caractéristiques
Maintenance : Veuillez conserver la platine toujours propre. Si la surface de l’unité se salit, nettoyez-la à l’aide d’un tissu doux ou utilisez une solution savonneuse douce diluée. Rassurez-vous de retirer complètement tout excès de liquide. N’utilisez pas de solvants comme le diluant, le benzène ou l’alcool car ils peuvent endommager la surface de l’unité.