Table of Contents
Advertisement
Available languages
Available languages
Quick Links
Advertisement
Table of Contents

Related Manuals for Numark TT250 USB


Summary of Contents for Numark TT250 USB
- Page 1 User Guide English ( 3 – 6 ) Guía del usuario Español ( 7 – 10 ) Guide d’utilisation Français ( 11 – 14 ) Guida per l’uso Italiano ( 15 – 18 ) Benutzerhandbuch Deutsch ( 19 – 22 ) Appendix English ( 23 )
-
Page 3: English
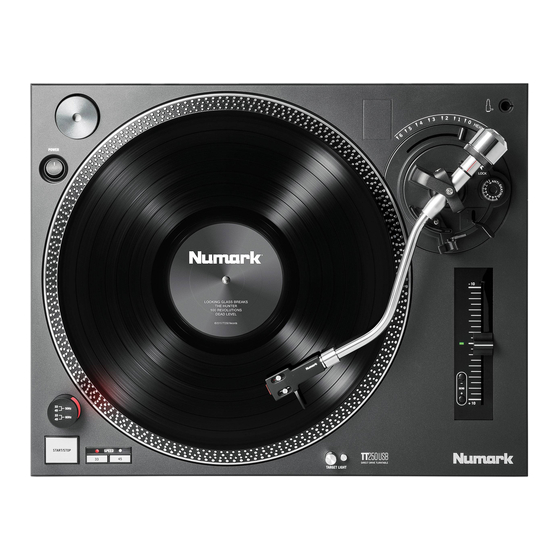
Dust Cover Safety & Warranty Manual Support For the latest information about this product (system requirements, compatibility information, etc.) and product registration, visit numark.com. For additional product support, visit numark.com/support. Features Rear Panel 1. Support Feet: If you want to (slightly) lower or raise the height of your TT250USB, you can turn the four support feet clockwise or counterclockwise, respectively. - Page 4 Top Panel LOCK 6. Power Switch: Press this switch to power TT250USB on or off. The ring around the switch illuminates when TT250USB is powered on. 7. Voltage Selector (under platter): Use the switch under the platter to select the voltage for your country.
- Page 5 14. Pitch Light: This light illuminates when the pitch slider is set at 0%. 15. Pitch Fader: Move this fader to increase or decrease the pitch of the track (and speed of the platter) by up to 10%. In the center position, the pitch is at 0%. 16.
- Page 6 Setup Platter Place the platter onto the motor by aligning the pins in the bottom of the platter with the holes in the motor. Press it down firmly. Check to make sure that it rotates uniformly and does not wobble excessively, and then place the slipmat onto the platter.
-
Page 7: Español
Cubierta antipolvo Manual sobre la seguridad y garantía Soporte Para obtener la información más completa acerca de este product (los requisitos del sistema, compatibilidad, etc) y registro del producto, visite numark.com. Para soporte adicional del producto, visite numark.com/support. Características Panel trasero 1. - Page 8 Panel superior LOCK 6. Interruptor de encendido: Pulse este botón para encender o apagar el TT250USB. El anillo alrededor de este interruptor se ilumina cuando el TT250USB está encendido. 7. Selector de voltaje (bajo el plato): Utilice el interruptor ubicado debajo del plato para seleccionar el voltaje según su país.
- Page 9 14. Luz de pitch: Esta luz se ilumina cuando el deslizador de pitch está ajustado al 0%. 15. Fader de pitch: Mueva este fader para aumentar o disminuir el pitch de la pista (y velocidad del plato) en un 10%. En la posición central, el pitch está al 0%. 16.
-
Page 10: Instalación
Instalación Plato Coloque el plato en el motor alineando los pernos de la parte inferior del plato con los orificios del motor. Presiónelo firmemente. Asegúrese de que gire de manera uniforme y sin tambalear en exceso y coloque la almohadilla antideslizante sobre el plato. Importante: •... -
Page 11: Caractéristiques
Assistance Pour les dernières informations concernant ce produit (la configuration système minimale requise, la compatibilité, etc) et l’enregistrement du produit, veuillez visitez le site numark.com. Pour toute assistance supplémentaire, veuillez visiter le site numark.com/support. Caractéristiques Panneau arrière 1. - Page 12 Panneau supérieur LOCK 6. Interrupteur d’alimentation : Cet interrupteur permet de mettre la TT250USB sous et hors tension. L’anneau autour de cet interrupteur s’allume lorsque la TT250USB est sous tension. 7. Sélecteur de tension (sous le plateau) : Utilisez l’interrupteur sous le plateau pour sélectionner la tension correspondant à...
- Page 13 15. Curseur de hauteur tonale : Ce curseur permet d’augmenter ou diminuer la hauteur tonale de la piste (et la vitesse du plateau) jusqu’à 10 %. Lorsqu’il occupe la position centrale, la hauteur tonale est de 0 %. 16. Touches de variation de vitesse de lecture : Appuyez sur une de ces touches pour réduire ou augmenter temporairement la vitesse de lecture de la piste (vitesse du plateau).
-
Page 14: Installation
Installation Plateau Placez le plateau sur le moteur en alignant les broches du fond du plateau avec les trous du moteur. Appuyez fermement. Vérifiez qu’il tourne uniformément et qu’il ne vacille pas excessivement, puis placez le tapis sur le plateau. Important : •... -
Page 15: Italiano
Istruzioni di sicurezza e garanzia Assistenza Per conoscere le ultime informazioni in merito a questo prodotto (i requisiti di sistema complete, compatibilità, ecc) e per la registrazione del prodotto, recarsi alla pagina numark.com. Per ulteriore assistenza, recarsi alla pagina numark.com/support. Caratteristiche Pannello posteriore 1. - Page 16 Pannello superiore LOCK 6. Interruttore di alimentazione: premere questo interruttore per accendere o spegnere il TT250USB. L’anello intorno all’interruttore si illumina quando il TT250USB è acceso. 7. Selettore di tensione (sotto il piatto): servirsi dell’interruttore posto sotto il piatto per selezionare la tensione specifica per il proprio Paese.
- Page 17 15. Fader del pitch: muovere questo fader per aumentare o diminuire il pitch della traccia (e la velocità del piatto) fino al 10%. In posizione centrale, il pitch è di 0%. 16. Bend del Pitch –/+: premere uno di questi tasti per ridurre o aumentare temporaneamente il pitch della traccia (velocità...
- Page 18 Configurazione Piatto Collocare il piatto sul motore allineando i perni a livello della parte inferiore del piatto con i fori nel motore. Premerlo verso il basso con decisione. Assicurarsi ruoti uniformemente oscilli eccessivamente, quindi collocare il tappetino sul piatto. Importante: •...
-
Page 19: Deutsch
Kundendienst Für aktuelle Informationen zu diesem Produkt (Systemanforderungen, Informationen zur Kompatibilität etc.) und zur Produktregistrierung besuchen Sie numark.com. Um weitere Unterstützung zu Ihrem Produkt zu erhalten, besuchen Sie numark.com/support. Funktionen Rückseite 1. Stützfüße: Wenn Sie die Höhe Ihres TT250USB (leicht) absenken oder erhöhen möchten, können Sie die vier Stützfüße im oder gegen den Uhrzeigersinn drehen. - Page 20 Oberseite LOCK 6. Netzschalter: Drücken Sie diesen Schalter, um das TT250USB ein- oder auszuschalten. Der Ring um die Taste beginnt zu leuchten, wenn das TT250USB eingeschaltet ist. 7. Spannungswahl (unter dem Plattenteller): Verwenden Sie den Schalter unter dem Plattenteller, um die Spannung für Ihr Land auszuwählen. Ändern Sie diese Einstellung nur wenn dies notwendig ist (z.B.
- Page 21 14. Pitch-Licht: Dieses Licht leuchtet, wenn der Pitch Fader auf 0% gesetzt ist. 15. Pitch-Fader: Bewegen Sie diesen Regler, um die Tonhöhe des Tracks (und die Geschwindigkeit der Platte) bis zu 10% zu erhöhen oder zu verringern. In der Mittelposition ist die Tonhöhe bei 0%.
- Page 22 Setup Plattenteller Legen Sie die Plattenteller auf den Motor, indem Sie die Stifte an der Unterseite des Plattentellers mit den Löchern im Motor ausrichten. Drücken Sie den Teller fest nach unten. Stellen Sie sicher, dass er sich gleichmäßig dreht und nicht zu stark wackelt.
-
Page 23: Technical Specifications
Specifications are subject to change without notice. Trademarks and Licenses Numark is a trademark of inMusic Brands, Inc., registered in the U.S. and other countries. All other product or company names are trademarks or registered trademarks of their respective owners. - Page 24 Manual Version 1.3...