
Related Manuals for Siemens Motion SX


Summary of Contents for Siemens Motion SX
- Page 1 Motion PX Motion SX Motion SA Motion SX, SA, and PX ® binax hearing instruments User Guide usa.siemens.com/hearing Life sounds brilliant.
- Page 3 Enhance your Siemens experience. Learn about your hearing aids and accessories you may find helpful, access the latest information about hearing health, and receive promotional offers by joining the Siemens hearing health community at usa.siemens.com/join or: Learn more about Siemens...
-
Page 4: Table Of Contents
Content Welcome Your hearing instruments Instrument type Getting to know your hearing instruments Components and names Controls Settings Batteries Battery size and handling tips Replacing batteries Recharging rechargeable batteries Daily use Turning on and off Inserting and removing the hearing instruments Adjusting the volume ... - Page 5 Maintenance and care Hearing instruments Custom-made ear pieces (earmolds), ear pieces, tubes Professional maintenance Further information Safety information Wireless functionality Accessories Troubleshooting Service information Symbols: Be aware of information marked with the warning symbol WARNING, CAUTION or NOTICE! WARNING points out a situation that could lead to serious injuries, CAUTION indicates a situation that could lead to minor and moderate injuries.
-
Page 6: Welcome
Welcome Thank you for choosing our hearing instruments to accompany you through everyday life. Like anything new, it may take you a little time to become familiar with them. This guide, along with support from your Hearing Care Professional, will help you understand the advantages and greater quality of life your hearing instruments offer. -
Page 7: Your Hearing Instruments
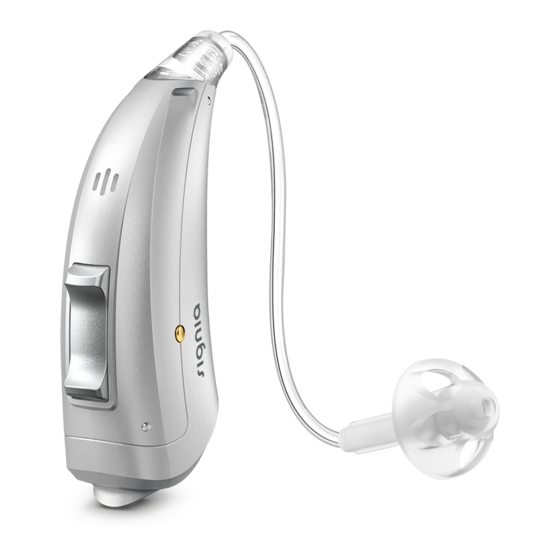
Your hearing instruments This user guide describes optional features that your hearing instruments may or may not have. Ask your Hearing Care Professional to indicate the features that are valid for your hearing instruments. Instrument type Your hearing instruments are BTE (Behind-The-Ear) models. A tube delivers the sound from the hearing instrument into the ear. -
Page 8: Components And Names
Use the following pictures to identify the type of hearing instrument that you use. Your hearing instruments are either attached to an earhook and a custom-made ear piece or to a standard tube (LifeTube, ThinTube) and a standard ear piece (LifeTip). Motion SX, Motion SA ➎ ➎ ➍ ➌... - Page 9 Motion PX ➊ ➏ Ear piece (LifeTip) Push button (control) ➋ ➐ Retention strand (optional) Rocker switch (control) ➌ ➑ Tube (LifeTube, ThinTube) Charging contacts (optional) ➍ ➒ Earhook Battery compartment (on/off switch) ➎ Microphone openings You can use standard ear pieces together with a standard tube (LifeTube, ThinTube) or custom-made ear pieces together with an earhook and tube.
-
Page 10: Controls
Custom-made ear pieces (earmolds) Examples: Controls With the controls you can, for example, adjust the volume or switch hearing programs. Your hearing instruments either have a rocker switch, or a rocker switch and a push button. Your Hearing Care Professional has programmed your desired functions to the controls. - Page 11 Rocker switch function Press <1 second: Program up/down Volume up/down Tinnitus therapy feature level up/down Sound balance Focus selection (spatial configurator) Sound mixer (audio input) Press >3 seconds: Standby/turn on Program up/down Press 5 seconds: Standby/turn on L = Left, R = Right Push button function Press <1 second: Program change...
-
Page 12: Settings
Settings Hearing programs Read more in section "Changing the hearing program". Features Power-on delay enables whistle-free insertion of hearing instruments. Read more in section "Turning on and off". AutoPhone™ automatically switches to the telephone program when the telephone receiver approaches the ear. Read more in section "On the phone". -
Page 13: Batteries
Batteries When the battery is low the sound becomes weaker or you will hear an alert signal. The battery type will determine how long you have to replace or recharge the battery. Battery size and handling tips Ask your Hearing Care Professional for recommended batteries. Battery size: Always use the correct battery size for your hearing instruments. -
Page 14: Recharging Rechargeable Batteries
Use the cleaning brush with magnet to pull out the battery. The cleaning brush with magnet is available from your Hearing Care Professional. Inserting the battery: If the battery has a protective film, remove it only when you are ready to use the battery. Insert the battery with the "+"... -
Page 15: Daily Use
Daily use Turning on and off You have the following options to turn your hearing instruments on or off. Via battery compartment: Turning on: Close the battery compartment. The default volume and hearing program are set. Turning off: Open the battery compartment to the first catch. Via push button or rocker switch: Turning on or off: Press and hold the push button or the rocker switch for several seconds. - Page 16 easyPocket™ easyTek™ LED status indicators Control buttons Program change Volume button buttons Volume up/down buttons Multi‑function button For detailed information and instructions refer to the easyTek User Guide or the Remote Control User Guide for easyPocket or ask your Hearing Care Professional. Follow the instructions in the Remote Control User Guide.
-
Page 17: Inserting And Removing The Hearing Instruments
Your hearing instruments have been fine-tuned for your right and left ear. Colored markers indicate the side: red marker = right ear blue marker = left ear Motion SX, Motion SA Motion PX Inserting a hearing instrument: Hold the tube close to the ear piece. - Page 18 It may be helpful to insert the right hearing instrument with the right hand and the left hearing instrument with the left hand. If you have problems inserting the ear piece, use the other hand to gently pull your earlobe downwards. This opens the ear canal and eases insertion of the ear piece.
-
Page 19: Adjusting The Volume
Clean and dry your hearing instruments after usage. Read more in section “Maintenance and care”. Adjusting the volume Your hearing instruments automatically adjust the volume to the listening situation. If you prefer manual volume adjustment, press the rocker switch briefly or use a remote control. Refer to section “Controls”... -
Page 20: Further Adjustments (Optional)
Further adjustments (optional) The controls of your hearing instruments can also be used to change, for example, the sound balance or the tinnitus therapy feature level. Sound balance allows you to adjust the bass and treble to your preferences. Refer to section “Controls” for the setting of your controls. Locking the controls (optional) To prevent any accidental operation you can lock the controls. - Page 21 You can select different levels – from “focus to frontal position” (left picture) to “middle position” (center picture) to “hear all around” (right picture). Prerequisites: You need to wear two hearing instruments. On one of your hearing instruments the rocker switch needs to be set for the spatial configurator.
-
Page 22: On The Phone
Exiting spatial configurator mode: Toggle to the minimum or maximum level. An optional signal tone can indicate the minimum and maximum level. Toggle one step further. The same signal tone as for changing the hearing program is played, indicating that you have exited the spatial configurator mode. - Page 23 Not all telephones produce a magnetic field strong enough to activate the AutoPhone function. In this case, you can use the Siemens AutoPhone magnet, which is available as an accessory, and attach it to the telephone receiver.
-
Page 24: Audio Induction Loops / Telecoil
You must use the original magnet provided with your hearing instrument. Using other magnets may cause irreversible damage to the electronics of your hearing instrument. When magnets are properly cared for, they are safe to use and can last a lifetime. However, the following guidelines should be followed while using these magnets. -
Page 25: Audio Input (Fm System)
Switch to the telecoil program whenever you are in a place with an audio induction loop. If a telecoil program is configured for your hearing instruments, it is listed in section “Settings”. Telecoil program and remote control NOTICE For instruments with wireless connectivity: When the telecoil program is active, the remote control may cause a pulsing noise. - Page 26 Ask your Hearing Care Professional to configure your hearing instruments, for example: Adjust the mix of the audio input signal with surrounding sounds. Configure the rocker switch so that you can select between audio input signal only, surrounding sound only, or a mix of both signals.
-
Page 27: Maintenance And Care
Maintenance and care To prevent damage it is important that you take care of your hearing instruments and follow a few basic rules, which will soon become a part of your daily routine. Hearing instruments Drying and storage Dry your hearing instruments overnight. Ask your Hearing Care Professional for recommended drying products. -
Page 28: Custom-Made Ear Pieces (Earmolds), Ear Pieces, Tubes
Ask your Hearing Care Professional for recommended cleaning products, special care sets, or more information on how to keep your hearing instruments in good condition. Custom-made ear pieces (earmolds), ear pieces, tubes Cerumen (ear wax) may accumulate on the earmolds or ear pieces. - Page 29 Cleaning tubes Never use running water or immerse the tube in water. You can clean standard tubes (LifeTube, ThinTube) using a special cleaning wire. Ask your Hearing Care Professional for suitable cleaning wires. Screw off the tube. Carefully insert the cleaning wire into the tube ➊. Push the cleaning wire all the way through the tube ➋.
-
Page 30: Professional Maintenance
Exchanging standard ear pieces (LifeTip) Pull off the used ear piece and plug on the new ear piece. Exchanging standard tubes (LifeTube, ThinTube) Unscrew the used tube and screw the new tube on. Professional maintenance Your Hearing Care Professional can perform a thorough cleaning and maintenance. -
Page 31: Further Information
Further information Safety information For more safety information, refer to the safety manual supplied with the device. Wireless functionality Your hearing instruments are equipped with wireless functionality. This provides synchronization between your two hearing instruments: If you change the program or volume on one instrument, the other one is automatically changed, too. -
Page 32: Troubleshooting
Troubleshooting Problem and possible solutions Sound is weak. Increase the volume. Replace or recharge the battery (depending on the battery type). Clean or exchange the tube and the ear piece. Hearing instrument emits whistling sounds. Reinsert the ear piece until it fits securely. Decrease the volume. -
Page 33: Service Information
Service information Serial numbers Left: Right: Service dates Your Hearing Care Professional Date of purchase:... - Page 35 Motion PX Motion SX Motion SA Instrumentos auditivos Motion SX, SA y PX binax ® Guía del usuario usa.siemens.com/hearing La vida con sonido es brillante.
- Page 37 Aprenda acerca de los dispositivos auditivos y de los accesorios que le puedan ser útiles, acceda a la información más reciente sobre salud auditiva y reciba ofertas promocionales al formar parte de la comunidad de salud auditiva de Siemens en usa.siemens.com/join o: Para conocer más acerca de...
- Page 38 Contenido Bienvenida Sus instrumentos auditivos Tipo de instrumento Conozca sus instrumentos auditivos Componentes y sus nombres Controles Configuración Baterías Tamaño de la batería y sugerencias para su manipulación Reemplazo de las baterías Recargar las baterías recargables Uso diario Encendido y apagado Colocación y extracción del instrumento auditivo ...
- Page 39 Mantenimiento y cuidado Instrumentos auditivos Piezas auditivas hechas a la medida (moldes de oído), auriculares, tubos Mantenimiento profesional Información adicional Información de seguridad Funcionalidad inalámbrica Accesorios Solución de problemas Información de servicio Símbolos: ¡Tenga en cuenta la información marcada con el símbolo de advertencia ADVERTENCIA, ATENCIÓN o AVISO! ADVERTENCIA señala una situación que podría ocasionar lesiones graves ATENCIÓN indica una situación que podría...
-
Page 40: Bienvenida
Bienvenido Gracias por seleccionar nuestros instrumentos auditivos para que le acompañen durante su vida diaria. Como con cualquier cosa nueva, es posible que le tome un poco de tiempo familiarizarse con ellos. Esta guía, junto con el apoyo de su profesional de cuidado auditivo, le ayudarán a entender las ventajas y la mejor calidad de vida que ofrecen sus instrumentos auditivos. -
Page 41: Sus Instrumentos Auditivos
Sus instrumentos auditivos Esta guía del usuario describe las funciones opcionales que pueden o no tener sus instrumentos auditivos. Pida a su profesional de cuidado auditivo que le indique cuáles de estas funciones son válidas para sus instrumentos auditivos. Tipo de instrumento Sus instrumentos auditivos son los modelos BTE (retroauricular). -
Page 42: Componentes Y Sus Nombres
Sus instrumentos auditivos pueden estar conectados a un gancho auricular y a un auricular hecho a la medida o bien, a un tubo estándar (LifeTube, ThinTube) y a un auricular estándar (LifeTip). Motion SX, Motion SA ➎ ➎ ➍... - Page 43 Motion PX ➊ ➏ Auricular (LifeTip) Pulsador (control) ➋ ➎ Cuerda de sujeción Interruptor oscilante (control) (opcional) ➏ Contactos de carga (opcional) ➌ Tubo (LifeTube, ThinTube) ➒ Compartimiento de la batería ➍ Gancho auricular (interruptor de encendido/apagado) ➍ Aberturas del micrófono Puede usar los auriculares estándar junto con un tubo estándar (LifeTube, ThinTube) o un auricular hecho a la medida junto con un gancho auricular y un tubo.
-
Page 44: Controles
Auriculares hechos a la medida (moldes de oído) Ejemplos: Controles Con los controles puede, por ejemplo, ajustar el volumen o cambiar el programa de audición. Sus instrumentos pueden tener un interruptor oscilante o un interruptor oscilante y un pulsador. Su profesional de cuidado auditivo programó sus funciones deseadas para los controles. - Page 45 Función del interruptor oscilante Presione < 1 segundo: Programa arriba/abajo Volumen subir/bajar Función para subir/bajar el nivel de la terapia de tinnitus Equilibrio del sonido Selección de foco (configuración espacial) Mezclador de sonido (entrada de audio) Presione > 3 segundos: En espera/Encendido Programa arriba/abajo Presione 5 segundos:...
-
Page 46: Configuración
Función del pulsador y del interruptor oscilante Bloquear/Desbloquear los controles Lea más en la sección "Bloquear los controles". I = Izquierdo, D = Derecho Configuración Programas auditivos Lea más en la sección "Cambiar el programa de audición". Características Retardo de encendido permite la inserción de los instrumentos auditivos sin silbidos. -
Page 47: Baterías
Características La funcionalidad e2e wireless permite el control simultáneo de ambos instrumentos auditivos. Lea más en la sección "Funcionalidad inalámbrica". Baterías Cuando la batería está baja, el sonido se debilita o se escucha una señal de alerta. El tipo de batería determina el tiempo que tiene para cambiarla o recargarla. -
Page 48: Reemplazo De Las Baterías
Reemplazo de las baterías Cómo retirar la batería: Abra el compartimiento de la batería. Use el cepillo de limpieza con imán para sacar la batería. Puede obtener el cepillo de limpieza con imán que está disponible como accesorio a través de su profesional de cuidado auditivo. Cómo insertar la batería: Si la batería tiene una película de protección, retírela solo cuando esté... -
Page 49: Recargar Las Baterías Recargables
Recargar las baterías recargables Cargue las baterías recargables antes del primer uso. Para cargar las baterías, siga las instrucciones que se proporcionan en la guía del usuario. Después de varios ciclos de recarga se puede reducir la vida útil de la batería. En ese caso, cambie la batería recargable por una nueva. - Page 50 Por medio del control remoto: Control remoto y transmisor de audio easyTek y control ™ remoto easyPocket ™ Es posible que haya recibido de forma opcional easyTek o easyPocket con su instrumento auditivo. easyTek o easyPocket se puede usar para cambiar el programa y el volumen de su instrumento auditivo.
-
Page 51: Colocación Y Extracción Del Instrumento Auditivo
Colocación y extracción del instrumento auditivo Sus instrumentos auditivos están afinados para su oreja derecha e izquierda. Los marcadores de color indican el lado: color rojo = oreja derecha color azul = oreja izquierda Motion SX, Motion SA Motion PX... - Page 52 Colocación del instrumento auditivo: Sostenga el tubo cerca del auricular. Con cuidado empuje el auricular dentro del canal auditivo ➊. Gírelo ligeramente hasta que se acomode bien. Abra y cierre la boca para evitar la acumulación de aire en el canal auditivo.
- Page 53 La cuerda de sujeción opcional ayuda a mantener el auricular dentro de la oreja de una manera segura. La posición de la cuerda de sujeción: Doble la cuerda de sujeción y colóquela con cuidado en la concha de la oreja (consulte la imagen).
-
Page 54: Ajustar El Volumen
Ajustar el volumen Sus instrumentos auditivos ajustan automáticamente el volumen de acuerdo con la situación de audición. Si prefiere ajustar manualmente el volumen, presione brevemente el interruptor oscilante o use un control remoto. Consulte la sección "Controles" para ver los ajustes del interruptor oscilante. -
Page 55: Otros Ajustes (Opcional)
Otros ajustes (opcionales) Los controles de sus instrumentos auditivos también se pueden usar para cambiar, por ejemplo, el equilibrio del sonido o el nivel de la función de la terapia de tinnitus. El equilibrio del sonido permite ajustar los sonidos graves y agudos de acuerdo con su preferencia. -
Page 56: Situaciones Especiales De Audición
Situaciones especiales Ajuste del foco (opcional) Si desea enfocarse directamente en la conversación con la persona que está frente a usted o desea escuchar un entorno más amplio, el configurador espacial le permite el control, según su preferencia. Puede seleccionar diferentes niveles, desde "enfoque en la posición frontal"... -
Page 57: Para Hablar Por Teléfono
Presione el interruptor oscilante que está configurado para esta función. El nivel medio está activo como ajuste predeterminado. Presione el interruptor oscilante superior para enfocarse más en el frente o el interruptor oscilante inferior para escuchar un entorno más amplio. Esta función está... - Page 58 AutoPhone. En este caso, puede usar el imán AutoPhone de Siemens, que está disponible como accesorio y colocarlo en el receptor del teléfono. Consulte en la guía del usuario de AutoPhone las instrucciones...
- Page 59 AVISO Use solo el imán AutoPhone aprobado. Pregunte a su profesional de cuidado auditivo acerca de este accesorio. Accesorio magnético de AutoPhone Hay un accesorio magnético AutoPhone disponible para su teléfono el cual puede usarse con la característica AutoPhone de su instrumento auditivo.
- Page 60 ADVERTENCIA • Los imanes pueden representar riesgos para los medios de almacenamiento electrónicos y magnéticos cuando se colocan cerca. • Tenga cuidado de no colocar los imanes cerca de computadoras, monitores a color, televisores, disquetes, cintas de video/audio y otros equipos electrónicos. •...
-
Page 61: Entrada De Audio (Sistema Fm)
Si su instrumento auditivo tiene configurado un programa de telebobina, aparecerá en la lista de la sección "Ajustes". Programa telebobina y control remoto AVISO Para los instrumentos con conectividad inalámbrica: Cuando está activo el programa de telebobina, el control remoto puede provocar un ruido pulsante. Utilice el control remoto a una distancia mayor de 4 pulgadas (10 centímetros). - Page 62 Pida a su profesional de cuidado auditivo que configure sus instrumentos auditivos, por ejemplo: Ajuste la mezcla de sonido de la señal de entrada con los sonidos del ambiente. Configure el interruptor oscilante de manera que pueda seleccionar las opciones de solo la señal de entrada de sonido, solo el sonido del ambiente o una mezcla de ambas señales.
-
Page 63: Mantenimiento Y Cuidado
Mantenimiento y cuidado Para evitar daños, es importante que cuide sus instrumentos auditivos y que siga algunas reglas básicas, que pronto se convertirán en parte de su rutina diaria. Instrumentos auditivos Secado y almacenamiento Seque los instrumentos auditivos durante la noche. Pregunte a su profesional de cuidado auditivo acerca de los productos de secado recomendados. -
Page 64: Auriculares, Tubos
Pregunte a su profesional de cuidado auditivo acerca de los productos de limpieza, los estuches de cuidado especial o pídale más información sobre cómo mantener sus instrumentos auditivos en buenas condiciones. Auriculares hechos a la medida (moldes de oído), auriculares, tubos Es posible que se acumule cerumen (cera del oído) en los moldes del oído o en los auriculares. - Page 65 Limpieza de los moldes de oído o los auriculares Limpie los moldes de oído o los auriculares con un paño suave y seco cuando los extraiga. Esto evita que el cerumen se seque y se endurezca. Nunca use agua del grifo ni sumerja los instrumentos en agua.
-
Page 66: Mantenimiento Profesional
Limpie cualquier resto de cerumen o suciedad que esté fuera del tubo. Retire completamente el alambre de limpieza del tubo. Enrosque el tubo en el instrumento auditivo. ATENCIÓN Riesgo o daño al canal auditivo y al tímpano. Retire siempre el alambre de limpieza Life del tubo antes de volver a colocarlo en su instrumento auditivo. -
Page 67: Información Adicional
Pregunte a su profesional de cuidado auditivo cuál es la recomendación para los intervalos de mantenimiento y de soporte. Más información Información de seguridad Para obtener más información de seguridad, consulte el manual de seguridad provisto con el dispositivo. Funcionalidad inalámbrica Es posible que sus instrumentos auditivos estén equipados con funcionalidad inalámbrica. -
Page 68: Solución De Problemas
Solución de problemas Problema y posibles soluciones Sonido débil. Aumente el volumen. Cambie o recargue la batería (dependiendo del tipo de la batería). Limpie o cambie el tubo y el auricular. El instrumento auditivo emite un silbido. Vuelva a insertar el auricular hasta que calce bien. Disminuya el volumen. -
Page 69: Información De Servicio
Consulte con su profesional de cuidado auditivo si encuentra otros problemas. Información de servicio Números de serie Izquierdo: Derecho: Fechas de servicio Su profesional de cuidado auditivo: Fecha de compra:... - Page 72 Copyright © 2015 Siemens AG. All rights reserved. La información que contiene este folleto está sujeta a cambios sin aviso. Copyright © 2015 Siemens AG. Todos los derechos reservados. Hearing Instrument Made in Singapore Instrumento auditivo Hecho en Singapur Manufactured by Sivantos, Inc.