Table of Contents
Advertisement
Available languages
Available languages
Advertisement
Table of Contents

Related Manuals for Alto RMX1008 DFX


Summary of Contents for Alto RMX1008 DFX
- Page 1 QUICKSTART GUIDE ENGLISH ( 2 – 8 ) MANUAL DE INICIO RÁPIDO ESPAÑOL ( 9 – 15 ) GUIDE D’UTILISATION RAPIDE FRANÇAIS ( 16 – 22 ) GUIDA RAPIDA ITALIANO ( 23 – 29 ) KURZANLEITUNG DEUTSCH ( 30 – 36 ) SNELSTARTGIDS NEDERLANDS ( 37 –...
-
Page 2: Box Contents
BOX CONTENTS RMX1008DFX Power cable Quickstart Guide Safety Instructions & Warranty Information booklet CONNECTION DIAGRAM QUICK SETUP Follow the procedure below to have a signal processed for each channel: Set all channel levels to zero, set pan to the middle, set output to zero, and set EQ’s flat. Connect your mic and then apply phantom power if your mic requires this. -
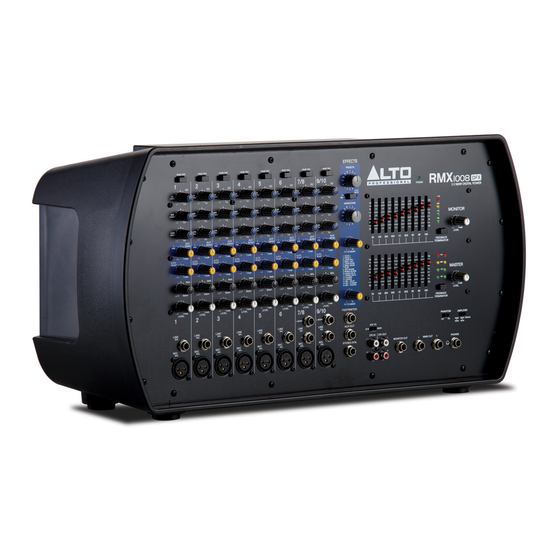
Page 3: Front Panel
FRONT PANEL MIC/LINE MONO INPUTS – Connect a microphone or line level instrument to LEVEL LEVEL LEVEL LEVEL these inputs using standard XLR or ¼” cable. MIC/LINE STEREO INPUTS- These XLR and ¼” TRS connections are organized in stereo pairs. If you connect only the left jack, the input will operate in mono LINE LINE mode, (the mono signal will appear on both input channels). - Page 4 MASTER I/O (INPUT/OUTPUT) AMPLIFIER Mode Switch- This switch provides three modes: MAIN/MAIN, MAIN/MONITOR BRIDGE. Select any one of these modes to route the signals to the corresponding jacks according to the speaker panel connection. This switch only affects the rear panel outputs. front panels outputs...
-
Page 5: Rear Panel
REAR PANEL POWER SWITCH – Turns the mixer on and off. Turn on the mixer after all input devices have been connected and before you turn amplifiers. Turn amplifiers before you turn off the mixer. POWER IN – Use the included IEC power cable to connect the mixer to a power outlet. - Page 6 EFFECTS TO HEAR THE EFFECTS ON A CHANNEL: Use the Effects Selector to choose one of the effects below, adjust the parameter with the Variations Selector, then turn up the Aux 2/FX Post knob for that channel. PRESET DESCRIPTION PARAMETER RANGE Decay time 0.8~1.1s...
-
Page 7: Connection Diagrams
CONNECTION DIAGRAMS MAIN SPEAKER CONNECTION Please use only the power connectors to make connections with other signal source equipment for the passive speaker cabinets. In normal condition, the terminals 1+ and 1- of the speakon connecter can be connected. In bridge mode, the terminals 2+ and 1+ of the speakon connecter can be connected. - Page 8 MAIN + MONITOR Mode Main Speaker Use either the Speakon Monitor jacks or 1/4" jacks With the AMPLIFIER MODE in MAIN+MONITOR position, OUTPUT 1 drives a Main speaker cabinet while OUTPUT 2 drives a stage monitor. WARNING: In MAIN + MONITOR mode, the speaker loads of OUTPUT 1 and OUTPUT 2 cannot be less than 4 ohm, or it will damage the unit.
-
Page 9: Contenido De La Caja
CONTENIDO DE LA CAJA RMX1008DFX Cable de alimentación Guía de inicio rápido Folleto de instrucciones de seguridad e información sobre la garantía DIAGRAMA DE CONEXIÓN INSTALACIÓN RÁPIDA Siga el procedimiento indicado a continuación para procesar una señal por cada canal: Ajuste los niveles de todos los canales a cero, el paneo (pan) al centro, la salida a cero y la ecualización plana. -
Page 10: Panel Frontal
PANEL FRONTAL ENTRADAS MONO DE MICRÓFONO/LÍNEA – Conecte a estas entradas un micrófono o LEVEL LEVEL LEVEL LEVEL un instrumento de nivel de línea usando cable XLR o de ¼” estándar. ENTRADAS ESTÉREO DE MICRÓFONO/LÍNEA- Estas conexiones XLR y ¼” TRS están organizadas en pares estéreo. - Page 11 E/S (ENTRADAS/SALIDAS) MAESTRAS Conmutador de modo del AMPLIFICADOR – Este conmutador proporciona tres modos: MAIN / MAIN (Principal / Principal), MAIN / MONITOR (Principal / Monitor) y BRIDGE (Puente). Seleccione uno de estos modos para aplicar las señales a los conectores correspondientes de acuerdo a la conexión del panel de altavoces.
-
Page 12: Panel Trasero
PANEL TRASERO INTERRUPTOR ENCENDIDO – Enciende y apaga el mezclador. Encienda el mezclador después de conectar todos los dispositivos de entrada y antes de encender los amplificadores. Apague los amplificadores antes apagar mezclador. ENTRADA DE ALIMENTACIÓN – Use el cable de alimentación IEC incluido para conectar mezclador tomacorriente. - Page 13 EFECTOS PARA OÍR LOS EFECTOS EN UN CANAL: Use el SELECTOR DE EFECTOS para elegir uno de los efectos siguientes, ajuste el parámetro con el SELECTOR DE VARIACIONES y luego aumente el ajuste de la perilla Aux 2/FX Post de ese canal. PRESET DESCRIPCIÓN PARÁMETRO...
-
Page 14: Diagramas De Conexión
DIAGRAMAS DE CONEXIÓN CONEXIÓN DEL ALTAVOZ PRINCIPAL Use sólo conectores Speakon para las conexiones con otros equipos fuente de señal para los gabinetes de altavoces pasivos. En condiciones normales, pueden conectarse los terminales 1+ y 1- del conector Speakon. En modo puente, pueden conectarse los terminales 2+ y 1+ del conector Speakon. - Page 15 Modo PRINCIPAL + MONITOR Altavoz principal Use los conectores Altavoz monitor Speakon o conectores 1/4" Con el MODO DEL AMPLIFICADOR en posición MAIN+MONITOR (Monitor + Principal), la salida Output 1 excita el gabinete del altavoz principal, mientras que la salida Output 2 excita un monitor de escenario. ADVERTENCIA: En modo MONITOR + PRINCIPAL, las cargas de altavoces de OUTPUT1 y OUTPUT2 no pueden ser inferiores a 4 ohmios, puesto que de lo contrario puede dañarse la unidad.
-
Page 16: Contenu De La Boîte
CONTENU DE LA BOÎTE RMX1008DFX Câble d'alimentation Guide d’utilisation simplifié Consignes de sécurité et informations concernant la garantie SCHÉMA DE CONNEXION INSTALLATION Veuillez suivre la procédure ci-dessous afin que chaque canal puisse traiter un signal : Réglez tous les niveaux des canaux sur zéro, le panoramique au centre, les sorties sur zéro et aplatissez l’égalisation. Branchez le microphone et activez l’alimentation fantôme si le type de microphone le requiert. -
Page 17: Panneau Avant
PANNEAU AVANT ENTRÉES MIC/LINE MONO – Ces entrées permettent de brancher un microphone ou un LEVEL LEVEL LEVEL LEVEL instrument à niveau ligne à l’aide d’un câble XLR ou ¼ po (6,35 mm). ENTRÉES MIC/LINE STÉRÉO – Ces entrées XLR et ¼ po (6,35 mm) TRS fonctionnent en couple stéréo. - Page 18 ENTRÉES ET SORTIES GÉNÉRALES (MASTER) Sélecteur du mode d’amplification – Ce sélecteur dispose trois modes d’amplification : MAIN / MAIN, MAIN / MONITOR BRIDGE. modes permettent d’acheminer les signaux aux sorties correspondantes selon configuration du raccordement des haut- parleurs. Ce sélecteur affecte uniquement les sorties du panneau arrière.
-
Page 19: Panneau Arrière
PANNEAU ARRIÈRE INTERRUPTEUR D'ALIMENTATION – Cette touche permet mettre l’appareil sous hors tension. Branchez la console de mixage après avoir branché tous les appareils et avant de mettre les amplificateurs sous tension. Mettez les amplificateurs hors tension avant de mettre la console de mixage hors tension. - Page 20 EFFETS POUR ENTENDRE LES EFFETS SUR UN CANAL : Utilisez le sélecteur d’effet afin de sélectionner un des effets ci- dessous, ajustez le paramètre à l’aide du variateur d’effet, puis augmentez le réglage du bouton Aux 2/FX Post du canal correspondant. PRÉRÉGLAGE DESCRIPTION PARAMÈTRE...
- Page 21 SCHÉMA DE CONNEXION RACCORDEMENT DES HAUT-PARLEURS Veuillez n’utiliser que des connecteurs Speakon pour raccorder cette console de mixage à des enceintes passives. En mode normal, les bornes 1+ et 1- du connecteur Speakon peuvent être branchées. En mode ponté (bridge), les bornes 2+ et 1+ du connecteur Speakon peuvent être branchées.
- Page 22 Mode MAIN+MONITOR Enceinte acoustique Moniteur Utilisez soit les connecteurs Speakon ou les connecteurs 1/4 po Lorsque le sélecteur du mode d’amplification est en position MAIN+MONITOR, la sortie OUTPUT 1 pilote l’enceinte acoustique principale, alors que la sortie OUTPUT 2 pilote un moniteur de scène. MISE EN GARDE : Lorsque le sélecteur du mode d’amplification est en position MAIN + MONITOR, la charge d’une enceinte acoustique des sorties OUTPUT 1 et OUTPUT 2 doit être supérieure à...
-
Page 23: Contenuti Della Confezione
CONTENUTI DELLA CONFEZIONE RMX1008DFX Cavo di alimentazione Guida rapida Istruzioni di sicurezza e garanzia SCHEMA DEI COLLEGAMENTI IMPOSTAZIONE RAPIDA Affinché venga elaborato un segnale per ciascun canale, procedere come segue: Impostare tutti i livelli di canale su zero, pan al centro, le uscite su zero e l'EQ piatto. Collegare il microfono e applicare l'alimentazione phantom se il microfono lo richiede. -
Page 24: Pannello Anteriore
PANNELLO ANTERIORE INGRESSI MONO MIC/LINEA – Collegare un microfono o uno strumento a livello di linea LEVEL LEVEL LEVEL LEVEL a questi ingressi servendosi di un cavo standard XLR o da ¼”. INGRESSI STEREO MIC/LINEA – Questi collegamenti XLR e TRS da ¼” sono organizzati in coppie stereo. - Page 25 INGRESSO / USCITA MASTER Interruttore modalità AMPLIFICATORE - Questo interruttore garantisce tre modalità: MAIN/MAIN, MAIN/MONITOR e BRIDGE. Selezionare una qualsiasi di tali modalità convogliare segnali jack corrispondenti in base al collegamento del pannello dell'altoparlante. Questo interruttore influisce unicamente sulle uscite del pannello posteriore. Le uscite del pannello anteriore non subiscono alcuna influenza da parte di questo interruttore.
-
Page 26: Pannello Posteriore
PANNELLO POSTERIORE INTERRUTTORE DI ALIMENTAZIONE (POWER) – Accende e spegne il mixer. Accendere il mixer dopo aver collegato tutti i dispositivi d’ingresso e prima di accendere gli amplificatori. Spegnere gli amplificatori prima di spegnere il mixer. POWER IN – Servirsi del cavo di alimentazione IEC in dotazione per collgare il mixer ad una presa elettrica. - Page 27 EFFETTI PER SENTIRE GLI EFFETTI SU UN CANALE: servirsi del selettore di effetti per scegliere uno degli effetti, regolare il parametro con il selettore di variazioni, quindi alzare la manopola Aux 2/FX Post per quel canale. PRESET DESCRIZIONE PARAMETRO GAMMA Tempo di Riverbero, che simula una sala con un piccolo tempo di 0,8~1,1 s...
-
Page 28: Schemi Dei Collegamenti
SCHEMI DEI COLLEGAMENTI COLLEGAMENTO ALTOPARLANTE MAIN Servirsi dei connettori di alimentazione unicamente per effettuare il collegamento con attrezzature aventi altre fonti di segnale per le casse dell'altoparlante passivo. In condizioni normali, è possibile collegare i terminali 1+ e 1- del connettore speakon. - Page 29 Modalità MAIN + MONITOR Altoparlante Main Servirsi dei jack Speakon o 6,3mm Altoparlante Monitor Con la MODALITÀ AMPLIFICATORE in posizione MAIN+MONITOR, l'uscita 1 guida una cassa dell'altoparlante Main, mentre l'uscita 2 un moditor da palco. AVVERTENZA: in modalità MAIN + MONITOR i carichi dell'altoparlante delle uscite OUTPUT1 e OUTPUT2 non possono essere inferiori a 4 ohm o danneggeranno l'apparecchio.
-
Page 30: Schnelles Einrichten
LIEFERUMFANG RMX1008DFX Netzkabel Schnellstart-Anleitung Sicherheitshinweise und Garantieinformationen ANSCHLUSSÜBERSICHT SCHNELLES EINRICHTEN Befolgen Sie die unten angeführten Anweisungen, um für jeden Kanal ein Signal zu verarbeiten: Bringen Sie alle Kanalpegel auf Null, alle Panning-Werte in die Mittelposition, den Ausgang auf Null und alle EQ-Werte in die mittlere Position. - Page 31 VORDERSEITE MIC/LINE MONO-EINGÄNGE - Schließen Sie ein Mikrofon oder Line-Level-Instrument LEVEL LEVEL LEVEL LEVEL mit einem handelsüblichen XLR- oder ¼"-Kabel an diese Eingänge an. MIC/LINE STEREO-EINGÄNGE - Diese XLR- und ¼" TRS-Verbindungen sind als Stereo- Paare organisiert. Wenn Sie nur die linke Buchse anschließen, wird der Eingang im Mono- LINE LINE Modus betrieben (das Mono-Signal wird auf beiden Eingangskanälen zu hören sein).
- Page 32 MASTER I/O (EINGANG/AUSGANG) Wahlschalter VERSTÄRKERMODUS- Dieser Schalter bietet drei Modi: HAUPT/HAUPT, HAUPT/MONITOR und BRIDGE. Wählen Sie einen dieser Modi, um die Signale an die entsprechenden Buchsen zu routen (siehe Lautsprecher- Anschlüsse). Dieser Schalter betrifft nur die Ausgänge an der Rückseite. Die Ausgänge Vorderseite sind...
- Page 33 RÜCKSEITE NETZSCHALTER – Schaltet den Mixer ein/aus. Schalten Mixer ein, nachdem alle Eingabegeräte angeschlossen wurden und bevor Sie die Verstärker einschalten. Schalten Sie die Verstärker aus, bevor Sie den Mixer ausschalten. NETZEINGANG – Verwenden Sie das mitgelieferte IEC-Netzkabel, um den Mixer mit einer Steckdose zu verbinden.
- Page 34 EFFEKTE SO HÖREN SIE DIE EFFEKTE EINES KANALS: Mit dem Effektwahlschalter wählen Sie einen der folgenden Effekte aus. Passen Sie die Parameter mit dem Variationswahlschalter an und drehen anschließend Aux 2/FX Post für diesen Kanal auf. PRESET BESCHREIBUNG PARAMETER BEREICH Reverb, der einen Raum mit einer kurzen Abklingzeit 0,8~1,1s...
- Page 35 ANSCHLUSSÜBERSICHT HAUPT-LAUTSPRECHERANSCHLUSS Verwenden Sie bitte nur Speakon-Anschlüsse, um diesen Mixer mit passiven Lautsprecherboxen zu verbinden. Unter normalen Umständen können die Klemmen 1+ und 1- des Speakon-Anschlusses verbunden werden. Im Bridged- Modus können die Klemmen 2+ und 1+ des Speakon-Anschlusses verbunden werden. Speakon-Anschluss Modus HAUPT + HAUPT Hauptlautsprecher...
- Page 36 Modus HAUPT + MONITOR Hauptlautsprecher Verwenden Sie entweder die Speakon-Buchsen oder die Monitor-Lautsprecher Klinkenbuchsen Befindet sich der VERSTÄRKERMODUS in der Position HAUPT+MONITOR betreibt der Ausgang 1 eine Haupt- Lautsprecherbox, während Ausgang 2 den Bühnen-Monitor betreibt. WARNUNG: Im Modus HAUPT + MONITOR darf die Lautsprecherlast von AUSGANG1 und AUSGANG2 nicht weniger als 4 Ohm betragen, andernfalls kann das Gerät Schaden nehmen.
- Page 37 DOOSINHOUD RMX1008DFX Stroomkabel Snelstartgids Veiligheidsinstructies & Garantie informatieboekje VERBINDINGSDIAGRAM SNELLE SETUP Volg de procedure hieronder om een signaalprocessor te hebben voor elk kanaal: Zet alle kanalen op nul, zet de pan-functie naar het midden, zet de output op nul, zet de EQ’s tevens op de beginstand. Verbind je microfoon en pas phantom power toe indien uw microfoon dit benodigd.
- Page 38 FRONTPANEEL MIC/LINE MONO INPUTS – Verbind een microfoon of line level instrument met LEVEL LEVEL LEVEL LEVEL deze inputs door middel van een standaard XLR or ¼” kabel. MIC/LINE STEREO INPUTS – Deze XLR en ¼” TRS verbindingen zijn gegroepeerd in stereoparen. Wanneer je alleen de linker jack verbindt, zal de input LINE LINE in mono mode opereren, (het mono-signaal zal verschijnen op beide inputkanalen).
- Page 39 MASTER I/O (INPUT/OUTPUT) AMPLIFIER Mode Switch – Deze schakelaar verschaft drie modi: MAIN / MAIN, MAIN / MONITOR en BRIDGE. Kies een van deze modi om de signalen te voeren naar corresponderende jacks volgens speakerpaneel-verbinding. Deze schakelaar beïnvloed alleen het achter-paneel outputs.
- Page 40 ACHTERPANEEL POWER SWITCH – Zet de mixer aan en uit. mixer nadat alle inputapparaten verbonden zijn alvorens je de versterkers aanzet. Zet de versterkers uit alvorens je de mixer uitzet. POWER IN – Gebruik de bijgevoegde IEC stroomkabel om verbinding te maken tussen de mixer en de power outlet.
- Page 41 EFFECTEN OM DE EFFECTEN TE HOREN OP EEN KANAAL: Gebruik de effectenkiezer om een van de onderstaande effecten te gebruiken, pas de parameter aan met de Variations Selector, draai vervolgens de Aux 2/FX Post regelaar omhoog voor dat betreffende kanaal. PRESET OMSCHRIJVING PARAMETER...
- Page 42 VERBINDINGSDIAGRAMMEN HOOFDSPEAKERVERBINDING Gelieve allen de power-connectoren te gebruiken om verbindingen te maken met andere signaalbron-uitrusting voor de passieve speakerboxen. Onder normale omstandigheden kunnen terminals 1+ en 1- van de speakon connectoren verbonden worden. In brugmodus, kunnen terminals 2+ en 1+ van de speakon connector worden verbonden. Speakon connector MAIN+MAIN modus Main speaker...
- Page 43 MAIN+ MONITOR Mode Main speaker Gebruik ofwel de Speakon jacks of de 6,3mm jacks Monitor Speaker Met de AMPLIFIER MODE in MAIN+MONITOR positie, voert Output 1 een Main speaker box terwijl Output 2 een podiummonitor voert. WAARSCHUWING: In MAIN + MONITOR modus, mogen de speakerbelastingen van OUTPUT1 en OUTPUT2 niet minder zijn dan 4 ohm, dit kan mogelijkerwijs de eenheid beschadigen.
-
Page 44: Technical Specifications
TECHNICAL SPECIFICATIONS MONO INPUT CHANNELS • Microphone input: Electronically balanced, discrete input configuration • Frequency response: 10Hz to 55kHz, +/–3dB • Distortion: (THD+N) 0.006% at +4dBu, 1kHz • Gain: 50dB (MIC) • SNR: (Signal to Noise Ratio) >90dB • Line input: Electronically balanced •...