Table of Contents

Related Manuals for Sprint Motorola Deluxe ic902


Summary of Contents for Sprint Motorola Deluxe ic902
- Page 1 Phone User Guide PowerSource Phone Motorola Deluxe ic902 www.sprint.com © 2007 Sprint Nextel. All rights reserved. SPRINT, the NEXTEL name and logo, and other trademarks are trademarks of Sprint Nextel. Printed in the U.S.A.
- Page 2 Motorola, Inc. Consumer Advocacy Office 1307 East Algonquin Road Schaumburg, IL 60196 www.hellomoto.com 1-800-331-6456 (United States) 1-888-390-6456 (TTY/TDD United States for hearing impaired) 1-800-461-4575 (Canada) Product Support: www.motorola.com/iden/support Certain mobile phone features are dependent on the capabilities and settings of your service provider’s network. Additionally, certain features may not be activated by your service provider, and/or the provider's network settings may limit the feature’s functionality.
-
Page 3: Table Of Contents
Table of Contents Welcome to Sprint ....... . .i Introduction ........ii Your Phone’s Menu . - Page 4 Dialing Sprint Services ........136...
- Page 5 Sending Pictures and Videos ....... 189 Using Sprint Picture Mail ........192 2K.
- Page 6 Updating Phone Software ....... . . 227 3B. Sprint Voice Command ......228 Getting Started With Sprint Voice Command .
- Page 7 4B. Manufacturer’s Warranty ..... . . 261 Motorola Limited Warranty for the United States and Canada ......262 Service and Repairs .
-
Page 9: Welcome To Sprint
This combination gives you more of what you need to do more of what you want. With Sprint, the power is back in your hands, where it belongs. Sprint. Power Up. Welcome and thank you for choosing Sprint. -
Page 10: Introduction
Introduction This Phone Guide introduces you to Sprint service and the features of your new phone. It’s divided into four sections: Section 1: Getting Started Section 2: Using Your Phone Section 3: Service Features Section 4: Safety and Warranty Information... -
Page 11: From Your Phone
You’ll also hear a summary of your account balance and your most recent payment information. Use Your Phone’s Web Browser From the Sprint Power Vision home page, select My Account (Option 0). You’ll see many helpful categories including Payment Due, Current Usage, and Plan Overview. Select a topic to display the latest information. -
Page 12: Your Phone's Menu
ILTER BY 4: S PEED 5: M USINESS 6: S ERVICES 1: Customer Solutions 2: Account Info 3: Dir. Assistance 4: Sprint Operator 5: Voice Command 7: M ANAGE ATEGORIES 1: General 2: Family 3: Friends 4: Work 8: M... - Page 13 MESSAGING 1: S ESSAGE 1: Text Message 2: Picture Mail 3: Voice SMS 2: T ESSAGING 1: Inbox 2: Outbox 3: Sent Folder 4: Drafts Folder 5: Preset Messages 6: Send Message 3: P ICTURE 1: Inbox 2: Sent Mail 3: Saved Mail 4: Pending Messages 5: Send Message...
-
Page 14: Media Player
1: G AMES 1: Get New 2: My Content Manager 2: T HEMES 1: Get New 2: My Content Manager 3. Moto 4. Sprint 3: R INGERS 1: Get New 2: My Content Manage 4: S CREEN AVERS 1: Get New... - Page 15 SETTINGS/TOOLS 1: S ETTINGS 1: Sounds 1: Ringer Type 1: Ringer 2: Messaging 3: Calendar 4: Alarm 5: Call Alert 6: Roam Ringer 2: Volume 1: Ringer 2: Messaging 3: Alarm 4: Key Beep 5: Advanced 6: Reset Volumes 3: Indicators 1: Service 2: Minute Beep 3: Call Lost...
- Page 16 5: Data Services 1: Data Services 2: Net Guard 3: Data Services Profile 6: Roaming 1: Set Mode 2: Call Guard 3: Data Roam Guard 7: Location 8: Security 1: Lock Phone 2: Lock Code 3: SIM PIN 4: SIM PIN Code 5: Special Numbers 1: Special Number 1 2: Special Number 2...
- Page 17 9: Voice Guide 10: Wireless Backup 1: Subscribe 2: Alert: ON/OFF 3: Learn More 10: Phone Info 1: My Phone Numbers 2: Icon Glossary 3: Version 4: Advanced 5: Phone Software 2: T OOLS 1: Bluetooth 1: Trusted Devices 1: Add New 2: Find Me 2: Calendar 3: Alarm Clock...
- Page 18 13: SIM Manager 1: Copy to Contacts 2: Copy to SIM 3: Manage SIM 4: Help...
-
Page 19: Section 1: Getting Started
Section 1 Getting Started... -
Page 20: Setting Up Service
Setting up service on your new phone is quick and easy. This section walks you through the necessary steps to unlock your phone, set up your voicemail, establish passwords, and contact Sprint for assistance with your wireless service. Section 1A: Setting Up Service... -
Page 21: Getting Started
Getting Started Determining If Your Phone Is Already Activated If you purchased your phone at a Sprint Store, it is probably ready to use. If you received your phone in the mail, it probably has been activated; all you need to do is unlock it. If... -
Page 22: Setting Up Your Voicemail
Note: Voicemail Passcode If you are concerned about unauthorized access to your voicemail account, Sprint recommends that you enable your voicemail passcode. For more information about using your voicemail, see “Using Voicemail” on page 213. -
Page 23: Account Passwords
4 for more information on your voicemail password. Data Services Password With your Motorola Deluxe ic902 phone, you may elect to set up a data services password. This optional password may be used to authorize purchase of Premium Services content and to protect personal information on multi-phone accounts. -
Page 24: Getting Help
View other service plans and options available. Learn more about data services and other great products like games, ringers, screen savers, and more. Reaching Sprint Customer Service You can reach Sprint Customer Service many different ways: * 2 t Dial on your phone. -
Page 25: Sprint 411
You can get up to three pieces of information per call, and the operator can automatically connect your call at no additional charge. There is a per-call charge to use Sprint 411 and you are billed for airtime. To call Sprint 411:... -
Page 26: Your Phone: The Basics
Sec tion 1B Your Phone: The Basics In This Section Your Motorola Deluxe ic902 Phone Getting Started With Your Phone Finding Your Phone Number and Walkie-Talkie Number Basic Phone Features Accessories Entering Text Your phone is packed with features that simplify your life and expand your ability to stay connected to the people and information that are important to you. -
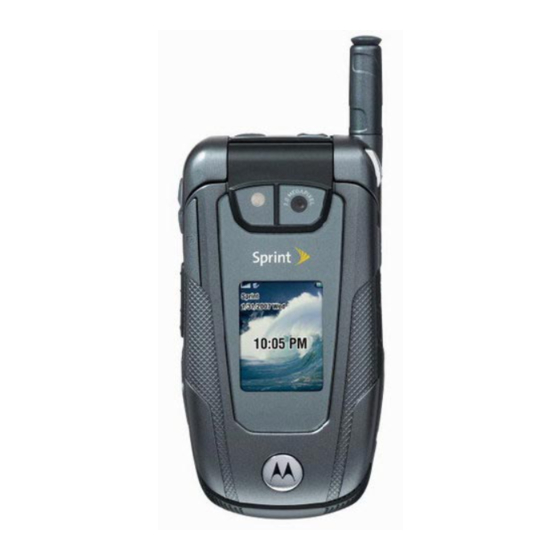
Page 27: Your Motorola Deluxe Ic902 Phone
Your Motorola Deluxe ic902 Phone Front View of Your Phone 7. Retractable Antenna 6. Smart Key 8. Quick Release 1. Speaker Key Button 2. microSD 9. Status Light Cardholder 10. Camera 3. Volume 11. Flash Keys 12. External Display 4. Walkie-Talkie Button 5. -
Page 28: Inside View Of Your Phone
Inside View of Your Phone 19. Display Screen 14. Earpiece 20. Music Players Keys 21. External Camera Key 15. Softkeys 22. Keypad Sensor 16. Camera Key 23. BACK Key 24. END / Power Key 17. TALK 25. Menu/OK 26. Navigation Keys 18. -
Page 29: Key Functions
Key Functions Speaker Key turns the speakerphone on and off during phone calls and Nextel Walkie-Talkie calls. You can also use it to answer phone calls in speaker mode. When the phone is closed, it can be used with the Smart Key to make a phone call from the Call History list. - Page 30 Smart Key ends a phone call or Walkie-Talkie call, forwards an incoming call to voicemail, and dismisses a Call Alert. In standby mode, it accesses Call History when the phone is closed. Retractable Antenna can be extended to optimize your phone’s performance during phone calls, Walkie-Talkie calls, and data sessions.
- Page 31 Music Player Keys allow you to control the music playing through the Sprint Music Store when the phone is closed. After you begin playing music through the Sprint Music Store, if you close your phone, you can use these...
- Page 32 END/Power Key ends a call. Press and hold for two seconds to turn your phone on or off. While in the main menu, it returns the phone to standby mode and cancels your input. When you receive an incoming call, press to mute the ringer.
-
Page 33: Getting Started With Your Phone
This card is included in the shrink-wrap package that also contains the phone user guide and other documentation. If no SIM card came with your phone, contact Sprint Customer Service at 1-888-211-4727. IMPORTANT You must use the SIM card that comes with your PowerSource phone. -
Page 34: Inserting Your Sim Card
Inserting Your SIM Card To insert your SIM card: Detach the SIM card from the larger card in which it is lodged. With your phone powered off, remove the battery door and battery. See “Removing the Battery” on page 20. With your fingers, carefully slide the SIM card in under the edge, and press it gently in place. -
Page 35: Removing Your Sim Card
Removing Your SIM Card Important: To avoid losing information stored in your SIM card, do not remove it from your phone unless absolutely necessary. To remove your SIM card: With your phone powered off, remove the battery door and battery. See “Removing the Battery” on page 20. With your fingernail, carefully slide the SIM card out from under the edge. - Page 36 Using Your Phone’s Battery and Charger WARNING Use only Sprint-approved or Motorola-approved batteries and chargers with your phone. The failure to use a Sprint- approved or Motorola-approved battery and charger may increase the risk that your phone overheats, catches fire, or explodes, resulting in serious bodily injury, death, or property damage.
-
Page 37: Installing The Battery
Installing the Battery Note: Depending on the capacity of the battery, your battery and battery door may look slightly different than the illustrations shown in this user guide. To install your battery: Make sure the phone is powered off. Slide the release button to the side until it releases the battery door. -
Page 38: Removing The Battery
Replace the battery door and press it gently until you hear a click. Removing the Battery WARNING Do not handle a damaged or leaking Li-Ion battery as you can be burned. To remove your battery: Make sure the phone is powered off. Slide the release button back until the battery door unlatches. -
Page 39: Charging The Battery
If the battery charge is getting too low, the phone makes a sound and displays a message. Always use a Sprint-approved or Motorola-approved charger or vehicle power adapter to charge your battery. Using the Charger To use the charger provided with your phone: Plug the charger into an electrical outlet. - Page 40 USB cable and a computer that supports charging through its USB port. You can only use a Motorola-approved USB cable. Battery Use and Maintenance Sprint-approved Li-Ion chargers provide optimum performance. Other chargers may not charge the Li-Ion battery, only partially charge it, or may yield a reduced number of lifetime charge cycles Extreme temperatures degrade battery performance.
-
Page 41: Finding Your Phone Number And Walkie-Talkie Number
Turning Your Phone On and Off To turn your phone on: Open the phone. Press and hold for approximately two seconds. As your phone connects to the network, you see a connecting message. Your phone may require you to enter identifying information to use it or to access specific features. -
Page 42: Basic Phone Features
(page 79). Word English Text Input lets you quickly type messages with one key press per letter (page 32). Sprint Voice Command lets you dial phone numbers by saying a name or the digits of a phone number (page 228). - Page 43 The Media Player allows you to enjoy video clips and listen to audio files with your phone (page 196). Note: Sprint Power Vision — Your phone and service provide access to Sprint Power Vision enhanced data services, including Sprint TV...
- Page 44 Sprint Vision connection/coverage indicator (1XRTT/CDMA Packet Data Service). Sprint Power Vision connection/coverage indicator (EVDO). indicates your phone is operating in TTY mode. indicates a data cable is connected to your phone.
- Page 45 indicates your phone’s location feature is on. indicates your phone’s location feature is off. indicates you are in Airplane mode. indicates you have Nextel Walkie-Talkie coverage. indicates the Walkie-Talkie speaker is on. indicates the Walkie-Talkie speaker is off. indicates your phone is set to ring for incoming calls.
-
Page 46: Navigating Through Phone Menus And Options
Navigating Through Phone Menus and Options The navigation keys on your phone allows you to scroll through menus and options quickly and easily. To navigate through a list-type menu, simply press your navigation keys up or down. The scroll bar at the right of the menu keeps track of your position in the menu at all times. - Page 47 Backing Up Within a Menu To go to the previous menu, press To return to standby mode, press Shortcuts and Favorites In standby mode, your phone give you ways to quickly access features you use frequently: Use the navigation keys to use shortcuts to five features.
-
Page 48: Accessories
To order additional accessories, go to or call www.sprint.com 1-888-242-4187. You can also contact your Sprint Authorized Representative or stop by any Sprint Store. For information on Sprint Store locations, go to www.sprintstorelocator.com Section 1B: Your Phone: The Basics... -
Page 49: Entering Text
Entering Text Selecting a Character Input Mode Your phone provides convenient ways to enter words, letters, punctuation, and numbers whenever you are prompted to enter text (for example, when adding a Contacts entry or when using SMS Text Messaging). To change the character input mode: When you display a screen where you can enter text, press Options (right softkey) to change the character input mode. -
Page 50: Entering Characters Using Word English Text Input
Entering Characters Using Word English Text Input Word English Text Input lets you enter text into your phone by pressing keys just once per letter. (To select the Word English mode when entering text, see “Selecting a Character Input Mode” on page 31.) Word English Text Input analyzes the letters you enter using an intuitive word database and creates a suitable word. -
Page 51: Entering Characters Using Multi-Tap Mode
Adding a Word to the Word English Database If a word you want to enter is not displayed as an option when you are using Word English Text Input, you can add it to the database. To add a word to the Word English Text Input database: Select the Multi-Tap character input mode. -
Page 52: Entering Numbers And Symbols
Characters scroll in the following order: . ? ! , @ ' - _ : ; ( ) & " 1 0 ^ ` % $ + * / \ | ~ [ ] = > < # A B C 2 D E F 3 G H I 4 J K L 5... -
Page 53: Section 2: Using Your Phone
Section 2 Using Your Phone... -
Page 54: Making And Answering Calls
Making and Answering Nextel Direct Talk Calls Using Call Alerts Keeping Track Your Motorola Deluxe ic902 phone offers many different ways to connect to your family, friends, and associates. In addition to traditional wireless phone calls, you can make Nextel Walkie- Talkie calls to both individuals and groups, participate in Talkgroups, use Nextel Direct Talk, and send Call Alerts. -
Page 55: Types Of Calls
Types of Calls With the Nationwide Sprint PCS Network, Nextel Walkie- Talkie, and your Motorola Deluxe ic902 phone, you have the following traditional wireless phone and Nextel Walkie-Talkie services available to you: Digital Wireless Phone Calls offer clear calls and many extra services, including missed call notification, three-way calling, speakerphone, and speed dialing (page 38). -
Page 56: Making And Answering Phone Calls
Making and Answering Phone Calls Making Calls Placing a traditional, wireless phone call from your phone is as easy as making a call from any landline phone. To make a phone call using your keypad: Make sure your phone is on and open. Enter a phone number from standby mode. - Page 57 Answering a Roam Call With Call Guard Enabled Call Guard is an option that helps you manage your roaming charges when making or receiving calls while outside the Nationwide Sprint PCS Network. Please see “Controlling Your Roaming Experience” on page 105 for more information about roaming.
-
Page 58: Calling Emergency Numbers
Missed Phone Calls Missed phone calls are forwarded to voicemail. Calling Emergency Numbers 9 1 1 You can place calls to 911 (dial and press even if your phone is locked or your account is restricted. During an emergency call, press Options (right softkey) to display your options. -
Page 59: In-Call Options
Enhanced 911 (E911) Information This phone features an embedded Global Positioning System (GPS) chip necessary for utilizing E911 emergency location services where available. When you place an emergency 911 call, the GPS feature of your phone begins to seek information to calculate your approximate location. -
Page 60: End-Of-Call Options
3-Way Call lets you initiate a three-way call (see page 225). Record Recipient creates a Voice Record of the call. Phone Info opens your Phone Info menu. Send Text Message opens your Text Messaging menu. Call History opens your Call History menu. Use Bluetooth or Switch Audio switches the call from a Bluetooth headset to your phone. -
Page 61: Saving A Phone Number
Saving a Phone Number Your phone can store up to five phone numbers in each Contacts entry. Each entry’s name can contain 24 characters. Your phone automatically sorts the Contacts entries alphabetically. (For more information, see “Using Contacts” on page 120.) To save a number from standby mode: Enter a phone number. - Page 62 To dial or save phone numbers with pauses: Enter the phone number. Press Options (right softkey) and select either Hard Pause or 2Sec Pause. Enter additional numbers. Press to dial the number. – or – Press Options (right softkey) and select Save to save the number in your Contacts.
-
Page 63: Abbreviated Dialing
Abbreviated Dialing You can set up your phone to make calls using just the last four digits of the number. Your phone automatically prepends the first digits (for example, the area code and prefix). You must enable Abbreviated Dialing and define the first digits before you can use this feature. - Page 64 Dialing From Call History You can make calls from Call History with your phone open or closed. To make a call with the phone open: Press > Call History. Find the entry you want on the All Calls list or scroll left or right to view the entries on The Walkie Talkie list, the Missed Calls list, the Incoming Calls list, and the Outgoing Calls list.
-
Page 65: Using Speed Dialing
“Calling Options” on page 88 for instructions. Speed dialing is not available when you are roaming; when you are roaming off the Nationwide Sprint PCS Network, you must always dial using 11 digits (1 + area code + number). For Speed Dial locations 2-9 (One-Touch Dialing): Press and hold the appropriate key for approximately two seconds. -
Page 66: Making And Answering Nextel Walkie-Talkie Calls
Making and Answering Nextel Walkie-Talkie Calls Making Nextel Walkie-Talkie Calls To make a Walkie-Talkie call: Enter the Walkie-Talkie number you want to call. (See “Dialing Nextel Walkie-Talkie Numbers” below.) Press and hold the Walkie-Talkie button on the side of your phone. Begin talking after your phone emits a chirping sound. - Page 67 Tip: When you store a Walkie-Talkie number in Contacts, it is good practice to include the whole number, including the asterisks. Using Just the Member ID If you are contacting someone sharing your network and area IDs, you only need to enter the member ID. To make a Walkie-Talkie call using only the member ID: Enter the member ID of a Walkie-Talkie number.
- Page 68 W-T Contacts W-T Contacts filters Contacts and Call History to display only Walkie-Talkie numbers. To access a Walkie-Talkie number using W-T Contacts: Press > Walkie-Talkie > W-T Contacts. Use your left and right navigation keys to select W-T Contacts or W-T Call History. Scroll to and highlight the Walkie-Talkie number you want to call.
-
Page 69: Sending Contact Information
Sending Contact Information Use Send via Walkie-Talkie to send your own (or another’s) contact information to a Walkie-Talkie user. Setting Up Send via Walkie-Talkie By default, your phone automatically sends your personal information every time you make a Walkie-Talkie call. You can turn this functionality off or modify how much information you want to send. - Page 70 To send contact information using Send via Walkie-Talkie during a Walkie-Talkie call: Begin a Walkie-Talkie call in the regular manner. Release the Walkie-Talkie button. Press Options (right softkey). To send your own contact information to the caller, select Send Business Card. –...
- Page 71 Press Options (right softkey) and then select Send Business Card > Walkie-Talkie. Press the Walkie-Talkie button to send the information. Note: You can also use the All Calls and Walkie-Talkie lists in Call History to Send via Walkie-Talkie. Press O > Call History and scroll to All Calls or Walkie Talkie.
- Page 72 Creating a Group Using Walkie Talkie Contacts Use Walkie Talkie Contacts to create a Group and make a Group Walkie-Talkie call quickly. Or, you can save it to Contacts and then make the Group Walkie-Talkie call. To create a Group using Walkie Talkie Contacts: Press >...
- Page 73 Group Walkie-Talkie Call Information While you are on a Group Walkie-Talkie call, the following appears on the display screen: The name of the Group. The name or the Walkie-Talkie number of the person speaking. The number of participants in the Group Walkie-Talkie call.
- Page 74 Sharing Groups You share Groups by saving Groups from calls you participated in and by sending Groups to other callers. To store Groups from Call History: Press > Call History and scroll to All Calls or Walkie Talkie. From the list, select the Group you want. Press Options (right softkey) and then select Save.
-
Page 75: Making And Answering Talkgroup Calls
Highlight the caller you want to forward the Group to and press Push the Walkie-Talkie button to send the Group. Making and Answering Talkgroup Calls A Talkgroup is a predetermined group of Walkie-Talkie users, created by an account administrator. They can contain up to 100 members. -
Page 76: Joining A Talkgroup
. You must www.sprint.com be an account administrator to use Talkgroup Management. Contacting your Sprint Sales Representative at the time of activation. Note: You can only in participate in (“join”) one Talkgroup at a time. Section 2A: Making and Answering Calls... -
Page 77: Making Talkgroup Calls
Making Talkgroup Calls To make Talkgroup calls: Press and then enter the Talkgroup number using the keypad. – or – Select the Talkgroup from Contacts, the All Calls and Walkie-Talkie lists in Call History, or from Walkie Talkie Contacts. Press the Walkie-Talkie button and continue as if making a Walkie-Talkie call. -
Page 78: Making And Answering Nextel Direct Talkcalls
Making and Answering Nextel Direct TalkCalls Nextel Direct Talk allows for two-way radio communication “off the network” between two or more phones equipped with this capability. This feature is very useful in areas without network coverage. You can make – Code calls –... - Page 79 Setting Your Phone to Nextel Direct Talk Before you and another caller can use Direct Talk, both of your phones must be set to Direct Talk mode. To set your phone to Direct Talk: Press > Walkie-Talkie > Direct Talk. After a few seconds, your channel and code appear on the display screen.
- Page 80 Code Nextel Direct Talk Calls Your phone has 10 channels and 15 codes within each channel. Channels represent the radio frequencies on which you make and receive Nextel Direct Talk calls. Codes allow you to minimize interference from others using the same channel as you.
- Page 81 If you receive an error message, this means: There may be no parties on your channel or code. You are out of range. When you receive a Code call using Direct Talk, your phone displays Receiving, along with the channel and code selected. Answer a Direct Talk Code call just like you would any other Walkie-Talkie call.
- Page 82 Note: You do not need to set your phone to Private Only to receive Private calls. As long as you are on the same channel as your caller, you can receive Private Direct Talk calls. Making a Private Direct Talk Call You can make Private Direct Talk calls to any person on your same channel.
- Page 83 To set the code to Receive All: In Direct Talk mode, press Options (right softkey) and then select Edit Channel/Code. With Code number field highlighted, use your up and down navigation keys to select a channel number and press Select Receive All and press Press Done (left softkey).
-
Page 84: Using Call Alerts
Using Call Alerts Sending a Call Alert lets the recipient know you want to talk to him or her on a Nextel Walkie-Talkie call. When you send a Call Alert, the recipient’s phone alerts them and displays your name or Walkie-Talkie number. Sending Call Alerts To send a Call Alert: Enter the Walkie-Talkie number you want to send the... - Page 85 Responding to a Call Alert Note: You can set a distinctive ringer for Call Alerts. See “Ringer Types” on page 72. To answer a Call Alert: Press the Walkie-Talkie button to make a Walkie-Talkie call to the sender. To clear a Call Alert, do one of the following: Press Dismiss (right softkey).
-
Page 86: Keeping Track
Keeping Track Your Motorola Deluxe ic902 phone allows you to contact your family, friends, and business associates in many different ways – phone calls, Walkie-Talkie calls, Group Walkie-Talkie calls, Talkgroup calls, and Call Alerts. Your phone tracks these communications through Call History and the Events list. -
Page 87: Call Alerts
Incoming Walkie-Talkie Calls, Talkgroup Calls, and Call Alerts If... Then... Your phone is turned off. Your phone does not list Walkie-Talkie calls, Talkgroup calls, or Call Alerts in Call History. Your phone is in standby You receive the Walkie-Talkie call, mode. - Page 88 Nextel Group Walkie-Talkie Calls Your phone does not display an incoming call notification for Group Walkie-Talkie calls. It does display the calls in the Call History. Nextel Direct Talk Because Code calls do not take place on the network, your phone does not track them.
-
Page 89: Controlling Your Phone's Settings
Sec tion 2B Controlling Your Phone’s Settings In This Section Sound Settings Display Settings Location Settings Messaging Settings Airplane Mode TTY Use Phone Setup Options Nextel Walkie-Talkie Settings Using the menu options available on your phone, you can customize your phone to sound, look, and operate just the way you want it. -
Page 90: Sound Settings
Sound Settings Ringer Types Ringer types help you identify incoming calls and messages. You can assign ringer types to individual Contacts entries, types of calls, and types of messages. Preprogrammed Ringers include a variety of standard ringer types and familiar music included with your phone. Vibrating Ringer alerts you to calls or messages without disturbing others. - Page 91 Selecting Ringer Types for Messages To select a ringer type for messages: Press >Settings/Tools > Settings > Sounds > Ringer Type > Messaging. Select Text Message, Voice SMS, Picture Mail, or Voicemail. Select In Phone, External Memory, Assigned Media, or New Voice Recording.
-
Page 92: Adjusting The Phone's Volume Settings
Adjusting the Phone’s Volume Settings You can adjust your phone’s volume settings to suit your needs and your environment. To adjust your phone’s volume settings: Press > Settings/Tools > Settings > Sounds > Volume. Select Ringer, Messaging, Alarm, Key Beep, or Advanced, and press If you selected Advanced, you can then select Applications, Calendar, Call Alert, Connected Call, Incoming... -
Page 93: Display Settings
Key Tones You can set the duration of key tones whenever you press a key. To set your key tone length: Press > Settings/Tools > Settings > Sounds > Key Tone Length. Select Short or Long and press Display Settings Changing the Text Greeting The text greeting can be up to 12 characters and is displayed on your phone’s screen in standby mode. - Page 94 Setting Light Controls You can determine whether, and for how long, to light the display screen, keypad, Walkie-Talkie button, or status light. Status Light or Walkie-Talkie Button Light To turn on or off the status light or the light behind the Walkie-Talkie button: Press >...
-
Page 95: Changing The Clock Display
To set Keypad Light Sensor to measure ambient light: Press > Settings/Tools > Settings > Display > Light Control > Keypad Light Sensor. Highlight On. Press Note: Setting long light durations affects the life of the battery. Changing the Phone’s Menu Style Your phone allows you to choose how the menu appears on your display screen. - Page 96 Changing Other Display Settings Your Motorola Deluxe ic902 phone offers you many different ways to customize your display screen. To change additional display settings: Press > Settings/Tools > Settings > Display. Select the display option you want to change. (See below for a list of options.)
-
Page 97: Location Settings
Location Settings Your phone is equipped with a Location feature for use in connection with location-based services. The Location feature allows the network to detect your position. Turning Location off hides your location from everyone except 911. Turning Location on allows the network to detect your Note: position using GPS technology, making some applications and services easier to use. -
Page 98: Messaging Settings
Messaging Settings Staying connected to your friends and family has never been easier. With your phone’s advanced messaging capabilities, you can send and receive text messages without placing a voice call. (See “SMS Text Messages” on page 81, and “SMS Voice Messages”... - Page 99 SMS Text Messages Auto-Signing for Text Messages You can choose to have your phone automatically add your name to each text message or a custom signature created by you to reflect your personality. To add a signature to each sent message: Press >...
-
Page 100: Managing Preset Messages
Managing Preset Messages Your phone is programmed with 15 preset messages to help make sending text messages faster and easier. These messages, such as “Let’s get lunch” and “Meet me at,” can be customized or deleted to suit your needs. You can also add your own preset messages to the list. - Page 101 SMS Voice Messages You can customize the way you use SMS Voice messages. You can set your SMS Voice messages to always play in speakerphone mode. You can also set your phone to add a name to each SMS Voice message. To set your SMS Voice messages to play in speakerphone: Press >...
-
Page 102: Airplane Mode
Airplane Mode Airplane Mode allows you to use many of your phone’s features, such as Games, Calendar, Voice Records, etc., when you are in an airplane or in any other area where making or receiving phone calls, Walkie-Talkie calls, or using data services is prohibited. -
Page 103: Tty Use
If this cable was not provided with your TTY device, contact your TTY device manufacturer to purchase the connector cable. When establishing your wireless service, please call Sprint Customer Service via the state Telecommunications Relay 7 1 1 t Service (TRS) by first dialing . -
Page 104: Phone Setup Options
WARNING 911 Emergency Calling Sprint recommends that TTY users make emergency calls by other means, including Telecommunications Relay Services (TRS) and landline communications. Wireless TTY calls to 911 may be corrupted when received by public safety answering points (PSAPs) rendering some communications unintelligible. The problem encountered appears related to TTY equipment or software used by PSAPs. -
Page 105: Call Answer Mode
Tip: You can choose to show or hide the navigation keys on your screen. Go to > Settings/Tools > Settings > Display > Foregrounds >Navigation Key Display and select Hide or Show. Even if you hide the shortcuts, you can still use them by pressing the appropriate navigation key. -
Page 106: Calling Options
Calling Options You can set up your phone to make dialing numbers even quicker and easier. To set special options to making dialing easier: Press > Settings/Tools > Settings > Others > Call Setup. Select the calling option you want to use. (See below for a list of options.) Follow the prompts to make your choice. -
Page 107: Voice Guide
Voice Guide You can enable your phone to read aloud the main menu, your Settings submenu, your Contacts entries, and the digits you are entering. To set your Voice Guide options: Press > Settings/Tools > Settings > Others > Voice Guide. Select On, Off, or Custom. -
Page 108: Nextel Walkie-Talkie Settings
Nextel Walkie-Talkie Settings Your phone offers you ways to manage your Nextel Walkie- Talkie calls. You may want to consider these options. One Touch Walkie-Talkie lets you quickly access frequently used functions with a press of the Walkie-Talkie button. Talkgroup Silent controls whether you hear active Talkgroup calls. - Page 109 Silencing Talkgroup Calls When you join a Talkgroup, you hear all the conversations among the different members. To mute the chatter, enable the Talkgroup Silent setting. To set how your phone deals with Talkgroup calls: Press > Settings/Tools > Settings > Walkie-Talkie > Talkgroup Silent >...
-
Page 110: Setting Your Phone's Security
Limiting Use of Your Phone Erasing Data Resetting Your Phone Security Features for Sprint Power Vision By using the security settings on your phone, you receive peace of mind without sacrificing flexibility. This section will familiarize you with your phone’s security settings. With several options available, you can customize your phone to meet your personal needs. -
Page 111: Accessing Your Security Menu
> Settings/Tools > Settings > Security. Enter your four-digit lock code. Tip: If you can’t recall your lock code, try using the last four digits of your wirless phone number. If this doesn’t work, call Sprint Customer Service. SIM Card Security Important: Except for making emergency calls, your phone does not function without the SIM card. - Page 112 Turning SIM PIN On and Off To turn SIM PIN on or off: Press > Settings/Tools > Settings > Security. Enter your lock code. (The Security menu is displayed.) Select SIM PIN. Select On or Off. Enter the current SIM PIN. Tip: The default SIM PIN is 0000.
- Page 113 Unblocking the PIN If you enter your PIN incorrectly three times, your SIM card is blocked. To unblock your SIM card, you must contact Sprint Customer Service to get a PIN Unblock Code (PUK). Follow their instructions for unblocking your SIM PIN...
-
Page 114: Using Your Phone's Lock Feature
Locking Your Phone Locking your phone secures it from unauthorized access. However, you can still receive incoming calls or make calls to 911, Sprint Customer Service, or special numbers. To lock your phone: Press > Settings/Tools > Settings > Security. -
Page 115: Using Special Numbers
Calling In Lock Mode You can place calls to 911, Sprint Customer Service, and to your special numbers when in lock mode. To place an outgoing call in lock mode: To call an emergency number, special number, or Sprint Customer Service, enter the phone number and press KeyGuard Your phone’s KeyGuard feature protects against activating... -
Page 116: Limiting Use Of Your Phone
You can limit access to Contacts, Sprint Power Vision Services, and Pictures. You can limit access to Contacts and data services. You can also restrict incoming and outgoing phone calls as well as Walkie-Talkie calls. - Page 117 Limiting Access to Contacts To limit access to your Contacts: Press > Settings/Tools > Settings > Security. Enter your lock code. (The Security menu is displayed.) Select Limit Use > Contacts. Choose one of the following options and press Unlock clears all limitations. Lock asks users to enter your lock code whenever they select Contacts.
-
Page 118: Limiting Outgoing Calls
Limiting Access to Pictures & Videos To limit access to your pictures and videos: Press > Settings/Tools > Settings > Security. Enter your lock code. (The Security menu is displayed.) Select Limit Use > Pictures. Choose one of the following options and press Unlock clears all limitations. -
Page 119: Limiting Incoming Calls
Limiting Incoming Calls To limit incoming calls: Press > Settings/Tools > Settings > Security. Enter your lock code. (The Security menu is displayed.) Select Limit Use > Restrict Incoming Calls. Choose one of the following options and press All stops all incoming calls. None allows all calls. -
Page 120: Erasing Data
All Settings – Restores all phone settings to their factory defaults. Walkie Talkie Service – Allows Sprint Customer Service to reset your Nextel Walkie-Talkie service in the event of a security or provisioning issue. Phone Reset – Deletes all items in Contacts, My Content, Voice Records, Pictures, and Messages, and resets Nextel Walkie-Talkie Services. -
Page 121: Security Features For Sprint Power Vision
Enabling and Disabling Sprint Power Vision Services You can disable Sprint Power Vision services without turning off your phone; however, you will not have access to all Sprint Power Vision services, including Web and messaging. Disabling Sprint Power Vision will avoid any charges associated with Sprint Power Vision services. -
Page 122: Net Guard
Net Guard The Net Guard option prompts you each time you connect to Sprint Power Vision. When you access the browser, a screen is displayed with two choices: Connect to Sprint Power Vision once. (You will be prompted again the next time you sign in.) Always Auto-Connect to Sprint Power Vision from now on without being prompted. -
Page 123: Controlling Your Roaming Experience
Nationwide Sprint PCS Network. Your new Motorola Deluxe ic902 phone works anywhere on the Nationwide Sprint PCS Network and allows you to roam on other networks where we’ve implemented roaming agreements with other carriers. (Nextel Walkie-Talkie calls are allowed anywhere on the Nextel National Network.) -
Page 124: Understanding Roaming
Messaging. Note: If you’re on a call when you leave the Nationwide Sprint PCS Network, your call is dropped. If your call is dropped in an area where you think Sprint service is available, turn your phone off and on again to reconnect to the Nationwide Sprint PCS Network. -
Page 125: Checking For Voicemail Messages While Roaming
Checking for Voicemail Messages While Roaming When you are roaming off the Nationwide Sprint PCS Network, you may not receive on-phone notification of new voicemail messages. Callers can still leave messages, but you will need to periodically check your voicemail for new messages if you are in a roaming service area for an extended period of time. -
Page 126: Setting Your Phone's Roam Mode
Press > Settings/Tools > Settings > Roaming > Set Mode. To select an option, highlight it and press Sprint Only allows you to access the Nationwide Sprint PCS Network only and prevents roaming on other networks. Automatic seeks Sprint service. When Sprint service is unavailable, the phone searches for an alternate system. -
Page 127: Alerting Yourself To Roaming
Highlight Distinct to give your incoming roaming calls a distinct ringer. Highlight Normal to give incoming roaming calls a ringer that is not distinct from the calls you receive when you are on the Nationwide Sprint PCS Network. Press Using Call Guard... -
Page 128: Using Data Roam Guard
Data Roam Guard makes it easy to manage roaming charges incurred when accessing the Web through data services. Whenever you are outside the Nationwide Sprint PCS Network, Data Roam Guard alerts you to this and asks you whether you want to continue using the Web. (This additional step is not required when you connect to the Web while on the Nationwide Sprint PCS Network.) -
Page 129: Managing Call History
Sec tion 2E Managing Call History In This Section Viewing Call History Phone Call History Options Walkie-Talkie Call History Options Erasing Call History Call History keeps track of incoming and outgoing phone calls, missed phone calls, Nextel Walkie-Talkie calls, and Call Alerts. This section guides you through accessing and making the most of your Call History. -
Page 130: Viewing Call History
Viewing Call History Call History makes returning phone and Walkie-Talkie calls, and responding to Call Alerts fast and easy. It lists the last 20 numbers (or Contacts entries) of phone calls you have made, received or missed. Call History also lists Walkie-Talkie calls, Group Walkie-Talkie calls, Talkgroup calls, Call Alerts, and Private Direct Talk calls. - Page 131 To view Call History entries for phone calls: Press > Call History. Scroll left or right to select All Calls, Walkie Talkie, Missed Calls, Incoming Calls, or Outgoing Calls. Your phone calls are displayed in reverse chronological order. To view additional details about a call, press If the caller is listed in your Contacts, your phone displays the name, number and time/date when the call occurred.
- Page 132 Note: The Walkie-Talkie list contains outgoing, incoming, and missed Walkie-Talkie calls as well as sent and received Call Alerts. You cannot view Walkie-Talkie calls or Call Alerts on the Missed Calls, Incoming Calls, or Outgoing Calls lists. These only contain phone calls. To view Walkie-Talkie calls on the All Calls list: Press >...
-
Page 133: Phone Call History Options
Phone Call History Options This feature displays the date and time of the call, the phone number (if available), and the caller’s name (if the number is already in your Contacts). By highlighting a Call History entry and pressing Options (right softkey), you can select from the following options: Save to save the number if it is not already in your Contacts. -
Page 134: Saving A Phone Number From Call History
Use your navigation keys to scroll to a Call History entry and press Saving a Phone Number From Call History Your phone can store up to 1000 numbers or electronic addresses. Individual Contacts entries can contain up to five separate phone numbers, a Walkie-Talkie number, an email address, and a Web address. -
Page 135: Walkie-Talkie Call History Options
Enter the prefix and press – or – Press Options (right softkey) and then select Save to save the amended number to your Contacts. Walkie-Talkie Call History Options After viewing a Walkie-Talkie call in the All Calls or Walkie- Talkie lists, you can select from the following options: View Contact to view the Contacts entry of the caller. - Page 136 Making a Walkie-Talkie Call From Call History To place a Walkie-Talkie call from Call History: Press > Call History and scroll to All Calls or Walkie Talkie. Scroll through the calls listed, highlight the Walkie-Talkie number you want to call. Press and hold the Walkie-Talkie button and speak.
-
Page 137: Erasing Call History
Erasing Call History You can erase individual Call History lists or all of them at one time. To erase Call History: Press > Call History. Select the list you want to erase. Press Options (right softkey) and select Delete All. If you are certain you want to erase the list, press Yes (left softkey). -
Page 138: Using Contacts
Contacts Entries for Walkie-Talkie Groups and Talkgroups Managing Your Contacts Using Your SIM Manager Dialing Sprint Services Using Wireless Backup Now that you know the basics that make it easier to stay in touch with people and information, you’re ready to explore your phone’s more advanced features. -
Page 139: About Contacts
About Contacts Your phone can store up to 1000 numbers or electronic addresses. Individual Contacts entries can contain up to five separate phone numbers, a Walkie-Talkie number, an email address, and a Web address. The total capacity (numbers and electronic addresses) is 1000, meaning that if each Contacts entry has only one number or electronic address, you have space for 1000 Contacts entries. -
Page 140: Finding Contacts Entries
An electronic address — This may be an email address or Web address. Each Contacts entry must contain a number or an electronic address. A memo — You can write a short note to yourself regarding the entry. Personal and business information — You can store a birthday, job title, company name, and street address with each entry. -
Page 141: Finding Speed Dial Numbers
Highlight the phone number you want to call and press – or – To view the entry’s details, press and then press your navigation keys left or right. – or – To send a message, press Send MSG (left softkey), create the message, and then press Send (left softkey). - Page 142 To view the entry’s details, press and then press your navigation keys left or right. – or – Highlight the phone number you want to call and press – or – To send a message, press Send MSG (left softkey), create the message, and then press Send (left softkey).
-
Page 143: Creating A Contacts Entry
Creating a Contacts Entry To add a new Contacts entry: Press > Contacts > Add New. Highlight Contact and press Enter the Contacts name and press To enter a Walkie-Talkie number, highlight Walkie-Talkie, enter the number, and press To enter a phone number, highlight Number, enter the number, and press Assign Mobile, Home, Work, Pager, or Other to the number and press... -
Page 144: Assigning Speed Dial Numbers
Assigning Speed Dial Numbers Once you have added a number to your Contacts, you can assign a speed dial number to it. Your phone can store 99 numbers in speed dial locations. To assign a speed dial number to an existing phone number: Press >... -
Page 145: Assigning An Email Address Or Web Address
Select a source for the assigned file (for example, In Phone, External Memory, Assigned Media, or Take New Picture). Use your navigation keys to scroll through the available files. To hear a ringer, press Listen (left softkey). Highlight your desired picture or ringer and press Press Save (left softkey) to save the entry. - Page 146 Use your navigation key to scroll right to the tab with the Birthday option. Highlight the date field, use your navigation keys or keypad to set the date, and then press Press Save (left softkey) to save the entry. Working With Distribution Lists A Distribution List is a group of entries that you can send messages to —...
-
Page 147: Contacts Entries For Walkie-Talkie Groups And Talkgroups
Tip: To quickly send a message to the Distribution List, press O > Contacts > Filter by > Distribution List . Highlight the Distribution List you want and press Send MSG (left softkey). Editing a Contacts Entry or Distribution List To edit a Contacts entry or Distribution List: Display a Contacts entry or Distribution List. - Page 148 Highlight Add Members and press Use your left and right navigation keys to select Contacts or Call History. Highlight each Walkie-Talkie contact you want to add to this Group and press after each selection. A checkmark appears next to each selected entry. Press Done (left softkey) to save the membership.
- Page 149 To delete a Group from Contacts: Press > Contacts > Filter by > Walkie-Talkie Group. Scroll to the Group you want to delete and press Edit (left softkey). Press Options (right softkey) and then select Delete. Press Yes (left softkey). Editing Walkie-Talkie Group Entries You can edit the name, Category, or membership of a Group entry.
-
Page 150: Managing Your Contacts
Managing Your Contacts Organize your Contacts entries by assigning them to Categories. Your phone has some already defined – General, Family, Friends, and Work. You can also create your own. To view your Categories: Press > Contacts > Manage Categories. To create your own custom Category: Press >... -
Page 151: Using Your Sim Manager
Erasing All Contacts To erase all the Contacts entries stored in your phone: Press > Settings/Tools > Settings > Security. Enter your Lock Code. Select Manage Applications. Select Contacts. If you are sure you want to delete all Contacts, press Yes (left softkey). - Page 152 Note: To view details, highlight the Contacts entry and press Details (left softkey). If you selected a Walkie-Talkie Group, pressing Details (left softkey) displays the members. You cannot dial numbers directly from SIM Manager. You can do so from Contacts or the Call History lists. Deleting Entries Stored in Your SIM Card To delete entries stored in the SIM card: Press...
- Page 153 Copying Contacts Entries – SIM Card to Phone To copy entries from a SIM card to your phone: Press > Contacts > SIM Manager > Copy to Contacts. Highlight the entries you want to copy and press after each selection. A checkmark appears next to each selected entry.
-
Page 154: Dialing Sprint Services
Dialing Sprint Services Your Contacts contain entries for various Sprint services. To dial a service from your Contacts: Press > Contacts > Services. Select Customer Solutions, Account Info., Dir. Assistance, Sprint Operator, or Voice Command. Press to place the call. -
Page 155: Using Wireless Backup
Using Wireless Backup Wireless Backup is an optional subscription service from Sprint that allows you to securely and privately back up, store, and edit your Contacts on the Web, using your personal computer. Setting Up Wireless Backup Press O > Contacts > Wireless Backup. - Page 156 From your personal computer, launch your Internet browser and go to www.wirelessbackup.sprint.com. Enter your wireless phone number (without hyphens) in the Sprint PCS Phone Number field. Enter the wireless password you received via text message into the Wireless Backup Password field.
-
Page 157: Using The Phone's Tools
Sec tion 2G Using the Phone’s Tools In This Section Using Your Phone’s Calendar Using the Alarm Clock Using the Calculator Using the World Clock Using the Stop Watch Using the Notepad Using the Tip Calculator Using the Currency Converter Using the Unit Converter Using Voice Records Using the File Manager... -
Page 158: Using Your Phone's Calendar
Using Your Phone’s Calendar Adding an Event to the Calendar Your Calendar helps organize your time and reminds you of important events. To add an event: Press > Settings/Tools > Tools > Calendar. Using your navigation keys, highlight the day to which you would like to add an event. -
Page 159: Event Alerts
Highlight None, On Time, 5 mins, 10 mins, 15 mins, 30 mins, 1 hr, or 1 day and press Press Save (left softkey) to save the event. Tip: To change your default event ringer type, from the standby screen, press >... -
Page 160: Deleting An Event
Changing to Weekly View To go to the Weekly Calendar view: Press > Settings/Tools > Tools > Calendar. Press Options (right softkey). Select Week View. Going to Today’s Date To go to today’s date: Press > Settings/Tools > Tools > Calendar. Press Options (right softkey). -
Page 161: Using The Alarm Clock
Press Yes (left softkey) or No (right softkey). Using the Alarm Clock Your phone comes with a built-in alarm clock with multiple alarm capabilities. To use the alarm clock: Press > Settings/Tools > Tools > Alarm Clock. Select Add New Alarm and press Enter the alarm Name and press Select a time for the alarm by highlighting the Time field and pressing... -
Page 162: Using The Calculator
Using the Calculator Your phone comes with a built-in calculator. To use the calculator: Press > Settings/Tools > Tools > Calculator. Enter numbers using your keypad. Press the navigation keys to enter operators (+ ÷ - ×) as indicated in the display. Press to enter a decimal. -
Page 163: Using The Stop Watch
Using the Stop Watch Your phone comes with a built-in stop watch. To use the stop watch: Press > Settings/Tools > Tools > Stop Watch. Press Options (right softkey) to choose Countdown, Lap Summary, Setup, or Reset. When you are ready to use the stop watch timer, press Start (left softkey). -
Page 164: Using The Tip Calculator
Using the Tip Calculator Your phone comes with a built-in tip calculator. To calculate tips: Press > Settings/Tools > Tools > Tip Calculator. Enter the bill amount (dollar amount) and press Enter the bill amount (cent amount) and press The default number of people paying the bill is one. To change it, press b to delete the number 1 and enter the number of people splitting the bill. -
Page 165: Using The Currency Converter
Using the Currency Converter Your phone comes with a built-in currency converter that lets you convert currency amounts if you know the exchange rate. To use the currency converter: Press > Settings/Tools > Tools > Currency Converter. Enter the bill amount (dollar amount) and press Enter the bill amount (cent amount) and press Enter the exchange rate (dollar amount) and press Enter the exchange rate (cent amount) and press... -
Page 166: Using The Unit Converter
Using the Unit Converter Your phone comes with a built-in unit converter that lets you convert a wide variety of units of measure. To use the unit converter: Press > Settings/Tools > Tools > Unit Converter. Select the type of unit to be converted: Area Energy Force... -
Page 167: Using Voice Records
Using Voice Records You can record brief records to remind yourself of important events, phone numbers, or grocery list items. You can also record phone conversations. Recording Voice Records To create a new Voice Record: Press > Settings/Tools > Tools > Voice Records. Press and begin recording after the prompt. -
Page 168: Playing Voice Records
Playing Voice Records To play the Voice Records you have recorded: Press > Settings/Tools > Tools > Voice Records. Press View All (right softkey). Use the navigation keys to scroll to a recording. Press to play the Voice Record. Tip: To make finding Voice Records easier, select Sort By ( Name , Date , Size , or Type ). -
Page 169: Using The File Manager
Using Other Voice Record Options You can also rename your Voice Records, use them as ringers, or delete them. To rename, set as ringer, or delete a Voice Record: Press > Settings/Tools > Tools > Voice Records. Press View All (right softkey) and press Use the navigation keys to scroll to the recording you want to work with. - Page 170 External Memory – This option allows you to view the properties of the files and folders stored on your microSD card, format an SD card, view the used and available memory in the phone’s memory and on the microSD card, and view the file manager Help screen.
- Page 171 Filter By – This option lets you view all the picture and video files in your phone’s memory, view only the picture files, or view only the video files. To manage your pictures and videos on your microSD card: Press >...
- Page 172 Using the Sounds Option The Sounds option lets you manage the audio files stored in your phone’s memory or on your microSD card. To manage your sounds in your phone’s memory: Press > Settings/Tools > Tools > File Manager. Select Sounds. Select In Phone to access sounds stored in your phone’s memory.
- Page 173 Do any of the following: Using your navigation keys, select the desired sound. Press Assign (left softkey) to assign the sound to any of the following: Set as a Ringer ID, Call with ID, Call without ID, Voicemail, Picture Mail, Text Message, Voice SMS, Calendar, or Alarm Using your navigation keys, select the desired sound.
- Page 174 Scroll to the file or folder you for which you want to view properties. To view files within a folder, select the folder. Press Properties (left softkey) to view details of the file or folder. To view memory usage: Press >...
-
Page 175: Using Your Phone's Voice Services
Sec tion 2H Using Your Phone’s Voice Services In This Section Voice Recognition — Dialing & Messaging Setting Up Voice Recognition Working With Voice Recognition Your phone’s voice-recognition software lets you place calls and perform quick tasks using just your voice, and Voice Records allows you to make recordings right on your phone. -
Page 176: Voice Recognition - Dialing & Messaging
Voice Recognition — Dialing & Messaging With Voice Recognition, you can place calls and perform tasks simply by speaking. You do not need any voice training to use Voice Recognition. You simply say the appropriate command in a normal tone of voice and your phone performs the desired function. - Page 177 If the name or number is not in Contacts, your phone tells you it cannot find a match. Calling Phone Numbers (Digit Dialing) To call a number that is not stored in your Contacts: Press and hold the Speaker Key. (Your phone displays the Say a command screen.) Say Call and then say a valid string of digits to be dialed, for example, say “Call 555 555 5555.”...
- Page 178 Note: You cannot send SMS Voice messages to Distribution Lists using Voice Recognition. Using Send Text <Name or #> Use Voice Recognition to open Text Messaging to the Create Message screen, with the recipient already addressed. To launch Text Messaging and address a message: Press and hold the Speaker Key.
- Page 179 Note: You cannot send Picture Mail to Distribution Lists using Voice Recognition . See the Experience Sprint Power Vision guide that came with your phone for information about Picture Mail. Section 2H: Using Your Phone’s Voice Services...
-
Page 180: Setting Up Voice Recognition
Setting Up Voice Recognition You can customize your phone’s Voice Recognition feature so that it works for you, the way you want it to. Using Choice Lists Your phone offers Choice Lists whenever it is not confident it has recognized a name or number correctly. In these cases, it displays a Choice List and prompts you with “Call?”... -
Page 181: Adapting Digit Dial
To adjust the Sensitivity setting: Press and hold the Speaker Key. (Your phone displays the Say a command screen.) Press Settings (left softkey). Highlight Sensitivity and press Using your navigation keys adjust the slider to the desired level. Press OK (left softkey). Adapting Digit Dial Some users with heavy accents or distinctive voices find it difficult to use Digit Dialing. - Page 182 Follow the prompts to complete the adaptation. Tips for adapting Digit Dial: Adapt digits in a quiet place. Make sure you wait for the beep before speaking. Speak clearly, but say each digit sequence naturally. If you make a mistake while recording a sequence of digits, or if an unexpected noise spoils the recording, you can say or select No when the prompt asks if the recording was OK.
- Page 183 To turn on or off all the audio prompts, select Prompts and then select On or Off. — or — To turn on or off the playback of digits spoken by you, select Digits and then select On or Off. —...
-
Page 184: Working With Voice Recognition
Working With Voice Recognition You can use Voice Recognition to easily perform tasks with your phone. You can look up entries stored in your Contacts, open applications or menus, and view or hear status information. Lookup <Name> You can find and display any Contacts entry by saying “Lookup”... - Page 185 Note: You can “go to” the following applications: Voicemail, Camera, Redial, and Received Calls. Using Check <Item> You can have the phone play back and display information about its current state, including its phone number, current signal strength, network coverage, and battery level. To see and hear status information: Press and hold the Speaker Key.
-
Page 186: Using The Microsd Card
Sec tion 2I Using the microSD Card In This Section Using Your Phone’s microSD Card and Adapter Working With the microSD Card Your phone allows you to use a microSD card and an adapter to expand the phone’s available memory space. This secure digital card enables you to quickly and easily exchange images, music, and voice data between SD-compatible devices. -
Page 187: Using Your Phone's Microsd Card And Adapter
Using Your Phone’s microSD Card and Adapter Your phone comes bundled with a microSD (Secure Digital) memory card and its adapter to expand the phone’s available memory space. You can purchase additional microSD cards with up to 2 GB in memory. - Page 188 Gently insert the microSD card into the cardholder as shown below. Use your fingertip to press in on the card until you hear a click. The card will stay firmly in place when inserted correctly. Tip: The writing on the microSD card should face up. Close the top of the cardholder.
-
Page 189: Removing The Microsd Card
Note: Make sure your battery is fully charged before using the microSD card. Your data may become damaged or unusable if the battery runs out while using the microSD card. — Be sure to use only recommended microSD cards (64MB 2GB). - Page 190 Press the card in and then release. The card should eject. Then gently slide out the microSD card from the cardholder. Close the top of the cardholder. Note: DO NOT remove your memory card while your phone is using it or writing files on it. Doing so will result in loss or damage of data.
-
Page 191: Using The Microsd Adapter
Using the microSD Adapter You can transfer files stored in your microSD card to an SD-compatible PC by using the microSD adapter. Because regular SD memory cards differ in size from microSD cards, their corresponding card slots differ as well. The microSD adapter is sized to fit in a regular-size card slot. - Page 192 Insert the microSD adapter into the appropriate slot in an SD-compatible PC. Select the files you want to copy from the card and drag them to the appropriate folder displayed on your PC. (Consult your operating system documentation for further details.) Then just remove the microSD adapter from the PC, remove the microSD card from the adapter and re-insert into your phone.
- Page 193 Sprint Music Store. For more information on using the Sprint Music Store, refer to the Experience Sprint Power Vision guide that came with your phone.
-
Page 194: Working With The Microsd Card
Working With the microSD Card Formatting the microSD Card Your phone automatically formats your microSD card. However, if you cannot save files on your microSD, you may need to format the card yourself. To format your microSD card: Insert the microSD card. See “Inserting the microSD Card”... -
Page 195: Using The Built-In Camera
Storing Pictures Shooting Videos Sending Pictures and Videos Using Sprint Picture Mail Your phone’s built-in camera and camcorder give you the ability to take full-color digital pictures and videos. You can use your phone to share your pictures and videos with others. It’s fun and easy to do. -
Page 196: Taking Pictures
Taking Pictures Taking pictures with your phone’s built-in camera is as simple as choosing a subject, pointing the lens, and pressing a button. Your camera features three different resolutions settings — Economy, Normal, or Fine — that let you balance the sharpness of the picture and the size of the file. - Page 197 Depending on your settings, you may be prompted to accept a data connection. Note: If this is the first time you have accessed your Sprint Picture Mail account, you will be prompted to create a password. See the Experience Sprint Power Vision guide that came with your phone for information about Picture Mail.
-
Page 198: Camera Options
Camera Options Your camera has many features that help you take professional-looking pictures quickly and easily. When the phone is in camera mode, press Options (right softkey) and then choose one of these features: Icons Display to show or hide your camera’s indicators from the viewfinder. - Page 199 Settings > Shutter Sound to set the sound your camera makes when you take a picture. Your phone offers you an array of choices. View All to view the pictures stored in My Albums (see page 182). Camcorder Mode to switch to Camcorder mode (see page 187).
-
Page 200: Storing Pictures
Storing Pictures You can store your pictures in your phone’s memory, your microSD card, and your Sprint Online Album. Your Sprint Online Album is your designated storage space on the Sprint Picture Mail Web site. My Albums After a picture is taken, it is automatically saved in the In Phone folder of My Albums. - Page 201 Send to transmit the picture to recipients in your Contacts or to send the picture to a variety of services, using Sprint Picture Mail. To Contacts to transmit the picture to recipients in your Contacts. To Services to send the picture to a variety of services, using Sprint Picture Mail.
- Page 202 Slideshow to display the pictures in letterbox and play a slide show. Filter By to control which item are shown: Show All, Pictures Only, or Videos Only. My Albums to return to the main My Albums menu. Storing Pictures in Your microSD Card Storing pictures in your microSD card frees up memory in My Phone and allows you to transfer photo files to other SD-compatible devices.
-
Page 203: Shooting Videos
Press If prompted, select a video mode: Video Mail to record a short video that can be sent using Sprint Picture Mail. Long Video to record a longer video (depending on space available on your microSD card). Using display screen as a viewfinder, aim the camcorder lens at your subject. -
Page 204: Picture Mail
Print to send the video to a printing service, using Sprint Picture Mail. Post To Service to send the video to a variety of services, using Sprint Picture Mail. Upload to upload the video you just shot to the Sprint Picture Mail Web site ( www.sprint.com/picturemail... -
Page 205: Camcorder Options
Camcorder Options Your phone’s camcorder has many features that help you shoot professional-looking videos quickly and easily. Note: Not all options will be available for all videos or from all menus. When the phone is in camcorder mode, press Options (right softkey) to access these features. -
Page 206: Storing Your Videos
Storing Your Videos You can store your videos in My Albums, your Sprint Online Album, and your microSD card. Your Sprint Online Album is your designated storage space on the Sprint Picture Mail Web site. My Albums After you shoot a video, it is automatically saved in the In Phone folder of My Albums. -
Page 207: Sending Pictures And Videos
Storing Videos in Your microSD Card Storing videos in your microSD card frees up memory in My Album and allows you to transfer video files to other SD-compatible devices. To save a video to the microSD card: Press > Pictures > My Albums > In Phone. Highlight a video you wish to save to the microSD card and then press . - Page 208 Confirm your recipients, message, voice recording, and picture or video. Press Send (left softkey) to send your picture mail. Note: The first time you send Sprint Picture Mail, you will be prompted to establish an account and password. Section 2J: Using the Built-in Camera...
- Page 209 Sending Pictures and Videos From Messaging You can also send pictures and videos from your Messaging menu, using the Picture Mail application. To send pictures and videos from the Messaging menu: Press > Messaging > Send Message > Picture Mail. Add up to 16 recipients for the message and press Next (left softkey).
-
Page 210: Using Sprint Picture Mail
You can use your personal computer to manage your pictures. From the Sprint Picture Mail Web site, you can share pictures and videos, create and edit albums, add captions, and organize files. You can even send your pictures to be printed at participating retail locations. -
Page 211: Uploading Pictures And Videos
Visiting the Sprint Picture Mail Web Site After you receive confirmation that your account has been registered, you can access the Sprint Picture Mail Web site and begin uploading and sharing pictures. To visit the Sprint Picture Mail Web site: Open your computer’s browser and go to... - Page 212 “Sending Pictures and Videos From My Albums” on page 190. Working With Pictures Stored Online You can manage the pictures you have uploaded to Sprint Picture Mail from your phone and online. You can create, view, and edit albums, download pictures to your phone, and share your albums.
- Page 213 . (The selected item will download and be placed in My Album.) Sharing Albums To send an album from the Sprint Picture Mail Web site: From the Picture Mail Web site (see steps 1-4 under “Downloading Pictures and Videos to Your Phone”), select an album, scroll to Album Options, and press Select Share Album: "<name>".
-
Page 214: Using The Built-In Media Player
— anywhere, anytime on the Nationwide Sprint PCS Network. Just access your media player from your phone's main menu, scroll to your choice of channel, and select one of the video or audio clips to play. It's like having a TV in the palm of your hand. -
Page 215: Your Multimedia Channel Options
Your Multimedia Channel Options Sprint TV offers a variety of accessible audio or video channels, depending on your Sprint service plan and multimedia subscriptions. Your subscription options include a comprehensive basic service as well as a full menu of additional channel options. -
Page 216: Accessing Media Player's Channel Listings
My Channels: These include the complimentary Previews channel that Sprint provides, as well as any available individual channels for which you have purchased access. If you have purchased Sprint TV, either through a Vision Plan subscription or by purchasing it separately, it will be displayed here. -
Page 217: Playing A Video Or Audio Clip
Playing a Video or Audio Clip To select and play a media clip: Press > Media Player. Use your keypad to enter a channel number (or use your navigation key to scroll to a channel and press My Channels: If you have selected a channel that you've already signed up for (or if it's a channel with no monthly fee), you will see a list of available clips. -
Page 218: Multimedia Faqs
Can I access a multimedia clip wherever I am, as long as I have my phone? As long as you are on the Nationwide Sprint PCS Network, you will have access to the audio and video clips. Note:... - Page 219 These channels are automatically displayed in the My Channels section of your channel listings. If I don't subscribe to a Sprint Power Vision Plan, will I still be able to view the multimedia clips? Yes. For service access charges, please consult your Sprint Service Plan or visit www.sprint.com...
- Page 220 How can I cancel service if I decide I don't want it? To cancel your Sprint TV Service, visit www.sprint.com sign on to My Sprint Wireless with your phone number and password. From this page, you have the ability to cancel the service or any Available Channels to which you subscribe.
-
Page 221: Using Bluetooth
Sec t ion 2L Using Bluetooth In This Section Turning Bluetooth On and Off Setting Up Your Bluetooth Transferring Files Between Your Phone and Your PC Bluetooth Profiles Your phone features built-in Bluetooth technology, allowing you to share information more easily than ever before. Bluetooth is a short-range communications technology that allows you to connect wirelessly to a number of Bluetooth devices, such as headsets and hands-free car kits, and Bluetooth-enabled... -
Page 222: Turning Bluetooth On And Off
Turning Bluetooth On and Off By default, your device’s Bluetooth functionality is turned off. Turning Bluetooth on allows your phone to connect to other Bluetooth-capable devices. To turn Bluetooth on or off: Press > Settings/Tools > Tools > Bluetooth. Press Options (right softkey). Highlight Settings and press Highlight the Bluetooth Power field and press Use your navigation key to select On or Off, as desired... -
Page 223: Setting Up Your Bluetooth
Setting Up Your Bluetooth You need to connect your phone to your Bluetooth headset before you can begin using it. To do this, you need to: Enter the name your phone uses for Bluetooth communication. Set your phone to be discovered by other Bluetooth devices. -
Page 224: Paired Devices
Find Me By enabling Find Me, you make your phone visible (or discoverable) to other Bluetooth equipped devices. To enable Find Me and make your phone visible to other Bluetooth devices: Press > Settings/Tools > Tools > Bluetooth. Highlight Find Me and press Your phone makes itself visible to other Bluetooth devices for three minutes. - Page 225 Note: Due to different specifications and features of other Bluetooth-compatible devices, display and operations may be different, and functions such as transfer or exchange may not be possible with all Bluetooth-compatible devices. After a connection is established with a device, no other device can connect to your phone until the currently connected device is disconnected.
-
Page 226: Transferring Files Between Your Phone And Your Pc
Press Options (right softkey) and select Properties to view information about your Bluetooth feature, including the Bluetooth Address. Transferring Files Between Your Phone and Your PC You can transfer files such as music, pictures, and video between your phone and Bluetooth-enabled PC or similar device. -
Page 227: Bluetooth Profiles
Bluetooth Profiles All of the Bluetooth settings you configure are stored in your phone’s Bluetooth user profile. Different profiles can be used for specific Bluetooth functions. File Transfer Profile (FTP) — This profile functions as a wireless data cable allowing the browsing and transfer of files using the Bluetooth client software available on most Bluetooth-enables PCs. - Page 228 Object Push Profile (OPP) — This profile functions as a mechanism to allow for the transfer of contact information. Contacts and your business card can be transferred to other Bluetooth devices using this profile. In addition, this profile allows the phone to accept and receive contact and business card information from other Bluetooth devices.
-
Page 229: Section 3: Service Features
Section 3 Service Features... -
Page 230: Sprint Service Features: The Basics
Using Call Forwarding Updating Phone Software Now that you’ve mastered your phone’s fundamentals, it’s time to explore the calling features that enhance your Sprint Service. This section outlines your basic Sprint Service features. Section 3A: Sprint Service Features: The Basics... -
Page 231: Using Voicemail
Your phone accepts messages even when it is turned off. However, you are only notified of new messages when your phone is turned on and you are in a Sprint service area. Section 3A: Sprint Service Features: The Basics... -
Page 232: Retrieving Your Voicemail Messages
Enter your passcode. Tip: When you call into voicemail, you first hear the header information (date, time, and sender information) for the message. To skip directly to the message, press during the header. Section 3A: Sprint Service Features: The Basics... -
Page 233: Voicemail Options
Press to change your Personal Options, following the system prompts. Press for Settings. Press for Group Distribution Lists. Follow the voice prompts to create, edit, rename, or delete group lists. Section 3A: Sprint Service Features: The Basics... - Page 234 To return a call directly from voicemail: Press after listening to a message. Voicemail-to-Voicemail Message You can record and send a voicemail message to other Sprint Voicemail users. To record and send a voicemail message: From the main voicemail menu, press to send a message.
-
Page 235: Clearing The Message Icon
Extended Absence Greeting When your phone is turned off or you are off the Nationwide Sprint PCS Network for an extended period, this greeting can be played instead of your normal personal greeting. To record an extended absence greeting:... -
Page 236: Voicemail Menu Key
Numeric Paging to a Wireless Phone Return to Personal Options Menu Greetings Main Greeting Recorded Name Extended Absence Greeting Return to Personal Options Menu Expert Mode (On/Off) Return to Personal Options Menu Place a Call Exit Section 3A: Sprint Service Features: The Basics... -
Page 237: Using Sms Text Messaging
When you have entered all the recipients, press Next. Scroll to Message and compose your message. To type a message, use your keypad to enter your message. Press Options (right softkey) to select a character input mode. Section 3A: Sprint Service Features: The Basics... - Page 238 If you want to receive a receipt when you send your message, select the Return Receipt check box. If your message is urgent, select the Urgent check box. Review your message and press Send (left softkey). Section 3A: Sprint Service Features: The Basics...
-
Page 239: Using Sms Voice Messaging
SMS Voice message and follow the system prompts. To activate SMS Voice messages: Press Contacts (right softkey). Highlight an entry you want to send an SMS Voice message. Press Send MSG (left softkey) and select Voice SMS. Section 3A: Sprint Service Features: The Basics... -
Page 240: Playing An Sms Voice Message
Use your keypad to enter a recipient’s phone number under Add Mobile #:. Use your keypad to enter a recipient’s phone number under Add Email:. When you have entered all the recipients, press Next. Press Record (left softkey). Section 3A: Sprint Service Features: The Basics... - Page 241 Select Voice SMS. Press Record (left softkey). Start recording after the beep. (You can record up to two minutes.) When you finish recording, press Done (left softkey). Press Send (left softkey) to send the message. Section 3A: Sprint Service Features: The Basics...
-
Page 242: Using Caller Id
Press Enter the number you want to call. Press To permanently block your number, call Sprint Customer Service. Responding to Call Waiting When you’re on a call, Call Waiting alerts you to incoming phone calls. Your display screen alerts you that another call is coming in and shows the caller’s number (if it is available). -
Page 243: Making A Three-Way Call
If one of the people you called hangs up during your call, you and the remaining caller stay connected. If you initiated the call and are the first to hang up, all other callers are disconnected. Section 3A: Sprint Service Features: The Basics... -
Page 244: Using Call Forwarding
Call Forwarding.) To deactivate Call Forwarding: *720 Press Press . (You will hear a tone to confirm the deactivation.) Note: You are charged a higher rate for calls you have forwarded. Section 3A: Sprint Service Features: The Basics... -
Page 245: Updating Phone Software
After the software update is complete, your phone powers off and then powers back on. If software updates are available, Sprint may send a request to your phone asking you to update your phone's software. This request will appear as a message on your phone's display. -
Page 246: Sprint Voice Command
Making a Call With Sprint Voice Command Getting Information With Sprint Voice Command With Sprint Voice Command, reaching your friends, family, and coworkers has never been easier — especially when you’re on the go. You can even listen to Web-based information, such as news, weather, and sports. -
Page 247: Getting Started With Sprint Voice Command
Contacts or address book. It’s Easy to Get Started There are two easy ways to sign up for Sprint Voice Command: Sign up when you purchase and activate your phone. -
Page 248: Creating Your Own Address Book
Your address book can store up to 20 voice recorded names at once. Call Sprint 411. If you don’t have a computer or Internet access handy, you can have Sprint 411 look up phone numbers for you and automatically add them to your address book. -
Page 249: Making A Call With Sprint Voice Command
Say “No” if you wish to cancel. Tip: Keep in mind that Sprint Voice Command recognizes not only your voice, but any voice, so that others can experience the same convenience if they use your phone. -
Page 250: Getting Information With Sprint Voice Command
— or — Simply say “Call news room,” “Call the weather,” “Call Sports Central,” etc. Note: Sprint Voice Command is not available while roaming off the Sprint National Network. Section 3B: Sprint Voice Command... -
Page 251: Section 4: Safety And Warranty Information
Section 4 Safety and Warranty Information... -
Page 252: Important Safety Information
S e c t i o n 4 A Important Safety Information In This Section General Precautions Safety and General Information Using Your Phone With a Hearing Aid Battery Tips Specific Absorption Rate Data Owner’s Record Phone Guide Proprietary Notice Information From the World Health Organization Product Registration Export Law Assurances... -
Page 253: General Precautions
General Precautions There are several simple guidelines to operating your phone properly and maintaining safe, satisfactory service. Hold the phone with the antenna raised, fully-extended, and over your shoulder. Try not to hold, bend, or twist the phone’s antenna. Don’t use the phone if the antenna is damaged. Speak directly into the mouthpiece. -
Page 254: Safety And General Information
Safety and General Information This section contains important information on the safe and efficient operation of your mobile device. Read this information before using your mobile device. AgION Antimicrobial — Built-in Protection for Your Phone Motorola has incorporated AgION antimicrobial into the painted surfaces of your phone to help provide protection against a broad range of product damaging mold and mildew. - Page 255 Benefits of AgION AgION antimicrobial technology helps provide protection against product damaging microbes on the painted surfaces of the phone. AgION antimicrobial is effective in protecting the product against a broad spectrum of microbes. AgION helps inhibit the ability of microbes to grow and spread on the painted surfaces of the phone.
-
Page 256: Rf Operational Characteristics
The active ingredient in AgION is silver, in the form of silver ions. Accreditation The AgION antimicrobial compound is registered with the Environmental Protection Agency (EPA) as a preservative and bacteriostatic agent for use in the manufacturing of polymers and plastics. NSF, FDA-listed. -
Page 257: Phone Operation
Australian Communications Authority Radiocommunications (Electromagnetic Radiation - Human Exposure) Standard 2003. ANATEL, Brasil Regulatory Authority, Resolution 303 (July 2, 2002) "Regulation of the limitation of exposure to electrical, magnetic, and electromagnetic fields in the radio frequency range between 9 kHz and 300 GHz." "Attachment to Resolution 303 from July 2, 2002."... -
Page 258: Operational Precautions
Body-worn Operation To maintain compliance with FCC RF exposure guidelines, if you wear a radio product on your body when transmitting, always place the radio product in a Motorola approved clip, holder, holster, case or body harness for this product. Use of non-Motorola-approved accessories may exceed FCC RF exposure guidelines. - Page 259 damage the mobile device and/or may result in your device not complying with local regulatory requirements in your country. DO NOT hold the external antenna when the mobile device is IN USE. Holding the external antenna affects call quality and may cause the mobile device to operate at a higher power level than needed.
-
Page 260: Implantable Medical Devices
In an aircraft, turn off your mobile device whenever instructed to do so by airline staff. If your mobile device offers an airplane mode or similar feature, consult airline staff about using it in flight. Implantable Medical Devices A minimum separation of six (6) inches should be maintained between a handheld wireless phone and an implantable medical device, such as a pacemaker or implantable cardioverter defibrillator, to avoid potential interference with the device. -
Page 261: Operational Warnings
Responsible driving practices can be found in the “Smart Practices While Driving” section of this guide and/or at the Motorola Web site: www.motorola.com/callsmart Automobile Air Bags Do not place a mobile device in the air bag deployment area. Operational Warnings Obey all posted signs when using mobile devices in public areas, such as health care facilities or blasting areas. -
Page 262: Choking Hazards
Caution: To avoid risk of personal injury, do not dispose of your battery in a fire. Your battery, charger, or mobile device may contain symbols, defined as follows: Symbol Definition Important safety information follows. 032374o Do not dispose of your battery or mobile device 032376o in a fire. -
Page 263: Caution About High Volume Usage
receives a substantial impact. If glass breaks, do not touch or attempt to remove. Stop using your mobile device until the glass is replaced by a qualified service center. Seizures/Blackouts Some people may be susceptible to epileptic seizures or blackouts when exposed to flashing lights, such as when playing video games. -
Page 264: Using Your Phone With A Hearing Aid
Using Your Phone With a Hearing Aid A number of Sprint phones have been tested for hearing aid compatibility. When some wireless phones are used with certain hearing aids, users may detect a noise which can interfere with the effectiveness of the hearing aid. - Page 265 30 days of purchase. With the Sprint 30-day Risk- Free Guarantee, you may return the phone within 30 days of purchase for a full refund.
-
Page 266: Battery Tips
Battery Tips Battery life depends on the network, signal strength, temperature, features, and accessories you use. Always use Motorola Original batteries and chargers. The warranty does not cover damage caused by non-Motorola batteries and/or chargers. New batteries or batteries stored for a long time may take more time to charge. -
Page 267: Specific Absorption Rate Data
Specific Absorption Rate Data This model wireless phone meets the government’s requirements for exposure to radio waves. Your wireless phone is a radio transmitter and receiver. It is designed and manufactured not to exceed limits for exposure to radio frequency (RF) energy set by the Federal Communications Commission (FCC) of the U.S. - Page 268 each government for safe exposure. The tests are performed in positions and locations (e.g., at the ear and worn on the body) reported to the FCC and available for review by Industry Canada. The highest SAR value for this model phone when tested for use at the ear is 1.53 W/kg, and when worn on the body, as described in this user guide, is 1.41 W/kg.
-
Page 269: Information From The World Health Organization
Information From the World Health Organization WHO Information Present scientific information does not indicate the need for any special precautions for the use of mobile phones. If you are concerned, you may want to limit your own or your children’s RF exposure by limiting the length of calls or by using hands-free devices to keep mobile phones away from your head and body. -
Page 270: Owner's Record
Record the serial number in the space provided below. This will be helpful if you need to contact us about your phone in the future. Model: Motorola Deluxe ic902 Serial No.: Phone Guide Proprietary Notice... -
Page 271: Wireless: The New Recyclable
Wireless: The New Recyclable Your wireless phone can be recycled. Recycling your wireless phone reduces the amount of waste disposed in landfills and allows recycled materials to be incorporated into new products. The Cellular Telecommunications Industry Association (CTIA) and its members encourage consumers to recycle their phones and have taken steps to promote the collection and environmentally sound recycling of end-of-life wireless devices. -
Page 272: Smart Practices While Driving
Smart Practices While Driving Drive Safe, Call Smart Check the laws and regulations on the use of mobile devices and their accessories in the areas where you drive. Always obey them. The use of these devices may be prohibited or restricted in certain areas. Contact for more information. - Page 273 Do not engage in stressful or emotional conversations that may be distracting. Make people you are talking with aware you are driving and suspend conversations that can divert your attention away from the road. Use your mobile device to call for help. Dial 911 or other local emergency number in the case of fire, traffic accident, or medical emergencies.
-
Page 274: Declaration Of Conformity
Declaration of Conformity Per FCC CFR 47 Part 2 Section 2.1077(a) Responsible Party Name: Motorola, Inc. Address: 8000 West Sunrise Boulevard Plantation, FL 33322 USA Phone Number: 1 (800) 453-0920 Hereby declares that the product: Product Name: ic902 Model Number: H93ZAH9JR7AN Conforms to the following regulations: FCC Part 15, subpart B, section 15.107(a), 15.107(d) and section 15.109(a) - Page 275 Note: This equipment has been tested and found to comply with the limits for a Class B digital device, pursuant to part 15 of the FCC Rules. These limits are designed to provide reasonable protection against harmful interference in a residential installation. This equipment generates, uses and can radiate radio frequency energy and, if not installed and used in accordance with the instructions, may cause harmful interference to radio...
-
Page 276: California Perchlorate Label
California Perchlorate Label Some mobile phones use an internal, permanent backup battery on the printed circuit board that may contain very small amounts of perchlorate. In such cases, California law requires the following label: “Perchlorate Material - special handling may apply. See .”... -
Page 277: Privacy And Data Security
Privacy and Data Security Motorola understands that privacy and data security are important to everyone. Because some features of your mobile device may affect your privacy or data security, please follow these recommendations to enhance protection of your information: Monitor access —Keep your mobile device with you and do not leave it where others may have unmonitored access. - Page 278 If you have further questions regarding how use of your mobile device may impact your privacy or data security, please contact Motorola at , or contact Sprint Customer privacy@motorola.com Service. Section 4A: Important Safety Information...
-
Page 279: Manufacturer's Warranty
If for any reason you have a problem with your equipment, please refer to the manufacturer’s warranty in this section. For information regarding the terms and conditions of service for your phone, please visit www.sprint.com or Sprint Customer Service at 1-888-211-4727. Section 4B: Manufacturer’s Warranty... -
Page 280: Motorola Limited Warranty
Motorola Limited Warranty for the United States and Canada What Does this Warranty Cover? Subject to the exclusions contained below, Motorola, Inc. warrants its telephones, pagers, messaging devices, and consumer and professional two-way radios (excluding commercial, government or industrial radios) that operate via Family Radio Service or General Mobile Radio Service, Motorola- branded or certified accessories sold for use with these Products (“Accessories”) and Motorola software contained on CD-ROMs or... - Page 281 Products Covered Length of Coverage Monaural Headsets Limited lifetime warranty for the Ear buds and boom lifetime of ownership by the headsets that first consumer purchaser of the transmit mono product. sound through a wired connection. Consumer and Ninety (90) days from the date of Professional Two-Way purchase by the first consumer Radio Accessories.
-
Page 282: Who Is Covered
Motorola, or its authorized service centers, are excluded from coverage. Altered Products. Products or Accessories with (a) serial numbers or date tags that have been removed, altered or obliterated; (b) broken seals or that show evidence of tampering; (c) mismatched board serial numbers;... -
Page 283: What Will Motorola Do
What Will Motorola Do? Motorola, at its option, will at no charge repair, replace or refund the purchase price of any Products, Accessories or Software that does not conform to this warranty. We may use functionally equivalent reconditioned/refurbished/pre-owned or new Products, Accessories or parts. -
Page 284: What Other Limitations Are There
What Other Limitations Are There? ANY IMPLIED WARRANTIES, INCLUDING WITHOUT LIMITATION THE IMPLIED WARRANTIES OF MERCHANTABILITY AND FITNESS FOR A PARTICULAR PURPOSE, SHALL BE LIMITED TO THE DURATION OF THIS LIMITED WARRANTY, OTHERWISE THE REPAIR, REPLACEMENT, OR REFUND AS PROVIDED UNDER THIS EXPRESS LIMITED WARRANTY IS THE EXCLUSIVE REMEDY OF THE CONSUMER, AND IS PROVIDED IN LIEU OF ALL OTHER WARRANTIES, EXPRESS OR IMPLIED. -
Page 285: Service And Repairs
Service and Repairs Go to www.motorola.com/iden/support, where you can select from a number of customer care options. You can also contact the Motorola Customer Support Center at 1-800-734-5580 (United States), 1-888-390-6456 (TTY/TDD United States for hearing impaired), or 1-800-461-4575 (Canada). Section 4B: Manufacturer’s Warranty... -
Page 286: Index
Index Prepending a Phone Number 116 Saving a Phone Number Abbreviated Dialing 45 Accessories 30 Saving Walkie-Talkie Charger 30 Information 118 Li-Ion Battery 30 Viewing Phone Calls 112 AgION antimicrobial 236 Viewing Walkie-Talkie Calls Airplane Mode 84 Alarm Clock 143 Call Waiting 224 Auto-Answer Mode 87 Caller ID 224... - Page 287 Adding a Phone Number Setting Up 61 Adding an Entry 125 Entering Text Categories 132 Numbers 34 Creating An Entry 125 Symbols 34 Date 127 Word English Text Input 32 Distribution Lists 128 Editing an Entry 129 Email Address 124, 127 File Manager 151 Entry Consists Of 121 Erasing 102, 133...
- Page 288 Your Numbers 23 Operator Services 7 Phone Settings 71–88 Setting Up 2 Any Key 87 Sprint 411 7 Auto-Answer Mode 87 Sprint Customer Service 6 Call Answer Mode 87 Voicemail 4 Display Settings 75–77 www.sprint.com 6 Location Settings 79 Set Time/Date 78...
- Page 289 Voicemail Special Numbers 97 Menu Key 218 Speed Dialing 47 Options 215 Sprint 411 7 Retrieving 214 Sprint Customer Service 6 Setting Up 4, 213 Sprint Power Picture Mail Volume 74 Downloading Pictures 195 Password 192 Walkie-Talkie Button Light 76...