Zenith ZDX-313 Installation And Operating Manual
Hide thumbs
Also See for ZDX-313:
- Installation and operating manual (40 pages) ,
- Service manual (136 pages)
Table of Contents
Advertisement
Quick Links
Download this manual
See also:
Service Manual
Advertisement
Table of Contents

Related Manuals for Zenith ZDX-313


Summary of Contents for Zenith ZDX-313
- Page 1 V9810MZ.NA1ULZ_RV0016P_ENG Installation and Operating Guide | Warranty Model Number | ZDX - 313 | DVD Player + Video Cassette Recorder...
- Page 2 CAUTION RISK OF ELECTRIC SHOCK DO NOT OPEN CAUTION: TO REDUCE THE RISK OF ELECTRIC SHOCK DO NOT REMOVE COVER (OR BACK) NO USER-SERVICEABLE PARTS INSIDE REFER SERVICING TO QUALIFIED SERVICE CAUTION: This product employs a Laser PERSONNEL. System. To ensure proper use of this product, This lightning flash with arrowhead symbol please read this owner’s manual careful- within an equilateral triangle is intended to...
- Page 3 FCC WARNING: This equipment may generate or CAUTION concerning the Power Cord use radio frequency energy. Changes or modifica- Most appliances recommend they be placed upon tions to this equipment may cause harmful interfer- a dedicated circuit; ence unless the modifications are expressly That is, a single outlet circuit which powers only that approved in the instruction manual.
-
Page 4: Important Safety Instructions
IMPORTANT SAFETY INSTRUCTIONS CAUTION: PLEASE READ AND OBSERVE ALL WARNINGS AND INSTRUCTIONS IN THIS OWNER’S MANUAL. AND THOSE MARKED ON THE PRODUCT. RETAIN THIS BOOKLET FOR FUTURE REFERENCE. This product has been designed and manufactured to assure personal safety. Improper use can result in electric shock or fire hazard. -
Page 5: Table Of Contents
VCR Tape Recording ....23-26 Contents Basic Instructions .....23 Timer Recording . -
Page 6: Introduction
Introduction To ensure proper use of this product, please read this About the Symbol Display owner’s manual carefully and retain for future refer- ence. “ ” may appear on your TV display during opera- tion and indicates that the function is not permitted by This manual provides information on the operation this unit or the disc or not available at that time. -
Page 7: Types Of Playable Discs
Types of Playable Discs Disc-related terms MP3 is a popular compression format used for digital (8 cm / 12 cm disc) audio files that yields very high near-CD quality sound. Audio CD (8 cm / 12 cm disc) Windows Media Audio file. A type of coding / decod- ing developed by Microsoft Corp. -
Page 8: Notes On Copyrights
Regional Code About the Remote Control This DVD+VCR is designed and Operation Range manufactured for playback of region “1” encoded DVD soft- Point the Remote Control at the remote sensor and ware. This unit can play only DVD press the buttons. discs labeled “1”... -
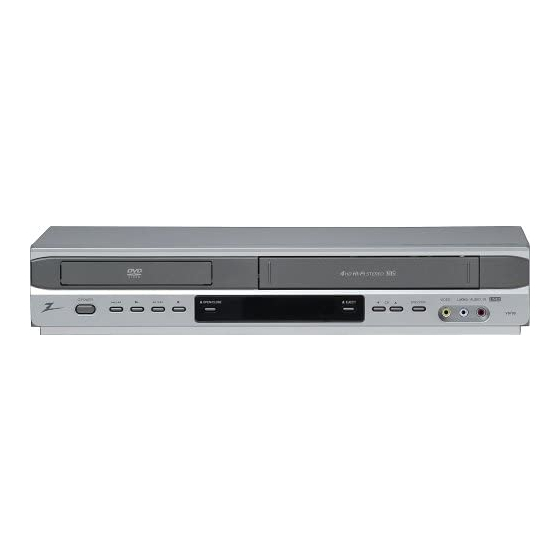
Page 9: Front Panel
Front Panel d e f g Disc Tray (DVD deck) Display Windows Insert a disc here. The DVD deck is selected. Cassette Compartment (VCR deck) A disc is in the DVD deck. Insert a video cassette here. (Lights when a disc is in the DVD deck 1 POWER and Flashes when no disc.) Switches the DVD+VCR ON and OFF. -
Page 10: Remote Control
Remote Control TV Control Buttons - POWER: Switches TV ON and OFF. - INPUT: Selects the TV’s source. - CH +/-: Selects TV’s channel. - VOL +/-: Adjusts TV’s volume. - MUTE: Turns on or off TV sound. DISC MENU Accesses menu on a DVD disc. -
Page 11: Rear Panel
Rear Panel Caution Do not touch the inner pins of the jacks on the rear panel. Electrostatic discharge may cause permanent damage to the unit. b c d e ANT.IN AUDIO OUT (Left/Right) (DVD OUT) Connect the VHF/UHF/CATV antenna to this terminal. Connect to a TV or other equipment with audio inputs. -
Page 12: Connecting An Antenna Or Cable Tv
Connecting an Antenna To view or record a CATV channel Connecting an Antenna or Cable TV or Cable TV 1. Tune the TV to the DVD+VCR output channel (CH 3 or 4). a Antenna 2. Set the DVD+VCR channel selector to the cable output channel. -
Page 13: Optional Tv Connections
RF coaxial connection Optional TV Connections Optional TV Connections Connect the RF.OUT jack on the DVD+VCR to the These connections support only DVD playback. The antenna in jack on the TV using the supplied 75-ohm tuner and VCR still output through the RF.OUT (R) or Coaxial Cable (R). - Page 14 Connecting to an amplifier equipped with two chan- Accessory Audio/Video (A/V) Connections to nel digital stereo (PCM) or to an Audio/Video receiv- DVD+VCR er equipped with a multi-channel decoder (Dolby Connect the VCR IN LINE 1 or LINE 2 jacks on the Digital™, MPEG 2, or DTS) DVD+VCR to the audio/video out jacks on your 1.
-
Page 15: Initial Settings - Vcr
AUTO CLOCK SET Initial Settings - VCR Initial Settings - VCR • The Auto Clock Set feature is set to ON at the fac- tory. In the ON setting, the DVD+VCR looks for a By using the VCR Setup menu, you can make channel carrying XDS (Extended Data Services) various adjustments to items such as clock setting, information. -
Page 16: Tuning
TUNING SETUP This DVD+VCR is equipped with a frequency synthe- sized tuner capable of receiving up to 181 channels. These include VHF channels 2-13, UHF channels 14-69 and CATV channels 1-125. Auto Channel Programming FUNCTION OSD The on-screen display can be turned on or off. AUDIO MODE The DVD+VCR has two separate audio playback sys- tems, the high quality VHS Hi-Fi system and standard... -
Page 17: Initial Settings - Dvd
Initial Settings - DVD LANGUAGE Initial Settings - DVD By using the DVD Setup menu, you can make vari- ous adjustments to items such as picture and sound. You can also set a language for the subtitles and the Setup menu, among other things. For details on each Setup menu item, see pages 17 to 20. -
Page 18: Display
4. When the confirm menu appears on your screen DISPLAY “Cancel” is highlighted as default. Use the b button to highlight “Enter”. 5. Pressing ENTER will set this unit to progressive scan mode. TV Aspect Notes: 4:3 : Select when a standard 4:3 TV is connected. •... -
Page 19: Audio
AUDIO OTHERS Each DVD disc has a variety of audio output options. The Auto Play, and B.L.E. settings can be changed. Set this unit’s AUDIO options according to the type of audio system you use. Auto Play Dolby Digital / DTS / MPEG You can set up the DVD+VCR so a DVD disc auto- Bitstream: Select “Bitstream”... -
Page 20: Lock (Parental Control)
LOCK (Parental Control) 4. Press ENTER to confirm your rating selection, then press SETUP to exit the menu. 5. Press OPEN/CLOSE (Z) to activate parental control. Password (Security Code) You can enter or change password. 1. Select “Password” on the LOCK menu then press 2. -
Page 21: Operation
Operation This chapter describes how to operate the VCR and Manual Tracking DVD. To manually adjust the tracking use the VCR T ape Playback ape Playback VCR T CH/TRK (v/V) buttons on the Remote Control or CH (v/V) on the front panel during playback. Press the VCR button to select the device to be oper- Notes: ated. -
Page 22: Slow Motion
Slow Motion During slow motion, audio is muted and horizontal lines (noise bars) may appear on the TV screen. This is normal. 1 While in still mode, press FORWARD (M). The tape is played at a speed 1/19 times slower than the normal speed. -
Page 23: Vcr Tape Recording
VCR T ape Recording To record one TV program while watching VCR T ape Recording another Basic Instructions 1. Press TV/VCR to select the TV mode during recording. The TV indicator appears. 1. Turn on the DVD+VCR and TV. 2. Using the TV, select the channel to be viewed. 2. - Page 24 Channel: Select a TV channel, LINE1 or LINE2. If Checking or Erasing the Timer Program you have CABLE TV and use a cable box (con- verter) you must set the channel to match the Programming can be checked whenever the cable box output channel (usually CH 3 or 4).
-
Page 25: Instant Timer Recording
Instant Timer Recording Extending the Recording Time With this feature you can record for a preset length without using the program timer. The recording time can be extended anytime by 1. Turn on DVD+VCR and the TV. pressing REC/ITR (z). Subsequent presses result in advancing the recording time by 30-minute 2. -
Page 26: Copying From Dvd To Vcr
Copying from DVD to VCR Each press of the ENTER changes the TV screen in the following sequence. You can copy the contents of a DVD to a VHS tape. STOP CH 4 STEREO 1. Insert the disc you wish to copy into the DVD deck and close the disc tray. -
Page 27: Additional Vcr Information
Additional VCR Information S-VHS Quasi Playback (SQPB) Additional VCR Information • During manual recording, timer recording, Instant • This DVD+VCR can play back S-VHS recorded Timer Recording, playback, or fast forward tapes, however, it cannot make recordings using modes, the DVD+VCR automatically starts S-VHS format tapes. -
Page 28: Playing A Dvd
Playing a DVD General Features Playing a DVD Notes: Playback Setup Unless stated otherwise, all operations described use the Remote Control. Some features may also be avail- 1. Turn on the TV and select the video input source able on the Setup menu. connected to the DVD+VCR. -
Page 29: Still Picture And Frame-By-Frame Playback
Still Picture and Frame-by-Frame Playback Repeat You can repeat a title/chapter on a disc. Press REPEAT during playback to select a desired 1. Press PAUSE/STEP (X) during playback. repeat mode. Advance the picture frame-by-frame by pressing PAUSE/STEP (X) repeatedly. • Chapter: repeats the current chapter. 2. -
Page 30: Last Scene Memory
Special DVD Features Special DVD Features Last Scene Memory This player memorizes last scene from the last disc Checking the contents of DVD discs: Menus that is viewed. The last scene remains in memory even if you remove the disc from the player or switch DVDs may offer menus that allow you to access off the player. -
Page 31: On-Screen Display - Dvd
On-Screen Display - DVD Maintenance and Service On-Screen Display - DVD Maintenance and Service You can display the general playback status on the Refer to the information in this chapter before con- TV screen. Some items can be changed using the tacting a service technician. -
Page 32: Playing An Audio Cd Or Mp3/Wma Disc
Playing an Audio CD or Playing an Audio CD or MP3 / WMA disc compatibility with this player is limited as follows: MP3/WMA Disc MP3/WMA Disc • Sampling frequency: within 8 - 48 kHz (MP3), within 32 - 48kHz (WMA) The DVD+VCR can play MP3/WMA formatted record- •... -
Page 33: Audio Cd And Mp3 / Wma Disc Features
Audio CD and MP3 / WMA Audio CD and MP3 / WMA Random Disc Features Disc Features 1. Press RANDOM during playback. Random Playback begins immediately and “Random” appears on the menu screen. Pause 2. To return to normal playback, press RANDOM 1. -
Page 34: Programmed Playback
Programmed Playback Repeat Programmed Tracks Programmed Playback 1. Press REPEAT when playing a disc. The repeat icon appears. The program function enables you to store your favourite tracks from any disc in the player memory. 2. Press REPEAT to select a desired repeat mode. A program can contain 30 tracks. -
Page 35: Viewing A Jpeg Disc
iewing a JPEG Disc iewing a JPEG Disc Slide Show JPEG Use v V b B to highlight the (Slide Show) then Using this DVD+VCR you can view discs with JPEG press ENTER. files. 1. Insert a disc and close the tray. The PHOTO Still Picture JPEG menu appears on the TV screen. -
Page 36: Reference
Reference Language Codes Use this list to input your desired language for the following initial settings: Disc Audio, Disc Subtitle, Disc Menu. Language Code Language Code Language Code Language Code Abkhazian 6566 Fiji 7074 Lingala 7678 Singhalese 8373 Afar 6565 Finnish 7073 Lithuanian... -
Page 37: Troubleshooting
roubleshooting roubleshooting Check the following guide for the possible cause of a problem before contacting service. Symptom Cause Correction The power cord is disconnected. Plug the power cord into the wall out- No power. let securely. Refer to page 8. The power is on, but DVD or VCR button is not switched the DVD+VCR does... - Page 38 Symptom Cause Correction An unplayable disc is inserted. Insert a playable disc. (Check the disc The DVD+VCR does type and Regional code.) not start playback. The disc is placed upside down. Place the disc with the playback side down. Place the disc on the disc tray correctly The disc is not placed within the inside the guide.
-
Page 39: Specifications
Specifications Specifications General Power requirements 120V, 60 Hz Power consumption 16 W Dimensions (approx.) 16.9" X 3.1" X 10.4" (430 X 78.5 X 265 mm) (w x h x d) Weight (approx.) 9.24 lbs (4.2 kg) Operating temperature 5˚C to 40˚C (41˚F to 104˚F) Operating humidity 5 % to 90 % Signal system... - Page 40 Return Authorization (RA). If the defect has occurred during the first 90 days of the Warranty Period, Zenith will send you a return-shipping label. After you obtain an RA for return, please box your unit with a legible copy of the sales receipt and enough packing material to ensure undamaged delivery of your product.