Table of Contents
Advertisement
Advertisement
Table of Contents

Related Manuals for Asus M4N78-AM V2


Summary of Contents for Asus M4N78-AM V2
- Page 1 M4N78-AM V2...
- Page 2 Product warranty or service will not be extended if: (1) the product is repaired, modified or altered, unless such repair, modification of alteration is authorized in writing by ASUS; or (2) the serial number of the product is defaced or missing.
-
Page 3: Table Of Contents
Contents Notices ......................v Safety information ..................vi About this guide ..................vi M4N78-AM V2 specifications summary ..........viii Chapter 1: Product introduction Before you proceed ..............1-1 Motherboard overview ..............1-2 1.2.1 Motherboard layout ............1-2 1.2.2 Layout contents ............... 1-2 Central Processing Unit (CPU) ........... - Page 4 Boot menu .................. 2-14 2.6.1 Boot Device Priority ............2-14 2.6.2 Boot Settings Configuration .......... 2-14 2.6.3 Security ................. 2-15 Tools menu ................. 2-16 2.7.1 ASUS EZ Flash 2 ............2-16 2.7.2 AI NET 2................ 2-16 Exit menu ..................2-16...
-
Page 5: Notices
Complying with the REACH (Registration, Evaluation, Authorisation, and Restriction of Chemicals) regulatory framework, we published the chemical substances in our products at ASUS REACH website at http://green.asus.com/english/REACH.htm. DO NOT throw the motherboard in municipal waste. This product has been designed to enable proper reuse of parts and recycling. -
Page 6: Safety Information
Safety information Electrical safety • To prevent electric shock hazard, disconnect the power cable from the electric outlet before relocating the system. • When adding or removing devices to or from the system, ensure that the power cables for the devices are unplugged before the signal cables are connected. If possible, disconnect all power cables from the existing system before you add a device. -
Page 7: Conventions Used In This Guide
Refer to the following sources for additional information and for product and software updates. ASUS websites The ASUS website provides updated information on ASUS hardware and software products. Optional documentation Your product package may include optional documentation, such as warranty flyers, that may have been added by your dealer. -
Page 8: M4N78-Am V2 Specifications Summary
Supports NVIDIA Hybrid SLI Technology (for Windows ® ® ® Vista only) * Refer to www.asus.com for details on how to use Hybrid SLI ® Expansion slots 1 x PCIe x16 slot 1 x PCIe x1 slot 2 x PCI slots... - Page 9 M4N78-AM V2 specifications summary Supports up to 10 USB 2.0/1.1 ports (6 ports at mid-board, 4 ports at the back panel) Broadcom B5071 PHY Gigabit LAN ASUS special features ASUS Turbo Key ASUS Q-Fan ASUS CrashFree BIOS3 ASUS EZ Flash2...
-
Page 10: Chapter 1: Product Introduction
Chapter 1 Product introduction Thank you for buying an ASUS M4N78-AM V2 motherboard! ® Before you start installing the motherboard, and hardware devices on it, check the items in your motherboard package. Refer to page ix for the list of accessories. -
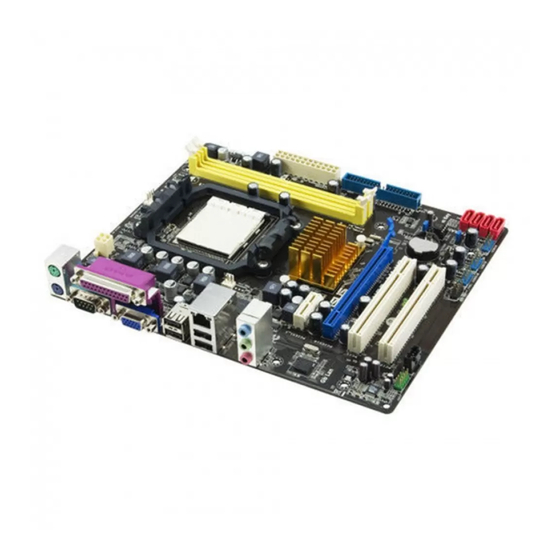
Page 11: Motherboard Overview
IDE connector (40-1 pin PRI_IDE) 1-11 14. Front panel audio connector (10-1 pin AAFP) 1-10 Internal speaker connector (4-pin SPEAKER) 15. Digital audio connector (4-1 pin SPDIF_OUT) 1-14 Clear RTC RAM (3-pin CLRTC) 16. Keyboard power (3-pin KBPWR) ASUS M4N78-AM V2... -
Page 12: Central Processing Unit (Cpu)
Central Processing Unit (CPU) This motherboard supports AMD Phenom™ II / Athlon™ II / Phenom™ / Athlon™ / ® Sempron™ Family processors. The AM2+ socket has a different pinout from the 940-pin socket designed for the AMD Opteron™ processor. Use a CPU that is designed for the AM2+ socket. System memory 1.4.1 Overview... - Page 13 OS if you want to install 4GB or more memory on the ® motherboard. • This motherboard does not support DIMMs made up of 256 megabits (Mb) chips or less. M4N78-AM V2 Motherboard Qualified Vendors Lists (QVL) DDR2-1066MHz capability DIMM Chip...
- Page 14 DDR2-800MHz capability DIMM support Vendor Part No. Size Chip No. Chip Brand 2G(Kit of Crucial BL12864AL804.8FE5 Heat-Sink Package • • 2)(EPP) M2Y1G64TU88D5B-AC Elixir N2TU16800E-AC Elixir • • 0828.GS Elixir M2Y1G64TU8HB0B-25C N2TU 51280BE-25C802006Z1DV Elixir • • M2Y2G64TU8HD5B-AC Elixir N2TUG80DE-AC Elixir • •...
-
Page 15: Expansion Slots
• B*: Supports one pair of modules inserted into both the yellow slots as one pair of dual-channel memory configuration. Visit the ASUS website at www.asus.com for the latest QVL. Expansion slots In the future, you may need to install expansion cards. Refer to the technical documentation that comes with your expansion card for installation details. -
Page 16: Jumpers
Jumpers Clear RTC RAM (3-pin CLRTC) This jumper allows you to clear the Real Time Clock (RTC) RAM in CMOS. You can clear the CMOS memory of date, time, and system setup parameters by erasing the CMOS RTC RAM data. The onboard button cell battery powers the RAM data in CMOS, which include system setup information such as system passwords. -
Page 17: Connectors
LAN (RJ-45) port. This port allows Gigabit connection to a Local Area Network (LAN) through a network hub. LAN port LED indications SPEED ACT/LINK Activity/Link LED Speed LED Status Description Status Description No link 10Mbps connection ORANGE Linked ORANGE 100Mbps connection BLINKING Data activity GREEN 1Gbps connection LAN port ASUS M4N78-AM V2... -
Page 18: Internal Connectors
Line In port (light blue). This port connects to the tape, CD, DVD player, or other audio sources. Line Out port (lime). This port connects to a headphone or a speaker. In 4-channel and 6-channel configurations, the function of this port becomes Front Speaker Out. Microphone port (pink). - Page 19 Front Panel Select item in the BIOS is set to [HD Audio]. If you want to connect an AC97 front panel audio module to this connector, set the item to [AC97]. See page 2.4.3 Chipset for details. ASUS M4N78-AM V2 1-10...
- Page 20 IDE connector (40-1 pin PRI_IDE) The onboard IDE connector is for an Ultra DMA 133/100/66 signal cable. There are three connectors on each Ultra DMA 133/100/66 signal cable: blue, black, and gray. Connect the blue connector to the motherboard’s IDE connector, then select one of the following modes to configure your devices.
- Page 21 DO NOT forget to connect the CPU fan cable to the CPU fan connector. Insufficient air flow inside the system may damage the motherboard components. It is not a jumper! DO NOT place a jumper cap on the CPU fan connector. Only the CPU fan supports the ASUS Q-Fan feature. ASUS M4N78-AM V2 1-12...
- Page 22 The system may become unstable or may not boot up if the power is inadequate. • If you are uncertain about the minimum power supply requirement for your system, refer to the Recommended Power Supply Wattage Calculator at http://support.asus. com/PowerSupplyCalculator/PSCalculator.aspx?SLanguage=en-us for details. System panel connector (10-1 pin F_PANEL) This connector supports several chassis-mounted functions.
- Page 23 Ensure that the audio device of Sound playback is VIA High Definition Audio (the name may be different based on the OS). Go to Start > Control Panel > Sounds and Audio Devices > Sound Playback to configure the setting. The S/PDIF module is purchased separately. ASUS M4N78-AM V2 1-14...
-
Page 24: Software Support
The contents of the Support DVD are subject to change at any time without notice. Visit the ASUS website at www.asus.com for updates. To run the Support DVD Place the Support DVD into the optical drive. -
Page 25: Chapter 2: Bios Information
BIOS in the future. Copy the original motherboard BIOS using the ASUS Update utility. 2.1.1 ASUS Update utility The ASUS Update is a utility that allows you to manage, save, and update the motherboard BIOS in Windows environment. ®... -
Page 26: Asus Ez Flash 2 Utility
Follow the onscreen instructions to complete the updating process. 2.1.2 ASUS EZ Flash 2 utility The ASUS EZ Flash 2 feature allows you to update the BIOS without using an OS-based utility. Download the latest BIOS file from the ASUS website at www.asus.com. -
Page 27: Asus Crashfree Bios 3 Utility
2.1.3 ASUS CrashFree BIOS 3 utility The ASUS CrashFree BIOS 3 is an auto recovery tool that allows you to restore the BIOS file when it fails or gets corrupted during the updating process. You can update a corrupted BIOS file using the motherboard Support DVD or a USB flash disk that contains the updated BIOS file. -
Page 28: Bios Setup Program
• The BIOS setup screens in this section are for reference only. They may not exactly match what you see on your screen. • Visit the ASUS website at www.asus.com to download the latest BIOS file for this motherboard. Main menu When you enter the BIOS Setup program, the Main menu screen appears, giving you an overview of the basic system information. - Page 29 2.3.3 Primary IDE Master/Slave, SATA 1/2/3/4 While entering Setup, the BIOS automatically detects the presence of IDE/SATA devices. There is a separate submenu for each IDE/SATA device. Select a device item then press <Enter> to display the IDE/SATA device information. The BIOS automatically detects the values opposite the dimmed items (Device, Vendor, Size, LBA Mode, Block Mode, PIO Mode, Async DMA, Ultra DMA, and SMART monitoring).
-
Page 30: Storage Configuration
BIOS SETUP UTILITY Main Advanced Power Boot Tools Exit JumperFree Configuration Adjust System CPU Configuration Frequency/Voltage etc. Chipset Onboard Devices Configuration PCIPnP USB Configuration v02.61 (C)Copyright 1985-2008, American Megatrends, Inc. ASUS M4N78-AM V2... -
Page 31: Jumperfree Configuration
2.4.1 JumperFree Configuration The items in this menu may vary depending on the AMD CPU type. CPU Overclocking [Auto] Selects the CPU overclocking options to achieve desired CPU internal frequency. [Manual] - Allows you to manually set overclocking parameters. [Auto] - Loads the optimal settings for the system. [Overclock Profile] - Loads overclocking profiles with optimal parameters for stability when overclocking. - Page 32 Configuration options: [11 CLK] ~ [26 CLK] [Auto] tWR [Auto] Configuration options: [Auto] [3 CLK] ~ [6 CLK] TRRD [Auto] Configuration options: [Auto] [2 CLK] ~ [5 CLK] tRWTTO [Auto] Configuration options: [Auto] [2 CLK] ~ [9 CLK] ASUS M4N78-AM V2...
-
Page 33: Cpu Configuration
tWRRD [Auto] Configuration options: [Auto] [0 CLK] ~ [3 CLK] tWTR [Auto] Configuration options: [Auto] [1 CLK] [2 CLK] [3 CLK] [Auto] [1 CLK] [2 CLK] [3 CLK] tWRWR [Auto] Configuration options: [Auto] [1 CLK] [2 CLK] [3 CLK] tRDRD [Auto] Configuration options: [Auto] [2 CLK] [3 CLK] [4 CLK] [5 CLK] tRFC0/1/2/3 [Auto] Configuration options: [Auto] [75ns] [105ns] [127.5ns] [195ns] [327.5ns]... -
Page 34: Chipset
Hybrid SLI Mode [mGPU Auto] Allows you to select the Hybrid SLI mode. Comnfiguration options: [mGPU Auto] [mGPU always enable] iGPU Frame Buffer Size [128MB] Sets the iGPU frame buffer size. Configuration options: [32MB] [64MB] [128MB] [256MB] 2-10 ASUS M4N78-AM V2... -
Page 35: Onboard Devices Configuration
PCIE 2.0 Support [Auto] Configures the PCIE 2.0 support. Configuration options: [Disabled] [Auto] AZALIA AUDIO [Enabled] Allows you to enable or disable the HD audio mode. Configuration options: [Disabled] [Enabled] Front Panel Select [HD Audio] Allows you to set the HD audio mode. Configuration options: [AC97] [HD Audio] Onboard LAN [Enabled] Allows you to set or disable the Onboard LAN. -
Page 36: Usb Configuration
Power Interface (ACPI) and the Advanced Power Management (APM). Select an item then press <Enter> to display the configuration options. Select the ACPI state Suspend Mode [Auto] used for System ACPI 2.0 Support [Disabled] Suspend. ACPI APIC Support [Enabled] APM Configuration Hardware Monitor 2-12 ASUS M4N78-AM V2... -
Page 37: Suspend Mode
2.5.1 Suspend Mode [Auto] Allows you to select the Advanced Configuration and Power Interface (ACPI) state to be used for system suspend. Configuration options: [S1 (POS) Only] [S3 Only] [Auto] [S1(POS) Only] - Enables the system to enter the ACPI S1 (Power on Suspend) sleep state In S1 sleep state, the system appears suspended and stays in a low power mode. -
Page 38: Hardware Monitor
N/A. Select Ignored if you do not want the detected speed to be displayed. CPU Q-Fan Control [Disabled] Allows you to enable or disable the ASUS Q-Fan feature that smartly adjusts the CPU fan speeds for more efficient system operation. Configuration options: [Disabled] [Enabled] VCORE Voltage, 3.3V Voltage, 5V Voltage, 12V Voltage... -
Page 39: Security
AddOn ROM Display Mode [Force BIOS] Sets the display mode for option ROM. Configuration options: [Force BIOS] [Keep Current] Bootup Num-Lock [On] Allows you to select the power-on state for the NumLock. Configuration options: [Off] [On] Wait for ‘F1’ If Error [Enabled] When set to Enabled, the system waits for the F1 key to be pressed when error occurs. -
Page 40: Tools Menu
AI NET2 2.7.1 ASUS EZ Flash 2 Allows you to run ASUS EZ Flash 2. After you press <Enter>, a confirmation message appears. Use the left/right arrow key to select between [Yes] or [No], then press <Enter> to confirm your choice.