Cuisinart baby CS-7 Series - Electric Steam Sterilizer & Dryer Manual
- Instruction booklet (16 pages) ,
- Quick reference manual (2 pages)
Advertisement
IMPORTANT SAFEGUARDS
When using an electrical appliance, especially when children are present, basic safety precautions should always be adhered to, including the following:
- READ ALL INSTRUCTIONS BEFORE USING THE STERILIZER.
- Always unplug unit from outlet when not in use, before putting on or taking off parts, and before cleaning. To unplug, grasp plug and pull from electrical outlet. Never pull cord. Allow to cool before handling.
- To protect against risk of electric shock, do not put cord, plug or unit base in water or other liquids.
- Close supervision is necessary when any appliance is used by or near children. The appliance becomes very hot and the steam can cause severe scalding.
- Do not operate any appliance with a damaged cord or plug, or after the appliance malfunctions, or if appliance has been dropped or damaged in any manner. Return the appliance to the nearest authorized Cuisinart Service Facility for examination, repair, and electrical or mechanical adjustment.
- The use of attachments not recommended or sold by Cuisinart may cause fire, electric shock or injury.
- Do not let cord hang over edge of table or counter, or touch hot surfaces.
- Don't attempt to handle the electrical cord to plug or unplug the unit when your hands are wet.
- Do not use outdoors.
- Do not touch hot surfaces. Use handles or knobs.
- Extreme caution must be used when moving an appliance containing hot oil or other hot liquids.
- When in use, the sterilizer contains hot water. Be careful to avoid spilling any water on yourself when removing items from the sterilizer.
- Do not operate your appliance in an appliance garage or under a wall cabinet. When storing in an appliance garage, always unplug the unit from the electrical outlet. Not doing so could risk a fire, especially if the appliance touches the walls of the garage or the door touches the unit as it closes.
- Do not use the appliance for other than its intended use.
- Where applicable, always attach plug to appliance and check that the control is OFF before plugging cord into wall outlet. To disconnect, turn the control to OFF, then remove plug from wall outlet.
- Do not place on or near a hot gas or electric burner, or in a heated oven.
- WHEN IN USE, THE STERILIZER CONTAINS BOILING WATER AND STEAM ESCAPES FROM THE VENT IN THE LID.
- Not for space-heating purposes.
- This appliance is not intended for use by persons (including children) with reduced physical, sensory or mental capabilities, or lack of experience and knowledge, unless they have been given supervision or instruction concerning use of the appliance by a person responsible for their safety.
Children should be supervised to ensure that they do not play with the appliance.
This appliance is intended to be used in household and similar applications such as:
- staff kitchen areas in shops, offices and other working environments;
- farm houses;
- by clients in hotels, motels and other residential type environments;
- bed and breakfast type environments.
The heating element surface is subject to residual heat after use.
SAVE THESE INSTRUCTIONS FOR HOUSEHOLD USE ONLY
SPECIAL CORD SET INSTRUCTIONS
A short power-supply cord is provided to reduce the risks of becoming entangled in or tripping over a longer cord. Extension cords are available and maybe used if care is exercised in their use. If an extension cord (or a long, detachable power-supply cord) is used:
- The marked electrical rating of the detachable power-supply cord or extension cord should be at least as great as the electrical rating of the appliance.
- If the appliance is of the grounded type, the extension cord should be a grounding type 3-wire cord.
- The longer cord should be arranged so that it will not drape over the countertop or tabletop where it can be tripped over, snagged or pulled on unintentionally (especially by children).
NOTICE
This appliance has a polarized plug (one prong is wider than the other). As a safety feature, this plug will fit into a polarized outlet only one way. If the plug does not fit fully in the outlet, reverse the plug. If it still does not fit, contact a qualified electrician. Do not attempt to defeat this safety feature.
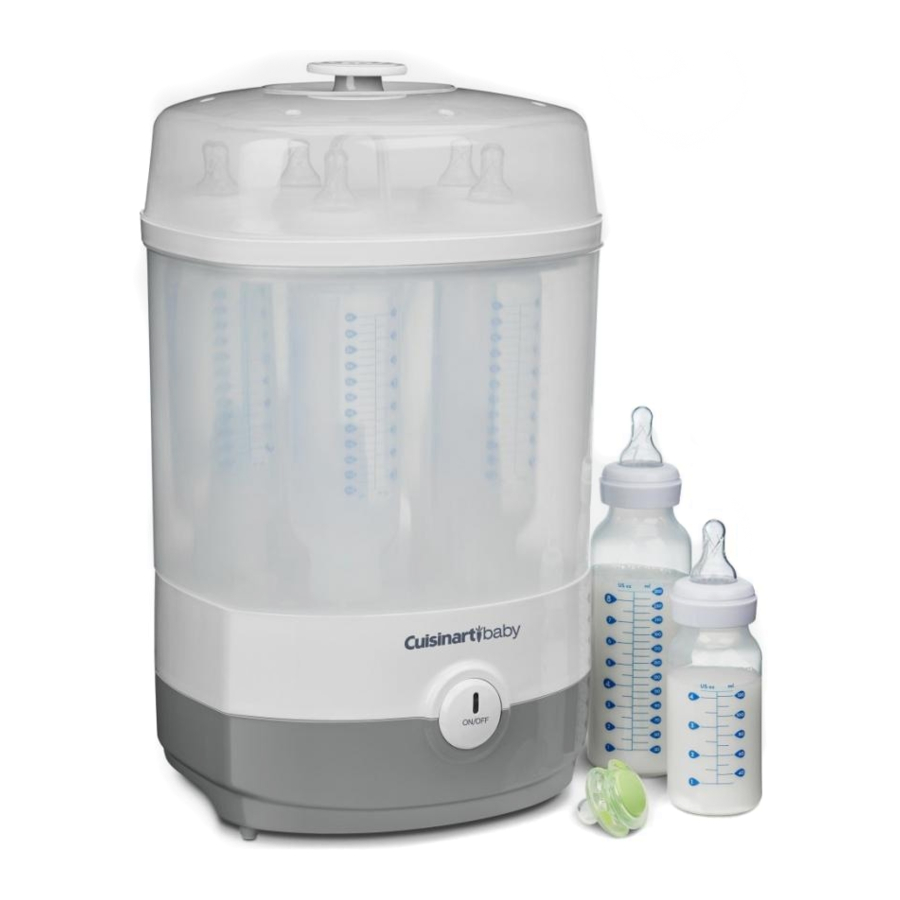
FEATURES AND BENEFITS

- Two-Tier Sterilization Chamber – integrates lid and bottom chamber to quickly sterilize and dry bottles and accessories; easily converts to one compact tier for accessories only.
- Bottle Chamber – holds 5 glass or plastic bottles of all brands, shapes and sizes.
- Removable Accessory Tray – holds pacifiers, nipples, teething toys, and other small items.
- Sterilizer Base – contains stainless steel water reservoir that holds water to convert to steam.
- Button Control – choose complete steam-and-dry cycle not steam only.
- BPA Free (not shown) – all materials that come in contact with water, bottles and accessories are free of the industrial chemical known as BPA.
- Measuring Cup – 120 ml maximum fill; 90 ml minimum fill.
BEFORE THE FIRST USE
Carefully unpack the unit and remove any packaging and promotional labels in or on the sterilizer. Rinse all accessories thoroughly with warm, soapy water.
OPERATION
Before you begin sterilizing, thoroughly wash all bottles and feeding accessories in warm, soapy water or in the dishwasher.
Set up
- Place unit on a flat surface where it is out of reach of children and cannot be moved during operation.
![]()
- Remove the lid, the removable accessory tray, and bottle chamber from the sterilizer base and set aside.
![]()
- Fill the stainless steel water reservoir with distilled water to the MAX fill line (120 ml). DO NOT EXCEED the MAX fill line.
![]()
- Place clean bottles on bottle racks in bottle chamber (fits 5 bottles total). Place clean accessories on the removable accessory tray and place on top of the bottle chamber using the center holder piece for easy handling.
![]()
- Lastly, place lid on top securely.
![]()


Note: If you are not sterilizing both bottles and accessories simultaneously, you can choose to sterilize bottles only or accessories only. The removable accessory tray & lid can both fit on the sterilizer base.
- Plug unit in. You are now ready to Sterilize & Dry.
Sterilize & Auto Dry Function
- Press the ON/OFF button to turn unit on. A blue light will turn on, indicating the sterilizing process will begin. Note: It takes about 12 minutes for the sterilizing process to complete.
![]()
- After approximately 12 minutes pass, the ON/OFF light will switch from blue to white and immediately start the drying function. The drying process can take up to 60 minutes total.
![]()


Note: The user has the option to Sterilize ONLY. (Follow steps 1–6) Press the ON/OFF button to turn unit on. This begins the sterilizing process. After 12 minutes and the light changes to white, press ON/OFF button to turn off unit and unplug from outlet. Remove sterilized bottles and accessories. Be careful handling as items and unit will be hot.
TIPS AND HINTS
For best results, use distilled water to minimize a buildup of calcium in the sterilizer base.
TROUBLESHOOTING
Q: Why won't sterilizing start when I turn the unit on?
A: Check that the plug is securely inserted into the outlet.
A: The sterilizer base may be empty.
Add required water amount to the water reservoir.
Q: How do I empty the unit of excess water?
A: To empty the unit of excess water, remove tray, lid and bottle chamber and tilt the sterilizer base onto its side over the sink.
Any extra water will come out.
Note: Never empty the water from the direction of fan port.
Q: Why is there a white residue in the sterilizer base water reservoir?
A: Mineral-rich water causes calcium deposits to build up in the sterilizer base. The unit should be cleaned out once a month to avoid this buildup. Refer to the Decalcification section in Cleaning and Maintenance, following. To help prevent/minimize this buildup, distilled or purified water can be used.
Q: Why are the bottles coming out with marks on them?
A: This can happen when the sterilizer has a buildup of calcium deposits. Refer to the Decalcification section in Cleaning and Maintenance, following.
CLEANING AND MAINTENANCE
Cleaning accessories and base
Clean all accessories in warm, soapy water or on the top rack of the dishwasher.
Wipe the base clean with a damp sponge or cloth. Dry it immediately. Never submerge the base or the plug in water or other liquids.
Decalcification
Sometimes mineral deposits form inside the sterilizer base, can cause damage to the machine. To avoid buildup of these minerals, the unit should be descaled once a month.
To descale, pour 1 cup of white (distilled) vinegar into the sterilizer base water reservoir. Let it stand for at least 2 hours and then empty. Rinse the unit with water after you empty the unit of the vinegar to ensure it is properly rinsed out. Repeat if necessary.
You can also run the unit with a mixture of ¼ cup of vinegar + ¼ cup of water; total of 120 ml max. Boil until dry.
Storage
The Cuisinart Baby® Electric Steam Sterilizer & Dryer stores neatly on the countertop in a minimum amount of space. When it is not in use, make sure to empty any leftover water from the unit and leave it unplugged.
The Cuisinart Baby® Electric Steam Sterilizer & Dryer is intended for HOUSEHOLD USE ONLY. Any service other than cleaning and normal user maintenance should be performed by an authorized Cuisinart Service Representative.

Documents / ResourcesDownload manual
Here you can download full pdf version of manual, it may contain additional safety instructions, warranty information, FCC rules, etc.
Download Cuisinart baby CS-7 Series - Electric Steam Sterilizer & Dryer Manual
Advertisement
Thank you! Your question has been received!


Need Assistance?
Do you have a question about the CS-7 Series that isn't answered in the manual? Leave your question here.