Cuisinart SPI-50 Instruction And Recipe Booklet
Hide thumbs
Also See for SPI-50:
- Instruction and recipe booklet (37 pages) ,
- Instruction and recipe booklet (114 pages) ,
- Instruction and recipe booklet (44 pages)
Chapters
Table of Contents

Related Manuals for Cuisinart SPI-50


Summary of Contents for Cuisinart SPI-50
- Page 1 INSTRUCTION AND RECIPE BOOKLET PrepExpress Attachment SPI-50 For your safety and continued enjoyment of this product, always read the Instruction Book carefully before using.
-
Page 2: Important Safeguards
SM-50. with certain disabilities. 18. Do not operate your appliance in an Cuisinart does not recommend appliance garage or under a wall the use of this appliance by cabinet. When storing in an children or individuals with appliance garage, always unplug the certain disabilities. -
Page 3: Table Of Contents
CONTENTS UNPACKING INSTRUCTIONS Important Safeguards ....2 Unpacking Instructions....3 CAUTION: THE CUTTING CONES Parts and Features ......4 HAVE VERY SHARP EDGES. Accessories ........5 To avoid injury when unpacking Operating Instructions ....6 the parts, please follow these instructions. -
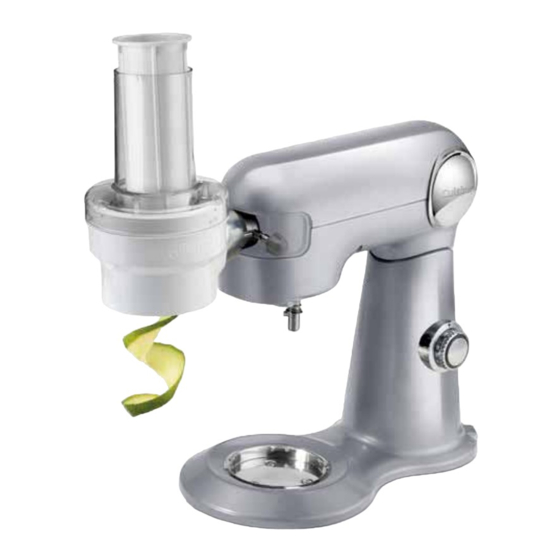
Page 4: Parts And Features
PARTS AND FEATURES 1. Base 3. Cutting Cone Holder 2. 4 Cutting Cones 4. Straight Feed Tube for spiralizing a. 2.5mm Slice/Ribbon (Green) a. Straight Feed Tube Pusher b. 3.0mm Crinkle Slice/Ribbon 5. Angled Feed Tube (Blue) for slicing and shredding c. -
Page 5: Accessories
ACCESSORIES SELECT CUTTING CONES Slicer/Shredder Spiralizer RESULTS 3.0mm Thin Shred/Spaghetti (Maroon) 9.0mm Wide Shred/Spaghetti (Black) 2.5mm Slice/Ribbon (Green) 3.0mm Crinkle Slice/Ribbon (Blue) -
Page 6: Operating Instructions
OPERATING INSTRUCTIONS Attaching to 2. Place Straight Feed Tube on Stand Mixer unit and turn 1. Make sure stand mixer is OFF. counterclockwise until it clicks to 2. Gently pull port lock into place. cover off front of mixer head to 3. -
Page 7: Cleaning, Storage And Maintenance
Slicing and Shredding CLEANING, (Use Angled Feed Tube STORAGE AND and Pusher) MAINTENANCE 1. Properly insert • Unplug the power cord desired Cutting before cleaning. Do not put Cone into Cutting power cord, plug or stand Cone Holder. mixer in water or other liquids. 2. -
Page 8: Warranty
• Make sure Pusher is firmly commercial purchasers or owners. inserted into the desired ® We warrant that your Cuisinart ingredient before spiralizing. PrepExpress™ Spiralizer Attachment will be free of defects in materials and • Put the narrowest end of the workmanship under normal home use food into the Feed Tube first. - Page 9 Please pay by check or money order another retail store that sells Cuisinart made payable to Cuisinart (California products of the same type. residents need only supply proof of The retail store shall then, at its purchase and should call...
-
Page 10: Recipes
RECIPES ® To help your Cuisinart PrepExpress™ Spiralizer Attachment feel right at home in your kitchen, we’ve assembled a variety of delicious recipes to get you started, from quick and easy to more complex gourmet dishes. - Page 11 MANUAL DE INSTRUCCIONES Y LIBRO DE RECETAS ™ Aditamento PrepExpress SPI-50 Para su seguridad y para disfrutar plenamente de este producto, siempre lea cuidadosamente las instrucciones antes de usarlo.
- Page 12 MEDIDAS DE los niños. 8. El uso de accesorios/aditamentos SEGURIDAD no recomendados o vendidos por Cuisinart presenta un riesgo de IMPORTANTES incendio, descarga eléctrica o heridas. Al usar aparatos eléctricos, 9. Asegúrese de que la boca de especialmente en presencia de niños, alimentación está...
- Page 13 IMPORTANTE: siempre desenchufe la peligrosos no aislados en ® batidora de pie Cuisinart antes de el interior del aparato, los instalar/sacar accesorios/aditamentos. cuales pueden ser de suficiente magnitud para ÍNDICE...
-
Page 14: Instrucciones De Desembalaje
INSTRUCCIONES 3. Ponga el molde de pulpa de celulosa sobre una superficie DE DESEMBALAJE plana. Saque el cepillo de limpieza, el empujador inclinado y la parte PRECAUCIÓN: LOS FILOS DE LOS superior del molde. Luego, saque CONOS PROCESADORES SON del molde de pulpa de celulosa MUY AFILADOS. -
Page 15: Piezas Y Características
PIEZAS Y CARACTERÍSTICAS 1. Base 3. Portacono 2. 4 conos procesadores/ 4. Boca de alimentación recta 8 opciones de corte: para cortar en espiral a. Rodajas de 2.5 mm/Espiral a. Empujador recto ancho (cono verde) 5. Boca de alimentación b. Rodajas onduladas de inclinada 3 mm/Espiral ancho para rebanar y triturar... -
Page 16: Accesorios
ACCESORIOS ELIJA ENTRE CONOS PROCESADORES Tubo inclinado para rebanar/ Tubo recto para cortar en triturar espiral RESULTADOS Rallado delgado de 3 mm/Espiral “espagueti” delgado (cono rojo oscuro) Rallado grueso de 9 mm/Espiral “espagueti” grueso (cono negro) Rodajas de 2.5 mm/Espiral ancho (cono verde) Rodajas onduladas de 3 mm/ Espiral ancho ondulado (cono... -
Page 17: Instrucciones De Operación
INSTRUCCIONES DE OPERACIÓN Conexión a la Cómo cortar en batidora de pie espiral (usando la boca de 1. Asegúrese de que la batidora alimentación recta) está apagada (“OFF”). 1. Instale el cono 2. Quite, jalándola suavemente, procesador la tapa del deseado en el receptáculo para portacono. -
Page 18: Limpieza, Mantenimientoy Almacenaje
Resultados: 4. Encienda la batidora a (dependiendo del cono velocidad 12. procesador usado) Empuje el Rodajas de 2.5 mm/Espiral ancho empujador, (cono verde): ejerciendo presión regular; el alimento procesado se caerá en el bol. Después de Rodajas onduladas de 3 mm/Espiral terminar, apague la batidora ancho ondulado (cono azul): de pie, poniendo la perilla de... -
Page 19: Consejos Y Sugerencias
bocas de alimentación, conos alimentación, corte procesadores y portacono. ligeramente los lados. • Enjuáguelos en agua • Antes de cortar en espiral, corriente, quitando los corte las extremidades residuos de alimento con el superior e inferior del cepillo de limpieza. ingrediente para formar una superficie plana;... -
Page 20: Garantía
NOTA: para mayor seguridad, le aconsejamos que mande su paquete LIMITADA DE 1 AÑO por un método de entrega con seguro y seguimiento. Cuisinart no será (VÁLIDA EN LOS EE. responsable por los daños ocurridos UU. Y EN CANADÁ durante el transporte o por los paquetes mandados a una dirección... -
Page 21: Recetas
Los residentes de California también garantía. pueden, si lo desean, mandar el aparato defectuoso directamente a Cuisinart para que lo reparen o lo cambien. Para esto, se debe llamar RECETAS A continuación encontrará una variedad de deliciosas recetas, desde platos sencillos y rápidos hasta recetas “gourmet”...