Table of Contents
Advertisement
Quick Links
TWO-PIECE 4K CAMERA SYSTEM
GW-SP100U/GW-SP100E
INSTRUCTIONS
TM
The specifications and appearance of this product are subject to changes for further
improvement without prior notice.
Please check the latest version of the INSTRUCTIONS from our Website.
For Customer Use:
Enter below the System No. and Serial No.
which is located on the bottom of the video
unit.
Retain this information for future reference.
System No.
Serial No.
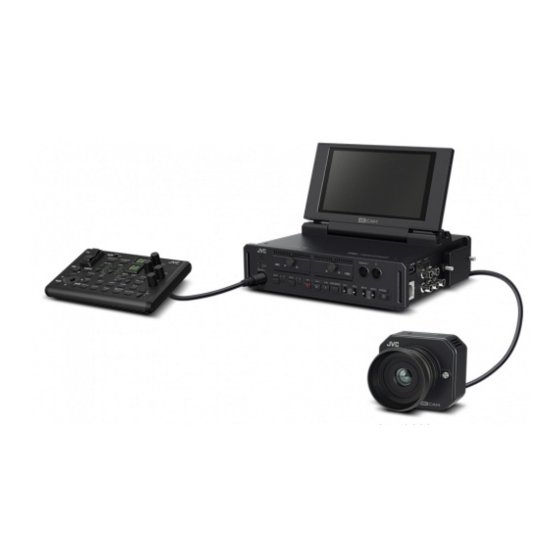
*This illustration shows the GW-SP100U/GW-SP100E
with separately sold signal transmission cable and lens.
Please read the following before getting
started:
Thank you for purchasing this product.
Before operating this unit, please read the
instructions carefully to ensure the best
possible performance.
In this manual, each model number is
described without the last letter (U/E) which
means the shipping destination.
(U: for USA and Canada, E: for Europe)
B5A-0533-10
Advertisement
Table of Contents

Related Manuals for JVC GW-SP100U


Summary of Contents for JVC GW-SP100U
- Page 1 TWO-PIECE 4K CAMERA SYSTEM GW-SP100U/GW-SP100E INSTRUCTIONS *This illustration shows the GW-SP100U/GW-SP100E with separately sold signal transmission cable and lens. The specifications and appearance of this product are subject to changes for further improvement without prior notice. Please check the latest version of the INSTRUCTIONS from our Website.
- Page 3 CAN ICES-3 A / NMB-3 A...
- Page 4 unit. and/or the back of the unit. La plaque de numéro de série est sur la partie inférieure et/ou l'arrière de l'appareil.
- Page 5 CAUTIONS: To prevent shock, do not open the cabinet. ● No user serviceable parts inside. " Refer servicing to qualified personnel. When you are not using the AC adapter for ● a long period of time, it is recommended that you disconnect the power cord from AC outlet.
- Page 6 Konrad-Adenauer-Allee 1-11 61118 Bad Vilbel GERMANY INFORMATION Manufacturer : JVC KENWOOD Corporation 3-12, Moriya-cho, Kanagawa-ku, Yokohama-shi, Kanagawa, 221-0022, JAPAN Importer (EU only) : JVCKENWOOD U.K. Limited 12 Priestley Way, London, NW2 7BA UNITED KINGDOM Exclusive REMOTE 2/3 Cable SDI OUT /...
- Page 7 FRANÇAIS Pr écaut i ons de sécur i t é Si le matériel est installé dans un coffret ou sur une étagère, s’assurer qu’il y a un espace suffisant sur tous les côtés pour PRÉCAUTIONS : permettre la ventilation (10 cm ou plus sur La fiche principale doit rester fonctionnelle.
- Page 8 POUR EUROPE PRÉCAUTIONS : Cet équipement est conforme aux clauses Pour éviter tout risque d’électrocution, et exigences de protection des directives ne pas ouvrir le boîtier. Aucune pièce européennes correspondantes. Il est conçu intérieure n’est à régler par l’utilisateur. pour les appareils vidéo professionnels et Se référer à...
- Page 9 électromagnétique et à la sécurité SSL-JVC50, SSL-JVC75 (IDX) électrique. Veuillez utiliser les batteries recommandées. ● Représentant européen de la société JVC KENWOOD Corporation : JVC Technical Services Europe GmbH Postfach 10 05 04 Konrad-Adenauer-Allee 1-11 61145 Friedberg 61118 Bad Vilbel Allemagne ALLEMAGNE...
- Page 10 ESPAÑOL Pr ecauci ones de Cuando el equipo se encuentra instalado segur i dad en un gabinete o en un estante, asegúrese que tenga suficiente espacio en todos los lados para permitir la PRECAUCIÓN: ventilación (10 cm o más en cada lado, El enchufe de alimentación de red en la parte superior y en la parte trasera).
- Page 11 PARA EUROPA PRECAUCIONES: Este equipo se ajusta a las estipulaciones Para evitar cortocircuitos, no abra la y normas de protección establecidas por videocámara. No hay componentes las correspondientes Directivas Europeas. que puedan ser reparados por el El equipo está diseñado para aparatos de usuario.
- Page 12 SSL-JVC50, SSL-JVC75 (IDX) electromagnética. Utilice las siguientes baterías recomendadas. ● El representante europeo de JVC KENWOOD Corporation es: JVC Technical Services Europe GmbH Postfach 10 05 04 Konrad-Adenauer-Allee 1-11 61145 Friedberg 61118 Bad Vilbel ALEMANIA Alemania INFORMACIÓN...
- Page 13 ITALIANO Pr ecauzi oni di si cur ezza Quando l’apparecchio è installato in un mobile o su uno scaffale, assicurarsi che rimanga spazio sufficiente su tutti i lati PRECAUZIONI : per consentire la ventilazione (10 cm o La spina di alimentazione deve essere più...
- Page 14 PER L'EUROPA PRECAUZIONI : Questo apparecchio è conforme alle Per prevenire scosse elettriche evitare regolamentazioni sulla sicurezza delineate di aprire l’apparecchio. All’interno non nelle direttive europee. Questo apparecchio vi sono parti la cui manutenzione è stato progettato per essere utilizzato con possa essere effettuata dal cliente.
- Page 15 SSL-JVC50, SSL-JVC75 (IDX) sicurezza elettrica. Utilizzare le batterie raccomandati. ● Il rappresentante europeo di JVC KENWOOD Corporation è: JVC Technical Services Europe GmbH Postfach 10 05 04 Konrad-Adenauer-Allee 1-11 61145 Friedberg 61118 Bad Vilbel GERMANIA Germania...
- Page 16 DEUTSCH Si cher hei t sm aßnahm en Wird dieses Gerät in ein Gehäuse oder ein Regal eingebaut, genügend Platz (jeweils 10 cm seitlich sowie hinter und über dem Gerät) VORSICHT : lassen, um einen einwandfreien Der Netzstecker muss jederzeit leicht Temperaturausgleich zu gewährleisten.
- Page 17 FÜR EUROPA VORSICHTSMASSNAHMEN : Dieses Gerät erfüllt die Normen und Um elektrische Schläge zu vermeiden, Schutzbestimmungen der zutreffenden das Gehäuse nicht öffnen! Dieses europäischen Richtlinien. Das vorliegende Gerät enthält keinerlei Teile, die vom Gerät wurde für professionelle Benutzer gewartet werden können. Videoanwendungen entwickelt und kann in den Überlassen Sie Wartungsarbeiten bitte folgenden Umgebungen eingesetzt werden:...
- Page 18 Nutzen Sie bitte die empfohlenen Akkus. ● Verträglichkeit und elektrischer Sicherheit überein. Die europäische Vertretung für die JVC KENWOOD Corporation ist: JVC Technical Services Europe GmbH Postfach 10 05 04 Konrad-Adenauer-Allee 1-11 61145 Friedberg 61118 Bad Vilbel Deutschland DEUTSCHLAND...
- Page 19 Contents Display Screen Display Screen in Camera Mode ....Safety Precautions ........Display Screen in Media Mode ...... Contents ............Precautions for Proper Use ......Connecting External Devices Operation Modes ........... Managing/Editing Clips on a PC ....Names of Parts ..........Video Unit ..........
- Page 20 ⇒ Micro Four Thirds and Micro Four Thirds ● Logo marks are trademarks or registered trademarks of Olympus Imaging Corp., in Japan, the United States, the European Union and other countries. AVCHD Progressive/AVCHD and AVCHD ● Progressive/AVCHD logo are trademarks of Panasonic Corporation and Sony Corporation.
- Page 21 SDHC/SDXC Cards ■ SDHC/SDXC card is referred to as “SD card” in this manual. ■ This camera system saves the recorded images and audio sound on the SD card (sold separately) in the card slot. When this unit is not in use, turn OFF the power ■...
- Page 22 Lens This camera system is an interchangeable ■ lens camera. Please have the interchangeable lens ready before use. Read the “INSTRUCTIONS” of the ■ interchangeable lens to be attached to get a full understanding before use. Optical performance of lens ■...
-
Page 23: Lcd Monitor
LCD Monitor Others ■ Do not insert objects other than the memory The LCD monitor is manufactured using high- ■ precision technology. card into the card slot. Do not block the vent on the unit. Black spots may appear on the LCD monitor, or ■... -
Page 24: Operation Modes
Operation Modes This camera system has three operation modes - Camera mode, Media mode and USB mode. Operation Mode Description Camera Mode This is the camera shooting mode. The camera system starts up in ● Camera mode when the power is turned on. Press the [REC] trigger button to start recording. -
Page 25: Names Of Parts
Names of Parts Video Unit (GW-VU100) Battery Lamp Audio Input Signal Selection Switch The battery lamp turns red when the battery power becomes low. Power Button And it starts blinking if the power becomes lower. Power Lamp Remote 1 Terminal Headphone Jack ( Φ... - Page 26 Bottom side : Mounting screw hole (1/4x20UNC x2) DC Input Terminal Cable Connector for Camera Input terminal for DC 12 V power supply. SDI (Moni) ON/OFF Switch SDI Output Terminal (BNC) (*) When this switch is set to "ON", images are When HD video is output, images are output output from the SDI (Moni) output terminal.
- Page 27 Cable Connector for Gimbal Unit Memo : When the camera system’s video is locking TC Output Terminal (BNC) ● to the external synchronizing signal, “Sync Connect the [TC OUT] terminal of the master Locking” appears on the screen. device with the [TC IN] terminal of the slave After locking to the external synchronizing device.
- Page 28 Battery 2 Caution : This unit does not work if two batteries are ● Gimbal Control Terminal not loaded. Future upgrade will allow use of this. Battery 1 Battery 1 Lock Release Button Battery 2 Lock Release Button...
-
Page 29: Camera Unit
Camera Unit (GW-CU100) Lens Mounting Index ⇒ P32 Tally Lamp Mount Lens Lock Pin Lens Release Button ⇒ P33 Bottom side : Mounting screw hole (1/4x20UNC x1, M3 x2) Lenses that Can be Used with This Unit (The lens is sold separately.) Interchangeable lenses dedicated to the Micro Four Thirds System can be used. -
Page 30: Control Unit
Control Unit (KA-CT001) Rear side: Mounting screw hole (1/4 x 20UNC) Zoom Speed Switch Button When the gimbal unit is connected ● Cross-shaped Button Up/Down : Tilting Record Trigger Button Cross-shaped Button Left/Right : Panning When a User button is assigned an Cross-Shaped Button /Set Button "Operating Speed Select"... - Page 31 User Button Full Auto Button function from the menu. White Balance Selection Button Status Screen Display Button Cancel Button Cancels various settings and stops playback. CH1/CH2 Audio Recording Mode Switch Zoom Lever Shutter Mode Switch Button Headphone/Speaker Volume Adjustment Button Exposure button...
- Page 32 Caution : Settings and Adjustments When connecting the video unit to the ● Before Use camera unit with a cable, remove the battery and power cable in advance. Select the length of the camera unit cable to ● be used in [Main Menu] [System] [Camera Connect the video unit to the camera unit.
- Page 33 Remove the lens. Caution : Be sure to turn OFF the power before ● mounting or removing the LCD unit. To remove the lens, turn it counterclockwise Do not press against the surface with force or while holding down the lens release button. ●...
-
Page 34: Power Supply
Power Supply To use this camera system, you can attach two battery packs or connect an AC adapter to it. Caution : Turn OFF the power before changing the ● power supply for operating this unit. Using a Battery Pack Recommended Batteries Attaching the Battery SSL-JVC50, SSL-JVC75 (IDX) -
Page 35: Power Status Display
Display Screen Using AC Power (DC IN Power) Use a separately sold AC adapter to operate this 100min unit with AC power. Menu Screen Memo : Since this unit does not work if only one ● battery is loaded, battery icon displays the power status of only the battery with less amount of charge. -
Page 36: Displays On The Monitor
Display Screen in Media Mode Displays on the Monitor You can display the camera status, media information, zebra pattern, and various markers in the video image on the monitor screen during shooting. 100min 1920x1080 100min 1920x1080 100min 50min 20min 60p XHQ... -
Page 37: Assignment Of Functions To User Buttons
screen) Assignment of Functions to User Buttons You can assign functions to the following buttons and use them as user buttons. By assigning functions to the buttons, the usability of the camera recorder can be enhanced. Perform settings in the menu items corresponding to each button. - Page 38 SD Card AVCHD This camera system saves the recorded images and audio sound on the SD card (sold separately) 16GB in the card slot. 32GB Usable Cards 64GB (SDXC) When shooting 4K images, use a UHS Speed 128GB Class 3 SD card formatted by this unit. (SDXC) When shooting HD images, use a Class 10 or (Unit: minute)
-
Page 39: Variable Scan Mapping (Vsm)
2 Select the scan range using the ▲/▼ buttons. Variable Scan Mapping The scan range when the size of the imaging ● (VSM) device is set to “100% (Super35)” is displayed as percentage. You can set the scan range for the imaging device according to the lens attached. - Page 40 While the brightness is displayed, you can Recording Simultaneously ● /▼ buttons to change the scan ▲ use the range. If you press the [USER3] button again, the ● item for setting the scan range appears as a By setting [System] to “4K+HD”, you can record screen.
- Page 41 UB Mode Flicker Correction Shutter AE Speed LCD/Monitor... ALC Limit Auto Iris Limit (OPEN) Auto Iris Limit (CLOSE) EEI Limit LCD Contrast Smooth Trans LCD Backlight LCD Bright GAIN L LCD Peaking GAIN M GAIN H Zoom Speed AF Assist User Switch Set...
- Page 42 EEI Limit For setting the shutter speed control range when the Automatic Shutter mode (EEI) is enabled. Smooth Trans For setting the shock reduction function, which slows down the sudden change when switching with the [GAIN] or [WHT BAL] selection. Memo : However, this function is disabled when the ●...
-
Page 43: User Switch Set Item
User Switch Set Item AE Lock For specifying the operation when any of the USER1 - USER4 [USER1]-[USER4] items is set to “AE Lock”. ● By assigning one of the following functions to each of the [USER1], [USER2], [USER3], function of Gain, Iris, or Shutter when the [USER4] buttons, these buttons can be used user button that is assigned “AE Lock”... - Page 44 → Stretch Level Stretch amount increases when a larger value Memo : This item is displayed only when [Black Toe] ● is set to “Stretch”. Otherwise, this item appears as “---” and cannot be selected. → Compress Level Compression amount increases when a larger →...
- Page 45 ● Sets the wide dynamic range function to “On”. Off: ● Sets the wide dynamic range function to “Off”. Memo : When [WDR] is set to “On”, [Black Toe], ● [Knee], [Gamma] and [White Clip] cannot be selected. White Balance... Menu for adjusting white balance.
-
Page 46: White Balance Item
White Balance Item Color Matrix For setting the color matrix. Preset Temp. Cinema Subdued: ● Sets to a subdued color matrix that is similar For specifying the color temperature when to the screen characteristics of movies. the White Balance Selection button is set to Cinema Vivid: ●... - Page 47 system This item can be set only when the frame rate is set to “60p”, “30p” or “60i”. When the frame rate is “24p”, “Non Drop” When the frame rate is “50p”, “25p” or “50i”, this item appears as “---” and cannot be selected.
-
Page 48: Lcd/Monitor Menu
LCD/Monitor Menu Shooting Assist Item Focus Assist This menu screen can be used to specify settings related to the LCD monitor and the For setting whether to add color to the contour settings related to the data displayed over of the focused image upon switching the image the images output from the SD(Moni) output to black-and-white. -
Page 49: Marker Settings Item
Marker Settings Item For setting the marker and safety zone, which are useful in helping you determine the angle of view for the image according to the shooting purpose. Memo : When in the Media mode, the markers do not ●... - Page 50 Media Remain Memo : The battery mark that appears before the ● For setting whether to display the remaining “Time” value changes according to the space of the recording SD card. remaining battery power. Memo : When the remaining space warning is ●...
-
Page 51: A/V Set Menu
A/V Set Menu → HDMI Rec Trigger For setting whether to superimpose trigger signals in tandem with the [HDMI] terminal as Menu screen for video output and audio. well as the [REC] button on this camera system. When a compatible device is connected, recording/stop control signals are output in Video Set... -
Page 52: Audio Set Item
HDMI/SDI Out Character XLR Manual Level For specifying whether to display the characters For setting whether to link manual audio displayed on the display screen and menu adjustment operation between [INPUT1] and screen over the screens output from the [SDI] [INPUT2] terminals. -
Page 53: System Menu
System Menu INPUT1 Mic Wind Cut For specifying whether to cut low frequencies of the audio signals input to the [INPUT1] terminal. This menu screen allows system-related Select "On" to reduce wind noise. settings. For specifying recording settings, formatting INPUT2 Mic Wind Cut and restoring of SD card, tally lamp settings, date/time, time zone, and other settings. - Page 54 Gimbal Set... Firmware Update For specifying settings related to gimbal operation. unit or lens to the latest ones. ( ⇒ P58 [Gimbal Set Item] ) (No explanation will be provided on the website until the program for updating this Video Unit's Camera Cable Length For selecting the length of the camera unit cable Memo :...
- Page 55 → Format recorded in the the SD card in slot C or D. Memo : When [System] is set to "4K", "---" is ● displayed as the setting value and no setting value can be selected. When [System] is set to "4K+HD", "QuickTime" ●...
- Page 56 4GB File Spanning(SDXC) For setting the Variable Scan Mapping (VSM). size exceeds 4 GB, but you can record clips Set the scan range for the imaging device larger than 4 GB by setting this option to “Off”. according to the lens attached. (Up to a maximum of 64 GB or 4 hours) The selectable options vary according to the [System] setting.
-
Page 57: Clip (Recorded Data) And Clip Name
Clip (Recorded Data) and Clip Name Clip Set → When recording is stopped, the images, ● audio and accompanying data which are recorded from start to stop are recorded as one “clip” on the SD card. Enter any of the 36 characters including An 8-character clip name is automatically ●... -
Page 58: Gimbal Set Item
Gimbal Set Item Delay When the gimbal is connected, "Gimbal Set…" For specifying the time that lapses until the is displayed to allow you to set up the gimbal. camera starts moving after the gimbal moves. tilting, and rolling. Operation Mode For specifying a gimbal operation mode. - Page 59 Battery Power ⇒ P35 ※ ※ ※ When the inserted SD card does not ● comply with the required speed class. When the SD card is not supported. ● ※ !REC INH When attempting to record in 50p or 50i ●...
- Page 60 Shutter The current shutter speed is displayed when ● appears on the screen when in the the shutter is set to “On”. Manual mode. Memo : The variable range of the shutter speed varies ● according to the video format settings. Displayed in the Display 0 screen only when ●...
- Page 61 focus assist is ※ Memo : You can specify whether to display the time ● code, user’s bit, or turn off the display in [LCD/ Monitor] [Display Settings] [TC/UB]. This item will not be displayed when “Off” is selected. Event/Warning Display Area Displays error messages.
- Page 62 of the currently played clip. Battery Power ⇒ P35 ※ [LCD/Monitor] [Display Settings] [Audio Meter] is set to “Off”. Displayed when the volume (0-15) of the headphones or speakers is changed...
- Page 63 Date/Time Display Displays the date/time that is recorded on the currently played SD card. Memo : ● in [LCD/Monitor] [Display Settings] [Date Style]/[Time Style]. ※ [Main Menu] [LCD/Monitor] [Display 60x, or 360x) 60x, or 360x)
- Page 64 When your PC cannot recognize the SD card Confirm and update the OS of your PC. Description...
-
Page 65: Tally Lamp
Warning display on the monitor, tally lamp indication and warning tone are as follows according to the error status. If the error persists, please contact the local dealers in your area. Fan Maintenance Required Usage time of the fan has exceeded Check the fan and replace 9000 hours. - Page 66 AVCHD mode exceeds 12 hours [REC] button again. and recording stops automatically. Update Can't Be Update cannot be executed. Executed! for the target model. Update Error! Update cannot be completed The probable cause is an normally. hardware error. Please consult your nearest JVC dealer.
- Page 67 Unable to start recording. Is the write-protect switch of the SD card turned on? ● Make sure that the write-protect switch is turned off. Is the camera recorder set to the Camera mode? ● Use the [CAM/MEDIA] selection button to switch to the Camera mode.
- Page 68 Item Description [INPUT1/ INPUT2] XLR (balanced), +48 V General terminal output (phantom power supply) Item Description Power Using battery pack : XLR (balanced) DC 7.4 V (IDX) 3.5 mm stereo mini jack Using AC adapter : Terminal -22dBu, 10 k Ω DC 11 V - 17V DEVICE : Mini USB-B type, Power...
- Page 69 29.97p, 23.98p, 50p, 50i, 25p Warranty Card (U model only) UHQ Mode MPEG-4 AVC/H.264, Instructions VBR, 35Mbps (Max) 1920x1080/59.94i, 29.97p, 23.98p, 50i, 25p Components (GW-SP100U) Audio LPCM 2ch, 48 kHz/16 Bit Components HD mode (AVCHD) Video Unit (GW-VU100U) Video AVCHD File Format...
-
Page 71: Important Notice Concerning The Software
(hereinafter the "Licensed Software"), a copyright of either JVC KENWOOD Corporation (hereinafter “JKC”) or a third party subsists. The Product uses the software component designated in the End-User License Agreement that was executed between JKC and a third party (hereinafter "EULA"). - Page 72 B5A-0533-10 2015...