LG WATCH URBANE User Manual
Hide thumbs
Also See for WATCH URBANE:
- User manual (270 pages) ,
- Quick start manual (98 pages) ,
- Quick start (2 pages)
Table of Contents
Advertisement
Available languages
Available languages
Quick Links
See also:
User Manual
Advertisement
Chapters
Table of Contents

Related Manuals for LG WATCH URBANE


Summary of Contents for LG WATCH URBANE
-
Page 1: User Guide
USER GUIDE LG-W150 www.lg.com MFL69142901 (1.0) - Page 3 NEDERLANDS Gebruikershandleiding Bepaalde inhoud en afbeeldingen wijken mogelijk af van uw apparaat, • afhankelijk van de regio, serviceprovider, softwareversie of de versie van het besturingssysteem die u gebruikt, en kunnen zonder aankondiging vooraf worden gewijzigd. Gebruik altijd originele LG-accessoires. De meegeleverde items zijn alleen voor dit • apparaat ontwikkeld en zijn mogelijk niet compatibel met andere apparaten. Dit apparaat is vanwege het aanraakscherm niet geschikt voor mensen met een • visuele handicap. Copyright ©2015 LG Electronics, Inc. Alle rechten voorbehouden. LG en het • LG-logo zijn geregistreerde handelsmerken van LG Group en diens gelieerde partners. Alle andere handelsmerken zijn het eigendom van hun respectieve eigenaren. Google™, Google Maps™, Gmail™, YouTube™, Hangouts™ en Play Store™ • zijn handelsmerken van Google, Inc.
-
Page 4: Table Of Contents
Inhoud Veiligheidsinformatie........4 Het scherm tijdelijk uitzetten met de modus Theater ........31 Meer informatie over uw horloge ..15 De helderheid van het scherm tijdelijk Lay-out van horloge .......15 verhogen ..........32 Het horloge opladen .......17 Het menu Opties openen......32 Oplaadmodus ........20 Opslagruimte beheren ......32 Als het scherm niet reageert ....20 Taken met gebruik van stemopdracht ...34 Het horloge in- en uitschakelen .....20... - Page 5 Wijzerplaat aanpassen ......46 Lettergrootte ..........46 Polsgebaren...........47 Wi-Fi-instellingen ........47 Bluetooth-apparaten ......47 Het scherm op Altijd aan instellen ..48 Flightmode ..........48 Toegankelijkheid ........48 Fabrieksinstellingen herstellen ....49 Opnieuw opstarten ........49 Schermvergrendeling......49 Uitzetten ..........50 Info ............50 Informatie over deze gebruikershandleiding ......51 Informatie over deze gebruikershandleiding ......51 Handelsmerken ........52 Accessoires ..........53...
-
Page 6: Veiligheidsinformatie
Veiligheidsinformatie Lees voor u uw product gebruikt de meegeleverde algemene veiligheidsinformatie. Algemene veiligheid en bediening Wees u tijdens het gebruik van uw product bewust van de volgende logische richtlijnen. Uw omgeving Veilige bedrijfstemperatuur. Gebruik en bewaar het product bij een temperatuur • tussen 0 °C en 40 °C. Het blootstellen van het apparaat aan extreem lage of hoge temperaturen kan leiden tot schade, storingen of zelfs explosies. Tijdens het autorijden. Wanneer u autorijdt, is het rijden uw primaire • verantwoordelijkheid. Het gebruik van een mobiel apparaat of accessoire voor een gesprek of andere toepassing tijdens het autorijden, kan afleiden. Houd uw ogen op de weg. In de buurt van explosieven. Gebruik het product niet in gebieden waar vonken • van het product kunnen leiden tot brand of explosie. In een vliegtuig. Houd u aan alle voorschriften en instructies voor het gebruik • van elektronische apparaten. Bij de meeste luchtvaartmaatschappijen is het gebruik van elektronische apparatuur alleen tijdens de vlucht en niet tijdens de start of landing toegestaan. Op vliegvelden zijn er drie belangrijke soorten beveiligingsapparatuur: röntgenapparaten (voor voorwerpen op transportbanden), detectiepoortjes (voor personen die door de controle komen) en magneetdetectoren (handbediende apparaten die op mensen of afzonderlijke voorwerpen worden gebruikt). Uw product mag door de röntgenapparatuur op het vliegveld. Neem het product niet mee door een detectiepoortje en stel het niet bloot aan een magneetdetector. - Page 7 Als u de polsband vervangt door een metalen band kan dit leiden tot problemen • met de Bluetooth/Wi-Fi-connectiviteit. Veiligheidstips WAARSCHUWING: het laadstation bevat sterke magneten die storingen kunnen veroorzaken bij pacemakers, creditcards, horloges en andere magneetgevoelige objecten. Neem de volgende logische voorzorgsmaatregelen in acht om het risico op schade aan uw product te voorkomen en de kans op brand of elektrische schokken, explosies of andere gevaren te verminderen: Gebruik uitsluitend kabels, laders en andere accessoires die door LG zijn • goedgekeurd. Laat het product niet vallen, sla er niet mee en schud het niet. • Beschadig het snoer niet door buigen, draaien, trekken, verwarmen of door er • zware voorwerpen op te plaatsen. Dit product is uitgerust met een USB-kabel om het te kunnen aansluiten op een • desktopcomputer, een notebook of de oplader. Zorg ervoor dat de computer correct is geaard voordat u uw product op de computer aansluit. Het netsnoer van een desktopcomputer of notebook heeft een aardgeleiding voor apparatuur en een stekker voorzien van randaarde. De stekker moet worden aangesloten op een stopcontact dat naar behoren is geïnstalleerd en is geaard in overeenstemming met de plaatselijke voorschriften en verordeningen. Maak het product niet open, haal het niet uit elkaar, plet, verbuig, vervorm of • doorboor het niet en maal het niet fijn. Steek geen vreemde voorwerpen in het product. • Plaats het product niet in de magnetron. • Stel het product niet bloot aan vuur, explosies of andere gevaren. • Reinig met een zachte, vochtige doek. Reinig het product niet met sterke • chemicaliën (bijv. alcohol, benzine, verdunners enz.) of reinigingsmiddelen. Veiligheidsinformatie...
- Page 8 Net als veel andere elektronische apparaten, genereert uw product warmte tijdens • normale werking. Langdurig direct contact met de huid zonder voldoende ventilatie leidt mogelijk tot ongemak of kleine brandwonden. Wees daarom voorzichtig tijdens en vlak na het gebruik van het apparaat. Als u problemen ondervindt tijdens het gebruik van het product, stopt u het gebruik • en neemt u contact op met een erkend LG Electronics-klantenservicecentrum. Vermijd onderdompeling in of blootstelling aan water of andere vloeistoffen. • Pedometer-, Slaapstand-, Inspannings en Hartslagmetingen zijn niet bedoeld • om welke medische toestand dan ook te behandelen of te diagnosticeren, en mogen alleen worden gebruikt voor ontspannings-, gezondheids- en fitnessdoeleinden.
- Page 9 Accuwaarschuwingen Maak de accu niet open, haal hem niet uit elkaar, plet, verbuig, vervorm of • doorboor hem niet en maal hem niet fijn Verander de accu niet, maak hem niet na, steek er geen voorwerpen in, dompel • de accu niet onder, stel hem niet bloot aan water of andere vloeistoffen, vuur, explosies of andere gevaren. Zorg dat er geen scherpe voorwerpen zoals tanden en nagels van huisdieren in • contact komen met de batterij. Dit kan brand veroorzaken. Gebruik de accu alleen voor het systeem waarvoor deze is opgegeven • Gebruik de accu alleen in combinatie met een oplaadsysteem dat is gekwalificeerd • voor het systeem en voldoet aan de CTIA certificeringsvoorschriften voor accusystemen die voldoen aan IEEE 1725. Het gebruik van een niet-goedgekeurde accu of acculader kan leiden tot brand, explosies, lekkage of andere gevaren. Zorg ervoor dat metalen objecten niet in contact komen of kortsluiting veroorzaken • met de batterijpolen. Vervang de accu alleen door een andere accu die is gekwalificeerd voor het • systeem en voldoet aan de norm IEEE-Std-1725. Het gebruik van een niet- goedgekeurde accu kan leiden tot brand, explosies, lekkage of andere gevaren. Alleen een erkende serviceprovider mag de accu vervangen (tenzij het een accu is die door de gebruiker vervangen kan worden) Blijf erbij wanneer kinderen de accu gebruiken. • Zorg ervoor dat u het horloge of de batterij niet laat vallen. Als het horloge of de • batterij valt, met name op een hard oppervlak, en u vermoedt dat er schade is, laat het product dan nakijken in een servicecenter. Oneigenlijk gebruik van een accu kan leiden tot brand, explosies of andere • gevaren. Verwijder gebruikte batterijen volgens de instructies van de fabrikant. Zorg indien • mogelijk voor recycling. Doe gebruikte batterijen niet bij het gewone huishoudelijk afval. Haal altijd de stekker van de oplader uit het stopcontact als de batterij van het •...
- Page 10 apparaat volledig is opgeladen om te voorkomen dat de oplader onnodig energie verbruikt. Er bestaat explosiegevaar als de batterij wordt vervangen door een batterij van een • verkeerd type. Opmerkingen over waterbestendige eigenschappen Dit product is water- en stofbestendig in overeenstemming met beschermingsgraad IP67* (Ingress Protection rating). * D e IP67-rating betekent dat het product kan worden gebruikt nadat dit 30 minuten zachtjes wordt ondergedompeld tot een diepte van 1 meter in een bak met kraanwater op kamertemperatuur. Stel het product niet bloot aan omgevingen met extreem veel stof of vocht. Gebruik het product niet in de volgende omgevingen. D ompel het product niet onder in chemische vloeistoffen (zeep, enz. ), maar SALT SOAP alleen in water. SALT SALT Dompel het product niet onder in zout water, zoals zeewater. SOAP SOAP Dompel het product niet onder in een warmwaterbron. Draag dit product niet tijdens het zwemmen. SALT SALT Gebruik het product niet onder water. SOAP SOAP SALT Plaats het product niet direct op zand (zoals op een strand) of in modder. SOAP Zodra het product nat wordt, kan er water achterblijven in de openingen op het • apparaat. Schud het product om water te verwijderen.
- Page 11 Gebruik dit product niet op plaatsen waar het kan worden besproeid met water • onder hoge druk (bijv. in de buurt van een kraan of douchekop) of dompel het niet gedurende langere tijd onder in water, als het product niet is ontworpen voor hoge waterdruk. Dit product is niet bestand tegen schokken. Laat het product niet vallen en stel • het niet bloot aan schokken. Dit kan beschadiging of vervorming van het product veroorzaken, waardoor het kan gaan lekken. Pacemakers en andere medische apparatuur Personen met een pacemaker dienen het volgende in acht te nemen: Zorg ALTIJD voor een minimale afstand van vijftien (15) cm tussen de pacemaker • en het INGESCHAKELDE product. Draag het product niet in een borstzak. • Gebruik de pols tegenover de pacemaker om mogelijke RF-interferentie te • minimaliseren. Schakel het apparaat onmiddellijk UIT als er enige aanwijzing bestaat dat er • interferentie plaatsvindt. Gebruikt u andere persoonlijke medische apparatuur, raadpleeg dan uw arts of de fabrikant van uw apparaat om vast te stellen of het voldoende beschermd is tegen externe RF-energie. Tips voor het gebruik van Bluetooth en Wi-Fi op het horloge Wanneer u het product met een ander mobiel apparaat verbindt, moeten de •...
- Page 12 Plaats geen voorwerpen tussen het product en de aangesloten apparaten. Het • uitgaand/inkomend signaal kan zwakker worden als gevolg van het lichaam van de gebruiker, muren, hoeken of voorwerpen. Gebruik het waar geen obstakels zijn. Als u gebruikmaakt van een Wi-Fi-verbinding op een horloge, kan uw horloge • meldingen van uw telefoon of tablet ontvangen, zelfs als Bluetooth niet beschikbaar Uw horloge zal het dichtstbijzijnde Wi-Fi-netwerk zoeken en hiermee verbinding • maken op basis van de op uw telefoon opgeslagen lijst met Wi-Fi-verbindingen. Tips voor het display Geef niet-bewegende beelden niet lang achter elkaar weer. Het beeld kan • inbranden of vlekken op het scherm veroorzaken. Het gebruik van applicaties die hetzelfde scherm langer dan 10 minuten • weergeven, wordt afgeraden omdat mogelijke beschadiging van het scherm niet onder de garantie valt. WAARSCHUWING! Notificatie voor vervanging batterij De Li-ion-batterij is een gevaarlijke component die letsel kan veroorzaken. • Voorkom schade aan uw apparaat door de batterij te laten vervangen door •...
- Page 13 • bevat, die niet gemakkelijk kan worden verwijderd door eindgebruikers, raadt LG aan om de batterij alleen door gekwalificeerde professionals te laten verwijderen, zijnde voor vervanging of voor recycling aan het einde van de levensduur van dit product. Om schade aan het product te voorkomen, en...
- Page 14 Hoewel de verschillende modellen apparaten van LG kunnen opereren op • onderling verschillende SAR-niveaus, zijn ze allemaal zodanig ontwikkeld dat naleving van de geldende richtlijnen wordt gewaarborgd. De SAR-limiet die wordt aanbevolen door de International Commission on • Non-Ionizing Radiation Protection (ICNIRP), is 2 W/kg gemiddeld bij 10 g weefsel voor de mond-SAR of 4,0 W/kg gemiddeld bij 10 g weefsel voor de...
- Page 15 Naast de broncode zijn alle licentievoorwaarden, beperkingen van garantie en auteursrechtaanduidingen beschikbaar om te downloaden. LG Electronics verleent u de open source-code op cd-rom tegen een vergoeding die de kosten van een dergelijke levering dekt, zoals de kosten van de media, de verzending en de verwerking. Een dergelijk verzoek kunt u per e-mail richten aan: opensource@lge.com.
- Page 16 Uw oude toestel wegdoen Elektrische en elektronische producten mogen niet worden meegegeven met het huishoudelijk afval, maar moeten worden ingeleverd bij speciale inzamelingspunten die door de lokale of landelijke overheid zijn aangewezen. De correcte verwijdering van uw oude toestel helpt negatieve gevolgen voor het milieu en de menselijke gezondheid voorkomen. Wilt u meer informatie over de verwijdering van uw oude toestel? Neem dan contact op met de plaatselijke autoriteiten, de afvalophaaldienst of de winkel waar u het product hebt gekocht. Batterijen wegdoen Dit symbool kan worden gebruikt in combinatie met chemische symbolen voor kwik (Hg), cadmium (Cd) of lood (Pb) als de accu meer dan 0,0005% kwik, 0,002% cadmium of 0,004% lood bevat. Alle batterijen/accu’s mogen niet worden meegegeven met het huishoudelijk afval, maar moeten worden ingeleverd bij speciale inzamelingspunten die door de lokale of landelijke overheid zijn aangewezen. De correcte verwijdering van uw oude batterijen/accu’s helpt negatieve gevolgen voor het milieu en de gezondheid van mens en dier voorkomen. Wilt u meer informatie over de verwijdering van uw oude batterijen/ accu’s? Neem dan contact op met de plaatselijke autoriteiten, de afvalophaaldienst of de winkel waar u het product hebt gekocht. Veiligheidsinformatie...
-
Page 17: Meer Informatie Over Uw Horloge
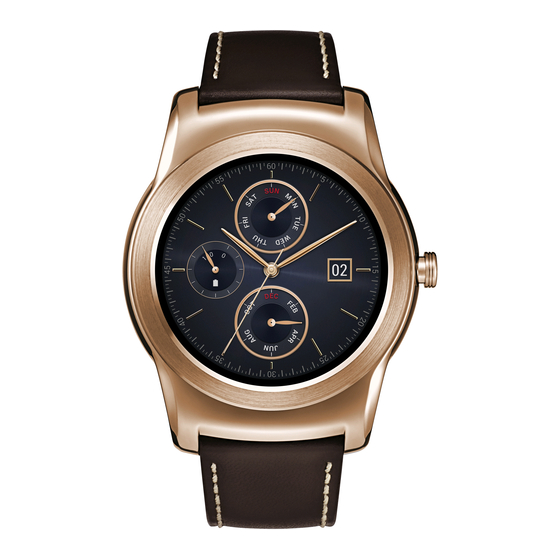
Meer informatie over uw horloge Lay-out van horloge Aan-/uittoets Opmerking: Het aanraakscherm mag niet in contact komen met andere elektrische apparaten. Elektrostatische ontladingen kunnen storingen van het aanraakscherm veroorzaken. Meer informatie over uw horloge... - Page 18 LG-logo verschijnt om het apparaat in te schakelen. Als het scherm niet reageert: Druk op de knop en houd die gedurende 10 seconden vast tot • LG-logo verschijnt om het horloge opnieuw op te starten. Aan-/ Wanneer het apparaat niet wordt gebruikt: uittoets Druk eenmaal kort op de knop om het scherm uit de slaapstand te •...
-
Page 19: Het Horloge Opladen
Waarschuwing Sluit het gat aan de onderzijde van het toestel niet af of raak het niet aan met iets scherps. Dit kan de werking van het apparaat verstoren. Het horloge opladen Voordat u het horloge voor de eerste keer gebruikt, dient u de batterij op te laden. Gebruik het laadstation van het horloge om de batterij van het apparaat op te laden. U kunt de batterij van het apparaat ook met een computer opladen. Daartoe sluit u de computer op het laadstation aan met de USB-kabel die bij het horloge is geleverd. Opmerking: Wanneer de batterij bijna leeg is, heeft het batterijpictogram de vorm van een lege batterij. - Page 20 Zoek de oplaadpunten op zowel het horloge als het laadstation. Oplaadpunten Opmerking: Het laadstation is alleen bedoeld voor gebruik met het horloge en is mogelijk niet compatibel met andere apparaten. Steek het smalle uiteinde van de meegeleverde USB-kabel in de USB-poort van het laadstation. Meer informatie over uw horloge...
- Page 21 Plaats het horloge op het laadstation en controleer of de oplaadpunten met elkaar zijn uitgelijnd. Sluit het laadstation aan op een stopcontact. Als uw horloge is uitgeschakeld, wordt het automatisch ingeschakeld. Koppel het horloge los van het laadstation als de batterij volledig is opgeladen. Opmerking: Het aanraakscherm werkt mogelijk niet bij een onstabiele stroomtoevoer naar • het horloge tijdens het opladen. Het horloge kan warm worden tijdens het opladen. Dat is normaal. Koppel de • oplader los als de batterij warmer wordt dan normaal. Meer informatie over uw horloge...
-
Page 22: Oplaadmodus
Oplaadmodus Nadat u het horloge voor de eerste keer hebt ingesteld, ziet u tijdens het opladen het oplaadscherm zoals hieronder weergegeven. Controleer het percentage van de resterende batterij en de tijd. Schuif naar rechts om terug te gaan naar de wijzerplaat. Oplaadniveau Tijd Batterijpercentage Als het scherm niet reageert Als het apparaat vastloopt en stopt met werken, houd de Aan-/uittoets dan gedurende 10 seconden vast totdat het scherm inschakelt en het LG-logo wordt weergegeven. Het horloge in- en uitschakelen Het horloge inschakelen U schakelt het horloge in door de Aan-/uittoets (aan de rechterkant van het apparaat) enkele seconden ingedrukt te houden. Het scherm licht op en het LG-logo wordt weergegeven. Meer informatie over uw horloge... -
Page 23: Verbinden Met Een Ander Mobiel Apparaat
Aan-/uittoets Het horloge uitschakelen Houd de Aan-/uittoets ingedrukt totdat de lijst met apps wordt weergegeven. Klik op Settings > Power off. Klik op als het bericht Power off: Are you sure?, wordt weergegeven. Verbinden met een ander mobiel apparaat Als u uw horloge op een ander apparaat wilt aansluiten, dient u uw apparaat te herstellen. Uw horloge herstellen Met deze instelling kunt u de fabrieksinstellingen van het horloge herstellen en verwijdert u al uw data. Houd de Aan-/uittoets ingedrukt totdat de lijst met apps wordt weergegeven. Klik op Settings > Factory reset. U wordt gevraagd om te bevestigen. Klik op . U kunt met het horloge met één mobiel apparaat tegelijk verbinding maken. • Door de fabrieksinstellingen te herstellen, worden alle data uit het geheugen van • uw horloge gewist. Nadat dit is voltooid, is het horloge gereed om verbinding te Meer informatie over uw horloge... -
Page 24: Tips Voor Het Aanraakscherm
maken met een ander mobiel apparaat. Tips voor het aanraakscherm Hier volgen enkele tips over hoe u op uw horloge kunt navigeren. Klikken of aanraken – met een enkele vingeraanraking kunt u items, • koppelingen, sneltoetsen en letters op het schermtoetsenbord selecteren. Tikken en vasthouden - klik op een schermitem, houd het item vast en til uw • vinger pas op als er een actie plaatsvindt. Vegen of schuiven – u kunt vegen of schuiven door uw vinger snel over het • schermoppervlak te bewegen. Houd uw vinger niet stil wanneer u het scherm voor het eerst aanraakt. Klikken of aanraken Vasthouden Vegen of schuiven Het horloge dragen Waarschuwingen voor waterbestendigheid Uw horloge is getest in een gecontroleerde omgeving en is in bepaalde omstandigheden water- en stofresistent (voldoet aan de vereisten van classificatie IP67, die zijn beschreven door de internationale norm IEC 60529 - Mate van bescherming door behuizing [IP-code]; testomstandigheden: 15 - 35 °C, 86 - 106 kPa, 1 meter, gedurende 30 minuten). Ondanks deze classificatie is het apparaat niet volledig bestand tegen waterschade. - Page 25 Let op het volgende voordat u de leren polsband gaat dragen De gestikte leren polsband van de LG Watch Urbane is dik genoeg om te • voldoen aan de hoge kwaliteitsnormen. Voordat u de leren polsband gaat dragen, dient u deze een paar keer heen en weer te buigen.
-
Page 26: Hartslagsensor
Hartslagsensor Bevestig het horloge correct om uw pols voordat u uw hartslag meet. Hartslagsensor OPMERKINGEN: Als het horloge te los zit of te veel beweegt, is de meting mogelijk niet • correct. Kijk nooit direct in het licht van de hartslagsensor; dit kan uw • gezichtsvermogen beschadigen. Als de hartslagmetingen onnauwkeurig zijn, kunt u deze opnieuw meten door •... -
Page 27: Het Horloge Verbinden Met Een Mobiel Apparaat
Het horloge verbinden met een mobiel apparaat Vóór de koppeling Voer vóór de koppeling het volgende op de telefoon of het tablet uit. Controleer of u Android-versie 4.3 of later op de telefoon of het tablet hebt geïnstalleerd en of het apparaat Bluetooth ondersteunt. ® Ga vanaf uw telefoon of tablet naar http://g.co/WearCheck om te zien of uw • telefoon of tablet Android Wear ondersteunt. Als uw telefoon of tablet niet met Android 4.3 of later werkt, vraag dan aan de • fabrikant of er een software-update beschikbaar is. Zorg dat uw telefoon of tablet zich naast uw horloge bevindt. Download de app Android Wear vanuit de Play Store en installeer deze op uw telefoon of tablet. Controleer of de app Android Wear is geïnstalleerd en naar de nieuwste versie op uw telefoon of tablet is bijgewerkt. -
Page 28: Het Koppelen Van Uw Horloge
Het koppelen van uw horloge Schakel het horloge in en veeg over het welkomstscherm naar links om te beginnen. Klik op een taal. Sluit uw horloge aan op een voedingsbron en veeg over het scherm naar links om door te gaan. Tip: Als de batterij lager dan 20% aangeeft, laadt u uw horloge eerst op voordat u verder gaat met de volgende stap. Schuif naar links over het scherm en volg de aanwijzingen op totdat de horlogecode wordt weergegeven. Open de app Android Wear op uw telefoon of tablet. Schakel Bluetooth in tijdens de installatie als dat nog niet is gebeurd. Op uw telefoon of tablet wordt een lijst met apparaten in uw omgeving weergegeven. Klik op de horlogecode. U ziet een koppelingscode op uw telefoon of tablet en op uw horloge. Controleer of de codes overeenkomen. -
Page 29: Uw Horloge Gebruiken
Uw horloge gebruiken Begin in het wijzerplaatscherm van uw horloge (waar u de tijd ziet) Haal eerst uw telefoon uit de slaapstand. Als het scherm van uw horloge donker is, kunt u het horloge als volgt uit de slaapstand halen: Tik op het scherm. • Draai uw pols zodat u de wijzerplaat ziet. • Druk op de Aan-/uittoets op het horloge. • Het scherm snel dimmen Druk met de palm van uw hand op het scherm totdat het trilt. Hiermee wordt het horloge gedimd. De wijzerplaat aanpassen Tik ergens op de wijzerplaat en houd deze een paar seconden vast. Schuif het scherm naar rechts of links om door de ontwerpen te bladeren en klik om het gewenste ontwerp te kiezen. Uw horloge gebruiken... -
Page 30: Notificatiekaarten
Tip: u kunt ook de wijzerplaat via de app Android Wear wijzigen en downloaden. Notificatiekaarten De meeste notificaties op uw telefoon worden ook op uw horloge getoond. Dat zijn notificaties voor gemiste oproepen, SMS-berichten, herinneringen voor gebeurtenissen, enzovoort. Notificaties worden in de vorm van kaarten onder aan de wijzerplaat weergegeven. Schuif omhoog om meer kaarten te bekijken. Schuif naar Schuif naar links voor rechts om meer details de kaart af en opties. te wijzen. -
Page 31: Notificaties Blokkeren
Schuif van links naar rechts om een kaart te verwijderen. Wanneer u een kaart hebt bekeken, kunt u deze verwijderen. Als u een kaart op uw horloge verwijdert, wordt dezelfde kaart of notificatie gewist op uw telefoon. Als u meer details wilt bekijken, schuift u de kaart van rechts naar links. Sommige kaarten bieden meer informatie of dingen die u kunt doen. Een kaart terughalen Nadat de kaart is afgewezen, schuift u van de bovenkant van het horlogescherm naar beneden en klikt u op de knop Herstel . U hebt een paar seconden om de kaart terug te krijgen. Als u de laatste kaart uit de reeks hebt weggeschoven, moet u vanaf de onderkant van het scherm naar boven schuiven om de knop Herstel te zien. Notificaties blokkeren Als u notificaties op uw telefoon krijgt die u niet op uw horloge wilt laten weergeven, kunt u instellen dat bepaalde apps niet op uw horloge worden getoond. -
Page 32: Oproepnotificaties
Oproepnotificaties U kunt direct oproepnotificaties ontvangen wanneer uw telefoon een inkomende oproep ontvangt. De notificatie geeft het nummer van de beller of de contactpersoon op uw telefoon weer en u kunt de oproep accepteren of afwijzen. OPMERKING: Uw horloge ontvangt alleen een notificatie. Gebruik de telefoon die is gekoppeld aan uw horloge om de oproep te beantwoorden. Schuif naar rechts Notificatie Schuif naar links om een oproep te inkomende oproep om een oproep te weigeren beantwoorden Wijzigen wanneer notificaties binnenkomen... -
Page 33: De Batterijstatus Of De Datum Bekijken
De batterijstatus of de datum bekijken Schuif vanaf de bovenkant van het scherm naar beneden. Resterende batterijcapaciteit Datum OPMERKING: Bepaalde inhoud kan afwijken van uw apparaat, afhankelijk van de versie van het besturingssysteem. Het scherm tijdelijk uitzetten met de modus Theater U kunt het scherm van uw horloge uitschakelen, zodat het display niet oplicht en er geen notificaties verschijnen. Druk tweemaal snel op de Aan-/uittoets. • Als het scherm donker is, tikt u op het scherm om het horloge uit de slaapstand te halen. Schuif vanaf de bovenkant van het scherm naar beneden. Schuif van rechts naar links totdat u modus Theater ziet. Klik op het pictogram om de functie in te schakelen. -
Page 34: De Helderheid Van Het Scherm Tijdelijk Verhogen
De helderheid van het scherm tijdelijk verhogen U kunt de helderheid tijdelijk verhogen als u buiten op een zonnige plek bent. De extra helderheid duurt een paar seconden en wordt automatisch uitgeschakeld. Druk drie keer snel achter elkaar op de Aan-/uittoets. • Als het scherm donker is, tikt u op het scherm om het horloge uit de slaapstand te halen. Schuif vanaf de bovenkant van het scherm naar beneden. Schuif van rechts naar links totdat u Helderheid versterken ziet. Klik op het pictogram om de functie in te schakelen. Het menu Opties openen Als het scherm donker is, klikt u op het scherm om het horloge uit de slaapstand te halen. Klik ergens op de achtergrond van het scherm en schuif omhoog naar het menu Opties. Schuif van de bovenkant van het scherm naar beneden, veeg naar links totdat het menu Opties verschijnt en klik daarna op Opties Opslagruimte beheren Via de app Android Wear op uw telefoon kunt u de volgende informatie bekijken: Hoeveel opslagruimte beschikbaar is • Totale opslagruimte op uw horloge • Apps of services die gebruikmaken van de opslagruimte van uw horloge • Uw horloge gebruiken... - Page 35 De details van de opslagruimte bekijken: Zorg dat uw horloge met uw telefoon verbonden is. Open de app Android Wear op uw telefoon. Klik op > Tik op de naam van uw horloge als u meerdere apparaten hebt > Horlogegeheugen. Uw horloge gebruiken...
-
Page 36: Taken Met Gebruik Van Stemopdracht
Taken met gebruik van stemopdracht U kunt een menu met eenvoudige taken op uw horloge bekijken. Alles in deze lijst kan ook hardop worden gezegd. Zeg gewoon OK Google of schuif het homescreen naar links totdat u de optie Nu spreken ziet en zeg uw opdracht of vraag. Als u bijvoorbeeld in het menu Nu spreken bent, kunt u Start stopwatch aanraken. Om hetzelfde met uw stem te doen, kunt u vanuit de meeste schermen gewoon OK Google, start stopwatch zeggen. Opmerking: Sommige spraakacties zijn niet beschikbaar in alle talen en landen. Volg deze stappen om uw stem te gebruiken bij uw horloge: Als het scherm donker is, klikt u op het scherm om het horloge uit de slaapstand te halen. -
Page 37: De Apps Wijzigen Die U Voor Spraakacties Gebruikt
De apps wijzigen die u voor spraakacties gebruikt U kunt instellen welke apps u voor verschillende spraakacties gebruikt. U kunt bijvoorbeeld de app wijzigen die u gebruikt om alarmen in te stellen of om berichten te verzenden. Open de app Android Wear op uw telefoon. Op de onderste helft van het scherm ziet u onder een lijst met acties. Blader en tik op een actie. U kunt kiezen uit de beschikbare apps. Tip: U kunt ook apps downloaden die met Android Wear uit de Play Store kunnen worden gebruikt. Een notitie maken of bekijken U kunt ook tegen uw horloge spreken om een notitie te maken of bestaande notities te bekijken via QuickMemo+ of Android-apps zoals Google Keep. Als het scherm donker is, klikt u op het scherm om het horloge uit de slaapstand te halen. -
Page 38: Een Herinnering Instellen
OPMERKING: Als u QuickMemo+ of Google Keep op uw telefoon hebt geïnstalleerd: Terwijl u spreekt, verandert de app de woorden in tekst. Wanneer u klaar • bent met spreken, wordt de tekst van de notitie in QuickMemo+ of Google Keep opgeslagen op uw mobiele apparaat. Bekijk en bewerk uw notities door de app op uw mobiele apparaat te •... -
Page 39: Mijn Hartslag Weergeven
weergegeven. Zeg Show me my steps (Mijn stappen weergeven). U ziet nu het aantal stappen, de voortgang ten opzichte van uw fitnessdoelstellingen en een staafdiagram van het aantal stappen per dag. U kunt een lijst met dagelijkse staptotalen weergeven door omhoog over het scherm te schuiven. Mijn hartslag weergeven Gebruik de app Hartslag om uw huidige hartslag te meten en op te nemen. OPMERKING: De hartslagmetingsfunctie van het apparaat is niet bedoeld voor klinische of medische diagnose. Volg de richtlijnen in Het horloge dragen en Nauwkeurige metingen om ervoor te zorgen dat uw hartslagmetingen nauwkeurig zijn. -
Page 40: Een Sms Verzenden
Zeg Show me my heart rate (Mijn hartslag weergeven). Als u deze functie voor het eerst probeert, moet u Google Fit of LG Pulse selecteren. Selecteer de app die u wilt gebruiken, dan wordt de geselecteerde app de volgende keer standaard weergegeven. Uw horloge zal uw hartslag gaan meten. Na korte tijd ziet u uw hartslag op het scherm samen met de geschiedenis van uw hartslagmetingen. U voert nog een hartslagmeting uit door nog een keer op Opnieuw controleren te klikken. Een SMS verzenden Met deze functie kunt u het horloge gebruiken om tekstberichten te dicteren voor contactpersonen die op uw mobiele apparaat zijn opgeslagen. U kunt ook ontvangen sms'jes beantwoorden die in sms-kaarten worden weergegeven. Een bericht verzenden Als het scherm donker is, klikt u op het scherm om het horloge uit de slaapstand te halen. Vanaf de wijzerplaat zegt u OK Google of klikt u op een willekeurige plek op de achtergrond van het scherm en schuift u naar links. De prompt Nu spreken wordt weergegeven. Zeg Send a text (Een SMS verzenden). Het scherm Naar wie? wordt weergegeven. De prompt Nu spreken wordt weergegeven. Spreek de naam van de contactpersoon die u een SMS wilt sturen, selecteer vervolgens de gewenste contactpersoon als de lijst met contactpersonen wordt weergegeven. -
Page 41: E-Mail
Een bericht beantwoorden U ziet kaarten als u berichtmeldingen op uw telefoon ontvangt. Veeg van rechts naar links totdat Antwoord verschijnt. Tik op Antwoord en zeg vervolgens uw bericht. E-mail U kunt het horloge gebruiken om e-mails te schrijven en e-mails te lezen die u op uw mobiele apparaat hebt ontvangen. Als het scherm donker is, klikt u op het scherm om het horloge uit de slaapstand te halen. Vanaf de wijzerplaat zegt u OK Googleof klikt u op een willekeurige plek op de achtergrond van het scherm en schuift u naar links. De prompt Nu spreken wordt weergegeven. Zeg Email. Het scherm Naar wie? wordt weergegeven. De prompt Spreek nu wordt weergegeven. Spreek de naam van de contactpersoon die u een e-mail wilt sturen, selecteer vervolgens de gewenste contactpersoon als de lijst met contactpersonen wordt weergegeven. U wordt gevraagd het bericht uit te spreken dat u wilt verzenden. Uw bericht wordt automatisch verzonden. E-mail lezen op uw telefoon U keert terug naar het lezen van e-mails op uw mobiele apparaat door vervolgens de berichtkaart van rechts naar links te schuiven en op Openen op telefoon te tikken. Een e-mail beantwoorden Als u van rechts naar links veegt, kunt u verschillende acties uitvoeren, zoals archiveren en beantwoorden. Tik op Antwoord en zeg uw bericht. Uw bericht wordt automatisch verzonden. Taken met gebruik van stemopdracht... -
Page 42: Agenda
E-mailberichten verwijderen Schuif de berichtkaart van rechts naar links en klik op Wissen. Agenda U kunt gebeurtenissen die in de agenda op uw mobiele apparaat zijn gepland, weergeven met het horloge. Als het scherm donker is, klikt u op het scherm om het horloge uit de slaapstand te halen. Vanaf de wijzerplaat zegt u OK Google of klikt u op een willekeurige plek op de achtergrond van het scherm en schuift u naar links. De prompt Nu spreken wordt weergegeven. Zeg Agenda. U ziet een lijst met al uw geplande gebeurtenissen. Klik op een gebeurtenis als u de details van een gebeurtenis wilt bekijken. Navigatie Gebruik het horloge om de weg naar een geselecteerde bestemming te vinden. Als het scherm donker is, klikt u op het scherm om het horloge uit de slaapstand te halen. Vanaf de wijzerplaat zegt u OK Google of klikt u op een willekeurige plek op de achtergrond van het scherm en schuift u naar links. De prompt Nu spreken wordt weergegeven. Zeg Navigate (Navigeren), gevolgd door de locatie. Een timer instellen U kunt het horloge als een afteltimer gebruiken. Zodra u een timer hebt ingesteld, ziet u een nieuwe kaart voor het aftellen. Als het scherm donker is, klikt u op het scherm om het horloge uit de slaapstand te Taken met gebruik van stemopdracht... -
Page 43: De Stopwatch Gebruiken
halen. Vanaf de wijzerplaat zegt u OK Google of klikt u op een willekeurige plek op de achtergrond van het scherm en schuift u naar links. De prompt Nu spreken wordt weergegeven. Zeg Set a timer (Een timer instellen). Veeg door de beschikbare tijdsduren en start de timer door op de gewenste tijdsduur te klikken. Start of hervat het aftellen door op te klikken. • Onderbreek de timer door op te klikken. • Timer afwijzen: Wanneer de timer afgaat, kunt u deze afwijzen door op uw scherm van links naar rechts te schuiven. De stopwatch gebruiken Meet met de app Stopwatch hoeveel tijd er is verstreken. Als het scherm donker is, klikt u op het scherm om het horloge uit de slaapstand te halen. Vanaf de wijzerplaat zegt u OK Google of klikt u op een willekeurige plek op de achtergrond van het scherm en schuift u naar links. De prompt Nu spreken wordt weergegeven. Zeg Start stopwatch. Klik op om te beginnen. Een alarm instellen U kunt op het horloge meerdere alarmen instellen. De alarmen op uw horloge en uw telefoon staan los van elkaar. -
Page 44: Huidige Alarmen Bekijken
Vanaf de wijzerplaat zegt u OK Google of klikt u op een willekeurige plek op de achtergrond van het scherm en schuift u naar links. De prompt Nu spreken wordt weergegeven. Zeg Set an alarm (Een alarm instellen). Zoek de gewenste alarmtijd door omhoog of omlaag te schuiven. Als u het alarm wilt herhalen, tikt u op . Tik op om het alarm op te slaan. Wanneer een alarm afgaat, trilt uw horloge en wordt een kaart getoond. Uitschakelen Sluimerstand Sleep het pictogram van Sleep het pictogram van links naar rechts. rechts naar links. Huidige alarmen bekijken Als het scherm donker is, klikt u op het scherm om het horloge uit de slaapstand te halen. Vanaf de wijzerplaat zegt u OK Google of klikt u op een willekeurige plek op de achtergrond van het scherm en schuift u daarna naar links. De prompt Nu spreken wordt weergegeven. Zeg Show alarms (Alarmen weergeven). Er wordt een lijst weergegeven met de alarmen die u op het horloge hebt ingesteld. Taken met gebruik van stemopdracht... -
Page 45: Apps Gebruiken
Apps gebruiken Het appsoverzicht is een lijst met apps die op het horloge zijn geïnstalleerd. Naar de geïnstalleerde apps op uw horloge gaan: Als het scherm donker is, klikt u op het scherm om het horloge uit de slaapstand te halen. Klik ergens op de achtergrond van het scherm om de lijst met apps te openen. Andere apps downloaden U ziet een lijst van aanbevolen apps in de Play Store Open de app Android Wear om meer apps naar uw telefoon te downloaden. Een oproep plaatsen Uw horloge kan het toetsenblok weergeven, zodat u een nummer kunt kiezen. Houd de Aan-/uittoets ingedrukt totdat de lijst met apps wordt weergegeven. Klik daarna op Bellen Schuif naar boven totdat de kiezer wordt weergegeven. Voer de telefoonnummers in en klik vervolgens op . Uw telefoon gaat het nummer bellen dat u hebt ingevoerd op uw horloge. Tip: U kunt ook bellen vanuit de lijst Recent en Favorieten. Apps gebruiken... -
Page 46: De App Google Fit Gebruiken
Klik en houd het plussymbool ( +) vast om een internationaal nummer te bellen. Klik hier om een onjuist nummer te wissen. Klik om het nummer te bellen dat u hebt ingevoerd. OPMERKING: deze functie is mogelijk beschikbaar na de software- updateplanning in mei 2015. De app Google Fit gebruiken Met de app Fit kunt u uw stappen tellen en zien hoe ver u hebt gelopen. U kunt ook uw hartslagmetingen zien. Door de app Google Fit op de telefoon te installeren die gekoppeld is aan uw Android Wear-horloge, kunt u gegevens tussen de twee apparaten synchroniseren en gebruikmaken van alle functies van Fit. Houd de Aan-/uittoets ingedrukt totdat de lijst met apps wordt weergegeven en klik daarna op Fit . Schuif naar links om details te zien. Bekijk een schatting van het aantal stappen dat u vandaag hebt gezet U kunt tegen uw horloge spreken of het menu gebruiken om een schatting te bekijken van het aantal stappen dat u vandaag hebt gezet. - Page 47 Uw hartslag controleren U kunt spreken of het menu gebruiken om uw hartslag te controleren. Zeg OK Google. Als u de opdracht Nu spreken ziet, zegt u: Show me my heart rate (Mijn hartslag weergeven) (Zie de sectie Mijn hartslag weergeven voor meer informatie) Open de Fit -app en schuif naar links. Dan ziet u de hartslag. Schuif omlaag om de geschiedenis van de hartslagmetingen te bekijken of klik op om de hartslag te meten. Apps gebruiken...
-
Page 48: Instellingen
Instellingen Het menu Opties openen Als het scherm donker is, klikt u op het scherm om het horloge uit de slaapstand te halen. Klik ergens op de achtergrond van het scherm en schuif omhoog naar Opties. Schuif vanaf de bovenkant van het scherm naar beneden en schuif naar links totdat • het menu Opties verschijnt. Klik vervolgens op Opties . Helderheid van display aanpassen U kunt de helderheid van het horlogescherm aanpassen op het apparaat zelf. Klik in het menu Opties op Pas de helderheid aan. Kies een helderheidsniveau door op een optie te tikken. Wijzerplaat aanpassen U kunt de vormgeving van de wijzerplaat van uw horloge op een paar manieren wijzigen: door op de achtergrond van uw scherm te drukken en dit vast te houden, via de app Android Wear op uw telefoon of via het menu Opties op uw horloge. Klik in het menu Opties op Wijzerplaat aanpassen. Schuif naar rechts en links om door de ontwerpen te bladeren. Als u helemaal naar links bladert, ziet u uw recente wijzerplaten. Klik om een nieuw ontwerp te kiezen. Lettergrootte U kunt de grootte van het weergegeven lettertype op het horloge instellen. In het menu Opties klikt u op Lettergrootte. Instellingen... -
Page 49: Polsgebaren
Kies een grootte door op een optie te klikken. Polsgebaren U kunt bewegingsgebaren gebruiken om het horlogescherm uit de slaapstand te halen of te dimmen. Draai uw pols zodat u de wijzerplaat ziet. In het menu Opties klikt u op Polsgebaren om deze functie in of uit te schakelen. • Wi-Fi-instellingen Als u Wi-Fi inschakelt en deze op de automatische modus is ingesteld, kunt u uw horloge ook met uw telefoon synchroniseren wanneer Bluetooth niet beschikbaar is. Wanneer de verbinding met Bluetooth is verbroken, wordt Wi-Fi automatisch ingeschakeld. Als u gebruikmaakt van een Wi-Fi-verbinding op een horloge, kan uw horloge meldingen van uw telefoon of tablet ontvangen, zelfs als Bluetooth niet beschikbaar is. Uw horloge zal het dichtstbijzijnde Wi-Fi-netwerk zoeken en hiermee verbinding maken op basis van de op uw telefoon opgeslagen lijst met Wi-Fi- verbindingen. Tik vanuit het menu Opties op Wi-Fi instellingen om de automatische modus in- of • uit te schakelen. Bluetooth-apparaten Het apparaat zoekt naar Bluetooth-apparaten binnen het bereik. U kunt ook de huidige Bluetooth-verbinding van uw telefoon verbreken. Klik in het menu Opties op Bluetooth-apparaten. • Instellingen... -
Page 50: Het Scherm Op Altijd Aan Instellen
Het scherm op Altijd aan instellen U kunt het scherm instellen om de tijd te tonen of compleet uit te schakelen wanneer u het horloge niet gebruikt. Als deze optie is ingesteld op Uitschakelen, wordt het scherm ingeschakeld als u het scherm kantelt of bedekt. In het menu Opties klikt u op Scherm altijd aan om deze functie in of uit te • schakelen. Aan: wanneer uw horloge niet actief is, wordt een gedimde wijzerplaat • weergegeven. Uit: wanneer het horloge niet actief is, is het scherm donker. • Flightmode Als Flightmode is ingeschakeld, kunt u nog steeds een groot aantal functies van uw horloge gebruiken, zoals Hartslag, enzovoort. Kies deze optie als u gaat vliegen of waar het niet is toegestaan om gegevens te verzenden of te ontvangen. Belangrijk! In de Flightmode heeft uw horloge geen toegang tot de informatie die op uw mobiele toestel is opgeslagen. Schakel de Flightmode ook in op het mobiele apparaat. -
Page 51: Fabrieksinstellingen Herstellen
Fabrieksinstellingen herstellen Met deze instelling kunt u de fabrieksinstellingen van het horloge herstellen en verwijdert u al uw data. Klik op Settings > Factory reset. U wordt gevraagd om te bevestigen. Klik op . U kunt met het horloge met één mobiel apparaat tegelijk verbinding maken. • Door de fabrieksinstellingen te herstellen, worden alle data uit het geheugen van • uw horloge gewist. Nadat dit is voltooid, is het horloge gereed om verbinding te maken met een ander mobiel apparaat. Opnieuw opstarten Met deze instelling start u uw horloge opnieuw op. Klik in het menu Settings op Opnieuw opstarten. Er wordt een prompt weergegeven om te bevestigen dat u uw horloge opnieuw wilt opstarten. Klik op om uw horloge opnieuw op te starten. Houd de Aan-/uittoets gedurende 10 seconden vast. Uw horloge wordt • uitgeschakeld en weer ingeschakeld. Schermvergrendeling Klik om schermvergrendeling in te stellen. Door met uw vingers een patroon te tekenen, wordt het scherm ontgrendeld. Instellingen... -
Page 52: Uitzetten
Uitzetten Tik vanuit het menu Settings op Power off. Klik op als het bericht Power off: Are you sure?, wordt weergegeven. Info Hier wordt informatie over uw horloge weergegeven. Model, apparaatnaam, softwareversie, serienummer, buildnummer en informatie over de verbinding en de batterij worden weergegeven. De volgende opties zijn eveneens beschikbaar. Klik in het menu Opties op Info. • Systeemupdates: hiermee zorgt u ervoor dat altijd de laatste software op uw • horloge is geladen. Wettelijke informatie: hiermee geeft u informatie over de wettelijke regelgeving • weer. Juridische mededelingen: hier vindt u instructies om de juridische mededelingen • voor het mobiele apparaat te bekijken. Instellingen... -
Page 53: Informatie Over Deze Gebruikershandleiding
Informatie over deze gebruikershandleiding Informatie over deze gebruikershandleiding Lees deze handleiding zorgvuldig voordat u het apparaat gaat gebruiken. U vindt • hier richtlijnen voor een veilig en correct gebruik van het product. Sommige afbeeldingen en schermafbeeldingen in deze handleiding zien er op uw • product mogelijk anders uit. Er kunnen verschillen zijn tussen de inhoud hier en het eindproduct, of met de • software die door serviceproviders of operators is geleverd. Deze inhoud kan zonder kennisgeving worden gewijzigd. Ga naar de website van LG op www.lg.com voor de meest recente versie van deze handleiding. De applicaties op uw product en hun functies kunnen per land, regio of • hardwarespecificaties variëren. LG is niet verantwoordelijk voor prestatieproblemen door het gebruik van applicaties die zijn ontwikkeld door andere providers dan LG. LG is niet verantwoordelijk voor prestatie- of compatibiliteitsproblemen als gevolg • van gewijzigde registerinstellingen of wijzigingen in het besturingssysteem. Wijzigingen in het besturingssysteem kunnen tot gevolg hebben dat het apparaat en de bijbehorende applicaties mogelijk niet langer naar behoren functioneren. De licentie van de software, audio, achtergronden, afbeeldingen en andere media • die bij uw apparaat zijn geleverd, is voor beperkt gebruik. Het uitpakken en gebruiken van deze materialen voor commerciële of andere doeleinden, is mogelijk een overtreding van de auteursrechtelijke wetgeving. U bent als gebruiker volledig verantwoordelijk voor eventueel onwettig gebruik van media. Aan dataservices, zoals berichten, uploaden en downloaden, auto-synchronisatie of • het gebruik van locatiediensten, zijn mogelijk extra kosten verbonden. Zorg ervoor dat u een abonnement kiest dat bij u past om aanvullende kosten te voorkomen. Neem contact op met uw serviceprovider voor meer informatie. Informatie over deze gebruikershandleiding... -
Page 54: Handelsmerken
Handelsmerken LG en het LG-logo zijn gedeponeerde handelsmerken van LG Electronics. • Alle andere handelsmerken en auteursrechten zijn het eigendom van hun • respectieve eigenaren. Informatie over deze gebruikershandleiding... -
Page 55: Accessoires
• USB-kabel • Laadstation • OPMERKING: Gebruik altijd originele LG-accessoires. De meegeleverde items zijn alleen • voor dit apparaat ontwikkeld en zijn mogelijk niet compatibel met andere apparaten. De items die bij het apparaat zijn meegeleverd kunnen variëren, afhankelijk •... - Page 57 Guide de l’utilisateur FRANÇAIS Certains contenus et illustrations peuvent différer de votre appareil en fonction de • la région, du fournisseur de service, de la version du logiciel, ou de la version du système d'exploitation, et sont sujets à modification sans préavis. Utilisez toujours des accessoires d’origine LG. Les éléments fournis sont conçus • uniquement pour ce téléphone et peuvent ne pas être compatibles avec d'autres appareils. Cet appareil n'est pas recommandé pour les personnes malvoyantes en raison de • son écran tactile. Copyright ©2015 LG Electronics, Inc. Tous droits réservés. LG et le logo LG sont • des marques déposées de LG Group et de ses entités apparentées. Toutes les autres marques commerciales appartiennent à leurs propriétaires respectifs. Google™, Google Maps™, Gmail™, YouTube™, Hangouts™ et Play Store™ • sont des marques commerciales de Google, Inc.
- Page 58 Sommaire Consignes de sécurité ......4 Voir le niveau de charge de la batterie ou la date ...........31 Se familiariser avec votre montre ..15 Éteindre temporairement l'écran grâce au Présentation de la montre ......15 mode Cinéma ........32 Chargement de la montre ......17 Augmenter temporairement la luminosité...
- Page 59 Paramètres ..........46 Lancement du menu Paramètres ...46 Régler la luminosité .......46 Modifier le cadran de la montre .....46 Taille de police ........47 Mouvements du poignet ......47 Paramètres Wi-Fi ........47 Appareils Bluetooth........47 Régler l'écran pour qu'il reste toujours allumé ...........48 Mode Avion ..........48 Accessibilité...
-
Page 60: Consignes De Sécurité
Consignes de sécurité Avant de mettre votre produit sous tension, consultez les informations relatives à la sécurité fournies dans ce document. Sécurité et manipulation - Informations générales Lorsque vous utilisez votre produit, suivez les conseils de bon sens énumérés ci-après. Votre environnement Températures de fonctionnement sûres. Utilisez et rangez votre produit à une • température comprise entre 0 °C/32 °F et 40 °C/104 °F. Exposer votre produit à des températures extrêmement basses ou hautes peut endommager votre appareil ou provoquer des dysfonctionnements, voire le faire exploser. En voiture... En voiture, la conduite doit être votre unique priorité. L'utilisation d'un • périphérique ou accessoire mobile pour passer un appel ou autre pendant que vous conduisez peut détourner votre attention de la route. Gardez les yeux sur la route. Lorsque vous vous trouvez à proximité d'explosifs... N'utilisez pas le produit • dans des zones où des étincelles causées par le produit seraient susceptibles de provoquer incendies ou explosions. En avion... Observez toutes les règles et instructions en vigueur pour l'utilisation •... - Page 61 Mettez votre appareil hors tension dans les zones où son utilisation est interdite ou dans lesquelles il pourrait provoquer des interférences ou des dangers. Changer le bracelet pour un bracelet un métal peut avoir un impact négatif sur la • connectivité Bluetooth/Wi-Fi de la montre. Conseils de sécurité AVERTISSEMENT : le support de chargement contient des aimants puissants pouvant créer des interférences avec les stimulateurs cardiaques, les cartes de crédit, les montres et autres objets sensibles aux aimants. Pour éviter d'endommager votre produit et réduire les risques d'incendies, d'électrocutions, d'explosions ou autres, veuillez observer les précautions de base suivantes : Utilisez uniquement des câbles, chargeurs et autres accessoires agréés LG. • Ne laissez pas tomber votre produit, ne le soumettez pas à des chocs et ne le • secouez pas. Évitez de plier, de tordre, de faire fondre le cordon d'alimentation ou de tirer • dessus, ou encore de placer des objets lourds dessus. Ce produit est équipé d'un câble USB permettant d'établir une connexion à • un ordinateur de bureau ou un notebook, ou au chargeur. Avant de relier votre produit à un ordinateur, vérifiez que celui-ci est correctement mis à la terre. Le cordon d'alimentation d'un ordinateur de bureau ou d'un notebook dispose d'un conducteur de mise à la terre de l'équipement et d'une fiche de mise à la terre. La fiche doit être branchée dans une prise appropriée correctement installée et mise à la terre, conformément aux codes et réglementations locaux en vigueur. Le produit ne doit pas être ouvert, écrasé, plié, déformé, percé ou abîmé. • Vous ne devez pas insérer d'objets étrangers dans le produit. • Ne placez pas le produit dans un four à microondes. • N'exposez pas le produit à du feu, des explosions ou autres dangers. • Nettoyez le produit avec un chiffon doux et humide. N'utilisez pas de substances •...
- Page 62 Si vous rencontrez un problème lors de l'utilisation de votre produit, cessez de • l'utiliser et consultez le centre de services client agréé LG Electronics. N'exposez pas le produit à de l'eau ou à d'autres liquides. • Les fonctions de podomètre, sommeil, exercice physique et fréquence • cardiaque ne sont pas conçues pour traiter ou diagnostiquer des problèmes de santé et doivent être utilisées exclusivement pour les activités de loisir, le bien-être et la remise en forme.
- Page 63 Avertissements concernant la batterie La batterie ne doit pas être démontée, ouverte, écrasée, pliée, déformée, percée • ou abîmée. Ne tentez pas de la modifier, d'y insérer des objets étrangers, de l'immerger ou de • l'exposer à de l'eau ou d'autres liquides, ou encore à du feu, des environnements explosifs ou autres environnements dangereux. Tenez la batterie hors de portée des animaux et de leurs crocs ou griffes, ainsi que • des objets pointus en général. Le non-respect de cette consigne peut entraîner un incendie. Utilisez uniquement la batterie correspondant au système spécifié. • Utilisez uniquement un système de chargement ayant reçu la certification CTIA • (conformité du système de batterie à la norme IEEE 1725). L'utilisation d'une batterie ou d'un chargeur inadapté peut entraîner un risque d'incendie, d'explosion, de fuite, etc. Veillez pas ne pas court-circuiter la batterie et à éviter tout contact entre les pôles • de la batterie et des objets métalliques conducteurs. Si vous devez remplacer la batterie, utilisez uniquement une batterie adaptée • au système et conforme à la norme IEEE-Std-1725. L'utilisation d'une batterie inadaptée peut entraîner un risque d'incendie, d'explosion, de fuite, etc. Le remplacement de la batterie ne doit être effectué que par des fournisseurs de services autorisés (si la batterie n'est pas remplaçable par l'utilisateur) Ne laissez pas des enfants utiliser la batterie sans votre supervision. • Évitez de faire tomber le produit ou sa batterie. Si le produit ou sa batterie tombe • sur une surface dure et que vous pensez que la chute a provoqué des dégâts, portez le produit ou la batterie à un centre de dépannage pour examen. Une mauvaise utilisation de la batterie pourrait entraîner un incendie ou une • explosion. Respectez les instructions du fabricant relatives au recyclage des batteries •...
- Page 64 Débranchez systématiquement le chargeur de la prise murale lorsque le • chargement du produit est terminé pour éviter qu'il ne consomme inutilement de l'énergie. Le remplacement de la batterie par un modèle inadapté risque d’entraîner une • explosion de cette dernière. Remarques concernant l'étanchéité du produit Ce produit est étanche et résistant à la poussière conformément à la norme de Protection d'entrée IP67*. * L a norme IP67 indique que le produit résiste à une immersion en douceur dans un récipient d’eau du robinet à température ambiante pendant un maximum de 30 minutes (profondeur maximale : 1 mètre). Évitez d'exposer le produit à des environnements présentant de la poussière ou un taux d'humidité excessifs. N'utilisez pas le produit dans les environnements suivants. N ’immergez pas le produit dans des produits chimiques liquides (savons, etc.) SALT SOAP ou tout liquide autre que l’eau. SALT SALT N'immergez pas le produit dans de l'eau salée (eau de mer, par exemple). SOAP SOAP N'immergez pas le produit dans une source chaude. Ne gardez pas le produit sur vous lorsque vous nagez. SALT N'utilisez pas le produit sous l'eau. SALT SOAP SOAP Ne placez pas le produit directement sur le sable (sur une plage, par exemple) SALT SOAP ou de la boue.
- Page 65 Agitez le produit si l'activation vocale ne fonctionne pas (cela peut être dû à la • présence d'eau dans le microphone). N'utilisez pas le produit dans des endroits où il risquerait de recevoir de l'eau à • haute pression (près d'un robinet ou d'une pomme de douche par exemple), et ne l'immergez pas dans l'eau pendant des périodes prolongées, car il n'est pas conçu pour résister à des pressions élevées. Ce produit n'est pas résistant aux chocs. Ne le laissez pas tomber et ne l'exposez • pas à des chocs. Vous risqueriez d'endommager ou de déformer l'unité principale et de provoquer des fuites. Stimulateurs cardiaques et autres dispositifs médicaux Si vous disposez d'un stimulateur cardiaque : gardez TOUJOURS le produit à une distance supérieure à 15 cm de votre • stimulateur lorsque le produit est sous tension ; ne transportez pas le produit dans une poche de chemise ; • utilisez le poignet opposé au stimulateur afin de réduire le risque d’interférence. • Si vous avez le moindre doute sur le fait qu’une interférence se produit, mettez le • produit hors tension immédiatement. Si vous utilisez tout autre dispositif médical, veuillez consulter votre médecin ou le fabricant afin de déterminer si l’appareil est adéquatement protégé contre les fréquences radioélectriques externes. Conseils pour l'utilisation du Bluetooth et du Wi-Fi sur votre montre Lorsque vous connectez votre produit à d'autres appareils mobiles, les appareils •...
- Page 66 Dans un espace ouvert, la portée de communication du Bluetooth est • généralement de 10 mètres environ. Cette portée peut varier en fonction de l'environnement d'utilisation. Veillez à ne pas placer d'obstacles entre votre produit et les appareils connectés. • Le signal entrant / sortant peut être affaibli par des obstacles tels que le corps de l'utilisateur, des murs, etc. Utilisez le produit dans un environnement sans obstacle. Lorsque vous utilisez une connexion Wi-Fi sur la montre, celle-ci peut recevoir des • notifications de votre téléphone ou votre tablette, même si le Bluetooth n'est pas disponible. La montre recherchera le réseau Wi-Fi le plus proche et s'y connectera en fonction • de la liste des réseaux Wi-Fi enregistrés sur votre téléphone. Conseils pour l'écran d'affichage N'affichez pas d'images fixes pendant une période prolongée. Cela peut provoquer • une brûlure d'écran ou l'apparition de taches sur l'écran. Les applications qui affichent un écran statique pendant plus de 10 minutes ne • sont pas recommandées, car les éventuels dommages causés à l'écran ne sont pas couverts par la garantie. AVERTISSEMENT Instructions relatives au remplacement de la batterie Les batteries Li-Ion sont des composants dangereux qui peuvent provoquer •...
- Page 67 Pour éviter d’endommager le produit et pour leur propre sécurité, les utilisateurs ne doivent pas tenter de retirer la batterie et ils doivent demander conseil à l’aide en ligne de LG Service ou à d’autres prestataires de services indépendants.
- Page 68 / du visage. DÉCLARATION DE CONFORMITÉ Par la présente, LG Electronics déclare que le produit LG-W150 est conforme aux exigences fondamentales et aux autres dispositions pertinentes de la directive 1999/5/EC. Consultez la Déclaration deconformité sur http://www.lg.com/global/declaration...
- Page 69 LG Electronics propose de vous fournir le code open source sur CD-ROM en échange des coûts couvrant cet envoi, notamment le coût du support, des frais de port et de prise en charge, une fois la demande reçue par LG Electronics à l’adresse suivante : opensource@lge.com. La validité de cette offre est de trois (3) ans à...
- Page 70 Recyclage de votre ancien téléphone Les éléments électriques et électroniques doivent être jetés séparément, dans les vide-ordures prévus à cet effet par votre municipalité ou être rapportés dans un magasin de téléphonie mobile. Le recyclage de votre téléphone dans une poubelle appropriée ou dans un magasin de téléphonie mobile aidera à réduire les risques pour l’environnement et votre santé. Pour plus d’informations concernant l’élimination de votre ancien appareil, veuillez contacter votre mairie, le service des ordures ménagères ou encore le magasin où vous avez acheté ce produit. Recyclage des batteries/accumulateurs usagés Ce symbole peut être associé aux symboles chimiques du mercure (Hg), du cadmium (Cd) ou du plomb (Pb) si la batterie contient plus de 0,0005 % de mercure, 0,002 % de cadmium ou 0,004 % de plomb. Les batteries/accumulateurs doivent être jetés séparément, dans les déchetteries prévues à cet effet par votre municipalité ou être rapportés dans un magasin de téléphonie mobile. La mise au rebut de vos batteries/accumulateurs dans une poubelle appropriée ou dans un magasin de téléphonie mobile aidera à réduire les risques pour l’environnement et votre santé. Pour plus d’informations concernant le recyclage de vos batteries/ accumulateurs, veuillez contacter votre mairie, le service des ordures ménagères ou encore le magasin où vous avez acheté ce produit. Consignes de sécurité...
-
Page 71: Se Familiariser Avec Votre Montre
Se familiariser avec votre montre Présentation de la montre Touche Marche-Arrêt Remarque : l'écran tactile ne doit pas entrer en contact avec d'autres appareils électriques. Des décharges électrostatiques peuvent altérer le bon fonctionnement de l'écran tactile. Se familiariser avec votre montre... - Page 72 Lorsque l'écran est éteint : Appuyez de manière prolongée sur la touche Marche-Arrêt pendant • quelques secondes pour l'allumer jusqu'à ce que le logo LG s'affiche. Si l'écran se bloque : Appuyez de manière prolongée sur la touche Marche-Arrêt pendant • plus de 10 secondes pour redémarrer la montre jusqu'à ce que le Touche logo LG s'affiche.
-
Page 73: Chargement De La Montre
Avertissement Ne pas obstruer ou appuyer sur l'orifice se trouvant sur la face intérieure de la montre avec un objet pointu. Votre périphérique pourrait ne plus fonctionner correctement. Chargement de la montre Avant d'utiliser la montre pour la première fois, chargez sa batterie. Utilisez le support de chargement inclus avec la montre pour charger sa batterie. Vous pouvez également charger la batterie de la montre en la connectant sur un ordinateur. Dans ce cas, connectez simplement l'ordinateur au support de chargement avec le câble USB livré avec la montre. Remarque : lorsque le niveau de la batterie devient insuffisant, l'icône de batterie vide s'affiche. - Page 74 Précautions à prendre pour éviter la corrosion des terminaux de chargement L'exposition à la sueur ou à d'autres corps étrangers pendant l'utilisation du produit peut provoquer la corrosion des terminaux pendant le chargement. Pour éviter ce problème, pensez à essuyer le produit avec un chiffon avant de le charger.
- Page 75 Branchez la plus petite extrémité du câble USB fourni au port USB du support de chargement. Posez la montre sur le support de chargement et assurez-vous que les terminaux sont alignés. Se familiariser avec votre montre...
-
Page 76: Mode De Charge
La montre peut chauffer pendant le chargement. Ceci est normal. Si la • batterie devient plus chaude que d'ordinaire, débranchez le chargeur. Mode de charge Après la configuration initiale, vous verrez s'afficher l'écran de chargement suivant pendant le chargement. Vérifiez le pourcentage de batterie restant et l'heure. Faites glisser votre doigt vers la droite pour revenir à l'écran de la montre. Niveau de charge Heure Pourcentage de la batterie Si l'écran se bloque Si la montre se bloque et cesse de fonctionner, appuyez de manière prolongée sur la Touche Marche-Arrêt pendant plus de 10 secondes jusqu'à ce que l'écran affiche le logo LG. Se familiariser avec votre montre... -
Page 77: Mise En Marche Et Arrêt De La Montre
Mise en marche et arrêt de la montre Activation de la montre Activez la montre en appuyant de manière prolongée sur la Touche Marche-Arrêt (située sur le côté droit de la montre) pendant quelques secondes. L'écran s'allume et le logo LG s'affiche. Touche Marche-Arrêt Désactivation de la montre Maintenez la Touche Marche-Arrêt enfoncée jusqu'à ce qu'apparaisse la Liste applications. Appuyez sur Paramètres > Éteindre. Lorsque le message Éteindre : Confirmer ? apparaît, appuyez sur . Connexion à un autre périphérique mobile Si vous souhaitez connecter votre montre à un autre appareil, vous devez la réinitialiser. Réinitialisation de votre montre Cette opération permet de rétablir les paramètres de la montre définis en usine et de supprimer toutes vos données personnelles. -
Page 78: Conseils D'utilisation De L'écran Tactile
applications. Appuyez sur Paramètres > Rétablir conf. usine. Vous êtes invité à confirmer votre choix. Appuyez sur . La montre se connecte à un seul appareil mobile à la fois. • La réinitialisation d'usine efface toutes les données enregistrées dans la mémoire • de la montre. Une fois la réinitialisation terminée, la montre peut être connectée à un autre appareil mobile. Conseils d'utilisation de l'écran tactile Voici quelques astuces pour vous familiariser avec votre montre. Appuyer sur : un simple appui avec le doigt permet de sélectionner des éléments, • des liens, des raccourcis et des lettres sur le clavier visuel. Exercer une pression prolongée : maintenez le doigt appuyé sur un élément de • l'écran sans le relever jusqu'à ce qu'une action se produise. Faire glisser le doigt : passez rapidement le doigt sur la surface de l'écran sans • le relever après le premier contact. Appuyer ou effleurer Appui de façon Faire glisser ou prolongée déplacer... -
Page 79: Porter La Montre
Porter la montre Précautions pour l'étanchéité de la montre Votre montre a été testée dans un environnement contrôlé et il a été démontré qu'elle est résistante à l'eau et à la poussière dans certaines circonstances (conformément à l'indice de protection IP67 tel que décrit par la norme internationale IEC 60529 - Degrés de protection assurés par les boîtiers [code IP] ; conditions de test : 15 ~ 35° C, 86 - 106 kPa, 1 mètre, pendant 30 minutes). Malgré cette classification, votre appareil n'est pas totalement résistant aux dommages liés à l'eau. La montre ne doit pas être immergée dans plus de 1 mètre d'eau, ni rester • immergée pendant plus de 30 minutes. L'appareil ne doit pas être exposé à de l'eau à haute pression, notamment dans • des vagues ou sous une cascade. Si la montre ou vos mains deviennent mouillées, séchez-les bien avant de • manipuler l'appareil. L'appareil ne doit pas être exposé à de l'eau salée, ionisée ou savonneuse. • La résistance de la montre à l'eau et la poussière risque d'être réduite si vous • faites tomber la montre ou si elle subit un impact. Si la montre est mouillée, utilisez un chiffon doux et propre pour la sécher •... -
Page 80: Capteur De Fréquence Cardiaque
Avertissements relatifs au port du bracelet en cuir L'épaisseur du bracelet en cuir à coutures de la LG Watch Urbane en fait • un accessoire de haute qualité. Avant de porter le bracelet en cuir, veuillez le plier d'avant en arrière plusieurs fois. Il sera ainsi plus confortable à porter. -
Page 81: Connexion De La Montre À Un Appareil Mobile
Connexion de la montre à un appareil mobile Préparation du couplage Avant l'association, veuillez effectuer les opérations suivantes sur votre téléphone ou votre tablette. Assurez-vous que votre téléphone ou votre tablette est doté(e) du système d'exploitation Android 4.3 ou de versions ultérieures et que le Bluetooth est pris en ® charge. Consultez http://g.co/WearCheck depuis votre téléphone ou votre tablette pour • savoir si Android Wear est pris en charge. Si votre téléphone ou votre tablette n'est pas doté(e) d'Android 4.3 ou une version • ultérieure, renseignez-vous auprès du fabricant pour obtenir une mise à jour logicielle. Assurez-vous que votre téléphone ou votre tablette est à proximité de votre montre. Téléchargez sur votre téléphone ou votre tablette l'application Android Wear depuis le Play Store puis installez-la. Vérifiez que la dernière version de l'application Android Wear est bien installée sur votre téléphone ou votre tablette. -
Page 82: Comment Associer Votre Montre
Comment associer votre montre Mettez la montre en marche et faites défiler l'écran de bienvenue vers la gauche pour commencer. Sélectionnez une langue. Branchez votre montre sur une source d'alimentation et faites défiler l'écran vers la gauche pour continuer. Conseil : si le niveau de la batterie est inférieur à 20 %, rechargez votre montre avant de passer à l'étape suivante. Suivez les instructions qui s'affichent à l'écran en défilant vers la gauche jusqu'à ce qu'apparaisse le code de la montre. Ouvrez l'application Android Wear sur votre téléphone ou votre tablette. Si ce n'est pas déjà fait, activez le Bluetooth lors de l'installation. Une liste des périphériques se trouvant à proximité s'affiche sur votre téléphone ou votre tablette. Saisissez le code de votre montre. Un code d'association s'affichera sur votre téléphone ou votre tablette et sur votre montre. Vérifiez que les codes correspondent. Appuyez sur Se connecter sur votre téléphone ou votre tablette pour démarrer l'appairage. -
Page 83: Comment Utiliser Votre Montre
Comment utiliser votre montre Commencez depuis l'écran de votre montre (où l'heure est affichée) Commencez par sortir votre montre de veille. Si l'écran de votre montre est sombre, vous pouvez la sortir de veille en : Touchant l'écran. • Tournant votre poignet pour mettre l'écran de la montre en position verticale. • Appuyant sur la Touche Marche-Arrêt de la montre. • Réduire rapidement la luminosité de l'écran Appuyez sur l'écran avec votre paume jusqu'à ce qu'il vibre. Cela réduira la luminosité de l'écran de la montre. Changer l'écran de la montre Maintenez le doigt enfoncé n'importe où sur l'écran de la montre pendant quelques secondes. Faites glisser l'écran vers la droite ou vers la gauche pour parcourir les modèles, puis appuyez sur l'un d'entre eux pour le choisir. Comment utiliser votre montre... -
Page 84: Cartes De Notification
Astuce : vous pouvez également modifier et télécharger un écran de montre par le biais de l'application Android Wear Cartes de notification La plupart des notifications que vous voyiez sur votre téléphone s'affichent également sur votre montre. Elles comprennent les notifications pour les appels manqués, les SMS, les rappels d'événements et plus encore. Les notifications s'affichent sous la forme de cartes en bas du cadran de la montre. Faites glisser votre doigt vers le haut pour afficher davantage de cartes. Faites glisser Faites glisser votre doigt votre doigt vers la gauche... -
Page 85: Bloquer Les Notifications
Pour fermer une carte, faites-la glisser de la gauche vers la droite. Une fois que vous avez fini de consulter une carte, vous pouvez la fermer. Si vous retirez une carte de votre montre, la même carte ou notification disparaît de votre téléphone. Pour voir plus de détails, faites glisser la carte de la droite vers la gauche. Certaines cartes fournissent de plus amples détails ou comportent des actions que vous pouvez mener. Pour rappeler une carte Une fois que la carte a été ignorée, faites glisser votre doigt du haut vers le bas de l'écran de votre montre et appuyez sur le bouton Annuler . Vous aurez quelques secondes pour rappeler la carte. Si vous avez rejeté la dernière carte de votre flux, vous devrez faire glisser votre doigt du bas vers le haut de l'écran pour voir le bouton Annuler. -
Page 86: Notifications D'appel
Bloquer des applications à l'aide de l'application Android Wear installée sur votre téléphone Sur votre téléphone, ouvrez l'application Android Wear Appuyez sur > Si vous avez plusieurs appareils, appuyez sur le nom de votre montre > Bloquer les notifications des applications > . Sélectionnez l'application à bloquer. Notifications d'appel Vous pouvez être immédiatement alerté par une notification d'appel dès que votre téléphone reçoit un appel entrant. La notification contient le numéro de l'appelant ou le contact de votre téléphone et vous offre la possibilité d'accepter ou de rejeter l'appel. REMARQUE : votre montre peut uniquement recevoir une notification. Pour répondre à l'appel, utilisez le téléphone associé à votre montre. Faites glisser le doigt Notification d'appel Faites glisser le... -
Page 87: Choisir Le Moment Où Vous Recevez Les Notifications
Choisir le moment où vous recevez les notifications Vous pouvez choisir quelles notifications s'affichent sur votre montre et quand. Pour modifier les paramètres d'interruption, faites glisser votre doigt du haut vers le bas de l'écran de votre montre. Les options d'interruption s'affichent. Appuyez ensuite sur Aucun, Prioritaires ou Toutes. : pour désactiver toutes les interruptions. : pour autoriser uniquement les interruptions prioritaires. : pour autoriser toutes les interruptions. REMARQUE : certains contenus peuvent être différents sur votre montre selon la version du système d'exploitation. Voir le niveau de charge de la batterie ou la date Faites glisser votre doigt vers le bas depuis le haut de l'écran. -
Page 88: Éteindre Temporairement L'écran Grâce Au Mode Cinéma
Éteindre temporairement l'écran grâce au mode Cinéma Vous pouvez éteindre l'écran de votre montre de façon à ce qu'il ne s'illumine pas et à ce que les notifications ne s'affichent pas. Appuyez rapidement deux fois sur la Touche Marche-Arrêt. • Si votre écran est sombre, touchez l'écran pour sortir la montre de veille. Faites glisser votre doigt vers le bas depuis le haut de l'écran. Faites glisser votre doigt de la droite vers la gauche jusqu'à ce que vous aperceviez Mode Cinéma . Appuyez sur l'icône pour l'activer. Augmenter temporairement la luminosité de l'écran Vous pouvez augmenter temporairement la luminosité de l'écran si vous êtes à l'extérieur, dans un endroit ensoleillé. Cette fonction dure quelques secondes et s'éteint automatiquement. Appuyez rapidement trois fois sur la touche Marche-Arrêt. • Si votre écran est sombre, touchez l'écran pour sortir la montre de veille. Faites glisser votre doigt vers le bas depuis le haut de l'écran. Faites glisser votre doigt de la droite vers la gauche jusqu'à ce que vous aperceviez Luminosité élevée . Appuyez sur l'icône pour l'activer. Accéder au menu Paramètres Si votre écran est sombre, appuyez sur l'écran pour sortir la montre de veille. Appuyez n'importe où sur l'arrière-plan de l'écran et faites glisser votre doigt vers le haut jusqu'au menu Paramètres. -
Page 89: Gestion Du Stockage
Faites glisser le haut de l'écran vers le bas et faites glisser votre doigt vers la gauche jusqu'à ce que le menu Paramètres s'affiche, puis appuyez sur Paramètres Gestion du stockage Grâce à l'application Android Wear installée sur votre téléphone, vous pouvez voir : L'espace de stockage disponible • L'espace de stockage total de votre montre • Les applications ou les services qui utilisent l'espace de stockage de votre montre • Pour voir les détails sur le stockage : Assurez-vous que votre montre est connectée à votre téléphone. Sur votre téléphone, ouvrez l'application Android Wear . Appuyez sur > Si vous avez plusieurs appareils, appuyez sur le nom de votre montre > Espace de stockage sur la montre. Comment utiliser votre montre... -
Page 90: Tâches Utilisant La Commande Vocale
Tâches utilisant la commande vocale Vous pouvez voir un menu des tâches simples sur votre montre pour lesquelles la commande vocale peut être utilisée. Il suffit de dire « Ok Google » ou de faire glisser l'écran d'accueil vers la gauche jusqu'à ce que vous voyiez l'option Parlez maintenant et de formuler votre commande ou votre question. Par exemple, une fois que vous êtes dans le menu Parler maintenant, vous pouvez appuyer sur « Lancer le chronomètre ». Pour faire la même chose avec votre voix, il vous suffit de dire « Ok Google, Lancer le chronomètre » à partir de la plupart des écrans. REMARQUE : certaines actions vocales ne sont pas disponibles dans toutes les langues et tous les pays. Suivez ces étapes pour commencer à utiliser la commande vocale sur votre montre : Si votre écran est sombre, appuyez sur l'écran pour sortir la montre de veille. -
Page 91: Modifier Les Applications Que Vous Utilisez Pour Les Actions Vocales
Modifier les applications que vous utilisez pour les actions vocales Vous pouvez définir les applications que vous utilisez pour les actions vocales différentes. Par exemple, vous pouvez changer l'application que vous utilisez pour régler des alarmes ou envoyer des messages. Sur votre téléphone, ouvrez l'application Android Wear . Dans la moitié inférieure de l'écran, une liste d'actions apparaît sous. Faites défiler et appuyez sur une action. Vous pouvez choisir parmi les applications disponibles. Astuce : vous pouvez également télécharger des applications qui fonctionnent avec Android Wear dans le Play Store Créer ou afficher une note Vous pouvez parler à votre montre pour créer une note ou afficher des notes existantes avec QuickMemo+ ou des applications Android comme Google Keep. -
Page 92: Définir Un Rappel
REMARQUE : si vous avez installé QuickMemo+ ou Google Keep sur votre téléphone : L'application convertit la parole en texte. Lorsque vous avez fini de parler, la • note est enregistrée dans QuickMemo+ ou Google Keep sur votre appareil mobile. Affichez et modifiez vos notes en ouvrant l'application sur votre appareil •... -
Page 93: Afficher Ma Fréquence Cardiaque
Dites « Show me my steps » (« Afficher mon nombre de pas »). Le nombre de pas s'affiche, ainsi que votre progression par rapport à vos objectifs de remise en forme et un histogramme du nombre de pas par jour. Pour afficher la liste du nombre total de pas quotidiens, faites glisser votre doigt vers le haut de l'écran. Afficher ma fréquence cardiaque L'application Heart Rate permet de mesurer et conserver une trace de votre fréquence cardiaque. REMARQUE : la fonctionnalité de mesure de la fréquence cardiaque de l'appareil ne doit pas être utilisée à des fins de diagnostic clinique ou médical. Appliquez les instructions des sections Port de la montre et Mesures précises pour assurer la précision des mesures de votre rythme cardiaque. -
Page 94: Envoyer Un Sms
Mesure de la fréquence cardiaque Si votre écran est sombre, appuyez sur l'écran pour sortir la montre de veille. Depuis l'écran principal, dites « Ok Google » ou appuyez n'importe où sur l'arrière-plan de l'écran, puis faites glisser le doigt vers la gauche. L'invite Parlez maintenant s'affiche. Dites « Show me my heart rate » (« Afficher ma fréquence cardiaque »). Si vous essayez cette fonction pour la première fois, vous devez sélectionner Google Fit ou LG Pulse. Sélectionnez l'application que vous voulez utiliser. La prochaine fois, l'application sélectionnée s'affichera par défaut. Votre montre commence à mesurer votre rythme cardiaque. Vous verrez rapidement votre rythme cardiaque s'afficher à l'écran avec l'historique de votre rythme cardiaque. Effectuez une autre mesure en appuyant à nouveau sur Revérifier. Envoyer un SMS Cette fonctionnalité permet d'utiliser la montre pour dicter des SMS destinés à des contacts enregistrés sur votre appareil mobile. Vous pouvez également répondre aux SMS qui s'affichent dans les cartes de SMS. Envoi d'un message Si votre écran est sombre, appuyez sur l'écran pour sortir la montre de veille. Depuis l'écran principal, dites « Ok Google » ou appuyez n'importe où sur l'arrière-plan de l'écran, puis faites glisser le doigt vers la gauche. L'invite Parlez maintenant s'affiche. Dites « Send a text » (« Envoyer un SMS »). -
Page 95: Envoyer Un E-Mail
Votre message sera automatiquement envoyé. Réponse à un message Vous verrez des cartes si les notifications de messages sont activées sur votre téléphone. Faites glisser votre doigt de la droite vers la gauche jusqu'à ce que l'option Répondre apparaisse. Appuyez sur Répondre, puis dictez votre message. Envoyer un e-mail La montre permet d'écrire des e-mails ou de lire les e-mails reçus sur votre appareil mobile. Si votre écran est sombre, appuyez sur l'écran pour sortir la montre de veille. Depuis l'écran principal, dites « Ok Google » ou appuyez n'importe où sur l'arrière- plan de l'écran, puis faites glisser le doigt vers la gauche. L'invite Veuillez parler s'affiche. Dites « Email » (« Envoyer un e-mail »). L'écran À qui ? S'affiche. L'invite Veuillez parler s'affiche. Prononcez le nom du contact à qui vous voulez envoyer un email, puis sélectionnez- le dans la liste qui s'affiche. Vous serez invité à dicter le message que vous souhaitez envoyer. Votre message sera automatiquement envoyé. Consulter des emails sur votre téléphone Revenez à l'écran de lecture de vos emails sur votre appareil mobile, faites glisser la carte message de droite à gauche, puis appuyez sur Ouvrir sur tél. Répondre à un email Faire glisser votre doigt de la droite vers la gauche vous permet d'effectuer différentes actions comme archiver ou répondre. Appuyez sur Répondre, puis dictez votre message. Votre message sera automatiquement envoyé. -
Page 96: Agenda
Suppression des e-mails Faites glisser la carte message de droite à gauche et appuyez sur Supprimer. Agenda Avec votre montre, vous pouvez consulter les événements notés sur l'agenda de votre appareil mobile. Si votre écran est sombre, appuyez sur l'écran pour sortir la montre de veille. Depuis l'écran principal, dites « Ok Google » ou appuyez n'importe où sur l'arrière-plan de l'écran, puis faites glisser le doigt vers la gauche. L'invite Parlez maintenant s'affiche. Dites « Agenda ». La liste des événements prévus s'affiche. Appuyez sur l'événement voulu pour en afficher le détail. Itinéraire Vous pouvez rechercher une destination donnée à partir de votre montre. Si votre écran est sombre, appuyez sur l'écran pour sortir la montre de veille. Depuis l'écran principal, dites « Ok Google » ou appuyez n'importe où sur l'arrière-plan de l'écran, puis faites glisser le doigt vers la gauche. L'invite Parlez maintenant s'affiche. Dites « Itinéraire », suivi de la destination. Régler le minuteur La montre peut être utilisée comme minuteur. Une fois le minuteur réglé, une nouvelle carte avec un compte à rebours s'affiche. Si votre écran est sombre, appuyez sur l'écran pour sortir la montre de veille. Depuis l'écran principal, dites « OK Google » ou appuyez n'importe où sur l'arrière-plan de l'écran, puis faites glisser le doigt vers la gauche. L'invite Parlez Tâches utilisant la commande vocale... -
Page 97: Lancer Le Chronomètre
maintenant s'affiche. Dites « Set a timer » (« Régler le minuteur »). Faites glisser les durées disponibles et lancez le minuteur en appuyant sur la durée voulue. Lancez ou reprenez le décompte en appuyant sur . • Mettez le minuteur en pause en appuyant sur . • Pour arrêter le minuteur : Lorsque le minuteur sonne, faites glisser votre doigt de la gauche vers la droite sur votre écran pour l'arrêter. Lancer le chronomètre Mesurez le temps écoulé avec l'application Stopwatch. Si votre écran est sombre, appuyez sur l'écran pour sortir la montre de veille. Depuis l'écran principal, dites « Ok Google » ou appuyez n'importe où sur l'arrière-plan de l'écran, puis faites glisser le doigt vers la gauche. L'invite Parlez maintenant s'affiche. Dites « Lancer le chronomètre ». Appuyez sur pour démarrer. Définir une alarme La montre permet de définir plusieurs alarmes. Les alarmes de votre montre et téléphone sont différentes. Si votre écran est sombre, appuyez sur l'écran pour sortir la montre de veille. Depuis l'écran principal, dites « OK Google » ou appuyez n'importe où sur l'arrière-plan de l'écran, puis faites glisser le doigt vers la gauche. L'invite Parlez maintenant s'affiche. -
Page 98: Voir Les Alarmes Actuelles
Réglez l'heure voulue en faisant glisser votre doigt vers le haut ou le bas. Appuyez sur pour définir la répétition de l'alarme. Appuyez sur pour enregistrer l'alarme. Lorsqu'une alarme se déclenche, votre montre vibre et affiche une carte. Désactiver Répéter Faites glisser de gauche Faites glisser de droite à à droite. gauche. Voir les alarmes actuelles Si votre écran est sombre, appuyez sur l'écran pour sortir la montre de veille. Depuis l'écran principal, dites « OK Google » ou appuyez n'importe où sur l'arrière-plan de l'écran, puis faites glisser le doigt vers la gauche. L'invite Parlez maintenant s'affiche. Dites « Afficher les alarmes ». La liste des alarmes définies sur la montre s'affiche. Tâches utilisant la commande vocale... -
Page 99: Utilisation Des Applications
Utilisation des applications La liste des applications contient les applications incluses sur la montre. Pour accéder aux applications installées sur votre montre : Si votre écran est sombre, appuyez sur l'écran pour sortir la montre de veille. Appuyez n'importe où sur l'arrière-plan de l'écran pour ouvrir la liste des applications. Téléchargement d'autres applications Vous pouvez voir une liste d'applications recommandées dans Play Store Ouvrez l'application Android Wear pour télécharger d'autres applications sur votre téléphone. Émission d'un appel Vous pouvez afficher sur votre montre un clavier vous permettant de composer un numéro. Appuyez de manière prolongée sur la touche Marche-Arrêt jusqu'à ce que la liste des applications s'affiche, puis appuyez sur Appeler Faites glisser votre doigt vers le haut jusqu'à ce que le clavier de numérotation apparaisse. Saisissez le numéro de téléphone, puis appuyez sur . Votre téléphone appelle le numéro que vous avez saisi sur votre montre. Astuce : vous pouvez également effectuer un appel à partir de la liste Récente et de la liste des Favoris. -
Page 100: Utilisation De L'application Google Fit
Maintenez le doigt enfoncé pour saisir le symbole plus ( + ) pour composer un numéro international. Appuyez sur cette icône pour effacer un numéro incorrect. Appuyez sur cette icône pour composer le numéro que vous avez saisi. REMARQUE : Cette fonctionnalité sera peut-être disponible après la mise à jour du logiciel en mai 2015. Utilisation de l'application Google Fit L'application Fit vous permet de compter vos pas et d'afficher la distance parcourue. Vous pouvez également voir votre rythme cardiaque. En installant l'application Google Fit sur le téléphone associé à votre montre Android Wear, vous pouvez synchroniser les données entre les deux appareils et profiter de toutes les fonctionnalités Fit. Appuyez de manière prolongée sur la Touche Marche-Arrêt jusqu'à ce que la liste des applications s'affiche, puis appuyez sur Fit . Faites glisser votre doigt vers la gauche pour afficher les détails. Voir une estimation du nombre de pas que vous avez effectués aujourd'hui Vous pouvez utiliser la commande vocale ou le menu de votre montre pour afficher une estimation du nombre de pas que vous avez effectués. - Page 101 Vérifier votre rythme cardiaque Vous pouvez utiliser la commande vocale ou le menu pour vérifier votre rythme cardiaque. Dites « OK Google ». Lorsque vous voyez l'invite Parlez maintenant, dites « Afficher ma frequence cardiaque » (voir la section Afficher ma frequence cardiaque pour en savoir plus) Ouvrez l'application Fit et faites glisser votre doigt vers la gauche jusqu'à ce que votre rythme cardiaque s'affiche. Faites glisser votre doigt vers le bas pour voir l'historique des rythmes cardiaques ou appuyez sur pour mesurer votre rythme cardiaque. Utilisation des applications...
-
Page 102: Paramètres
Paramètres Lancement du menu Paramètres Si votre écran est sombre, appuyez sur l'écran pour sortir la montre de veille. Appuyez n'importe où sur l'arrière-plan de l'écran et faites glisser votre doigt vers le haut jusqu'aux Paramètres. Faites glisser le haut de l'écran vers le bas et faites glisser votre doigt vers la gauche • jusqu'à ce que le menu Paramètres s'affiche, puis appuyez sur Paramètres . Régler la luminosité La luminosité de la montre peut être réglée directement sur cet appareil. Dans le menu Paramètres, appuyez sur Régler la luminosité. Choisissez un niveau de luminosité en sélectionnant une option. Modifier le cadran de la montre Vous pouvez modifier l'apparence du cadran de votre montre de plusieurs manières : en maintenant le doigt enfoncé sur l'arrière-plan de l'écran de votre montre, par le biais de l'application Android Wear installée sur votre téléphone ou via le menu Paramètres de votre montre. Dans le menu Paramètres, appuyez sur Modifier le cadran de la montre. Faites glisser votre doigt vers la droite et la gauche pour parcourir les modèles. Si vous faites défiler tous les modèles vers la gauche, vous verrez les cadrans récemment utilisés. -
Page 103: Taille De Police
Taille de police Vous pouvez définir la taille de police pour l'affichage de votre montre. Dans le menu Paramètres, appuyez sur Taille de police. Choisissez un niveau de taille en sélectionnant une option. Mouvements du poignet Vous pouvez utiliser des gestes pour illuminer ou assombrir l'écran de la montre. Tournez votre poignet pour mettre l'écran de la montre en position verticale. Dans le menu Paramètres, appuyez sur Mouvements du poignet pour activer ou • désactiver cette fonction. Paramètres Wi-Fi Si vous mettez le Wi-Fi en mode automatique, vous pouvez synchroniser votre montre et votre téléphone, même lorsque la connectivité Bluetooth n'est pas disponible. Le Wi-Fi est automatiquement activé lorsque le Bluetooth est déconnecté. Lorsque vous utilisez une connexion Wi-Fi sur la montre, celle-ci peut recevoir des notifications de votre téléphone ou votre tablette, même si le Bluetooth n'est pas disponible. La montre recherchera le réseau Wi-Fi le plus proche et s'y connectera en fonction de la liste des réseaux Wi-Fi enregistrés sur votre téléphone. Dans le menu Paramètres, appuyez sur Paramètres Wi-Fi pour activer ou • désactiver le mode automatique. Appareils Bluetooth Il recherche automatiquement les appareils Bluetooth à portée. Vous pouvez également désactiver la connexion Bluetooth de votre montre. Dans le menu Paramètres, appuyez sur Appareils Bluetooth. • Paramètres... -
Page 104: Régler L'écran Pour Qu'il Reste Toujours Allumé
Régler l'écran pour qu'il reste toujours allumé Vous pouvez configurer l'écran pour qu'il affiche l'heure ou qu'il s'éteigne complètement lorsque vous n'utilisez pas la montre. Si vous l'avez configuré pour qu'il s'éteigne, l'écran s'allume lorsque vous l'inclinez ou le recouvrez. Dans le menu Paramètres, appuyez sur Écran actif en permanence pour activer ou • désactiver cette fonction. ACTIVÉ : un cadran tamisé s'affiche lorsque la montre est inactive. • DÉSACTIVÉ : l'écran de la montre devient plus sombre lorsqu'elle est inactive. • Mode Avion Lorsque le mode Avion est activé, vous pouvez tout de même utiliser la plupart des fonctionnalités de votre montre, telles que la mesure du rythme cardiaque, lorsque vous êtes dans un avion ou tout endroit où l'envoi ou la réception de données est interdit. Important ! Lorsque le mode Avion est activé, votre montre ne permet pas d'accéder aux informations stockées sur votre appareil mobile. Vous devez également activer le mode Avion sur votre appareil mobile. -
Page 105: Rétablir Conf. Usine
Rétablir conf. usine Cette opération permet de rétablir les paramètres de la montre définis en usine et de supprimer toutes vos données personnelles. Appuyez sur Paramètres > Réinitialisation d'usine. Vous êtes invité à confirmer votre choix. Appuyez sur . La montre se connecte à un seul appareil mobile à la fois. • La réinitialisation d'usine efface toutes les données enregistrées dans la mémoire • de la montre. Une fois la réinitialisation terminée, la montre peut être connectée à un autre appareil mobile. Redémarrer Ce paramètre redémarre votre montre. Dans le menu Paramètres, appuyez sur Redémarrer. Une invite s'affiche. Confirmez-la pour redémarrer votre montre. Appuyez sur pour redémarrer votre montre. Appuyez de manière prolongée sur la Touche Marche-Arrêt pendant plus de • 10 secondes. Votre montre s'éteint et se rallume. Verrouillage de l'écran Appuyez pour définir un verrouillage de l'écran. Une forme que vous dessinez avec votre doigt permet de déverrouiller l'écran. Paramètres... -
Page 106: Éteindre
Éteindre Dans le menu Paramètres, appuyez sur Eteindre. Lorsque le message Éteindre : Confirmer ? apparaît, appuyez sur . À propos Les informations relatives à votre montre s'affichent ici. Vous pouvez afficher le modèle, le nom du périphérique, la version logicielle, le numéro de série, le numéro de build, ainsi que des informations sur la connexion et la batterie. Les options suivantes sont également disponibles. Dans le menu Paramètres, appuyez sur À propos. • Mises à jour du système : permet de s'assurer que la dernière version du logiciel • est installée sur votre montre. Informations réglementaires : affiche des informations relatives aux • réglementations en vigueur. Mentions légales : vous enjoint de consulter les informations légales de votre • appareil mobile. Paramètres... -
Page 107: À Propos De Ce Manuel De L'utilisateur
À propos de ce manuel de l'utilisateur À propos de ce manuel de l'utilisateur Veuillez lire ce manuel attentivement avant d'utiliser votre appareil. Ceci permet de • bénéficier d'une utilisation sûre et correcte de votre produit. Une partie des images et des copies d'écran qui s'affichent dans ce guide peuvent • différer de l'affichage de votre produit. D'autre part, le contenu du manuel peut parfois différer du produit final, ou des • logiciels proposés par les fournisseurs de services ou les opérateurs. Le contenu de ce manuel peut être modifié sans avis préalable. Consultez le site Web de LG à l'adresse www.lg.com pour obtenir la dernière version de ce manuel. Les applications de votre produit et leurs fonctions peuvent varier en fonction du • pays, de la région ou des spécifications matérielles. LG ne peut en aucun cas être tenu responsable des problèmes de performances résultant de l'utilisation d'applications développées par des entités autres que LG. LG n'est pas responsable des problèmes de performances ou d'incompatibilité • résultant de la modification de paramètres du registre ou de la modification du système d'exploitation. Toute tentative de personnalisation de votre système d'exploitation risque de provoquer le dysfonctionnement de l'appareil ou de ses applications. Les logiciels, les fichiers audio, le fond d'écran, les images et autres supports • fournis avec votre appareil disposent d'une licence pour un usage limité. L'extraction et l'utilisation de ces documents à des fins commerciales ou autres constituent une violation des lois sur le copyright. En tant qu'utilisateur, vous êtes... -
Page 108: Marques Commerciales
Marques commerciales LG et le logo LG sont des marques déposées de LG Electronics. • Tous les autres marques commerciales et droits d'auteurs sont la propriété de • leurs propriétaires respectifs. À propos de ce manuel de l'utilisateur... -
Page 109: Accessoires
Câble USB • Support de chargement • REMARQUE : Utilisez toujours des accessoires d’origine LG. Les éléments fournis sont • conçus uniquement pour ce téléphone et peuvent ne pas être compatibles avec d'autres appareils. Les éléments fournis avec l'appareil et tous les accessoires disponibles •... - Page 111 User Guide ENGLISH Some contents and illustrations may differ from your device depending on the • region, service provider, software version, or OS version, and are subject to change without prior notice. Always use genuine LG accessories. The supplied items are designed only for this • device and may not be compatible with other devices. This device is not suitable for people who have a visual impairment due to the • touchscreen. Copyright ©2015 LG Electronics, Inc. All rights reserved. LG and the LG logo are • registered trademarks of LG Group and its related entities. All other trademarks are the property of their respective owners. Google™, Google Maps™, Gmail™, YouTube™, Hangouts™ and Play Store™ • are trademarks of Google, Inc.
- Page 112 Table of contents Safety information ........4 Boost the screen brightness temporarily ..........31 Getting to know your watch ....15 Access the Settings menu .....31 Watch layout ..........15 Manage storage........31 Charging the watch .......17 Tasks using Voice command ....32 Charging mode ........19 Change the apps you use for voice If the screen freezes ......19 actions ..........33...
- Page 113 Wrist gestures ........43 Wi-Fi settings ........43 Bluetooth devices ........43 Setting the screen always on ....43 Airplane mode ........44 Accessibility .........44 Factory reset .........44 Restart ..........45 Screen lock ...........45 Power off ..........45 About .............45 About this user guide ......46 About this user guide ......46 Trademarks ...........47 Accessories ..........48 Table of contents...
-
Page 114: Safety Information
Safety information Before turning on your product, review the basic safety information provided here. General safety & handling While using your product, be aware of the following common-sense guidelines. Your environment Safe operating temperatures. Use and store your product in temperatures • between 0°C/32°F and 40°C/104°F. Exposing your product to extremely low or high temperatures may result in damage, malfunction, or even explosion. While driving. When driving a car, driving is your first responsibility. Using a • mobile device or accessory for a call or other application while driving may cause distraction. Keep your eyes on the road. Around explosives. Do not use in areas where sparks from the product might • cause a fire or explosion. On airplanes. Observe all rules and instructions for use of electronic devices. Most • airlines allow electronic use only between and not during takeoffs and landings. There are three main types of airport security devices: X-ray machines (used on items placed on conveyor belts), magnetic detectors (used on people walking through security checks), and magnetic wands (hand-held devices used on people or individual items). You can pass your product through airport X-ray machines. But do not send it through airport magnetic detectors or expose it to magnetic wands. Always follow any special regulations in a given area. Turn your device off in areas • where use is forbidden or when it may cause interference or danger. Changing the wrist straps to metal straps might cause Bluetooth/Wi-Fi connectivity • problem. - Page 115 Safety tips WARNING: The charging cradle contains strong magnets that may interfere with pacemakers, credit cards, watches, and other magnet-sensitive objects. To avoid damaging your product and reduce the risk of fire or electric shock, explosion, or other hazards, observe these common-sense precautions: Use only with cables, chargers, and other accessories approved by LG. • Do not drop, strike, or shake your product. • Do not damage the power cord by bending, twisting, pulling, heating, or placing • heavy items on it. This product is equipped with a USB cable for connecting to a desktop or notebook • computer or to the charger. Be sure your computer is properly grounded before connecting your product to the computer. The power supply cord of a desktop or notebook computer has an equipment-grounding conductor and a grounding plug. The plug must be plugged into an appropriate outlet that is properly installed and grounded in accordance with all local codes and ordinances. Do not open, disassemble, crush, bend or deform, puncture, or shred the product. • Do not insert foreign objects into the product. • Do not place the product in a microwave oven. • Do not expose the product to fire, explosion, or other hazards. • Clean with a soft, damp cloth. Don't use harsh chemicals (such as alcohol, • benzene, or thinners) or detergents to clean your product. Dispose of your product and battery separately from household waste and in • accordance with local regulations. Like many electronic devices, your product generates heat during normal operation. • Extremely prolonged, direct skin contact in the absence of adequate ventilation may result in discomfort or minor burns. Therefore, use care when handling your product during or immediately after operation. If you have a problem with using the product, please stop using it and consult with •...
- Page 116 Pedometer, Sleep, Exercise, and Heart rate are not intended to treat or • diagnose any medical condition, and should be used for leisure, well-being and fitness purposes only. Heart rate readings can be affected by measurement conditions and your • surroundings.
- Page 117 Do not short circuit a battery or allow metallic conductive objects to contact battery • terminals. Replace the battery only with another battery that has been qualified with the • system per this standard, IEEE-Std-1725. Use of an unqualified battery may present a risk of fire, explosion, leakage or other hazard. Only authorized service providers shall replace battery (If the battery is non-user replaceable) Battery usage by children should be supervised. • Avoid dropping the product or battery. If the product or battery is dropped, • especially on a hard surface, and the user suspects damage, take it to a service center for inspection. Improper battery use may result in a fire, explosion or other hazard. • Dispose of used batteries according to the manufacturer’s instructions. Please • recycle when possible. Do not dispose as household waste. Always unplug the charger from the wall socket after the product is fully charged • to save unnecessary power consumption of the charger. There is risk of explosion if the battery is replaced with an incorrect type. • Notes on water resistant properties This product is water and dust resistant in compliance with the Ingress Protection rating IP67*. * T he IP67 rating means that the product will maintain its operability even if it is gently submerged in a tank of still tap water at room temperature for about 30minutes, up to a depth of 1 meter. Avoid exposing the product to environments with excessive dusts or moisture. Do not use the product in the following environments. Do not immerse the product in any liquid chemicals (soap, etc.) other than SALT water.
- Page 118 SALT SOAP Do not immerse the product in hot spring. Do not swim wearing this product. SALT Do not use the product underwater. SOAP SALT SOAP SALT Do not place the product directly on sand (such as at a beach) or mud. SOAP Once the product gets wet, water may remain in gaps of the main unit. Shake the • product well to drain water. Even after water is drained, the inner parts might be still wet. Although you can use • the product, do not place it near things that must not get wet. Take care not to wet your clothes, bag or contents of the bag. Drain water if the voice activation does not work properly due to water remaining in • the microphone. Do not use the product in places where it may be sprayed with high-pressure • water (e.g. near a faucet or shower head) or submerge it in water for extended periods of time, as the product is not designed to withstand high water pressure. This product is not resistant to shock. Do not drop the product or subject it to • shock. Doing so might damage or deform the main unit causing water leak. Pacemakers and other medical devices Persons with pacemakers should: ALWAYS keep the product more than six (6) inches from their pacemaker when the • product is turned ON. Not carry the product in a breast pocket. • Use the wrist opposite the pacemaker to minimize the potential for RF interference.
- Page 119 Tips for using Bluetooth and Wi-Fi on your watch When connecting your product to other mobile devices, the devices must be • positioned close to each other. If not, it may cause abnormal operation or noise, depending on the use environment. In an open space, the Bluetooth communication range usually spans approximately • 10m. This range may vary depending on the use environment. Do not place obstacles between your product and connected devices. Outgoing/ • incoming signal can weaken due to user's body, walls, corners or obstacles. Use where there is no obstacle. When using a Wi-Fi connection on the watch, your watch can get notifications from • your phone or tablet even if Bluetooth is unavailable. Your watch will search and connect to the nearest Wi-Fi network based on the • Wi-Fi list registered on your phone. Tips for the display screen Do not display non-moving images for an extended period. This may cause image • burn-in or stains on the screen. Applications that display the same screen for more than 10 minutes are not • recommended because the potential screen damage is not covered by the warranty. Safety information...
- Page 120 In case this product contains a battery incorporated within the product • which cannot be readily removed by end-users, LG recommends that only qualified professionals remove the battery, either for replacement or for recycling at the end of this product’s working life. To prevent damage to...
- Page 121 While there may be differences between the SAR levels of various LG • product models, they are all designed to meet the relevant guidelines for exposure to radio waves.
- Page 122 In addition to the source code, all referred license terms, warranty disclaimers and copyright notices are available for download. LG Electronics will also provide open source code to you on CD-ROM for a charge covering the cost of performing such distribution (such as the cost of media, shipping, and handling) upon email request to opensource@lge.com.
- Page 123 HOW TO UPDATE YOUR DEVICE Access to latest firmware releases, new software functions and improvements. Press and hold the Power Key until the apps list appears. Tap Settings > About > System updates on your device. Safety information...
- Page 124 Disposal of your old appliance All electrical and electronic products should be disposed of separately from the municipal waste stream via designated collection facilities appointed by the government or the local authorities. The correct disposal of your old appliance will help prevent potential negative consequences for the environment and human health. For more detailed information about disposal of your old appliance, please contact your city office, waste disposal service or the shop where you purchased the product. Disposal of waste batteries/accumulators This symbol may be combined with chemical symbols for mercury (Hg), cadmium (Cd) or lead (Pb) if the battery contains more than 0.0005% of mercury, 0.002% of cadmium or 0.004% of lead. All batteries/accumulators should be disposed separately from the municipal waste stream via designated collection facilities appointed by the government or the local authorities. The correct disposal of your old batteries/accumulators will help to prevent potential negative consequences for the environment, animal and human health. For more detailed information about disposal of your old batteries/ accumulators, please contact your city office, waste disposal service or the shop where you purchased the product. Safety information...
-
Page 125: Getting To Know Your Watch
Note: The touch screen must not come into contact with any other electrical devices. Electrostatic discharges can result in the touch screen malfunctioning. While the screen is off: Press and hold for a few seconds to turn it on until LG logo appears. • If the screen freezes: Press and hold over 10 seconds to restart the watch until LG logo •... - Page 126 Charging Terminals Heart rate Sensor Warning Do not close or push the hole located at the bottom of the device with a sharp object. Doing so may cause your device to work improperly. Getting to know your watch...
-
Page 127: Charging The Watch
Charging the watch Before you use the watch for the first time, you should charge the battery. Use the charging cradle included with the watch to charge the device's battery. You can also charge the device's battery using a computer. Simply connect the computer to the charging cradle using the USB cable included with the watch. Note: When the battery power is getting low, the battery icon is displayed as empty. If the battery charge is completely empty, the watch cannot be turned on immediately after connecting the charger. Leave an empty battery to charge for a few minutes before turning the device on. - Page 128 Plug the small end of the USB cable provided into the charging cradle's USB port. Place the watch on the charging cradle and make sure that the charging terminals are aligned with each other. Getting to know your watch...
-
Page 129: Charging Mode
The watch may become warm while charging. This is normal. If the battery • becomes hotter than usual, disconnect the charger. Charging mode After the initial set up, you will see a charging screen shown as below while charging. Check the percent of remaining battery and time. Swipe right to return to the watch face. Charging level Time Battery percentage If the screen freezes If the device freezes up and stops working, press and hold the Power Key for over 10 seconds until the screen turns the LG logo is displayed. Getting to know your watch... -
Page 130: Turning The Watch On And Off
Turning the watch on and off Turning the watch on Turn the watch on by pressing and holding the Power Key (on the right-hand side of the device) for a few seconds. The screen lights up and the LG Logo is displayed. Power Key Turning the watch off Press and hold the Power Key until the apps list appears. Tap Settings > Power off. When prompted with the message Power off: Are you sure?, tap . Connecting to another mobile device If you want to connect your watch to another device, you must reset your device. Reset your watch This setting resets your watch’s settings to their factory default values and deletes all of your data. -
Page 131: Touch Screen Tips
Factory reset erases all data from your watch's memory. After completion, it is • ready to connect to another mobile device. Touch screen tips Here are some tips on how to navigate on your watch. Tap or touch – A single finger tap selects items, links, shortcuts and letters on the • on-screen keyboard. Touch and hold – Touch and hold an item on the screen by tapping it and not • lifting your finger until an action occurs. Swipe or slide – To swipe or slide, quickly move your finger across the surface of • the screen, without pausing when you first tap it. Tap or touch Touch and hold Swipe or slide Getting to know your watch... -
Page 132: Wearing The Watch
Cautions before wearing the leather strap The LG Watch Urbane’s stitched leather strap is thick enough to meet high • quality standard. Before wearing the leather strap, please bend it back and forth a few times. This will help you feel more comfortable when wearing it. -
Page 133: Heart Rate Sensor
Heart Rate Sensor Wear your watch on your wrist correctly before measuring the heart rate. Heart Rate Sensor NOTES: Loose fitting or too much movement may cause inaccurate measurements. • Never look directly at the heart rate sensor light as this may damage your • eyesight. When heart rate readings are inaccurate, retake your heart rate measurements •... -
Page 134: Connecting The Watch To A Mobile Device
Connecting the watch to a mobile device Before pairing Before pairing, please do the following on the phone or tablet. Make sure that the Android version on your phone or tablet is Android 4.3 or higher and supports Bluetooth ® To find out whether your phone or tablet supports Android Wear, visit http://g.co/ • WearCheck from your phone or tablet. If your phone or tablet is not Android 4.3, or later, please check with your • manufacturer for a possible software update. Make sure your phone or tablet is next to your watch. On your phone or tablet, download the Android Wear app from the Play Store app and install it. Check that the Android Wear app is installed and updated to the latest version on your phone or tablet. Make sure your phone or tablet is connected to mobile data or Wi-Fi. You need a data connection to set up your watch for the first time. Keep the watch connected to power during setup. -
Page 135: How To Pair Your Watch
How to pair your watch Turn on the watch and swipe the welcome screen left to begin. Tap a language. Connect your watch to a power source and swipe left to continue. Tip: If the battery is less than 20%, charge your watch first before proceeding the next step. Swipe left following the on-screen instruction until the watch code is displayed. Open the Android Wear app on your phone or tablet. Turn Bluetooth on during setup, if it isn’t already on. On your phone or tablet, you’ll see a list of nearby devices. Tap your watch’s code. You’ll see a pairing code on your phone or tablet and watch. Check that the codes match. Tap Pair on your phone or tablet to start pairing. You’ll see a confirmation message on your watch once it is paired. This can take a few minutes, so please wait a while. Follow the onscreen instructions to complete the initial setup. After pairing To have the best Android Wear experience, we recommend turning on Google Now and Location Services. Go to Google settings or Settings, if they aren’t already on. -
Page 136: How To Use Your Watch
How to use your watch Start on your watch face (where you see the time) Start by waking up your watch. If your watch’s screen is dimmed, you can wake up the watch by: Touching the screen. • Turning your wrist so your watch face is upright. • Pressing the Power Key on the watch. • Quickly dim the screen Press your palm onto the screen until it vibrates. This will dim the watch face. Changing the watch face Touch and hold anywhere on the watch face for a few seconds. Swipe the screen right or left to browse designs, then tap to choose one. Tip: * You can also change and download the watch face through the Android Wear app. -
Page 137: Notification Cards
Notification cards Most notifications you see on your phone will also show up on your watch. These include notifications for missed calls, texts, event reminders, and more. Notifications are displayed in the form of cards at the bottom of the watch face. Swipe up to see more cards. Swipe left for Swipe right more details & to dismiss options. the card. Swipe down to return Card previews to the home screen. Swipe down on the card to hide it. To view cards, swipe up from the bottom of your screen. Tap a card to see more info. To see more cards, keep swiping up from the bottom of the screen. -
Page 138: Block Notifications
To bring a card back After the card has been dismissed, swipe down from the top of your watch’s screen and tap the Undo button . You’ll have a few seconds to get the card back. If you’ve swiped away the last card in your stream, you’ll need to swipe up from the bottom of the screen to see the Undo button. Block notifications If you get notifications on your phone that you don’t want to see on your watch, you can stop specific apps from showing up on your watch. Block apps from your watch On your watch, go to a card. Swipe from right to left until you see . Tap > to confirm. Block apps using the Android Wear app on your phone On your phone, open the Android Wear app. Tap > Tap your watch's name if you have multiple devices > Block app notifications > . -
Page 139: Call Notifications
Call notifications You can get instant call notifications alert when your phone receives an incoming call. The notification displays caller's number or the contacts on your phone and allows you to accept or decline the call. NOTE: Your watch can only get a notification. Use the phone paired to your watch to answer the call. Swipe right to reject Incoming call Swipe left to answer a call notification a call Change when notifications arrive You can change what notifications show up on your watch and when. To change interruption settings, swipe down from the top of your watch’s screen. You'll see interruptions options, then tap to select None, Priority, or All. -
Page 140: See Your Remaining Battery Or The Date
See your remaining battery or the date Swipe down from the top of the screen. Battery remaining Date NOTE: Some content may differ from your device depending on the OS version. Turn your screen off temporarily with Theater mode You can turn off your watch’s screen so the display doesn’t light up and notifications don’t appear. Press the Power Key twice quickly. • If your screen is dim, touch the screen to wake up the watch. Swipe down from the top of the screen. Swipe from right to left until you see Cinema mode . Tap the icon to turn it on. How to use your watch... -
Page 141: Boost The Screen Brightness Temporarily
Boost the screen brightness temporarily You can turn up the brightness temporarily if you’re outdoors in a sunny spot. The extra brightness will last for a few seconds and turn off automatically. Press the Power Key three times quickly. • If your screen is dim, touch the screen to wake up the watch. Swipe down from the top of the screen. Swipe from right to left until you see Brightness boost . Tap the icon to turn it on. Access the Settings menu If your screen is dim, tap the screen to wake up the watch. Tap anywhere on the background of the screen and swipe up to Settings menu. Swipe down from the top of the screen, and swipe left until Settings menu appears, then tap Settings . Manage storage Through the Android Wear app on your phone, you can see: How much storage space is available • Total storage space on your watch • Apps or services that are using your watch’s storage • To see the storage details: Make sure your watch is connected to your phone. -
Page 142: Tasks Using Voice Command
Tasks using Voice command You can see a menu of simple tasks on your watch, and anything in this list can also be said aloud. Just say “Ok Google” or swipe the home screen to the left until you see the Speak now option and say your command or question. For example, once you’re on the Speak now menu you can touch “Start stopwatch”. To do the same thing with your voice, just say “Ok Google, start stopwatch” from most screens. NOTE: Some voice actions are not available in all languages and countries. Follow these steps to start using your voice on your watch: If your screen is dim, tap the screen to wake up the watch. -
Page 143: Change The Apps You Use For Voice Actions
Change the apps you use for voice actions You can set which apps you use for different voice actions. For example, you can change the app you use for setting alarms or for sending messages. On your phone, open the Android Wear app. On the bottom half of the screen, a list of actions will be displayed. Scroll and tap an action. You can choose from available apps. Tip: You can also download apps that work with Android Wear from the Play Store Take or view a note You can speak to your watch to create a note or view existing notes using QuickMemo+ or Android apps like Google Keep. If your screen is dim, tap the screen to wake up the watch. From the watch face, say “Ok Google” or touch anywhere on the background of the screen, then swipe left. You will see the Speak now prompt. -
Page 144: Set A Reminder
Set a reminder You can speak to your watch to set a reminder. Once you set a reminder, you’ll see a card when your reminder goes off. If your screen is dim, tap the screen to wake up the watch. From the watch face, say “Ok Google” or touch anywhere on the background of the screen, then swipe left. You will see the Speak now prompt. Say "Remind me". Complete your reminder when prompted. Your reminder will automatically save after a few seconds. Touch the X if you want to cancel. Show me my steps With this feature you can view a count of the steps you have taken today and review a log of your steps taken over the last week, as measured by the Fit app. If your screen is dim, tap the screen to wake up the watch. From the watch face, say “Ok Google” or touch anywhere on the background of the screen, then swipe left. You will see the Speak now prompt. Say "Show me my steps". You will see your step count, progress to your fitness goal and a bar chart of your daily step counts. View a list of your daily step totals by swiping up across the screen. Show me my heart rate You can use the Heart Rate app to measure and record your current heart rate. NOTE: The device's heart rate measurement feature is not to be used for clinical or medical diagnosis. -
Page 145: Ensuring Accurate Measurements
• or consuming alcohol can affect your heart rate. Never take heart rate measurements at low temperatures. Or keep yourself warm • when you measure your heart rate. Users with thin wrists may find their heart rate measurements are inaccurate. • Measuring heart rate If your screen is dim, tap the screen to wake up the watch. From the watch face, say “Ok Google” or touch anywhere on the background of the screen, then swipe left. You will see the Speak now prompt. Say "Show me my heart rate". If you try this feature first time, you have to select Google Fit or LG Pulse. Select the app you want to use, then the selected app will be shown from the next time as a default. Your watch will start measuring your heart rate. After a short period of time, you will see your heart rate on the screen along with your heart rate measurements history. Take another measurement by tapping Check again. Send a text This feature enables you to use your watch to dictate text messages to contacts stored on your mobile device. You can also reply to received text messages which appear in text message cards. Sending a message If your screen is dim, tap the screen to wake up the watch. From the watch face, say “Ok Google” or touch anywhere on the background of the screen, then swipe left. You will see the Speak now prompt. -
Page 146: Email
Say "Send a text". The To whom? screen will be displayed. You will see the Speak now prompt. Say the name of the contact you want to send a text message to, then select the contact you want when the contact's list appears. You will be prompted to say the message you want to send. Say your messages or insert emoticons. Your message will send automatically. Replying to a message You will see cards if you get message notifications on your phone. Swipe from right to left until Reply appears. Tap Reply, then say your message. Email Your watch can be used to write emails as well as read emails received on your mobile device. If your screen is dim, tap the screen to wake up the watch. From the watch face, say “Ok Google” or touch anywhere on the background of the screen, then swipe left. You will see the Speak now prompt. Say "Email". The To whom? screen will be displayed. You will see the Speak now prompt. Say the name of the contact you want to send an email to, then select the contact you want when the contact's list appears. You will be prompted to say the message you want to send. Your message will send automatically. Checking emails on your phone Return to reading your emails on your watch, then swipe the message card from right to left and tap Open on phone. Tasks using Voice command... -
Page 147: Agenda
Replying to an email When you swipe from right to left you can take different actions, such as archive or reply. Tap Reply and say your message. Your message will send automatically. Deleting email messages Swipe the message card from right to left and tap Delete. Agenda You can view events scheduled on your mobile device's calendar using your watch. If your screen is dim, tap the screen to wake up the watch. From the watch face, say “Ok Google” or touch anywhere on the background of the screen, then swipe left. You will see the Speak now prompt. Say "Agenda". You will see a list of your scheduled events. View the details of an event by tapping the event. Navigate You can find your way to a selected destination using the watch. If your screen is dim, tap the screen to wake up the watch. From the watch face, say “Ok Google” or touch anywhere on the background of the screen, then swipe left. You will see the Speak now prompt. Say "Navigate", followed by the location. Set a timer The watch can be used as a countdown timer. Once you set a timer, you’ll have a new card with the countdown. If your screen is dim, tap the screen to wake up the watch. From the watch face, say “Ok Google” or touch anywhere on the background of the Tasks using Voice command... -
Page 148: Use The Stopwatch
screen, thenswipe left. You will see the Speak now prompt. Say "Set a timer". Swipe through the available durations and start the timer by tapping the desired duration. Start or resume the countdown by tapping . • Pause the timer by tapping . • To dismiss timer: When your timer goes off, dismiss by swiping from left to right on your screen. Use the stopwatch Measure how much time has passed with the Stopwatch app. If your screen is dim, tap the screen to wake up the watch. From the watch face, say “Ok Google” or touch anywhere on the background of the screen, then swipe left. You will see the Speak now prompt. Say "Start stopwatch". Tap to start. Set an alarm Multiple alarms can be set on your watch. Your watch and phone alarms are separate. If your screen is dim, tap the screen to wake up the watch. From the watch face, say “Ok Google” or touch anywhere on the background of the screen, then swipe left. You will see the Speak now prompt. Say "Set an alarm". Find the desired alarm time by swiping up or down. -
Page 149: See Current Alarms
When an alarm goes off, your watch will vibrate and display a card. Turn off Snooze Drag from left to right. Drag from right to left. See current alarms If your screen is dim, tap the screen to wake up the watch. From the watch face, say “Ok Google” or touch anywhere on the background of the screen, then swipe left. You will see the Speak now prompt. Say "Show alarms". You will see a list of the alarms that you have set on your watch. Tasks using Voice command... -
Page 150: Using Apps
Using apps The apps list provides a list of the applications which are included on the watch. To get to the apps installed on your watch: If your screen is dim, tap the screen to wake up the watch. Touch anywhere on the background of the screen to open applications list. Downloading other apps You can see a list of recommended apps in the Play Store Open the Android Wear app to download more apps on your phone. Making a call Your watch can display the dialpad so you can dial a number. Press and hold the Power Key until the apps list appears, then tap Call Swipe up until the dialer appears. Enter the phone numbers, then tap . Your phone will make a call with the number you've entered on you watch. Tip: You can also make a call from the Recent list and Favorites list. Touch and hold to enter the plus ( + ) symbol to dial an international number. -
Page 151: Use Google Fit App
NOTE: This feature may be available after a software update planned for May 2015. Use Google Fit app The Fit app lets you count your steps, view how far you have walked. You can also see your heart rate measurements. By installing the Google Fit app on the phone that your Android Wear watch is paired with, you'll be able to sync the data between the two devices and enjoy all of Fit's features. Press and hold the Power Key until the apps list appears, then tap Fit . Swipe left to see details. See an estimate of how many steps you've taken today You can speak or use the menu to your watch to see an estimate of how many steps you've taken. Say "OK Google". When you see the Speak now prompt, say "Show me my steps" (See Show me my steps section for more information). -
Page 152: Settings
Settings Launching the Settings menu If your screen is dim, tap the screen to wake up the watch. Tap anywhere on the background of the screen and swipe up to Settings. Swipe down the top of the screen, and swipe left until Settings menu appears, then • tap Settings . Adjusting display brightness The brightness of the watch display can be altered on the device itself. From the Settings menu, tap Adjust brightness. Choose a brightness level by touching an option. Change your watch face You can change the design of your watch face in a few ways: touch and hold the background of your watch’s screen, through the Android Wear app on your phone, or through Settings menu on your watch. From the Settings menu, tap Change watch face. Swipe right and left to browse designs. If you scroll all the way to the left, you’ll see your recent watch faces. Tap to choose a new design. Change the font size You can set the size of the font displayed in the watch. From the Settings menu, tap Font size. Settings... -
Page 153: Wrist Gestures
Choose a size level by touching an option. Wrist gestures You can use motion gestures to awake or dim the watch screen. Turn your wrist so your watch face is upright. From the Settings menu, tap Wrist gestures to turn on or off. • Wi-Fi settings If Wi-Fi is set to automatic mode, you can sync your watch and phone even when Bluetooth is not available. Wi-Fi is turned on automatically when Bluetooth is disconnected. When using a Wi-Fi connection on the watch, your watch can get notifications from your phone or tablet even if Bluetooth is unavailable. Your watch will search and connect to the nearest Wi-Fi network based on the Wi-Fi list registered on your phone. From the Settings menu, tap Wi-Fi settings to set automatic or off. • Bluetooth devices It automatically searches for Bluetooth devices within range. You can also disconnect your watch's Bluetooth connection currently connected. From the Settings menu tap Bluetooth devices. • Setting the screen always on You can set the screen to show the time or turn off completely when you're not using the watch. If set to turn off, the screen will turn on when you tilt it or cover the screen. From the Settings menu, tap Always-on screen to turn on or off. • ON: A dimmed watch face is shown when your watch is idle. • Settings... -
Page 154: Airplane Mode
OFF: The watch screen darkens when idle. • Airplane mode When Airplane mode is on, you can use still many of the features on your watch, such as Heart Rate, when you are on an airplane or anywhere where sending or receiving data is prohibited. Important! When in Airplane Mode, your watch cannot access information stored on your mobile device. You should also enable the Airplane mode on your mobile device. From the Settings menu, tap Aeroplane mode and select to enable or disable the • feature. Accessibility From the Settings menu, tap Accessibility > Magnification gestures to enable •... -
Page 155: Restart
Restart This setting restarts your watch. From the Settings menu, tap Restart. You will see a prompt where you must confirm you want to restart your watch. Tap to restart your watch. Press and hold the Power Key for over 10 seconds. Your watch turns off and turns • back on. Screen lock Tap to set a screen lock. A pattern you draw with your finger unlocks the screen. Power off From the Settings menu, tap Power off. When prompted with the message Power off: Are you sure?, tap . About Information about your watch is displayed here. You can view the Model, Device name, Software version, Serial number, Build number, Connection and Battery information. The following options are also available. From the Settings menu, tap About. • System updates: This makes sure the latest software is loaded on your watch. • Regulatory information: Displays regulatory information. • Legal notices: Instructs you to see your mobile device for legal notices. • Settings... -
Page 156: About This User Guide
About this user guide About this user guide You must read this manual carefully before using your device. This will ensure safe • and correct use of your product. Some of the images and screenshots which appear in this guide may differ from • those on your product. There may be discrepancies between your content and the final product, or • software supplied by service providers or operators. This content may be subject to change without prior notice. Visit the LG website at www.lg.com to obtain the latest version of this manual. The applications on your product, and their functions, may vary according to • country, region or hardware specifications. LG will not be responsible for any performance issues which arise from using applications developed by providers other than LG. LG will not be responsible for performance or incompatibility issues which arise • from edited registry settings or modified operating system software. Any attempt to customizes your operating system may lead to the device or its applications not working correctly. The software, audio, wallpaper, images and other media which are supplied along • with your device are licensed for limited use. Extracting and using these materials for commercial or other purposes may be an infringement of copyright laws. As a user, be aware that you are fully and entirely responsible for any illegal use of media. Data services, such as messaging, uploading and downloading, auto-syncing or • using location services, may incur additional charges. Ensure you select a suitable data plan for your needs to avoid additional charges. Contact your service provider for further details. -
Page 157: Trademarks
Trademarks LG and the LG logo are registered trademarks of LG Electronics. • All other trademarks and copyrights are the property of their respective owners. • About this user guide... -
Page 158: Accessories
• Charging Cradle • NOTE: Always use genuine LG accessories. The supplied items are designed only • for this device and may not be compatible with other devices. The items supplied with the device and any available accessories may vary •... - Page 159 (6) The customer shall bear the cost of shipping the product to the Customer Service Department of LG. LG shall bear the cost of shipping the product back to the consumer after the completion of service under this limited warranty.
- Page 160 (3) Breakage or damage to antennas unless caused directly by defects in material or workmanship. (4) That the Customer Service Department at LG was not notified by consumer of the alleged defect or malfunction of the product during the applicable limited warranty period.
- Page 162 A QUESTION ABOUT YOUR MOBILE PHONE? Our Customer Service is there to support you: 0900 - 543 5454 (NL) 015 - 200 255 (BE)