
Related Manuals for Kenwood DPX-5000BT


Summary of Contents for Kenwood DPX-5000BT
-
Page 1: Instruction Manual
DPX-5000BT DUAL DIN SIZED CD RECEIVER INSTRUCTION MANUAL © 2015 JVC KENWOOD Corporation B5A-0912-00 (MN) -
Page 2: Table Of Contents
CONTENTS BEFORE USE BEFORE USE IMPORTANT • To ensure proper use, please read through this manual before using this product. It is especially important BASICS that you read and observe Warning and Caution in this manual. • Please keep the manual in a safe and accessible place for future reference. GETTING STARTED 1 Select the display language Warning... -
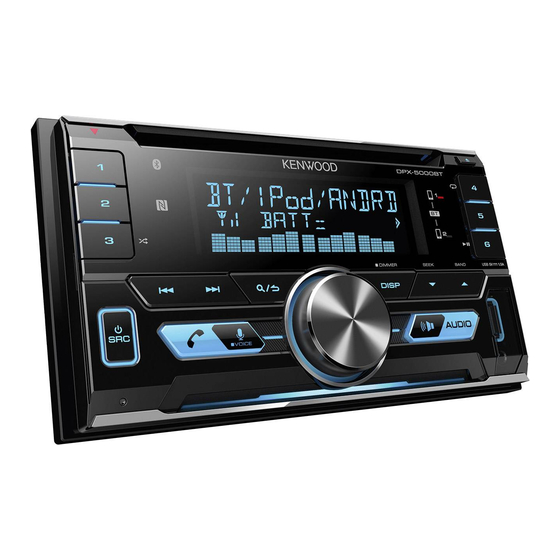
Page 3: Faceplate/Remote Control Overview
BASICS Faceplate Remote control (RC-406) Loading slot Display window Remote sensor (Do not expose to bright sunlight.) Lights up when Bluetooth connection is Pull out the established. insulation sheet ( 12) when using for the first time. How to replace the battery Reset button Volume knob Flashes when the unit... -
Page 4: Getting Started
GETTING STARTED Set the clock and date Press the volume knob to enter [FUNCTION]. Turn the volume knob to select [CLOCK], then press the knob. To adjust the clock Turn the volume knob to select [CLOCK ADJUST], then press the knob. Turn the volume knob to make the settings, then press the knob. - Page 5 F/W UP xx.xx YES: Starts upgrading the firmware. ; NO: Cancels (upgrading is not activated). For details on how to update the firmware, see: www.kenwood.com/cs/ce/ FACTORY RESET YES: Resets the settings to default (except the stored station). ; NO: Cancels. * Not applicable if 3-way crossover is selected.
-
Page 6: Radio
RADIO Other settings Press the volume knob to enter [FUNCTION]. Turn the volume knob to select an item (see the following table), then press the knob. Repeat step until the desired item is selected or activated. Press and hold to exit. To return to the previous setting item, press Default: XX TUNER SETTING... -
Page 7: Cd / Usb / Ipod / Android
Do not leave the cable inside the car when not using. When connecting an Android device, “Press [VIEW] to install KENWOOD MUSIC PLAY APP” is shown. Follow the instructions to install the application. You can also install the latest version of KENWOOD MUSIC PLAY application on your Android device before connecting. - Page 8 MODE OFF : Control iPod from this unit. While in ANDROID source, press 5 repeatedly. BROWSE MODE : Control Android device from this unit via KENWOOD MUSIC PLAY application installed in the Android On the faceplate On the remote control device.
- Page 9 CD / USB / iPod / ANDROID Select a file from a folder/list Listen to TuneIn Radio/ TuneIn Radio Pro/ Aupeo Press While listening to TuneIn Radio, TuneIn Radio Pro or Aupeo, connect the Turn the volume knob to select a folder/list, then press the knob. iPod/iPhone to the USB input terminal of the unit.
-
Page 10: Pandora
Pandora® Preparation: Preparation: Select [ON] for [BUILT-IN AUX]. ( 5) Install the latest version of the Pandora application on your device (iPhone/ iPod touch), then create an account and log in to Pandora. Start listening • Select [ON] for [PANDORA SRC]. ( 5) Connect a portable audio player (commercially available). - Page 11 Pandora® Create and save a new station Delete a station Press While listening to PANDORA... Turn the volume knob to select [NEW STATION], then press the knob. Press the volume knob to enter [FUNCTION]. Turn the volume knob to select [FROM TRACK] or [FROM ARTIST], then Turn the volume knob to select [SYSTEM], then press the knob.
-
Page 12: Bluetooth
– [AUTO PAIRING] is set to [ON]. ( 16) • For some Bluetooth devices, you may need to enter the Personal Identification – KENWOOD MUSIC PLAY application is installed on the Number (PIN) code immediately after searching. Android device ( 7) and [BROWSE MODE] is selected Press the volume knob to start pairing. - Page 13 BLUETOOTH® BLUETOOTH — Mobile phone Connect with a remote device by One-touch (NFC) Near Field Communication (NFC) enables short-range wireless communication between the unit and remote devices. By holding an NFC-compatible remote device near to the N-Mark on the unit, the unit and remote device proceed to complete pairing and established the BLUETOOTH connection automatically.
- Page 14 BLUETOOTH® Default: XX On the faceplate On the remote control MIC GAIN –10 — +10 (–4): The sensitivity of the While talking on the first incoming call... microphone increases as the number increased. Answer another incoming Press Press NR LEVEL –5 — +5 (0): Adjust the noise reduction level call and hold the current until the least noise is being heard during a phone call...
- Page 15 BLUETOOTH® Make a call NUMBER DIAL 1 Turn the volume knob to select a number (0 to 9) or character ( , #, +). You can make a call from the call history, phonebook, or dialing the number. Call 2 Press to move the entry position.
- Page 16 BLUETOOTH® Settings in memory Other settings Press the volume knob to enter [FUNCTION]. Store a contact in memory Turn the volume knob to select an item (see the following table), then press You can store up to 6 contacts into the number buttons the knob.
- Page 17 BLUETOOTH® BLUETOOTH — Audio Bluetooth test mode You can check the connectivity of the supported profile between the Bluetooth device and the unit. • Make sure there is no Bluetooth device paired. Press and hold “PLEASE PAIR YOUR PHONE PIN 0000” appears.
-
Page 18: Audio Settings
AUDIO SETTINGS BLUETOOTH® While listening to any source... Internet radio via Bluetooth Press AUD to enter [AUDIO CONTROL]. Listen to Pandora Turn the volume knob to select an item (see the following table), then press the knob. Repeat step until the desired item is selected or activated. You can listen to Pandora on the Android device via Press and hold to exit. - Page 19 AUDIO SETTINGS Crossover settings SUBWOOFER SET ON: Turns on the subwoofer output. ; OFF: Cancels. Below are the available setting items for 2-way crossover and 3-way FADER (Not applicable if 3-way crossover is selected.) crossover. R15 to F15 (0): Adjusts the rear and front speaker output balance. BALANCE L15 to R15 (0): Adjusts the left and right speaker output balance.
- Page 20 AUDIO SETTINGS 2-way crossover setting items 3-way crossover setting items SPEAKER SIZE SPEAKER SIZE FRONT SIZE 8CM/ 10CM/ 12CM/ 13CM/ 16CM/ 17CM/ 18CM/ TWEETER SMALL/ MIDDLE/ LARGE 4×6/ 5×7/ 6×8/ 6×9/ 7×10 MID RANGE 8CM/ 10CM/ 12CM/ 13CM/ 16CM/ 17CM/ 18CM/ 4×6/ 5×7/ 6×8/ TWEETER SMALL/ MIDDLE/ LARGE/ NONE (not connected) 6×9...
-
Page 21: Display Settings
DISPLAY SETTINGS Default: XX COLOR SELECT Select color for ALL ZONE, ZONE 1 and ZONE 2 separately. 1 Select a zone. (See the illustration on the left column.) 2 Select a color for the selected zone. VARIABLE SCAN/ CUSTOM R/G/B/ preset colors* To make your own color, select [CUSTOM R/G/B]. -
Page 22: Troubleshooting
TROUBLESHOOTING Symptom Remedy Symptom Remedy • Adjust the volume to the optimum level. • This unit can only display uppercase letters, numbers, Sound cannot be heard. Correct characters are not • Check the cords and connections. displayed (e.g. album and a limited number of symbols. •... - Page 23 TROUBLESHOOTING Symptom Remedy Symptom Remedy • Make sure KENWOOD MUSIC PLAY APP is installed on • Search from the Bluetooth device again. Cannot playback at No Bluetooth device is • Reset the unit. ( 3) [BROWSE MODE]. the Android device. ( 7) detected.
-
Page 24: References
Try the operation again. If “ERROR” appears again, More information check if the device supports the function you Visit also the following website <www.kenwood.com/cs/ce/> for: have tried. – Latest firmware updates and latest compatible item list “NO INFO” / “NO DATA”... -
Page 25: More Information
- iPhone 3G, 3GS, 4, 4S, 5, 5S, 5C, 6, 6 Plus “NFC Easy Connect” application. (“NFC Easy Connect” is a free application available at Google • You cannot operate iPod if “KENWOOD” or “ ” is displayed on iPod. Play.) •... -
Page 26: Specifications
SPECIFICATIONS REFERENCES Change the display information FM Frequency Range 87.5 MHz — 108.0 MHz (50 kHz space) Each time you press DISP, the display information changes. Channel Space Selection 50 kHz • If the information is unavailable or not recorded, “NO TEXT”, “NO INFO”, or other information (eg. - Page 27 SPECIFICATIONS Dynamic Range 90 dB Maximum Output Power 50 W × 4 Channel Separation 85 dB Full Bandwidth Power 22 W × 4 (at less than 1 % THD) MP3 Decode Compliant with MPEG-1/2 Audio Layer-3 Speaker Impedance 4 Ω — 8 Ω WMA Decode Compliant with Windows Media Audio Tone Action Band 1: 62.5 Hz ±9 dB Band 2: 100 Hz ±9 dB...
-
Page 28: Installing The Unit
Warning Installing the unit (in-dash mounting) • The unit can only be used with a 12 V DC power supply, negative ground. Install onto the car brackets using the supplied screws (C) or (D). The screw holes differ depending on • Disconnect the battery’s negative terminal before wiring and mounting. the model of the cars. -
Page 29: Wiring Connection
To front speaker (left) / For 3-way the tab. White/Black crossover: Mid range speaker (left) Gray Brown To connect the Kenwood To front speaker (right) / For 3-way Gray/Black (Mute control wire) navigation system, refer your crossover: Mid range speaker (right) - Page 30 • The Bluetooth® word mark and logos are registered trademarks owned by Bluetooth SIG, Inc. permitted provided that the following conditions are met: and any use of such marks by JVC KENWOOD Corporation is under license. Other trademarks and - Redistributions of source code must retain the above copyright notice, this list of trade names are those of their respective owners.
- Page 31 • The Bluetooth® word mark and logos are registered trademarks owned by Bluetooth SIG, Inc. permitted provided that the following conditions are met: and any use of such marks by JVC KENWOOD Corporation is under license. Other trademarks and - Redistributions of source code must retain the above copyright notice, this list of trade names are those of their respective owners.
- Page 32 (ﻗﻨﻮﺍﺕ: ﺳﻤﺎﻋﺔ ﻣﺘﻮﺳﻄﺔ ﺍﻟﻨﻄﺎﻕ )ﺍﻟﻴﺴﺮﻯ ﺭﻣﺎﺩﻱ ﺑﻨﻲ ﻟﺘﻮﺻﻴﻞ ﻧﻈﺎﻡ ﺍﻟﻤﻼﺣﺔ ﻣﻦ 3 ﺍﻟﻰ ﺍﻟﺴﻤﺎﻋﺔ ﺍﻻﻣﺎﻣﻴﺔ )ﺍﻟﻴﻤﻨﻰ(/ ﻟﻠﺘﻌﺪﻳﺔ ﺭﻣﺎﺩﻱ/ﺃﺳﻮﺩ )ﺳﻠﻚ ﺍﻟﺘﺤﻜﻢ ﻓﻲ ، ﻋﻠﻴﻚ ﺑﺎﻟﺮﺟﻮﻉKenwood (ﻗﻨﻮﺍﺕ: ﺳﻤﺎﻋﺔ ﻣﺘﻮﺳﻄﺔ ﺍﻟﻨﻄﺎﻕ )ﺍﻟﻴﻤﻨﻰ (ﻛﺘﻢ ﺍﻟﺼﻮﺕ ﺇﻟﻰ ﺩﻟﻴﻞ ﺍﻟﻤﻼﺣﺔ ﺃﺧﻀﺮ ( ﺑﺮﺍﻏﻲ ﻣﺪﻭﺭﺓ ﺍﻟﺮﺃﺱC) / (ﺇﻟﻰ ﺍﻟﺴﻤﺎﻋﺔ ﺍﻟﺨﻠﻔﻴﺔ )ﺍﻟﻴﺴﺮﻯ...
- Page 33 ﺗﺤﺬﻳﺮ (ﺗﺮﻛﻴﺐ ﺍﻟﻮﺣﺪﺓ )ﺩﺍﺧﻞ ﺗﺎﺑﻠﻮ ﺍﻟﺴﻴﺎﺭﺓ ،• ﻳﻤﻜﻦ ﺍﺳﺘﺨﺪﺍﻡ ﺍﻟﻮﺣﺪﺓ ﻓﻘﻂ ﻓﻲ ﺳﻴﺎﺭﺓ ﺑﻬﺎ ﻣﺼﺪﺭ ﺗﻴﺎﺭ ﻣﺒﺎﺷﺮ 21 ﻓﻮﻟﺖ (. ﺗﺨﺘﻠﻒ ﻓﺘﺤﺎﺕ ﺍﻟﺒﺮﺍﻏﻲD) ( ﺃﻭC) ﻗﻢ ﺑﺎﻟﺘﺮﻛﻴﺐ ﻋﻠﻰ ﺩﻋﺎﻣﺎﺕ ﺍﻟﺴﻴﺎﺭﺓ ﻣﺴﺘﺨﺪﻣﺎ ﺍﻟﺒﺮﺍﻏﻲ ﺍﻟﻤﺮﻓﻘﺔ .ﻭﺗﺄﺭﻳﺾ ﺳﻠﺒﻲ .ﺣﺴﺐ ﻣﻮﺩﻳﻞ ﺍﻟﺴﻴﺎﺭﺍﺕ .• ﻗﻢ ﺑﻔﺼﻞ ﺍﻟﻄﺮﻑ ﺍﻟﺴﻠﺒﻲ ﻟﻠﺒﻄﺎﺭﻳﺔ ﻗﺒﻞ ﺗﻮﺻﻴﻞ ﺍﻷﺳﻼﻙ ﻭﺍﻟﺘﺮﻛﻴﺐ ﻗﻢ...
- Page 34 ﺍﻟﻤﻮﺍﺻﻔﺎﺕ 4 × 05 ﻭﺍﻁ ﻗﺪﺭﺓ ﺍﻟﺨﺮﺝ ﺍﻟﻘﺼﻮﻯ 09 ﺩﻳﺴﻴﺒﻞ ﺍﻟﻤﺠﺎﻝ ﺍﻟﺪﻳﻨﺎﻣﻴﻜﻲ 22 ﻭﺍﻁ × 4 )ﻋﻨﺪ ﺃﻗﻞ ﻣﻦ % 1 ﺇﺟﻤﺎﻟﻲ ﺗﺸﺘﺖ ﻗﺪﺭﺓ ﺳﻌﺔ ﻧﻄﺎﻕ ﺍﻟﺒﺚ ﺍﻟﻜﺎﻣﻞ 58 ﺩﻳﺴﻴﺒﻞ ﻓﺼﻞ ﺍﻟﻘﻨﻮﺍﺕ (ﺍﻟﺼﻮﺕ MPEG-1/2 Audio Layer-3 ﻣﺘﻮﺍﻓﻖ ﻣﻊ MP3 ﻓﻚ ﺷﻔﺮﺓ 4 ﺃﻭﻡ...
- Page 35 ﺍﻟﻤﻮﺍﺻﻔﺎﺕ ﻣﺮﺍﺟﻊ ﺗﻐﻴﻴﺮ ﻣﻌﻠﻮﻣﺎﺕ ﺍﻟﺸﺎﺷﺔ 5.78 ﻣﻴﺠﺎ ﻫﺮﺗﺰ — 0.801 ﻣﻴﺠﺎ ﻫﺮﺗﺰ ﻧﻄﺎﻕ ﺍﻟﺘﺮﺩﺩ .، ﺗﺘﻐﻴﺮ ﻣﻌﻠﻮﻣﺎﺕ ﺍﻟﺸﺎﺷﺔDISP ﻛﻠﻤﺎ ﺿﻐﻄﺖ ﻋﻠﻰ ()ﻟﻤﺴﺎﻓﺔ 05 ﻛﻴﻠﻮ ﻫﺮﺗﺰ “ ﺃﻭNO INFO” “ ﺃﻭNO TEXT” • ﺇﺫﺍ ﻟﻢ ﺗﻜﻦ ﺍﻟﻤﻌﻠﻮﻣﺎﺕ ﻣﺘﻮﻓﺮﺓ ﺃﻭ ﺍﻧﻬﺎ ﻏﻴﺮ ﻣﺴﺠﻠﺔ، ﻳﻈﻬﺮ 05 ﻛﻴﻠﻮ...
- Page 36 6 Plus ،6 ،5C ،5S ،5 ،4S ،4 ،3GS ،iPhone 3G - .iPod “ ﺃﻭ ” “ ﻓﻲ ﺟﻬﺎﺯKENWOOD” ﻓﻲ ﺣﺎﻟﺔ ﻇﻬﻮﺭiPod • ﻟﻦ ﻳﻤﻜﻨﻚ ﺗﺸﻐﻴﻞ ﺟﻬﺎﺯ ، ﻗﺪ ﻻ ﺗﻌﻤﻞ ﺑﻌﺾ ﺍﻟﻮﻇﺎﺋﻒiPhone/iPod • ﺍﻋﺘﻤﺎﺩﺍ ﻋﻠﻰ ﻧﺴﺨﺔ ﻧﻈﺎﻡ ﺍﻟﺘﺸﻐﻴﻞ ﺍﻟﺨﺎﺹ ﺑﺠﻬﺎﺯ...
- Page 37 “ERROR” ﻣﺰﻳﺪ ﻣﻦ ﺍﻟﻤﻌﻠﻮﻣﺎﺕ “ )ﺧﻄﺄ( ﻣﺮﺓ ﺃﺧﺮﻯ، ﻓﺘﺤﻘﻖ ﻣﻤﺎ ﺇﺫﺍ ﻛﺎﻥERROR” :< ﻣﻦ ﺍﺟﻞwww.kenwood.com/cs/ce/> ﻛﻤﺎ ﻳﺮﺟﻰ ﺯﻳﺎﺭﺓ ﺍﻟﻤﻮﻗﻊ ﺍﻟﺘﺎﻟﻲ .ﺍﻟﺠﻬﺎﺯ ﻳﺪﻋﻢ ﺍﻟﻮﻇﻴﻔﺔ ﺍﻟﺘﻲ ﺗﺤﺎﻭﻝ ﺇﺟﺮﺍﺀﻫﺎ – ﺁﺧﺮ ﺗﺤﺪﻳﺜﺎﺕ ﺍﻟﺒﺮﺍﻣﺞ ﺍﻟﺜﺎﺑﺘﺔ ﻭﺍﺣﺪﺙ ﻗﺎﺋﻤﺔ ﺑﻨﻮﺩ ﻣﺘﻮﺍﻓﻘﺔ ﺍﻟﺤﺼﻮﻝ ﻋﻠﻰBluetooth ﻻ ﻳﺴﺘﻄﻴﻊ ﺟﻬﺎﺯ...
- Page 38 ﻣﻌﺎﻟﺠﺔ ﺍﻷﻋﻄﺎﻝ ﺍﻻﻋﺮﺍﺽ . ﻣﺮﺓ ﺃﺧﺮﻯBluetooth • ﺍﻟﺒﺤﺚ ﻣﻦ ﺟﻬﺎﺯ ﻟﻢ ﻳﺘﻢ ﺍﻟﺘﻌﺮﻑ ﻋﻠﻰ ﻻ ﻳﻤﻜﻦ ﺍﻟﺘﺸﻐﻴﻞ ﻓﻲ ﻓﻲKENWOOD MUSIC PLAY APP • ﺗﺄﻛﺪ ﻣﻦ ﺗﺜﺒﻴﺖ ﺍﻟﺘﻄﺒﻴﻖ ) .• ﺃﻋﺪ ﺿﺒﻂ ﺍﻟﻮﺣﺪﺓ .Bluetooth ﺟﻬﺎﺯ ) .Android ﺟﻬﺎﺯ .[BROWSE MODE] ﻭﺿﻊ...
- Page 39 ﺍﻟﺒﺤﺚ ﻋﻦ ﺍﻻﻋﻄﺎﻝ ﻭﺍﻻﺻﻼﺡ ﻣﻌﺎﻟﺠﺔ ﺍﻷﻋﻄﺎﻝ ﺍﻻﻋﺮﺍﺽ ﻣﻌﺎﻟﺠﺔ ﺍﻷﻋﻄﺎﻝ ﺍﻻﻋﺮﺍﺽ • ﺗﺴﺘﻄﻴﻊ ﻫﺬﻩ ﺍﻟﻮﺣﺪﺓ ﻓﻘﻂ ﻋﺮﺽ ﺍﻟﺤﺮﻭﻑ ﺍﻟﻬﺠﺎﺋﻴﺔ ﻻ ﻳﺘﻢ ﻋﺮﺽ ﺍﻟﺤﺮﻭﻑ • ﺍﺿﺒﻂ ﻣﺴﺘﻮﻯ ﻗﻮﺓ ﺍﻟﺼﻮﺕ ﻋﻠﻰ ﺍﻓﻀﻞ ﻣﺴﺘﻮﻯ .ﻻ ﻳﻤﻜﻦ ﺳﻤﺎﻉ ﺍﻟﺼﻮﺕ .ﺍﻟﻜﺒﻴﺮﺓ ﻭﺍﻷﺭﻗﺎﻡ ﻭﻋﺪﺩ ﻣﺤﺪﻭﺩ ﻣﻦ ﺍﻟﺮﻣﻮﺯ ﺍﻟﺼﺤﻴﺤﺔ...
- Page 40 ﺇﻋﺪﺍﺩﺍﺕ ﺍﻟﺸﺎﺷﺔ XX :ﺍﻓﺘﺮﺍﺿﻲ . ﺑﺸﻜﻞ ﻣﻨﻔﺼﻞZONE 2 ﻭZONE 1 ﻭALL ZONE ﺍﺧﺘﺮ ﻟﻮﻥ ﺍﻟﻰ COLOR SELECT (.1 ﺍﺧﺘﺮ ﻣﻨﻄﻘﺔ. )ﺭﺍﺟﻊ ﺍﻻﺿﺎﺀﺓ ﻋﻠﻰ ﺍﻟﻌﻤﻮﺩ ﺍﻻﻳﺴﺮ .2 ﺣﺪﺩ ﻟﻮ ﻧ ﹰ ﺎ ﻟﻠﻤﻨﻄﻘﺔ ﺍﻟﻤﺤﺪﺩﺓ * / ﺍﻻﻟﻮﺍﻥ ﺍﻟﻤﻀﺒﻮﻃﺔ ﻣﺴﺒﻘﺎCUSTOM R/G/B /VARIABLE SCAN [.
- Page 41 ﺇﻋﺪﺍﺩﺍﺕ ﺍﻟﺼﻮﺕ ﺑﻨﻮﺩ ﺇﻋﺪﺍﺩ ﺗﻌﺪﻳﺔ 3 ﻗﻨﻮﺍﺕ ﺑﻨﻮﺩ ﺍﻹﻋﺪﺍﺩ ﺗﻌﺪﻳﺔ ﺑﻘﻨﺎﺗﻴﻦ SPEAKER SIZE SPEAKER SIZE LARGE /MIDDLE /SMALL /17CM /16CM /13CM /12CM /10CM /8CM TWEETER SIZE FRONT 7×10 /6×9 /6×8 /5×7 /4×6 /18CM /5×7 /4×6 /18CM /17CM /16CM /13CM /12CM /10CM /8CM MID RANGE 6×9 /6×8 (...
- Page 42 ﺇﻋﺪﺍﺩﺍﺕ ﺍﻟﺼﻮﺕ ﺇﻋﺪﺍﺩﺍﺕ ﺍﻟﺘﻌﺪﻳﺔ .: ﺍﻟﻐﺎﺀOFF : ﻳﻘﻮﻡ ﺑﺘﺸﻐﻴﻞ ﺧﺮﺝ ﺍﻟﺼﺒﻮﻭﻓﺮ. ؛ON SUBWOOFER SET .ﻓﻴﻤﺎ ﻳﻠﻲ ﺑﻨﻮﺩ ﺍﻹﻋﺪﺍﺩ ﺍﻟﻤﺘﺎﺣﺔ ﻟﻠﺘﻌﺪﻳﺔ ﺑﻘﺎﺗﻴﻦ ﺃﻭ ﺑﻌﺪﻳﺔ 3 ﻗﻨﻮﺍﺕ (.)ﻏﻴﺮ ﻗﺎﺑﻞ ﻟﻠﺘﻄﺒﻴﻖ ﻋﻦ ﺍﺧﺘﻴﺎﺭ ﺗﻌﺪﻳﺔ 3 ﻗﻨﻮﺍﺕ FADER . )0(: ﻳﻀﺒﻂ ﺗﻮﺍﺯﻥ ﺧﺮﺝ ﺍﻟﺴﻤﺎﻋﺘﻴﻦ ﺍﻟﺨﻠﻔﻴﺔ ﻭﺍﻷﻣﺎﻣﻴﺔF15 ﺇﻟﻰR15 SPEAKER SIZE ....
- Page 43 ﺇﻋﺪﺍﺩﺍﺕ ﺍﻟﺼﻮﺕ BLUETOOTH® ...ﺃﺛﻨﺎﺀ ﺍﻻﺳﺘﻤﺎﻉ ﺇﻟﻰ ﺃﻱ ﻣﺼﺪﺭ Bluetooth ﺭﺍﺩﻳﻮ ﺍﻹﻧﺘﺮﻧﺖ ﻋﻦ ﻃﺮﻳﻖ .[AUDIO CONTROL] ﻟﻠﺪﺧﻮﻝ ﺇﻟﻰ ﻭﺿﻊAUD ﺍﺿﻐﻂ Pandora ﺍﻻﺳﺘﻤﺎﻉ ﺇﻟﻰ .ﺃﺩﺭ ﻗﺮﺹ ﻣﺴﺘﻮﻯ ﺍﻟﺼﻮﺕ ﻟﺘﺤﺪﻳﺪ ﺑﻨﺪ )ﺭﺍﺟﻊ ﺍﻟﺠﺪﻭﻝ ﺍﻟﺘﺎﻟﻲ(، ﺛﻢ ﺍﺿﻐﻂ ﺍﻟﻘﺮﺹ .ﺣﺘﻰ ﻳﺘﻢ ﺗﺤﺪﻳﺪ ﺍﻟﻌﻨﺼﺮ ﺍﻟﻤﻄﻠﻮﺏ ﺃﻭ ﺗﻨﺸﻴﻄﻪ ﻛﺮﺭ...
- Page 44 BLUETOOTH® — ﺻﻮﺕBLUETOOTH Bluetooth ﻭﺿﻊ ﺍﺧﺘﺒﺎﺭ ﻳﻤﻜﻨﻚ ﻓﺤﺺ ﺍﺗﺼﺎﻝ ﺍﻟﻮﺿﻊ ﺍﻟﻤﺪﻋﻮﻡ ﺑﻴﻦ ﺟﻬﺎﺯ . ﻭﺍﻟﻮﺣﺪﺓBluetooth . ﻣﻘﺎﺭﻥBluetooth • ﺗﺄﻛﺪ ﻣﻦ ﻋﺪﻡ ﻭﺟﻮﺩ ﺟﻬﺎﺯ ﺍﺿﻐﻂ ﻣﻊ ﺍﻻﺳﺘﻤﺮﺍﺭ ﻋﻠﻰ .“PLEASE PAIR YOUR PHONE PIN 0000” ﺗﻈﻬﺮ ﺍﺑﺤﺚ ﻋﻦ ﺍﺳﻢ ﻃﺮﺍﺯ ﺍﻟﻮﺣﺪﺓ ( ﻭﺣﺪﺩﻩ...
- Page 45 BLUETOOTH® ﺇﻋﺪﺍﺩﺍﺕ ﺃﺧﺮﻯ ﺇﻋﺪﺍﺩﺍﺕ ﻓﻲ ﺍﻟﺬﺍﻛﺮﺓ .[FUNCTION] ﺍﺿﻐﻂ ﻋﻠﻰ ﻗﺮﺹ ﻣﺴﺘﻮﻯ ﺍﻟﺼﻮﺕ ﻟﻠﺪﺧﻮﻝ ﺇﻟﻰ ﺗﺨﺰﻳﻦ ﺟﻬﺔ ﺍﺗﺼﺎﻝ ﻓﻲ ﺍﻟﺬﺍﻛﺮﺓ .ﺃﺩﺭ ﻗﺮﺹ ﻣﺴﺘﻮﻯ ﺍﻟﺼﻮﺕ ﻟﺘﺤﺪﻳﺪ ﺑﻨﺪ )ﺭﺍﺟﻊ ﺍﻟﺠﺪﻭﻝ ﺍﻟﺘﺎﻟﻲ(، ﺛﻢ ﺍﺿﻐﻂ ﺍﻟﻘﺮﺹ ﺍﻟﻰ ﺍﻥ ﻳﺘﻢ ﺍﺧﺘﻴﺎﺭ ﺍﻟﺒﻨﺪ ﺍﻟﻤﺮﻏﻮﺏ ﺍﻭ ﺍﺗﺒﻊ ﺍﻟﺘﻌﻠﻴﻤﺎﺕ ﺍﻟﻤﺘﻌﻠﻘﺔ ﺑﺎﻟﺒﻨﺪ ﻛﺮﺭ...
- Page 46 BLUETOOTH® ﺍﺟﺮﺍﺀ ﻣﻜﺎﻟﻤﺔ 1 ﻗﻢ ﺑﺘﺪﻭﻳﺮ ﻗﺮﺹ ﻣﺴﺘﻮﻯ ﺍﻟﺼﻮﺕ ﻟﺘﺤﺪﻳﺪ ﺭﻗﻢ )0 ﺇﻟﻰ 9( ﺃﻭ NUMBER DIAL .(+ ،# ، ) ﺣﺮﻑ ﻳﻤﻜﻦ ﺍﺟﺮﺍﺀ ﻣﻜﺎﻟﻤﺔ ﻣﻦ ﺳﺠﻞ ﺍﻟﻤﻜﺎﻟﻤﺎﺕ ﺃﻭ ﻣﻦ ﺩﻟﻴﻞ ﺍﻟﻬﺎﺗﻒ ﺃﻭ ﺍﻻﺗﺼﺎﻝ ﺑﺎﻟﺮﻗﻢ. ﻛﻤﺎ ﺗﺘﻮﻓﺮ ﻭﻇﻴﻔﺔ .ﻟﺘﺤﺮﻳﻚ ﻣﻮﺿﻊ ﺍﻹﺩﺧﺎﻝ 2 ﺍﺿﻐﻂ...
- Page 47 BLUETOOTH® XX :ﺍﻓﺘﺮﺍﺿﻲ ﻋﻠﻰ ﻭﺣﺪﺓ ﺍﻟﺘﺤﻜﻢ ﻋﻠﻰ ﻏﻄﺎﺀ ﺍﻟﺤﻤﺎﻳﺔ ﺇﻟﻰ ﻋﻦ ﺑﻌﺪ 01– — 01+ )4–(: ﺗﺰﻳﺪ ﺣﺴﺎﺳﻴﺔ ﺍﻟﻤﻴﻜﺮﻭﻓﻮﻥ MIC GAIN .ﻛﻠﻤﺎ ﺯﺍﺩ ﺍﻟﺮﻗﻢ ...ﺍﺛﻨﺎﺀ ﺍﻟﺮﺩ ﻋﻠﻰ ﺍﻭﻝ ﻣﻜﺎﻟﻤﺔ ﻭﺍﺭﺩﺓ ﺍﻻﺟﺎﺑﺔ ﻋﻠﻰ ﺍﻟﻤﻜﺎﻟﻤﺔ 5– — 5+ )0(: ﺍﺿﺒﻂ ﻣﺴﺘﻮﻯ ﺍﻟﺤﺪ ﻣﻦ ﺍﻟﻀﻮﺿﺎﺀ ﺍﺿﻐﻂ...
- Page 48 BLUETOOTH® — ﻫﺎﺗﻒ ﻣﺤﻤﻮﻝBLUETOOTH (NFC) ﺍﻟﺘﻮﺻﻴﻞ ﻣﻊ ﺟﻬﺎﺯ ﻋﻦ ﺑﻌﺪ ﺑﻠﻤﺴﺔ ﻭﺍﺣﺪﺓ ( ﺗﺘﻴﺢ ﺍﺗﺼﺎﻝ ﻻﺳﻠﻜﻲ ﻗﺼﻴﺮ ﺍﻟﻤﺪﻯNFC) ﺗﻘﻨﻴﺔ ﺍﻟﺘﻮﺻﻴﻞ ﻗﺮﻳﺐ ﺍﻟﻤﺪﻯ .ﺑﻴﻦ ﺍﻟﺠﻬﺎﺯ ﻭﺍﻻﺟﻬﺰﺓ ﺍﻟﺒﻌﻴﺪﺓ N ﺑﺎﻟﻘﺮﺏ ﻣﻦ ﺍﻟﻌﻼﻣﺔNFC ﺑﻤﺴﻚ ﺟﻬﺎﺯ ﺑﻌﻴﺪ ﻣﺘﻮﺍﻓﻖ ﻣﻊ ﻭﻇﻴﻔﺔ ﻋﻠﻰ ﻫﺬﺍ ﺍﻟﺠﻬﺎﺯ، ﻳﺴﺘﻤﺮ ﻫﺬﺍ ﺍﻟﺠﻬﺎﺯ ﻭﺍﻟﺠﻬﺎﺯ ﺍﻟﺒﻌﻴﺪ ﺑﻌﻤﻠﻴﺔ ﺍﻻﻗﺘﺮﺍﻥ ....
- Page 49 [ON] [ )ﺍﻹﻗﺮﺍﻥ ﺍﻟﺘﻠﻘﺎﺋﻲ( ﻣﻀﺒﻮﻁ ﻋﻠﻰ ﻭﺿﻊAUTO PAIRING] – .Bluetooth ( ﻭﺣﺪﺩﻩ ﻋﻠﻰ ﺟﻬﺎﺯDPX-50 BT) ﺍﺑﺤﺚ ﻋﻦ ﺍﺳﻢ ﻃﺮﺍﺯ ﺍﻟﻮﺣﺪﺓ ) .()ﺍﻟﺘﺸﻐﻴﻞ “ ﻟﻠﺘﻨﻘﻞ ﻋﻠﻰVOLUME KNOB” ﺍﺳﻢ ﺍﻟﺠﻬﺎﺯ ﻣﺜﺒﺖ ﻋﻠﻰ ﺟﻬﺎﺯ ﺍﻧﺪﺭﻭﻳﺪKENWOOD MUSIC PLAY – ﺍﻟﺘﻄﺒﻴﻖ “PRESS” “PASS XXXXXX” “PAIRING” .ﺍﻟﺸﺎﺷﺔ ) [BROWSE MODE] 7( ﻭﺗﻢ ﺍﺧﺘﻴﺎﺭ...
- Page 50 Pandora® ﺣﺬﻑ ﻣﺤﻄﺔ ﺍﻧﺸﺎﺀ ﻭﺣﻔﻆ ﻣﺤﻄﺔ ﺟﺪﻳﺪﺓ ﺍﺿﻐﻂ ...PANDORA ﻋﻨﺪ ﺍﻻﺳﺘﻤﺎﻉ ﺇﻟﻰ ﺟﻬﺎﺯ [، ﺛﻢ ﺍﺿﻐﻂ ﻋﻠﻰNEW STATION] ﺃﺩﺭ ﻗﺮﺹ ﻣﺴﺘﻮﻯ ﺍﻟﺼﻮﺕ ﻟﺘﺤﺪﻳﺪ .[FUNCTION] ﺍﺿﻐﻂ ﻋﻠﻰ ﻗﺮﺹ ﻣﺴﺘﻮﻯ ﺍﻟﺼﻮﺕ ﻟﻠﺪﺧﻮﻝ ﺇﻟﻰ .ﺍﻟﻘﺮﺹ .[، ﺛﻢ ﺍﺿﻐﻂ ﻋﻠﻰ ﺍﻟﻘﺮﺹSYSTEM] ﺃﺩﺭ ﻗﺮﺹ ﻣﺴﺘﻮﻯ ﺍﻟﺼﻮﺕ ﻟﺘﺤﺪﻳﺪ [،...
- Page 51 Pandora® :ﺍﻟﺘﺤﻀﻴﺮ :ﺍﻟﺘﺤﻀﻴﺮ (، ﺛﻢ ﻗﻢ ﺑﺈﻧﺸﺎﺀiPod touch /iPhone) ﻋﻠﻰ ﺟﻬﺎﺯﻙPandora ﻗﻢ ﺑﺘﺜﺒﻴﺖ ﺃﺣﺪﺙ ﺇﺻﺪﺍﺭ ﻣﻦ ﺗﻄﺒﻴﻖ ) .[BUILT-IN AUX] [ ﻣﻦ ﺃﺟﻞON] ﺣﺪﺩ .Pandora ﺣﺴﺎﺏ ﻭﺗﺴﺠﻴﻞ ﺍﻟﺪﺧﻮﻝ ﺇﻟﻰ ﺑﺪﺀ ﺍﻻﺳﺘﻤﺎﻉ ) .[PANDORA SRC] [ ﻟـON] • ﺣﺪﺩ .(ﺍﻻﺗﺼﺎﻝ ﺑﺠﻬﺎﺯ ﻣﺸﻐﻞ ﺍﻟﺼﻮﺕ ﺍﻟﻤﺤﻤﻮﻝ )ﻣﺘﺎﺡ ﻟﻠﺸﺮﺍﺀ ﺑﺪﺀ...
- Page 52 ANDROID / iPod / USB / CD Aupeo /TuneIn Radio Pro /TuneIn Radio ﺍﻻﺳﺘﻤﺎﻉ ﺍﻟﻰ ﺭﺍﺩﻳﻮ ﺍﺧﺘﺮ ﻣﻠﻒ ﻣﻦ ﻣﺠﻠﺪ/ ﻗﺎﺋﻤﺔ ﺍﺿﻐﻂ ، ﺻﻞ ﺟﻬﺎﺯAupeo ﺃﻭTuneIn Radio Pro ﺃﻭTuneIn Radio ﺍﺛﻨﺎﺀ ﺍﻻﺳﺘﻤﺎﻉ ﺍﻟﻰ .ﺍﺩﺭ ﻣﻘﺒﺾ ﻣﺴﺘﻮﻯ ﺍﻟﺼﻮﺕ ﻻﺧﺘﻴﺎﺭ ﻣﺠﻠﺪ/ ﻗﺎﺋﻤﺔ، ﺛﻢ ﺍﺿﻐﻂ ﺍﻟﻤﻘﺒﺾ ....
- Page 53 ﻋﻠﻰ ﻭﺣﺪﺓ ﺍﻟﺘﺤﻜﻢ ﻋﻦ ﺑﻌﺪ ﻋﻠﻰ ﻏﻄﺎﺀ ﺍﻟﺤﻤﺎﻳﺔ ﺇﻟﻰ ﺍﻟﺠﻬﺎﺯ ﻋﺒﺮ ﺗﻄﺒﻴﻖ ﺍﺿﻐﻂ ﺗﺸﻐﻴﻞ/ ﺗﻮﻗﻒ ﻣﺆﻗﺖ ﺍﺿﻐﻂ ﺍﻟﻤﺜﺒﺖ ﻓﻲKENWOOD MUSIC PLAY .Android ﺟﻬﺎﺯ ﺍﺿﻐﻂ ﻣﻊ ﺍﻻﺳﺘﻤﺮﺍﺭ ﻋﻠﻰ ﺍﺿﻐﻂ ﻣﻊ ﺍﻻﺳﺘﻤﺮﺍﺭ ﻋﻠﻰ ﺗﻘﺪﻳﻢ ﺳﺮﻳﻊ / ﺍﻹﺭﺟﺎﻉ ﺑﺎﺳﺘﺨﺪﺍﻡAndroid : ﻗﻢ ﺑﺎﻟﺘﺤﻜﻢ ﺑﺠﻬﺎﺯ HAND MODE ...
- Page 54 : ﻧﻮﻉ ﺍﻻﺿﺎﺀﺓKCA-iP103 ، : ﺍﻟﻨﻮﻉ 03 ﺩﺑﻮﺱKCA-iP102 * .* ﻻ ﺗﺘﺮﻙ ﺍﻟﻜﺎﺑﻞ ﺑﺪﺍﺧﻞ ﺍﻟﺴﻴﺎﺭﺓ ﻋﻨﺪ ﻋﺪﻡ ﺍﺳﺘﺨﺪﺍﻣﻪ “. ﺍﺗﺒﻊPress [VIEW] to install KENWOOD MUSIC PLAY APP” ، ﻳﺘﻢ ﻋﺮﺽAndroid * ﻋﻨﺪ ﺗﻮﺻﻴﻞ ﺟﻬﺎﺯ KENWOOD MUSIC PLAY ﺍﻟﺘﻌﻠﻴﻤﺎﺕ ﻟﺘﻨﺼﻴﺐ ﺍﻟﺘﻄﺒﻴﻖ. ﻛﻤﺎ ﻳﻤﻜﻦ ﺗﺮﻛﻴﺐ ﺍﺣﺪﺙ ﺍﺻﺪﺍﺭ ﻣﻦ ﺍﻟﺘﻄﺒﻴﻖ...
- Page 55 ﺭﺍﺩﻳﻮ ﺇﻋﺪﺍﺩﺍﺕ ﺃﺧﺮﻯ .[FUNCTION] ﺍﺿﻐﻂ ﻋﻠﻰ ﻗﺮﺹ ﻣﺴﺘﻮﻯ ﺍﻟﺼﻮﺕ ﻟﻠﺪﺧﻮﻝ ﺇﻟﻰ ﺃﺩﺭ ﻗﺮﺹ ﻣﺴﺘﻮﻯ ﺍﻟﺼﻮﺕ ﻟﺘﺤﺪﻳﺪ ﺑﻨﺪ )ﺭﺍﺟﻊ ﺍﻟﺠﺪﻭﻝ ﺍﻟﺘﺎﻟﻲ(، ﺛﻢ .ﺍﺿﻐﻂ ﺍﻟﻘﺮﺹ .ﺣﺘﻰ ﻳﺘﻢ ﺗﺤﺪﻳﺪ ﺍﻟﻌﻨﺼﺮ ﺍﻟﻤﻄﻠﻮﺏ ﺃﻭ ﺗﻨﺸﻴﻄﻪ ﻛﺮﺭ ﺍﻟﺨﻄﻮﺓ .ﻣﻦ ﺃﺟﻞ ﺍﻹﻧﻬﺎﺀ ﺍﺿﻐﻂ ﻣﻊ ﺍﻻﺳﺘﻤﺮﺍﺭ ﻟﻠﺮﺟﻮﻉ ﺇﻟﻰ ﻋﻨﺼﺮ ﺍﻹﻋﺪﺍﺩ ﺍﻟﺴﺎﺑﻖ، ﺍﺿﻐﻂ ﻋﻠﻰ XX :ﺍﻓﺘﺮﺍﺿﻲ...
- Page 56 .(: ﻳﻠﻐﻲ )ﺍﻟﺘﺮﻗﻴﺔ ﻏﻴﺮ ﻣﻨﺸﻄﺔNO : ﻳﺒﺪﺃ ﺗﺮﻗﻴﺔ ﺍﻟﺒﺮﻧﺎﻣﺞ ﺍﻟﺜﺎﺑﺖ. ؛YES F/W UP xx.xx :ﻟﻠﺤﺼﻮﻝ ﻋﻠﻰ ﺗﻔﺎﺻﻴﻞ ﺣﻮﻝ ﻛﻴﻔﻴﺔ ﺗﺤﺪﻳﺚ ﺍﻟﺒﺮﻧﺎﻣﺞ ﺍﻟﺜﺎﺑﺖ، ﺍﻧﻈﺮ www.kenwood.com/cs/ce/ : ﻳﻌﻴﺪ ﺍﻹﻋﺪﺍﺩﺍﺕ ﺍﻟﻰ ﺍﻹﻋﺪﺍﺩﺍﺕ ﺍﻻﻓﺘﺮﺍﺿﻴﺔ )ﺑﺎﺳﺘﺜﻨﺎﺀ ﺍﻟﻤﺤﻄﺎﺕYES FACTORY RESET .: ﺍﻟﻐﺎﺀNO ﺍﻟﻤﺨﺰﻧﺔ(. ؛...
- Page 57 ﺍﻟﺸﺮﻭﻉ ﻓﻲ ﺍﻟﻌﻤﻞ ﺿﺒﻂ ﺍﻟﺴﺎﻋﺔ ﻭ ﺍﻟﺘﺎﺭﻳﺦ .[FUNCTION] ﺍﺿﻐﻂ ﻋﻠﻰ ﻗﺮﺹ ﻣﺴﺘﻮﻯ ﺍﻟﺼﻮﺕ ﻟﻠﺪﺧﻮﻝ ﺇﻟﻰ .[، ﺛﻢ ﺍﺿﻐﻂ ﻋﻠﻰ ﺍﻟﻘﺮﺹCLOCK] ﺃﺩﺭ ﻗﺮﺹ ﻣﺴﺘﻮﻯ ﺍﻟﺼﻮﺕ ﻟﺘﺤﺪﻳﺪ ﻟﻀﺒﻂ ﺍﻟﺴﺎﻋﺔ [، ﺛﻢ ﺍﺿﻐﻂ ﻋﻠﻰCLOCK ADJUST] ﺃﺩﺭ ﻗﺮﺹ ﻣﺴﺘﻮﻯ ﺍﻟﺼﻮﺕ ﻟﺘﺤﺪﻳﺪ .ﺍﻟﻘﺮﺹ .ﺃﺩﺭ ﻗﺮﺹ ﻣﺴﺘﻮﻯ ﺍﻟﺼﻮﺕ ﻟﺘﺤﺪﻳﺪ ﺍﻹﻋﺪﺍﺩﺍﺕ، ﺛﻢ ﺍﺿﻐﻂ ﻋﻠﻰ ﺍﻟﻘﺮﺹ ﺩﻗﻴﻘﺔ...
- Page 58 ﺃ ﹶ ﺳﺎﺳ ﹺ ﻴ ﹼ ﺎﺕ (RC-406) ﺭﻳﻤﻮﺕ ﺍﻟﺘﺤﻜﻢ ﻭﺍﺟﻬﺔ ﺍﻟﺠﻬﺎﺯ ﻓﺘﺤﺔ ﺍﻟﺘﺤﻤﻴﻞ ﻧﺎﻓﺬﺓ ﺍﻟﻌﺮﺽ ﺣﺴﺎﺱ ﺍﻟﺘﺤﻜﻢ ﻋﻦ ﺑﻌﺪ )ﺗﺠﻨﺐ (.ﺍﻟﺘﻌﺮﻳﺾ ﻟﻀﻮﺀ ﺍﻟﺸﻤﺲ ﺍﻟﺴﺎﻃﻊ ﻳﻀﻲﺀ ﺍﻟﺮﻣﺰ ﻋﻨﺪ ﺇﻧﺸﺎﺀ ﺍﺗﺼﺎﻝ ﺑﻠﻮﺗﻮﺙ ) .Bluetooth ﻗﻢ ﺑﺴﺤﺐ ﻏﻄﺎﺀ ﻋﺎﺯﻝ ﺍﻟﻜﻬﺮﺑﺎﺀ ﻋﻨﺪ .ﺍﻻﺳﺘﺨﺪﺍﻡ ﻷﻭﻝ ﻣﺮﺓ ﻛﻴﻒ...
- Page 59 ﺍﻟﻤﺤﺘﻮﻳﺎﺕ ﻗﺒﻞ ﺍﻻﺳﺘﺨﺪﺍﻡ ﻗﺒﻞ ﺍﻻﺳﺘﺨﺪﺍﻡ ﻫﺎﻡ • ﻟﻀﻤﺎﻥ ﺍﻻﺳﺘﺨﺪﻟﻢ ﺍﻟﻤﻨﺎﺳﺐ، ﻳﺮﺟﻰ ﻗﺮﺍﺀﺓ ﻫﺬﺍ ﺍﻟﺪﻟﻴﻞ ﺑﺘﻤﻌﻦ ﻗﺒﻞ ﺍﺳﺘﺨﺪﺍﻡ ﻫﺬﺍ ﺍﻟﻤﻨﺘﺞ. ﻣﻦ ﺍﻟﻤﻬﻢ ﺟﺪﺍ ﺍﻥ ﺗﻘﺮﺃ ﻭﺗﺮﺍﻗﺐ ﺍﻟﺘﺤﺬﻳﺮﺍﺕ ﺃ ﹶ ﺳﺎﺳ ﹺ ﻴ ﹼ ﺎﺕ .ﻭﺍﻟﺘﻨﺒﻴﻬﺎﺕ ﺍﻻﺣﺘﻴﺎﻃﻴﺔ ﻓﻲ ﻫﺬﺍ ﺍﻟﺪﻟﻴﻞ .• ﻳﺮﺟﻰ ﺍﻻﺣﺘﻔﺎﻅ ﺑﻬﺬﺍ ﺍﻟﺪﻟﻴﻞ ﻓﻲ ﻣﻜﺎﻥ ﺁﻣﻦ ﻭﺳﻬﻞ ﺍﻟﻮﺻﻮﻝ ﻟﻠﺮﺟﻮﻉ ﺍﻟﻴﻪ ﻓﻲ ﺍﻟﻤﺴﺘﻘﺒﻞ ﺍﻟﺸﺮﻭﻉ...
- Page 60 DPX-5000BT ﻣﺰﺩﻭﺝ ﺑﺤﺠﻢ ﺭﺍﺩﻳﻮ ﻭﻣﺸﻐﻞ ﺃﺳﻄﻮﺍﻧﺎﺕ ﺩﻟﻴﻞ ﺍﻟﺘﻌﻠﻴﻤﺎﺕ...