Epson Stylus Photo R380 Manual
Epson stylus photo printer
Hide thumbs
Also See for Stylus Photo R380:
- Printer basics manual (72 pages) ,
- Start here manual (8 pages) ,
- Service manual (150 pages)
Table of Contents
Advertisement
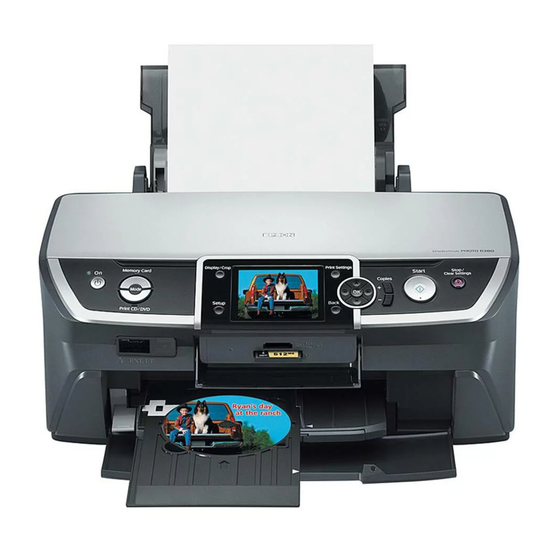
Printer Parts
Paper support
Sheet feeder
Edge
guide
External
interface
(PictBridge
port)
Infrared
port
Tray lever
Front tray
AC inlet
Printer cover
Control panel
Memory card
slots (under
cover)
Front cover
Front tray extensions
USB port
Ink
cartridge
holder
Display/ Crop
button
Memory
Card button
On button
Print CD/DVD
button
Setup
button
Accessories
Ink Cartridges
Epson
offers standard and high-capacity ink cartridge sizes
®
for each color, and you can use both sizes at once in your
Epson Stylus Photo R380, if desired. For example, you can
install a standard size magenta cartridge (part number 78) and
a high-capacity black cartridge (part number 77). The high-
capacity cartridges are available at www.epson.com/
highcapacity (U.S. sales) or www.epson.ca (Canadian sales).
Cartridge
Black
Cyan
Magenta
Yellow
Light Cyan
Light Magenta
High-Capacity Black
High-Capacity Cyan
High-Capacity Magenta
High-Capacity Yellow
High-Capacity Light Cyan
High-Capacity Light Magenta
Caution: To ensure good results, use genuine Epson cartridges
and do not refill them. Other products may cause damage to your
printer not covered by Epson's warranties.
Don't use an ink cartridge beyond the expiration date on the
package.
10/06
Epson Stylus Photo R380
OK button
Stop/Clear
Settings button
Print Settings button
Back button
Copies buttons
Navigation buttons
LCD screen
Part number
78 (T078120)
78 (T078220)
78 (T078320)
78 (T078420)
78 (T078520)
78 (T078620)
77 (T077120)
77 (T077220)
77 (T077320)
77 (T077420)
77 (T077520)
77 (T077620)
Epson Stylus Photo R380
Start
button
- 1
Advertisement
Table of Contents

Related Manuals for Epson Stylus Photo R380


Summary of Contents for Epson Stylus Photo R380
-
Page 1: Printer Parts
Ink Cartridges Epson for each color, and you can use both sizes at once in your Epson Stylus Photo R380, if desired. For example, you can install a standard size magenta cartridge (part number 78) and USB port a high-capacity black cartridge (part number 77). The high- capacity cartridges are available at www.epson.com/... -
Page 2: Epson Media
Epson Stylus Photo R380 Epson Media Paper name* Size Epson Ultra Premium Borderless 4 × 6 inches Photo Paper Glossy Letter (8.5 × 11 inches) Epson Ultra Premium Glossy Photo Paper Epson Premium Photo Borderless 4 × 6 inches Paper Glossy Borderless 5 ×... -
Page 3: Memory Card Compatibility
Input frequency range Rated current Power consumption * Check the label on the back of the printer for its voltage. Interfaces USB 2.0 Hi-Speed (Device Class for computers), based on Universal Serial Bus Specifications Revision 2.0; 480 Mbps USB 2.0 Hi-Speed (Mass Storage Class for external storage... -
Page 4: Selecting The Paper Type Setting
Inner hub area Outer periphery area Selecting the Paper Type Setting Select the correct paper printer driver so your printer knows what kind of paper you’re using and adjusts the ink coverage accordingly. For this paper Plain paper Epson Bright White Paper... -
Page 5: Paper Loading Guidelines
Paper Loading Guidelines You can load up to 120 sheets of plain paper and the following number of sheets of Epson special media: Paper type Epson Presentation Paper Matte Epson Photo Quality Ink Jet Paper Epson Bright White Paper Epson Premium Bright White Paper... -
Page 6: Printing On Cds And Dvds
Your printer includes a special tray that lets you print customized text, graphics, and photos directly on any ink jet- printable CD or DVD. The Epson Print CD software makes it easy to import your own photos, add text, and modify your designs with a variety of special effects. -
Page 7: Designing Cds And Dvds
(on both sides) Designing CDs and DVDs You can use the Epson Print CD program (included on the Printer Software CD-ROM) to create and print a design with images, graphics, and text. See your Printer Basics manual or on-screen User’s Guide for instructions. - Page 8 Note: Do not open ink cartridge packages until you are ready to install the ink. Cartridges are vacuum packed to maintain reliability. 1. Make sure the printer is turned on, the CD tray is not inserted, and the front tray is in the paper (lower) position.
-
Page 9: Checking The Print Head Nozzles
LCD screen, you cannot clean the print head. Replace the appropriate ink cartridge first. Caution: If you don’t use your printer often it is a good idea to print a few pages at least once a month to maintain good print quality. -
Page 10: Aligning The Print Head
Start and make sure the front tray is in the paper (lower) position. 2. Make sure the printer is turned on but not printing, and no warnings or errors are displayed on the LCD screen. 3. Make sure letter-size plain paper is loaded in the printer. -
Page 11: Cleaning The Printer
Keep the printer cover closed to prevent water from getting inside. 4. If there is any ink inside the printer, wipe it off with a damp cloth in the area shown. Clean here Warning: Don’t touch the gears or any other parts inside the... -
Page 12: Related Documentation
USB cable from the printer. Keep the printer level as you transport it. After transporting the printer, plug it in, turn it on, and test it. If you notice a decline in print quality, clean the print head; if output is grainy or blurry, align the print head.