Advertisement
Quick Links
OPERATING INSTRUCTIONS
Part #1775
STEP 1
CHANGING THE INPUT HARNESS
The CycloneC2 & CycloneTC2 ESCs come with the industry
standard connector on a user-replaceable input harness.
This connector works with all major radio brands. However,
with some older style receivers the sequence of the wires in
the plastic connector needs to be changed. This is an
important step, because the electronics inside the receiver
may be damaged if the sequence is incorrect. Changing
the wiring is easily accomplished as described below.
JR • Hitec • Futaba • New KO • Airtronics Z
If your receiver is a JR, Hitec, Futaba, new KO, or an
Airtronics Z (blue case) you do not need to change the
sequence of the ESC's input harness wires. New KO cases
have tabs on the input harness openings as in Figure 1.
• Insert one end of the input harness into receiver with
the BLACK wire toward the outside edge of receiver case.
• Insert opposite end of input harness into ESC with the
WHITE wire toward the 'WHT' marking on the case label.
FIGURE 1
white
tabs
no tabs
wires
red
black
wires
wires
black
wires
New KO (with tabs)
Old KO (no tabs)
Old-style KO • Old-style Sanwa/Airtronics
If your receiver is an older KO or Sanwa/Airtronics, you
must change the sequence of the ESC's input harness
wires. Old Sanwa/Airtronics cases are black in color. Old
KO cases do not have the tab openings (See Figure 2).
• Insert one end of input harness into ESC with the WHITE
wire toward the 'WHT' marking on the case label.
• Interchange the red and black wires in the plug plastic at
the opposite end of input harness as in Figure 3 below.
• Insert modified end of the harness into the receiver with
the RED wire toward the outside edge of receiver case.
FIGURE 3 With a small standard screwdriver, gently lift
the plastic prong until the wire and metal socket easily
slides out of the plastic housing. Repeat for each wire.
STEP 2
MOUNTING INSTRUCTIONS
1. DETERMINE BEST ESC MOUNTING LOCATION
Speed control should be positioned away from the
receiver and antenna as shown in set-up photo
Choose a mounting position that will keep power wires
away from the receiver and antenna, and will provide
maximum airflow through transistor tabs or heat sinks
to allow for proper cooling.
REMEMBER: Choose a mounting position where it
will be easy to get to the combination One-Touch/
ON-OFF switch on the top of the speed control. You
will need to get to this to turn the ESC on and off.
2. INSTALL THE SPEED CONTROL
Use the included double-sided tape to mount ESC.
3. INSTALL THE RECEIVER AND ANTENNA
Mount receiver as far from ESC, motor, power wires,
battery, and servo as possible. These components all
emit radio noise when the throttle is being applied.
On graphite or aluminum, it may help to place the
receiver on edge with the crystal and antenna as far
above the chassis as possible. Mount the antenna close
to the receiver and trail any excess wire off the top of
the antenna mast*.
*Cutting or coiling excess wire will reduce radio range.
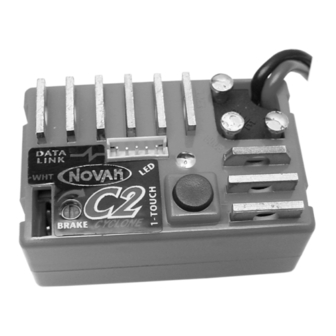
CycloneC2 & CycloneTC2
The CycloneC2 & CycloneTC2 touring edition are all-digital,
microprocessor-based ESC's
advanced components and the best HYPERFET III transistors
available, to deliver the highest performance with compact
size and light weight. Each have three user-selectable
throttle profiles and the ability to store a fourth custom
profile created by the optional Pit Wizard
Wizards requires adaptor #5710)
Novak's original One-Touch Set-Up™ button now performs
Part #1777
double duty as a Combination One-Touch/ON-OFF switch.
Constant Force Braking provides more effective braking at
lower motor RPMs, while a minimum brake adjustment
pot lets you set initial braking from 0-75%.
Novak's Polar Drive Circuitry gives you increased power
and reduced operating temperatures. This means even
smoother throttle response, increased radio system range,
quicker acceleration, and longer run times.
Other features include Low-Resistance Solder Posts
voltage drop & high current handling)
replacement and positioning, heavy-duty BEC for high power
servos, Digital Anti-Glitch Circuitry™, and Radio Priority
Circuitry™ to maintain steering control after battery dumps.
PRECAUTIONS
• WATER & ELECTRONICS DON'T MIX! Do not operate
model in or around water. Never allow water, moisture, or
other foreign materials to get inside the ESC.
• 4 to 7 CELLS ONLY Never use more than 7 cells (8.4 volts
DC) in the main battery pack.
• SCHOTTKY DIODE RECOMMENDED An external Shottky
diode should be properly installed on every motor to further
reduce radio interference and obtain the best performance
and efficiency from your CycloneC2 or CycloneTC2.
• POWER CAPACITOR REQUIRED The external power
capacitor must be used with your CycloneC2 or CycloneTC2.
Failure to use Power Capacitor will damage speed control !
• NO REVERSE VOLTAGE! Reverse battery polarity can damage
speed control––Disconnect battery immediately.
• DON'T LET TRANSISTOR TABS TOUCH Never allow the
two transistor tab banks to touch each other or any exposed
metal. The short circuit will damage the ESC.
• DISCONNECT THE BATTERIES Always disconnect the battery
pack from the speed control when not in use.
FIGURE 2
• TRANSMITTER ON FIRST Always turn on the power of
white
your transmitter first so that you will have control of the
wires
radio equipment when you turn on the speed control.
red
• DON'T GET BURNT! Transistor tabs can get hot, so be careful.
wires
If transistor tabs get extremely hot use optional heat sinks.
• INSULATE WIRES Always insulate exposed wiring with heat
shrink tubing to prevent short circuits.
STEP 3
HOOK-UP INSTRUCTIONS
1. MOTOR CAPACITORS
The CycloneC2 and TC2 have motor capacitors installed
inside the speed control. Capacitors are not required on motor.
Note: Many other ESCs still require that these capacitors be
installed on every motor to help reduce radio noise.
2. INSTALL SCHOTTKY DIODE
Solder the lead
of the Schottky diode to the
Solder the lead
of the Schottky to the
If installed backwards, a Schottky diode will be destroyed. The
body of a bad diode will normally crack open. Replace only with
Schottky diodes that have a minimum rating of 35 volts / 8 amps.
FIGURE 4
3. INSTALL POWER CAPACITOR
.
(back page)
WHY POWER CAPACITOR IS NEEDED:
drops the ESC's operating temperature by 10-15 F, and dissipates
noise & voltage spikes from the ESC's high switching speed. You
MUST use Novak capacitors. Other capacitors with similar ratings
will not provide the same protection. We have done extensive
research to find capacitors with the very best Quality Factors.
• Determine best place to mount Power Capacitor. If
mounting capacitor standing on end, bend capacitor's
leads flat along top of capacitor (Figure 5A).
If mounting capacitor laying down, bend capacitor's
leads flat along top of capacitor, then down over the
side of the capacitor (Figure 5B).
• Cut capacitor's leads so that both leads will be equally
held by PowerCap Harness. Insulate the exposed leads
of the capacitor with the included vinyl tubing.
• Attach PowerCap Harness to the leads of the capacitor.
Insert negative lead (–)
leading to the BLACK wire. Insert positive lead (+)
marked}
• Use the included double-sided tape to hold capacitor
against side or back of ESC, or onto chassis (Figure 5A/5B).
FIGURE 5
neg. lead (–)
{with stripe}
(Electronic Speed Controls)
(#1035/older Pit
, giving you extreme flexibility.
for quick and easy wire
Refer to Set-Up photo on back
to the silver stripe on the body
CLOSEST
POSITIVE
(+) motor tab.
the silver stripe on the body
OPPOSITE
NEGATIVE
(–) motor tab.
(Extra Schottky diodes available in Novak kit #5640)
Negative (–) motor tab
Schottky diode
Positive (+) motor tab
The power capacitor
into the opening
{marked with stripe}
into the opening leading to the RED wire.
[A]
[B]
red wire
black wire
SPECIFICATIONS
Input Voltage
using
Case Width
Case Depth
Case Height
Weight
(w/o heat sinks)
On-Resistance
@ Transistors
Rated Current
Braking Current
BEC Voltage
BEC Current
Wire Length
(Battery/Motor)
Signal Harness
(replaceable)
Minimum Brake Range
Minimum Drive
(% Full Drive) 2.0-6.0-4.0 (TC2: 2.0-3.0-5.0)
(minimal
Deadband
(% Full Throttle)
Drive Frequency
(kHz)
Brake Frequency
(kHz)
ACCESSORIES
SCHOTTKY DIODES
The C2 & TC2s have internal Schottky diodes. An external
diode is also included and should be used for optimum
ESC, braking, and motor performance. Refer to Step 3
Additional Schottky diodes are available in Novak kit #5640.
HEAT SINKS
Heat sinks are not required with the C2 or TC2, however the
added cooling will increase the ESC's efficiency. An optional
Heat Sink Set is available as Novak kit #5407. Heat sinks are
recommended for heavy load applications and set-ups with
limited air circulation, or whenever ESC gets excessively hot.
POWER CAPACITORS
An external power capacitor is included, and MUST BE USED
to maintain cool and smooth operation. Refer to Step 3
Replacement Power Capacitor is available in Novak kit #5675.
SOLDER POST WIRE SETS
Replacement C2 & TC2 solder post wire sets are available in Novak
kit #5537 and includes two 9" pieces of each color power wire.
INPUT SIGNAL HARNESS
The user-replaceable input signal harness is available in both
short
and long
(4.5")
(9.0")
4.5" harness in Novak kit #5315, and 9.0" harness in kit #5320.
PIT WIZARD-To-C2/TC2 ADAPTOR HARNESS
To connect to the C2 & TC2's new DataLink connector, older
Pit Wizards
(or ESC Profile Software)
TC2 Adapter Harness available in Novak kit #5710.
STEP 3
HOOK-UP INSTRUCTIONS (Cont.)
4. CONNECT SPEED CONTROL TO THE RECEIVER
Configure input harness wires and connect ESC to the
THROTTLE CHANNEL
5. CONNECT SPEED CONTROL TO THE BATTERY PACK
Cut the
wire to the desired length and strip
BLACK
about 1/8"-1/4" of insulation off each end. Solder to
the negative side of a completely charged 4 to 7 cell
battery pack and the other end to the BLK solder post.
Cut the
wire to desired length (to go from ESC to
RED
battery positive to motor) and strip about 1/8"-1/4" of
insulation off each end. Strip a short section of insulation
(1/4"-3/8") from the middle section of the
where it will attach to positive of battery pack. Solder
the stripped section of
pack and one end to the RED solder post.
IMPORTANT NOTE:
Prolonged or excessive heating of the solder post or the
solder joint on top of the solder post will result in the post
desoldering from PCB and short-circuiting inside ESC.
6. CONNECT SPEED CONTROL TO THE MOTOR
Solder the free end of the
Cut the
wire to desired length and strip about
BLUE
1/8"-1/4" of insulation off each end. Solder to the
negative tab of the motor and to the BLUE solder post.
TIP: Twisting the BLUE & RED motor wires one or two times
around each other as they go to motor can help reduce any
radio noise that may be emitted from the power wires.
7. USING PLUGS FOR BATTERY & MOTOR CONNECTION
High-quality/low-resistance connector plugs, such as
Dean's Ultra Plugs, can also be used to connect the
motor and battery pack. Note--while connectors make
component changes quick and easy, they will never have
as little resistance as a good solder joint.
Use connectors that can not be connected backwards!
It is good practice to use female connectors on battery
packs to avoid shorting the connector and the battery.
If using connectors for both battery and motor:
To Battery
{male}
black wire
{un-
red wire
4-7 cells
(1.2 volts DC/cell)
1.69 inches [4.29 cm]
1.11 inches [2.81 cm]
0.76 inch
[1.93 cm]
1.33 ounces [37.70 g]
0.00049
@ 25 C transistor
480 amps
junction temp.
160 amps
6.0 volts DC
3.0 amps
9 inches
[22.8 cm]
9 inches
[20.3 cm]
0 to 75 % Full Brake
5.0-5.0-5.0 (TC2: 5.0-3.0-3.0)
15.6-5.86-7.8 (TC2: 15.6-11.7-7.8)
3.9-3.9-5.86 (TC2: 3.9-5.86-11.7)
lengths to fit different applications.
require the Pit Wizard-To-C2/
of receiver as described in Step 1.
wire
RED
wire to positive of battery
RED
DO NOT OVERHEAT POSTS
RED
wire to positive motor tab.
Use a male connector on the ESC
wires going to the battery and a
female connector on the wires going
to the motor
.
(Shown here in Figure 6)
This will help prevent you from cross
connecting the battery and motor
outputs of speed control, and causing
internal damage.
To Motor
{female}
blue wire
red wire
FIGURE 6
Advertisement

Related Manuals for NOVAK CYCLONEC2


Summary of Contents for NOVAK CYCLONEC2
- Page 1 ESC’s efficiency. An optional and efficiency from your CycloneC2 or CycloneTC2. Heat Sink Set is available as Novak kit #5407. Heat sinks are JR • Hitec • Futaba • New KO • Airtronics Z recommended for heavy load applications and set-ups with •...
- Page 2 Print a copy of the PRODUCT SERVICE FORM from the [Reduce this after programming to reduce amount of brakes] SERVICE section of the website. Fill out the needed infor- mation on this form and return it with the Novak product 3. Set EXPONENTIAL to zero. that requires servicing.