Table of Contents
Advertisement
ECLIPSE®
EA2000/EA4000 Ownerls Manual
2 / 4 Channel Integrated Series Power Amplifier
0
0
EA2000
L'ECLIPSE
,,,.~.
~.
0.
6
100>
u
_
"""'" 0
01'
LOW'OSI
"'ASI
~ ~ ,
",
SPEAKER 001
00
19°0-01
TT.AEIlOIE
GICI
00
lIIl
PIIU'"
' "
~
'USE
10001
UTIO
0
•.
~ I'tZSlO:IO
!OO
IIIQf1
0
0
IllID6ED
_
-
-0
-
UU
LJ-
0
o
o
EA4000
L'ECLIPSE
u u u
o
Thank you for purchasing the EA2000(2 channel)
I
EA4000(4 Channel) Intergrated Series Power Amplifier.
Please read this Owner's Manual before use. Be sure to read the Safety information section.
Keep this Owner's Manual together with the Warranty information in a safe place for later reference.
Advertisement
Table of Contents

Related Manuals for Eclipse EA4000


Summary of Contents for Eclipse EA4000
- Page 1 Thank you for purchasing the EA2000(2 channel) EA4000(4 Channel) Intergrated Series Power Amplifier. Please read this Owner's Manual before use. Be sure to read the Safety information section. Keep this Owner's Manual together with the Warranty information in a safe place for later reference.
-
Page 2: Table Of Contents
Table of contents For your safety in using the EA Series Amplifiers About Your Amplifier Installation Requirements Power Amplifier Adjustments and Tuning Names and Functions of Terminals Connection Basic System AVN Connection Examples Head Unit Connection Examples Troubleshooting Specifications... -
Page 3: For Your Safety In Using The Ea Series Amplifiers
Warnings and caution signs, illustrated below, are posted throughout this manual as well as on the EA2000/EA4000. They show safe and correct ways to handle the product to prevent personal injury to you and others and to avoid damage to property. -
Page 4: About Your Amplifier
Eclipse Power Amplifiers use ATC fuses. Do not replace blown fuses with fuses of a higher current rating. This Amplifier requires maximum two 30 Amp fuses. (One 30 Amp fuse for EA2000 and two 30 Amp fuses for EA4000) Eclipse Power On Indicator: When the Power Amplifier is powered on the Eclipse Brand Logo will be Lighted. -
Page 5: Installation Requirements
Installation Requirements Before You Start: Congratulations on your purchase of this Eclipse Power Amplifier. The proper installation and system integration of this Power Amplifier will bring the optimum conditions for high performance and a long trouble free life for your Mobile Audio System. Please pay attention to the Installation hints listed in this section for the best results. -
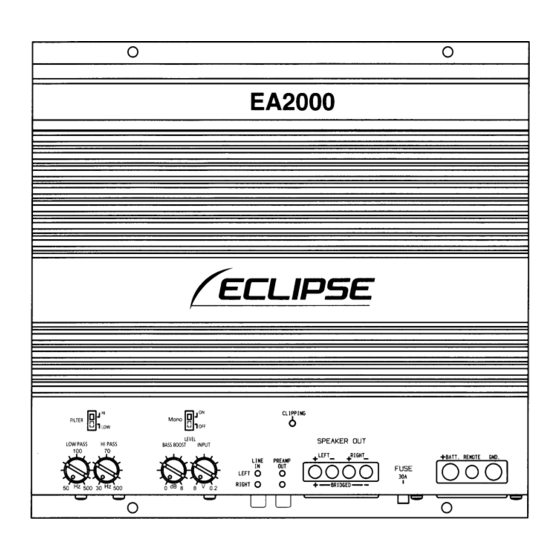
Page 6: Power Amplifier Adjustments And Tuning
Power Amplifier Adjustments and Tuning High Pass Filter: Stops the Low frequencies, Bass Boost: allows all frequencies Increase the output above the adjusted of low frequencies crossover ~'" point to be amplified. Mono FILTER llOW lOFF LEVEL Low Pass Filter: LOW PASS HI PASS BASS B... - Page 7 4. System Power Up: Initial Tuning: Once the system is turned on and it is verified that all channels are functional, you may load your choice of Media to set the system levels with. Media with a good level, or lots of energy including drums, bass, voice etc is advisable. The gain controls should be adjusted with the tone controls set to flat position and the balance and fader in the center positions on the source unit.
- Page 8 Quick Set Up Process 1. Set Crossover Points before installing the Amplifier based on Speaker Size and System Configuration. 2. Turn the Gain Controls down before installing the Amplifier. 3. Turn the Bass Boost Control down, before installing the Amplifier. 4.
-
Page 9: Names And Functions Of Terminals
Speaker Out L ~ ~Speaker Out Right + r - - - - - Left PreAmp Output Speaker Out Right - Speaker Out Left - If------ BRIDGED Right PreAmp Output EA4000 Power Connections Signal Input Connections LiNE [N1 FUSE FRONT REAR PREAMt OUT +6ATT. REMOTE GND. -
Page 10: Basic System Connection
Speaker Connections 2 Channel Speaker Connections Bridged SPEAKER OUT +LEFT_ +"IGHT_ BRIDGED r==="J r==="J Front Rear Front / Rear EA4000 ~JON l JON Mono Mono Mono 1 OFF 1 OFF lOFF Speaker Connections 4 Channel Speaker Connections 3 Channel SPEAKER OUT... -
Page 11: Avn Connection Examples
1::::::=======I==F======:l Right Channel Front Left Speaker Front Right Speaker Front Rear Left Speaker Rear Rear Right Speaker AVN Connections EA4000 example of 3 channel install EA4000 • • Front Out Non-Fader Out Front AVN connection using the EA2000 and EA4000... -
Page 12: Head Unit Connection Examples
_ _ _ _ _ F_ro_nt_Le_ft_Sp_ea_ke_r Front Front Right Speaker Rear Left Speaker Rear Rear Right Speaker AVN Connections EA4000 example of 3 channel install EA4000 • • Front Out ' - - - - - - - 1 L o Non-Fader Out... -
Page 13: Troubleshooting
Troubleshooting problem occurs after your system is installed, please refer to this troubleshooting section for solutions. If after carefully following these instructions you still have problem, please contact Eclipse Technical Supporl at 1-800-233-2216 Problem Possible Cause Possible Solution 1. Amp won't power on No fuse installed in the amplifier or fuse Install fuse. - Page 14 Problem Possible Cause Possible Solution 5. Amp has engine noise Speaker ground is shorted to car body Test for negative speaker speaker short: Make sure negative speaker lead is not shorted to vehicle chassis or body. Outer barrel of RCA connector is With amp off.
- Page 15 Possible Solution Problem Possible Cause 9. Speaker pops when Source unit may be sending pop noise to Disconnect RCA inputs then turn source unit is turned on or off amplifier unit on and off: If pop noise is gone a different Source Unit. Possible ground loop noise Check to make sure grounds are correct so No ground loops can exist:...
-
Page 16: Specifications
+0, -.5 dB 20Hz - 20KHz Channel Separation 70 dB < Damping Factor EIA / IHF 50 dB > Quiescent Current ( :: 1 Amp Idle Current) Maximum Current EA2000 30Amps EA4000 60Amps Amp Protect Temperature (Heat Sink) - 16 -... - Page 17 - 17 -...
- Page 18 - 18 -...
- Page 19 - 19 -...
- Page 20 The serial number is labeled or stamped on the chassis. Serial No. FUJITSU TEN LIMITED Contact: FUJITSU TEN CORP.OF AMERICA "ECLIPSE" is a registered trademark of 19600 So. Vermont Avenue, Torrance, CA 90502 FUJITSU TEN LIMITED in 48 countries 800·233·2216 including the U.S. and Japan. www.eclipse-web.com 090003-285007000503(CN,K)
- Page 21 LECLIPSE IMPORTANT SHOULD YOU HAVE ANY QUESTIONS, call: 1-800-233-2216 FUJITSU TEN CORP. OF AMERICA FUJITSU TEN 19600 S. Vermont Avenue, Torrance, CA 90502 PLACE FIRST-CLASS STAMP HERE FUJITSU TEN CORP. OF AMERICA Warranty Registration 19600 S. Vermont Avenue Torrance, CA 90502...
- Page 22 ECLIPSE LIMITED WARRANTY Eclipse (a division of Fujitsu Ten Corp. of America) hereby warrants your Eclipse product to be free from defects in material and workmanship for a period of one year from the original date of purchase. This warranty applies only to the original consumer- purchaser (this warranty is not transferable), and only when this product is originally purchased from an authorized Eclipse retailer in the United States or Canada.