Table of Contents
Advertisement
Available languages
Available languages
OWNER'S MANUAL
MANUEL
D'UTILISATION
Model • Modèle
>
DPAC120061
CAUTION:
Read and follow all safety
rules and operating
instructions before first use
of this product.
MISE EN GARDE :
Veuillez lire attentivement
les consignes de sécurité et
les directives d'utilisation
avant l'utilisation initiale de
ce produit.
ADVERTENCIA:
Es importante que lea y
observe todas las reglas de
seguridad e instrucciones de
operación antes de usar
esteproducto por primera
vez.
Danby Products Ltd, PO Box 1778, Guelph, Ontario Canada N1H 6Z9
Danby Products Inc, PO Box 669, Findlay, Ohio USA 45839-0669
PORTABLE 3 SEASON HOME COMFORT
Table of contents . . . . . . . . . . . . . . . . . . . . . .
APPAREIL DE CONFORT AU FOYER
PORTABLE 3 SAISONS
Table des matières . . . . . . . . . . . . . . . . . . . . 21
1
Version 1.12.07
Advertisement
Table of Contents

Related Manuals for Silhouette SILHOUETTE DPAC120061

Summary of Contents for Silhouette SILHOUETTE DPAC120061
- Page 1 Danby Products Ltd, PO Box 1778, Guelph, Ontario Canada N1H 6Z9 Danby Products Inc, PO Box 669, Findlay, Ohio USA 45839-0669 PORTABLE 3 SEASON HOME COMFORT Table of contents ..... .
-
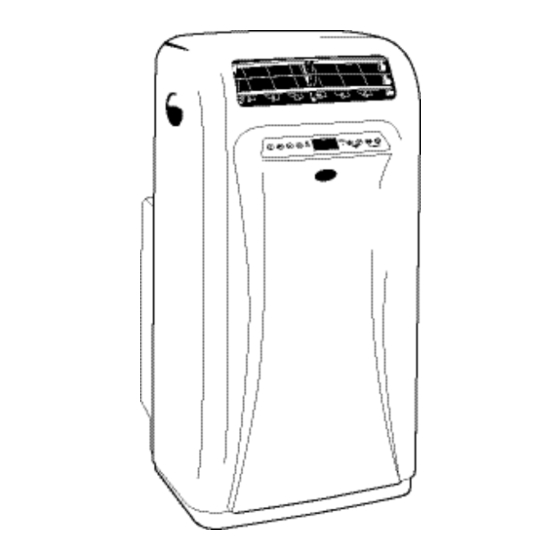
Page 2: Product View
Introduction and Unit Specifications ....... . . Electrical and Important Safety Information ......Energy-Saving Tips. -
Page 3: Specifications
Thank you for choosing an Danby appliance to provide you and your family with all of the “Home Comfort” requirements for your home, cottage or office. This Owner’s Manual will provide you with valuable information necessary for the proper care and maintenance of your new appliance. If properly maintained, your Danby appliance will give you many years of trouble free operation. - Page 4 Important Safety Instructions The power cord supplied with this air conditioner contains a current leakage detection device designed to reduce the risk of fire. Please refer to the section ‘Power Supply Cord’ for details. In the...
- Page 5 Energy-Saving Tips Your Danby appliance is designed to be highly efficient in energy savings. Follow these recommendations for greater efficiency. 1) Select a thermostat setting that suits your comfort needs and leave at that chosen setting. 2) The air filter is very efficient in removing airborne particles.
-
Page 6: Direct Drain
Internal Safety Feature This unit is equipped with a fail-safe switch mechanism that prevents the unit from condensing water in the event the internal reservoir becomes full. If this situation occurs, the unit will signal (BEEP) for 20 seconds, and the (RED) WATER FULL indicator light will flash. -
Page 7: Window/Patio Door Kit Installation
Window / Patio Door Kit Installation (Air Conditioning Mode ONLY) Your window kit has been designed to fit most standard “vertical” / “horizontal” windows and patio doors up to a maximum height of 80”. For vertical window and/or patio door applications, lock positions are provided in each slider sction. -
Page 8: Key Pad Functions
Key Pad Functions Power Switch: Turns unit On / Off. MODE : Allows you to scroll through and select desired operating mode. FAN : Select from three different fan speeds; Low, Medium and High, during Cool and Fan mode. Please note: During ‘Dry’ mode there is only one fan speed utilized (low) . -
Page 9: Setting Time
Setting TIME OF DAY (Clock): NOTE: This is a 24:00 hour clock system Push and hold the CLOCK (TIMER ON / TIMER OFF) key pads simultaneously Fig A. The clock symbol appears in the display and the minute “00” digits start flashing Fig C. Press the TEMP/TIMER buttons Fig B until the correct time (in minutes) is displayed. - Page 10 Air Conditioner Operating Instructions (cont’d) 4) Press the FAN key Fig F (1) to select the desired fan speed setting (Auto-Low-Med-High). Your selection will appear in the display window (each depression of the fan key will advance to a different setting).
- Page 11 DRY (Dehumidifier) Operating Instructions NOTE: During dehumidifier mode, the exhaust hoses do not have to be vented out- doors but should remain attached to the unit. The drain hose must be installed during dehumidifying mode, (see ‘Direct Drain Instructions’ on pg. 5). 1) Press the I/O (on/off) key pad to switch on the unit.
- Page 12 Direct Drain Lower Drain Caps CAUTION During air conditioning and dehumidifying modes, if the compressor cycle is interupted (unplugged, power failure,etc.) and reinstated immediately thereafter, (within 3-5 minutes) a “compressor protection circuit” is automatically self-activated. The compressor cannot operate during “compressor protection” mode (this is normal), and it may take 3-5 minutes before the “protection circuit”...
- Page 13 Fan Operating Instructions NOTE: The exhaust hoses are not required during FAN only mode operation. 1) Press the I/O (on/off) key pad to switch on the unit. See Fig H(1). 2) Press the MODE key (Fig H(2)) until the FAN symbol illuminates in the display window.
- Page 14 Auto-Timer Instructions The AUTO-TIMER feature offers a unique selection of multiple choice, fully automatic on/off (start/stop) programs between 0 - 23 hrs, 59 min., under any one mode of your Portable 3 Season Home Comfort unit. The programs are as follows: a) Auto -Off: Pre-select a time that will turn off the unit (automatically) at a specified time (between 0 - 23 hrs, 59 min.).
- Page 15 Setting the AUTO-ON TIMER (cont’d) 4) All of the settings are now registered. 5) To set the AUTO-ON timer, the unit must be turned “off” (non-operational). 6) Press the TIMER-ON key pad (Fig K) to initiate the AUTO-ON time sequence. The “TIMER-ON” icon (Fig L) will appear in the display window and the minute digits start to flash.
- Page 16 Setting the AUTO-ON & AUTO-OFF timer during the same program. Before setting the AUTO-ON & AUTO-OFF Timer, the time of day clock must be set/operational. You must select all appropriate settings (i.e. MODE, FAN SPEED, TEMP, HUMIDITY, SWING etc.) required to operate under the AUTO TIMED program before initiating the program.
- Page 17 Remote Control Features The hand held remote unit allows you to control all operational aspects of your Portable 3 Season Home Comfort Appliance from the convenience of your favorite armchair. Here are some things you should know about operating the unit with the hand held remote.
- Page 18 Remote Control Operating Instructions 1. Sending Signal: The remote control must be aimed directly at the infra-red eye located below control panel when initiating a command. When the remote control is switched on and a button is pressed, a beep will sound (main unit) confirming a signal was sent/received.
- Page 19 Remote Control Operating Instructions (cont’d) 6. Swing: Press the “Swing” button to activate the automatic air swing (oscillation) feature. The swing symbol will appear in the display window confirming the "swing" feature is activated. To deactivate the “swing” feature, press the swing button again.
- Page 20 Care and Maintenance CAUTION Before cleaning or servicing this unit, it is recommended that the unit be disconnected from any electrical supply outlet. 1) Do Not use gasoline, benzene, thinner or any other chemicals to clean this unit ,as these substances may cause damage to the finish and deformation of plastic parts.
-
Page 21: Limited Product Warranty
This quality product is warranted to be free from manufacturer’s defects in material and workmanship, provided that the unit is used under the normal operating conditions intended by the manufacturer. This warranty is available only to the person to whom the unit was originally sold by Danby or by an authorized distributor of Danby, and is non-trans- ferable. - Page 22 Table des matières Page Introduction et spécifications de l’unité... 23 Spécifications électric puis consignes de sécurité importante... 24 Conseils pour la conservation de l’énergie... 25 Directives d’installation dans la fenêtre ... 28 Soins et entretien... 41 Garantie ... 42 Identification des pièces de l’appareil Lamelles horizon- tales Évents à...
-
Page 23: Spécifications
Merci d’avoir choisi un appareil Danby qui vous fournira ainsi qu’à votre famille, le confort au foyer, à la maison, au chalet ou au bureau. Ce manuel d’utilisation vous offre des renseignements pratiques pour le soin et l’entretien de votre nouvel appareil. Un appareil Danby bien entretenu vous fournira plusieurs années de service sans ennui. - Page 24 Spécifications électriques 1. Le câblage doit être conforme aux codes local et national de l’électricité avec l’installation par un électricien qualifié. Pour toutes questions concernant les directives qui suivent, communiquer avec un électricien qualifié. 2. Vérifier l’alimentation de courant disponible et résoudre tout problème AVANT l’installation et l’usage de cette unité.
- Page 25 Suggestions pour l’économie de l’énergie Votre appareil ménager Danby est conçu pour l’efficacité en économie de l’énergie. Pour le rendement maximal, observer les recommandations qui suivent. 1. Choisir un réglage du thermostat qui répond à vos besoins de confort et le laisser au réglage choisi.
- Page 26 Caractéristique de sécurité interne Cette unité est équipée d’un mécanisme d’interrupteur à sûreté intégrée qui empêche l’unité de condenser de l'eau si le réservoir se remplit. Si la situation se produit, l’unité émettra un signal (bip sonore) pendant 20 secondes et un indicateur lumineux (ROUGE) clignotera pour signaler que l'unité...
- Page 27 Installation du kit de fenêtre et/ou de porte patio(Mode Climatisation Seulement) Votre kit de fenêtre a été conçu pour l’adaptation à la plupart des fenêtres verticales et/ou horizontales et portes patio standard. Les applications de porte patio sont limitées aux portes atteignant une hauteur maximale de 80 po (203 cm).
- Page 28 Fonctions du bloc de touches En marche / Arrêt. INTERRUPTEUR: Vous permet de voir and choisissez le MODE : mode d'opération désiré. Choisissez trois vitesses de VENTILATEUR : ventilateur différentes; Basse, Moyenne et Haut, pendant les mode ‘frais’ et ‘Ventilateur’. Note : Pendant le mode ‘sec’...
-
Page 29: D’utilisation Du Climatiseur
Instructions de réglage de l’HEURE DU JOUR (Horloge) : REMARQUE : Celui-ci est un système d’horloge de 24 heures. Pousser et tenir les touches HORLOGE (MINUTERIE EN MARCHE et MINUTERIE À L’ARRÊT) simultanément Fig A. Le symbole de l’horloge apparaît sur l’affichage et les chiffres «... - Page 30 Directives d’utilisation du climatiseur (suite) : 4. Appuyer sur la touche VENTILATEUR Fig F (1) pour choisir le réglage de la vitesse désirée du ventilateur (Auto – Basse – Moyenne – Haute). Votre sélection apparaîtra sur l’affichage (chaque dépression de la touche du ventilateur avancera l’affichage au prochain réglage).
- Page 31 DIRECTIVES D’UTILISATION DU DÉSHUMIDIFICATEUR : REMARQUE: L'unité ne doit pas être exhalée dehors pendant l'opération de mode ‘Sec’ ou ‘Ventilateur’, il est recommandée cependant que les tuyaux restent installés (sur l'unité) pendant la déshumidification. 1.Appuyer sur la touche I/O (en marche / arrêt) pour activer l’unité.
- Page 32 Vidage Directe Drain inférieur MISE EN GARDE En modes de climatisation et de déshumidification, si le cycle du compresseur est interrompu (par le débranchement de l’unité ou par une panne de courant, etc.) et immédiatement rétabli par la suite, (en dedans de 3 à...
- Page 33 Directives d’utilisation du ventilateur : REMARQUE : L’installation des boyaux d’échappement n’est pas requise pour le fonctionnement en mode de ventilation seulement. Le réservoir d’eau externe n’est pas requis pour le fonctionnement en mode de ventilation seulement. 1.Appuyer sur la touche I/O (en marche / arrêt) pour activer l’unité...
- Page 34 Directives d’utilisation du programme de minuterie automatique : La caractéristique de MINUTERIE AUTOMATIQUE offre une unique sélection de choix de programmes multiples entièrement automatiques d’activation / de mise hors de service (en marche / arrêt) entre 0 h et 23 h 59 min., pour chacun des modes de fonctionnement de votre unité...
- Page 35 Réglage de la MINUTERIE EN MARCHE AUTO (suite) : 4. Tous les réglages sont maintenant enregistrés. 5. Pour régler la minuterie EN MARCHE AUTO, l’unité doit être hors de service. 6. Appuyer sur la touche EN MARCHE AUTO (Fig K) pour initialiser la séquence de temporisation.
- Page 36 Réglage de la minuterie EN MARCHE AUTO et ARRÊT AUTO durant le même programme. Avant de régler la minuterie EN MARCHE AUTO et ARRÊT AUTO, l’heure du jour à l’horloge doit être réglée et/ou opérationnelle. Vous devez choisir tous les réglages appropriés (c. à-d., MODE, VENTILATEUR, VITESSE, TEMPÉRATURE, HUMIDITÉ, OSCILLATION, etc.) qui sont requis de fonctionner sous le programme de MINUTERIE AUTO...
- Page 37 Caractéristiques de télécommande La manette de télécommande pratique vous permet de contrôler toutes les fonctions de votre appareil de confort au foyer portable 3 saisons à partir de votre fauteuil favori. Voici quelques informations utiles pour l’utilisation de votre télécommande. Boutons de contrôle I/O : Commutateur de courant (En marche / arrêt) Mode : Utilisé...
- Page 38 Directives d’utilisation de la Directives d’utilisation de la télécommande télécommande 1. Pour envoyer un signal :La télécommande doit être dirigée directement sur l’œil infrarouge situé sous le panneau de contrôle de l’unité principalepour initialiser une fonction.Quand la télécommande est activée et un bouton est enfoncé, un signal sonore (bip) sera entendu provenant de l’unité...
- Page 39 Soins et entretien MISE EN GARDE Avant de nettoyer ou de faire le service sur cette unité, il est recommandé de débrancher le cordon d’alimentation de la prise de courant électrique. 1.Ne pas utiliser d’essence, de benzène, de diluant ou tous autres produits chimiques pour nettoyer cette unité.
- Page 40 Cette garantie n’est offerte qu’à l’acheteur initial de l’appareil vendu par Danby ou par l’un des ses distributeurs agréés et elle ne peut être transférée. Premières année Pendant le première (1) année, toutes pièces électriques de ce produit s’avèrent défectueuses, y compris les unités ayant des systèmes obturés, seront réparées ou remplacées, selon le choix du garant, sans frais à...
- Page 41 Danby Products Ltd, PO Box 1778, Guelph, Ontario Canada N1H 6Z9 Danby Products Inc, PO Box 669, Findlay, Ohio USA 45839-0669 Printed in China (P.R.C.) Portable 3 Season Home Comfort The model number can be found on the serial plate located on the back panel of the unit.