Table of Contents
Advertisement
Quick Links
Pump Model
GX5 D70
GX5 D115
GX5 D160
GX5 D250
PO Box 1611
Kearney, NE 68848
877.218.1981
www.agxcel.com
WWW.AGXCEL.COM
AgXcel GX5 for PWM Control
Diaphragms
Max Flow GPM
2
3
4
6
NOTE: This is only a guide! Please consult your John Deere
dealer for detailed instructions or troubleshooting!
877-218-1981 Rev 5/9/2016
AgXcel GX5
Fertilizer System Integration for
AG Leader Integra/Insight
GX5
D115
Max GPA on 40'
@6 MPH
15
25
35
55
Max GPA on 60'
@ 6 MPH
30
20
50
34
70
48
70
info@agxcel.com
Advertisement
Table of Contents

Summary of Contents for AgXcel Ag Leader GX5 Series
- Page 1 AgXcel GX5 Fertilizer System Integration for AG Leader Integra/Insight AgXcel GX5 for PWM Control D115 Pump Model Diaphragms Max Flow GPM Max GPA on 40’ Max GPA on 60’ @6 MPH @ 6 MPH GX5 D70 GX5 D115 GX5 D160...
-
Page 3: Initial Installation Steps
OEM dealer. The rate controller will provide the data required to manage the speed of the AgXcel electric or hydraulic pumps based on the flow response of the flow meter and the vehicle speed. The FAS system is also capable of managing section controls, also referred to as swath control, to minimize overlap areas with optional section control valves. - Page 4 The harness coming out of the AG Leader rate controller is a 12 pin amp connector that will be connected to the AgXcel 16 pin amp connector extending from the AgXcel GX system.
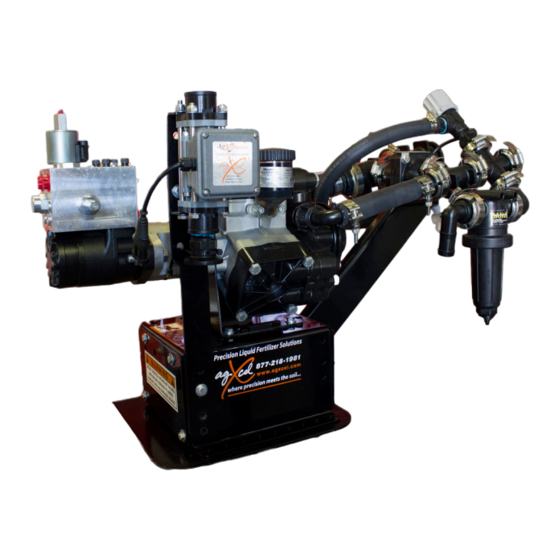
- Page 5 A. Ag Leader Liquid Product Control Module B. Ag Leader Integra with Direct Command C. AgXcel Integration Harness - Part #53514 D. AgXcel Section Valve Harness - Part #53594 (12 section harness also available) E. AgXcel Control Harness - Part #53697 F. AgXcel GX5 Hydraulic System WWW.AGXCEL.COM...
- Page 6 AGXCEL INTEGRATION INTO AG LEADER WITH DIRECT COMMAND (Read Instructions Completely before Beginning Installation) AG Leader Liquid Product Control Module This chart shows you the output functions by pin location on the Ag Leader Liquid Product Control Module. Use this information to verify if the Ag Leader system is providing the correct output.
- Page 7 Follow the general directions in your Ag Leader InSight User Manual (esp. Setup & This section will guide you through the necessary steps to set up your AG Leader display to control an AgXcel under Setup and Application) or Integra Operators Manual (esp. under Operation GX5 Hydraulic system.
- Page 8 AGXCEL INTEGRATION INTO AG LEADER WITH DIRECT COMMAND (Read Instructions Completely before Beginning Installation) Setup - InSight From this menu choose the Controller tab. This will enter Use the Speed Input Settings to set a manual the Controller menu shown on the next page.
-
Page 9: Pressure Calibration
AGXCEL INTEGRATION INTO AG LEADER WITH DIRECT COMMAND (Read Instructions Completely before Beginning Installation) Setup - InSight 1. From the Controller Menu select the Pressure Calibration controller you want to change or use the ADD button to create a new controller. - Page 10 AGXCEL INTEGRATION INTO AG LEADER WITH DIRECT COMMAND (Read Instructions Completely before Beginning Installation) Setup - InSight 1. Flow Meter Cal: • AgXcel Magnetic Flowmeter: see page 22 • Micro-Trak Flowmeter: 2nd number on tag (see page 24) 2. Control Valve Configuration: PWM 12 Volt 3.
- Page 11 AGXCEL INTEGRATION INTO AG LEADER WITH DIRECT COMMAND (Read Instructions Completely before Beginning Installation) Setup - Integra WWW.AGXCEL.COM 877-218-1981 info@agxcel.com...
- Page 12 AGXCEL INTEGRATION INTO AG LEADER WITH DIRECT COMMAND (Read Instructions Completely before Beginning Installation) Setup - InSight The RUN button on the right of the screen brings up the main run screen. System Diagnostic Button will take you to information in- cluding Liquid Diagnostics.
- Page 13 AGXCEL INTEGRATION INTO AG LEADER WITH DIRECT COMMAND (Read Instructions Completely before Beginning Installation) Setup - InSight 1. Enter MANUAL MODE by pressing the “M” button in the upper right corner of the screen. You can veri- fy you are in manual mode when the “Target Rate” says “OFF”.
- Page 14 AGXCEL INTEGRATION INTO AG LEADER WITH DIRECT COMMAND (Read Instructions Completely before Beginning Installation) Setup - InSight 1. Press the button in the lower right corner to return to the main run screen. Verify a speed in is showing. If not, return to setup and enter a manual ground speed.
- Page 15 AGXCEL INTEGRATION INTO AG LEADER WITH DIRECT COMMAND (Read Instructions Completely before Beginning Installation) Setup - Integra The Grid button in the lower left hand corner of the screen brings up the Map screen for Run Time Operations. The Product Tabs are shown in the upper right corner of the Map screen.
- Page 16 AGXCEL INTEGRATION INTO AG LEADER WITH DIRECT COMMAND (Read Instructions Completely before Beginning Installation) Setup - Integra 1. Enter MANUAL MODE by pressing the “M” button in the upper right corner of the screen. You can veri- fy you are in manual mode when the “Target Rate” says “OFF”.
- Page 17 AGXCEL INTEGRATION INTO AG LEADER WITH DIRECT COMMAND (Read Instructions Completely before Beginning Installation) Setup - Integra Diagnostic Button Rate 1 Target Rate Rate 2 Actual Rate 1. Press the grid button in the lower left corner to return to the main Run screen. Verify a speed is show- ing next to MPH.
-
Page 18: Troubleshooting
PUMP WILL NOT TURN ON Turn hydraulics off, go to the AgXcel PWM valve and use the manual override on top of the electric coil to man- ually open the valve (Manual Override UP = valve fully open, see image on bottom of page). Turn hydraulics on at a low flow only as the valve is 100% open. - Page 19 See pages 43-46 for wiring diagrams. 3. If no voltage on the AG Leader harness, connecting to AgXcel’s harness with 2 pin power connector, contact your AG Leader dealer for assistance. 4. If voltage is present on pins A&B of 3 pin connection to valve, then check pin C to Pin B.
- Page 20 A&C of flowmeter connector (on 53697 harness). A flow value should show up indicating the wiring is not damaged. 3. If the display responded to the tap test, your wiring to that point is good. If still not fixed, inspect adapter harness and test continuity per schematic. 4. Replace flowmeter. WWW.AGXCEL.COM 877-218-1981 info@agxcel.com...
- Page 21 (Read Instructions Completely before Beginning Installation) I can’t get up to my desired rate. How much flow is required? Can I achieve a new applica- tion rate with my current system? How much oil does my AgXcel system need? Follow the Steps Below: 1.
- Page 22 (Read Instructions Completely before Beginning Installation) AGXCEL MAG FLOWMETER The AgXcel Mag Flowmeter is a magnetic flowmeter, also technically known as an electromagnetic flowmeter. A magnetic field is applied to the metering tube, which results in a potential difference proportional to the flow velocity perpendicular to the flux lines.
- Page 23 (Read Instructions Completely before Beginning Installation) AGXCEL TURBINE FLOWMETER AgXcel flowmeter kits consist of the flowmeter, sensor, mounting bracket and hose barb fittings. The FM750 GFN turbine flowmeter requires a minimum of 24” of hose, with a gentle curve, should be used after the flow- meter outlet before any fittings are inserted.
- Page 24 “Divide by 8” cable connected to the flowmeter. The image to the right is what the cable looks like. This only ap- plies to the magnetic flowmeter. This cable is easily identified by the small “pill” in the middle of the harness. WWW.AGXCEL.COM 877-218-1981 info@agxcel.com...
- Page 25 1/4” port for either a manual 4” pressure gauge or optional pres- Liquid outlet to each section sure transducer which allows for pressure to viewed from controller in cab WWW.AGXCEL.COM 877-218-1981 info@agxcel.com...
- Page 26 (Read Instructions Completely before Beginning Installation) D70 & D115 Recirculation Regulation valve An optional CROSS fitting may be Recirculation On/Off added here for other AgXcel Optional Features like 1. Bypass Agitation Kit - Part #335 2. Pressure Transducer Kit - Part # 53491 Recirculation 3/4”...
- Page 27 MOUNT ON SECTION VALVES The AgXcel GX10 OEM integration harness is capable of implementing a pressure transducer into the system so that system pressure may be displayed on the console in the cab of the tractor. Now even though the in-cab pressure is for informational purposes only, it can be very useful for managing the system.
- Page 28 IMPLEMENT SWITCH (Read Instructions Completely before Beginning Installation) #54066 Standard implement switch also available #17921 WWW.AGXCEL.COM 877-218-1981 info@agxcel.com...
- Page 29 4.9 CID Motor with PWM Valve - HOW IT WORKS: The AgXcel proprietary PWM valve has a solenoid that receives a variable signal from the OEM liquid rate controller. This signal is used to open the pressure compensating valve to allow the correct amount of hydraulic fluid through the valve to rotate the diaphragm pump appropriately to apply the correct GPM.
- Page 30 2. For JD1770NT 12, 16 & 24 row planters, AgXcel offers an over the tire pump mount that fits all GX5 models. This mounts the pump over the center tires.
-
Page 31: Hydraulic Connections
The load sense line will signal the tractor hydraulic system to supply the flow needed by the pump to meet your application rate. The AgXcel valve has an internal load sense check valve, which is required for power beyond hydraulics. -
Page 32: Hydraulic Hose
CCS seed distribution fan. If using this method, the AgXcel PWM bypass valve must be open (see previous page for instruction & picture). If bypass is left closed, the AgXcel valve will limit the speed of the CCS fan. The CCS fan uses around 7 GPM of oil. This will limit the GX5 maximum flow (10 GPM oil necessary for maximum flow). - Page 33 GX5 HYDRAULIC OIL REQUIREMENTS (Read Instructions Completely before Beginning Installation) AgXcel G X5 H ydraulic O il / S izing C hart OIL FLOW FROM TRACTOR AgXcel G X5 M odel D 70 * 2 ...
- Page 34 GX5 LIQUID PLUMBING CONNECTIONS (Read Instructions Completely before Beginning Installation) PLUMBING CONNECTIONS Inlet Hose Barb - GX5 Pump Inlet feed. AgXcel highly recom- Flowmeter outlet mends 2” hose to feed the system” AgXcel Mag Flow Meter shown Pressure Relief Valve Inline 30 mesh filter Inlet: The D70 &...
- Page 35 The low flow column has a smaller internal diameter. This means a heaver ball can be used to monitor a smaller flow. AgXcel uses the low flow columns with 1/4” push to con- nect outlet fittings. The flow capability of 1/4” tubing and Low Flow the low flow column is a great pair for rates on 30”...
- Page 36 FLOATING BALL MANIFOLDS (Read Instructions Completely before Beginning Installation) In from flowmeter WWW.AGXCEL.COM 877-218-1981 info@agxcel.com...
- Page 37 FLOATING BALL MANIFOLDS (Read Instructions Completely before Beginning Installation) Sections WWW.AGXCEL.COM 877-218-1981 info@agxcel.com...
-
Page 38: Check Valves
P/N - 313 The recommended check valve for most Agxcel installations is the 10 lb check valve with 3/8” hose barbs. This works with 3/8” rubber hose which Agxcel recommends for most applications over 10 GPA on 30” rows. The recommended minimum system operation pressure for this check valve is 20 psi, to ensure all check valves open fully. -
Page 39: Part Numbers And Descriptions
ORS Male x ORS Female - 90° 18039 End Cap w/u-clip (Wilger) 18083 12 Column Bracket (6 and 8 Column Brackets available) 19898 3/8 NPTF - 90° 20106 12 Column Wilger White Backdrop (6 and 8 Column Back- drops available) WWW.AGXCEL.COM 877-218-1981 info@agxcel.com... - Page 40 25687 Flow Indicator Column (Wilger) 25709 1/4” Quick Connect - 90° 37614 Wilger Low Flow Column 1/4” Push Connect Outlet (Com- plete) 38260 GX1 Chassis Bracket 40406 2 Section Valve (Tee Jet) 52142 1/4” Poly Elbow 90° WWW.AGXCEL.COM 877-218-1981 info@agxcel.com...
- Page 41 9.7 12.1 14.6 17.0 19.4 21.8 24.3 8.5 1.0 7.7 10.3 12.9 15.5 18.0 20.6 23.2 25.8 9 1.1 8.2 10.9 13.6 16.4 19.1 21.8 24.6 27.3 10 1.2 9.1 12.1 15.2 18.2 21.2 24.3 27.3 30.3 WWW.AGXCEL.COM 877-218-1981 info@agxcel.com...
- Page 42 9.3 12.4 15.5 18.6 23.2 30.9 38.7 46.4 54.1 61.8 69.6 77.3 9 3.3 9.8 13.1 16.4 19.6 24.6 32.7 40.9 49.1 57.3 65.5 73.7 81.9 10 3.6 7.3 10.9 14.6 18.2 21.8 27.3 36.4 45.5 54.6 63.7 72.8 81.9 91.0 WWW.AGXCEL.COM 877-218-1981 info@agxcel.com...
-
Page 43: Wiring Diagrams
Servo +/PWM YELLOW Flow Signal Power Flow GND Servo -/PWM GREEN Run/Hold Dust Cap 2 Pin (Power In) Connector Shroud Tower 3-Pin Deutsch DTP04-2P Male 3-Pin Signal Signal +12VDC Ground Ground 14 AWG RED Ground 14 AWG BLK WWW.AGXCEL.COM 877-218-1981 info@agxcel.com... - Page 44 Seal +12 VDC Seal Flow Signal Ground Seal +12 VDC Flow 150 MP Tower 3-Pin Signal +12 VDC Ground Plug Pressure 2 150 MP Tower 3-Pin 150 MP Shroud 3-Pin Signal Seal +12 VDC Seal Ground Seal WWW.AGXCEL.COM 877-218-1981 info@agxcel.com...
- Page 45 +12 VDC +12 VDC Ground Ground Signal Signal Pressure 1 Pressure 2 150 MP Shroud 3-Pin 150 MP Shroud 3-Pin Signal Signal +12 VDC +12 VDC Ground Ground Flow Return WP Tower 3-Pin +12 VDC Ground Signal WWW.AGXCEL.COM 877-218-1981 info@agxcel.com...
- Page 46 150 MP Tower 3-Pin Signal +12 VDC Ground Signal Section 11 Section 12 Section 10 150 MP Shroud 3-Pin 150 MP Tower 3-Pin 150 MP Tower 3-Pin Signal +12 VDC +12 VDC +12 VDC Ground Ground Ground Signal Signal WWW.AGXCEL.COM 877-218-1981 info@agxcel.com...
- Page 47 RECOMMENDED PRESSURE (GX ELECTRIC SYSTEMS ONLY) Agxcel recommends to maintain a pressure between 10 and 20 psi. Doing so, and with proper winterization, will ensure the durability of the system, and reduce problems when preparing for the next season.
- Page 48 (Read Instructions Completely before Beginning Installation) 877.218.1981 www.agxcel.com precision liquid fertilizer systems 30” AGXCEL COLORED DISC ORIFICE RATE CHARTS FOR 30” SPACING (Read Instructions Completely before Beginning Installation) GX2 ELECTRIC PUMPS GX5 HYDRAULIC PUMPS The AgXcel GX2 Dual Pump electric system is The AgXcel GX5 Hydraulic Pump system is designed with a 2# or 4# inline check valve.
- Page 49 AGXCEL COLORED DISC ORIFICE RATE CHARTS FOR 30” SPACING AgXcel C olored D isc O rifice R ate C harts f or 3 0” S pacing (Read Instructions Completely before Beginning Installation) ...
- Page 50 AGXCEL 877.218.1981 www.agxcel.com precision liquid fertilizer systems 30” AGXCEL COLORED DISC ORIFICE RATE CHARTS FOR 30” SPACING (Read Instructions Completely before Beginning Installation) BROWN O RIFICE (41) MILES P ER H OUR ...
- Page 51 877.218.1981 www.agxcel.com precision liquid fertilizer systems 30” AGXCEL COLORED DISC ORIFICE RATE CHARTS FOR 30” SPACING (Read Instructions Completely before Beginning Installation) RED O RIFICE ( 63) MILES P ER H OUR ...
- Page 52 877.218.1981 www.agxcel.com precision liquid fertilizer systems 30” AGXCEL COLORED DISC ORIFICE RATE CHARTS FOR 30” SPACING (Read Instructions Completely before Beginning Installation) EM G REEN ORIFICE ( 110) MILES P ER H OUR ...
- Page 53 Insert p icture f rom o ur o rifice g uide h ere – C:\Users\RamiroT\Dropbox ( AgXcel)\AGXCEL T EAM F OLDER\AGXCEL HANDOUTS\GX A ccessories\AgXcel O rifice C harts ...
- Page 54 6. Install new diaphragm, then replace washer and bolt. 7. Turn pump to downstroke to seat new diaphragm into the sleeve groove. 8. Replace pump head and manifold(s). 9. Refill crankcase with SAE30 non detergent oil (Hypro Oil or hydraulic jack bolt oil). washer diaphragm WWW.AGXCEL.COM 877-218-1981 info@agxcel.com...
- Page 55 AgXcel low pressure diaphragm pumps can be adapted for handle fluids. Low-cost maintenance and almost wear- splined shaft, hollow shaft, and solid shaft drive options.
-
Page 56: Drive Options
For proper installation, refer to Page 5. use of a split taper bushing AgXcel part number 3115- 0011). Use of this bushing allows a Browning Q2 sheave NOTE: Model 9910-D135 is supplied with a 1-3/8" male to be mounted on the bushing. -
Page 57: Installation
2. Always drain and flush pumps prior to returning unit that this has been done. Please note that it is illegal to for repair. ship or transport any hazardous chemicals without United 3. Never store pumps containing hazardous chemicals. States Environmental Protection Agency Licensing. L-1381 (09/10) WWW.AGXCEL.COM 877-218-1981 info@agxcel.com... -
Page 58: Maintenance
1. After use, flush the pump with clean water. I. Valve and O-Ring Replacement Occasionally debris can cause the valves to not 2. AgXcel diaphragm pumps come with oil in the seat properly or damage the o-rings. To check crankcase. - Page 59 3. Place base (Ref. 7) on pump, and secure with bolts power source and tighten clamp. and washers. Secure opposite side of base with bolt (Ref. 9) and nut (Ref. 8). 4. Attach chains (Ref. 10) to tractor to prevent rotation of the pump. L-1381 (09/10) WWW.AGXCEL.COM 877-218-1981 info@agxcel.com...
- Page 60 6. The 3300-0087 or 3300-0088 control unit is now ready for b) Repeat for each boom feed valve. use. After each use, flush the unit with water. For extended or winter storage, drain the unit completely. L-1381 (09/10) WWW.AGXCEL.COM 877-218-1981 info@agxcel.com...
- Page 61 9910-GG600 Gauge Plug 9910-392180 Handle Body 9910-391500 9910-780050 O-ring 9910-680560 M6 x 16 Bolt 9910-393690 Adapter Washer Plunger 9910-392390 Body Flange 9910-391890 Seat 9910-1040370 M6 x 22 Bolt 9910-320511 O-ring 9910-550331 Washer Plug 9910-395060 Spring L-1381 (09/10) WWW.AGXCEL.COM 877-218-1981 info@agxcel.com...
- Page 62 Parts Illustrations for Models 3300-0087 and 3300-0088 24 56 24 56 48 35 70 109 42 104 24 60 35 36 37 38 39 32 33 19 20 21 L-1381 (09/10) WWW.AGXCEL.COM 877-218-1981 info@agxcel.com...
- Page 63 Bypass manifold 9910-390060 O-ring 9910-395020 Bypass adapter 9910-394870 Plug 9910-770260 O-ring 9910-392120 9910-880581 Plug 9910-394820 Mounting bracket 9910-770130 O-ring Stud 9910-850730 Clip 9910-1660560 Control lever 9910-1660020 Complete valve rod 9910-480561 O-ring, Viton 9910-1660010 Main valve body L-1381 (09/10) WWW.AGXCEL.COM 877-218-1981 info@agxcel.com...
- Page 64 95 94 9910-550920 Flange 9910-550950 Bolt 9910-550940 Gear 9910-620301 Plug 9910-160671 M10 x 25 Bolt 9910-621810 Gear housing 9910-621820 Pinion shaft 9910-480820 Seal 9910-881090 9910-651000 Bolt 9910-800800 M8 x 16 Bolt 9910-540290 M8 x 25 Bolt L-1381 (09/10) WWW.AGXCEL.COM 877-218-1981 info@agxcel.com...
- Page 65 Bolt 171.4 19.6 9910-1500350 Shield Plug 87.5 9910-550332 Washer Bolt 218.7 24.5 9910-740290 O-ring 9910-330173 Plug Bolt 218.7 24.5 9910-620472 M10 x 20 Bolt Bolt 87.5 9910-450120 Threaded adapter Bolt 218.7 24.5 9910-550870 Ring nut L-1381 (09/10) WWW.AGXCEL.COM 877-218-1981 info@agxcel.com...
- Page 66 M10 x 25 Bolt 9910-550940 Gear 9910-620301 Plug 9910-160671 M10x 25 Bolt 9910-621810 Gear housing 9910-621820 Pinion shaft 95 94 9910-480820 Seal 9910-881090 9910-651000 Bolt 9910-800800 M8 x 16 Bolt 9910-540290 M8 x 25 Bolt WWW.AGXCEL.COM 877-218-1981 info@agxcel.com L-1381 (09/10)
- Page 67 M6 x 30 Bolt 9910-620472 M10 x 20 Bolt Plug 87.5 9910-390180 O-ring Bolt 218.7 24.5 9910-1040310 Oil sight glass Bolt 218.7 24.5 9910-650920 O-ring Bolt 87.5 9910-1040322 Black oil tank cap Bolt 218.7 24.5 L-1381 (09/10) WWW.AGXCEL.COM 877-218-1981 info@agxcel.com...
- Page 68 Parts Illustrations for Model 9910-D160 57 53 11 55 48 47 50 32 31 39 38 Figure 10. Parts Illustrations for Model 9910-D160 L-1381 (09/10) WWW.AGXCEL.COM 877-218-1981 info@agxcel.com...
- Page 69 M8 x 40 Bolt NOT to be used as order numbers. 9910-680180 Accumulatorbody 9910-1500350 Shield 9910-850251 M8 x 12 Bolt 9910-180101 O-ring 9910-740290 O-ring 9910-580360 Diaphragm bolt 9910-390314 Washer 9910-580370 Retaining washer 9910-390670 Accumulator stud L-1381 (09/10) WWW.AGXCEL.COM 877-218-1981 info@agxcel.com...
- Page 70 Parts Illustrations for Model 9910-D250 57 61 60 59 40 58 Figure 11. Parts Illustration for Model 9910-D250 L-1381 (09/10) WWW.AGXCEL.COM 877-218-1981 info@agxcel.com...
- Page 71 ONLY to identify parts in the drawing and are 9910-330173 Plug NOT to be used as order numbers. 9910-650542 Gasket 9910-180020 Air valve 9910-750370 Elbow 9910-880581 Oil drain plug 9910-390314 Washer 9910-580360 Diaphragm bolt L-1381 (09/10) WWW.AGXCEL.COM 877-218-1981 info@agxcel.com...
-
Page 72: Pump Performance
BAR L/M 86.4 98.7 111.0 119.4 131.7 83.6 95.6 107.5 115.4 127.0 83.2 95.1 107.0 115.0 126.5 82.1 93.8 105.5 114.5 126.0 NOTE: “HP” is electrical horsepower. Consult your gas engine supplier for engine horsepower required. L-1381 (09/10) WWW.AGXCEL.COM 877-218-1981 info@agxcel.com... -
Page 73: Maintenance Schedule
166.0 186.8 208.2 10.4 229.7 11.5 Maintenance Schedule Oil crankcase capacities are approximate. Fill oil to proper level in sight glass. Always make sure all the air is purged out of crankcase prior to operating. L-1381 (09/10) WWW.AGXCEL.COM 877-218-1981 info@agxcel.com... -
Page 74: Return Procedures
Limited Warranty on AgXcel Agricultural Pumps & Accessories AgXcel agricultural products are warranted to be free of defects in material and workmanship under normal use for the time periods listed below, with proof of purchase. - Pumps: one (1) year from the date of manufacture, or one (1) year of use. This limited warranty will not exceed two (2) years, in any event.
Need help?
Do you have a question about the Ag Leader GX5 Series and is the answer not in the manual?
Questions and answers