Advertisement
Quick Links
Module Installation General
1. For mounting we recommend the following tools: Impact drill with possibly drill 6 mm for drilling holes
for supplied wall plugs. Please note that this applies to stone walls in particular. With other types of
walls, plugs can either be omitted to screw directly into the wall and with plaster walls, for example,
plugs must be purchased suitable for wall on site. From an aesthetic point of view, you can also choose
to omit the included installation kits and attach the mirrors as well as wall mats with mounting kit and
caulking gun. Furthermore, you will need, a hammer for entering the dowels/plugs into the wall, a
tape measure with pencil for marking the holes in the wall and a screwdriver for fixing the screws in
both wall and on the back of the mirrors or wall mats.
Advertisement

Summary of Contents for NENKO MOD02
- Page 1 Module Installation General 1. For mounting we recommend the following tools: Impact drill with possibly drill 6 mm for drilling holes for supplied wall plugs. Please note that this applies to stone walls in particular. With other types of walls, plugs can either be omitted to screw directly into the wall and with plaster walls, for example, plugs must be purchased suitable for wall on site.
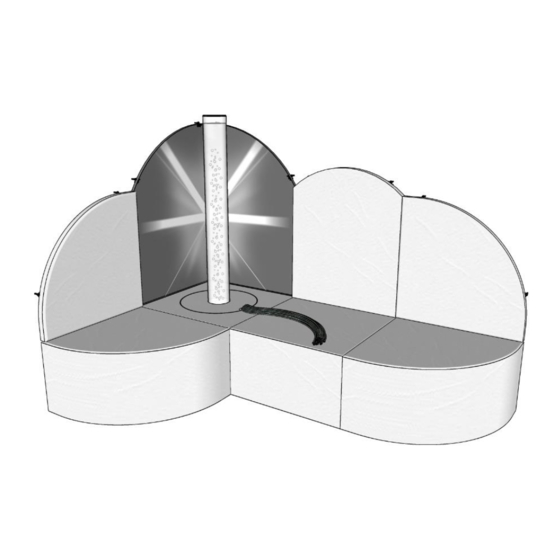
- Page 2 2. When purchasing optional fiber optics with light source, take this base, remove the bubble unit lid and tilt it for easy access from the bottom. Position the light source with fiber optics (first mount the fiber optics in the light source as described in the manual of this product) into the base against the top side a few centimeters from the recess of the bubble unit lid and slide fibers through half round recess so that you can be sure that the lid can be placed on the base and the fiber optics strands can pass through the half roundness.
- Page 3 3. Place the bubble unit base in the corner against the wall and remove the lid to place the bubble unit as centrally as possible in the base on the floor. PLEASE NOTE: the bubble unit is fragile especially at the attachment of the tube to the foot. Moving, bumping or lifting while it is filled can lead to breakage which is not covered by warranty conditions.
- Page 4 4. Mount the supplied mirrors against the wall 1 by 1 with the supplied mounting brackets and/or use a mounting kit suitable for the wall in question. First position the mirrors exactly on the correct height so that the base (height of which is 46 cm) fits well under it. Keep in mind that the mirrors and wall mats are the same level on the bases/platforms and therefore have to be placed at the same height to create a continue level.
- Page 5 5. Now mount any adjacent wall mats, in the same way as the mirrors. As described above, it is advisable to check that the wall mats do not lower when using sealant (this depends on the amount of type and amount of sealant used)