
Summary of Contents for Oasis Berco Oasissoft HUB Solo Small
- Page 1 Space to think HUBS (Solo Small & Solo Large) SAFETY AND INSTALLATION INSTRUCTIONS Updated March, 2019 www.oasis-berco.com...
-
Page 2: Important Safety Instructions
Oasis Berco Installation, Operating & Safety Instructions Linear & Soft Pod, Booth and Hub • All Oasis Berco products are intended for commercial use. • Please note that specific installation drawings and instructions are provided at the end of this document. -
Page 3: Grounding Instructions
Space to think GROUNDING INSTRUCTIONS This product is for use on a nominal 120-volt circuit and has a grounding plug that looks like the plug illustrated in the sketch below. Make sure that the product is connected to an outlet having the same configuration as the plug. -
Page 4: Tools Needed For Assembly
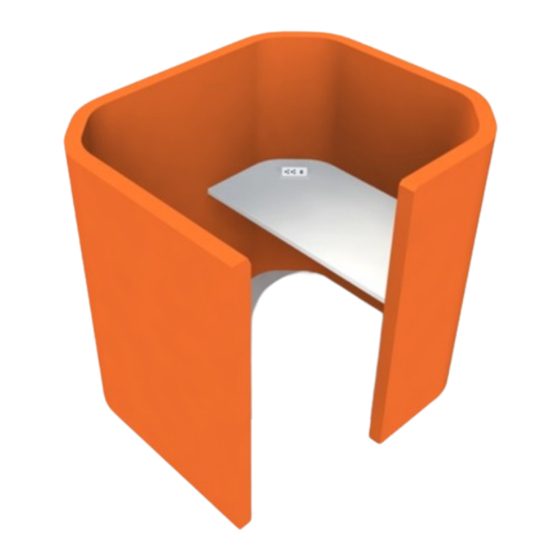
Space to think Tools needed for assembly: Before you start: • Drill/Driver with #2 Phillips Bit Read instructions and check that all parts are accounted for • Flat Pry Bar before you start building. • Lint Brush 2. Begin assembly as close to final product location as possible. Additional assembly instructions may be required depending on Hardware/Accessory Kit: specification of product ordered. - Page 5 Space to think The next panel to install is the curved entrance panel. It has the finished upholstered end. Align the panel; lift up and slide down engaging the tapered brackets. The panels will lock together. Make sure the tops of the panels are aligned. Skip to Step 6 if there is no work surface to install.
- Page 6 Space to think Lift the work surface into place. Make sure the corners are pushed securely into the corners of the Hub. Secure the work surface from the underside using #10 x 1” screws provided. Install electrical outlet (if purchased) according to directions provided with electrical unit.
- Page 7 Space to think Connect the remaining curved panel. Align the panel; lift up and slide down engaging the tapered brackets. The panels will lock together. Make sure the tops of the panels are aligned. Install the remaining straight panel with upholstered end. Align the panel;...
- Page 8 Space to think Make sure all panels are aligned and the connections are tight. If you need to remove a panel to make an adjustment, carefully use a flat pry bar under the panel and lift panel while applying downward pressure on the adjoining panel. Clean desk surface.