Table of Contents
Advertisement
Quick Links
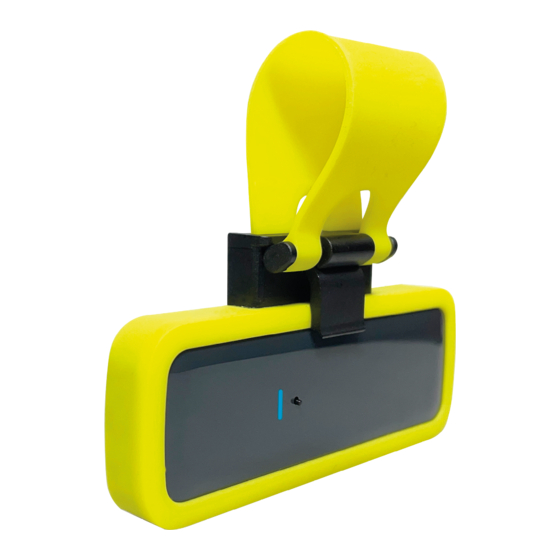
CAR DEFENDER
PARTCODE: CARDEFENDER-WE
30mm
Specification
Dimensions and weight
(W x H x D)
Casing / Colour
LED colours
Transmission frequency
Transmission method
Detection methods
Tilt alarm threshold
Shock sensitivity
Battery
Low battery threshold
Temperature
Standards
RoHS Directive
RE Directive
Emissions
Immunity compliance
Environmental class
95mm
10mm
Value
Device - 30 x 95 x 10mm, 30g
Holder - 122 x 163 x 12mm, 35g
Device - 2mm polycarbonate-ABS, anthracite
Holder - Silicone strap, yellow | UV Additive RIASORB UV-329 holder, black
Red, blue and green
868MHz FM transceiver narrow band
Fully encrypted rolling code
Shock only | tilt only | tilt or shock
~4°
Low, medium and high
2 x lithium CR2450R , 3V,500mAh with a 50mA pulse
2.2V +/-5% @ 25°C
Storage: -20°C to 50°C
Operating: -10°C to 40°C
EN50131-2-6-2008
EN50131-2-8-2016
EU 2015/853 | UK RoHS regulation 2012
2014/53/EU | Radio Equipment Regulations 2017 (RED)
EN 55032:2015+A1 1:2020 Class B
EN 50130-4:201 1+A1:2014
II
16mm
1 10mm
122mm
37mm
12mm
Advertisement
Table of Contents

Summary of Contents for Pyronix CAR DEFENDER
- Page 1 CAR DEFENDER PARTCODE: CARDEFENDER-WE 16mm 1 10mm 95mm 37mm 30mm 10mm 122mm 12mm Specification Value Dimensions and weight Device - 30 x 95 x 10mm, 30g (W x H x D) Holder - 122 x 163 x 12mm, 35g Device - 2mm polycarbonate-ABS, anthracite...
-
Page 2: Wireless Device Control
A. Setting activation button B. Learn button C. LEDs D. Multi-functional button E. Battery contacts WIRELESS DEVICE CONTROL Removing the Cover Before learning the device, the cover needs to be removed to expose the learn button and batteries. The device’s case has 3 opening points; using a flat bladed screwdriver, carefully push into 1 of these points and prise open. - Page 3 i. Prepare the system for pairing with the device. – Please refer to control panel instructions. ii. Remove the piece of polyester film that is separating the battery from the battery contacts. iii. Press and hold the ‘learn button’ on the device for at least 5 seconds and then release. –...
-
Page 4: Installation
INSTALLATION This device can either be installed into the holder and then attached to the vehicle it is protecting or it can be permanently fixed to a surface using screws, or with the adhesive pad provided. Alternatively, the device can be relocated whenever necessary as long as the control panel is disarmed (depending on control panel programming). - Page 5 Permanent Fixing Using Screws 1. Use a flat bladed screwdriver to prise the cover off the device 2. Remove the front cover and PCB 3. Screw the back of the device to the installation surface. 4. Put the front and the PCB back. Permanent Fixing Using Adhesive Strip Rotate the device Affix the adhesive pad...
- Page 6 MULTI-FUNCTIONAL BUTTON Overview Detection mode setting A 6 second press puts the device into detection mode setting where the sensitivity can be changed. Detection mode check A 3 second press is used to check the configuration setting the device is currently set to. Back to Home (B2H) Short press (less than 1 second).
-
Page 7: Home Position
Tilt Detection When movement is detected, it is then analysed by the unit and if the movement threshold angle is exceeded, an alarm will be generated. Tilt or movement more than ~4° on the x or y axis from the “home position”... -
Page 8: Battery Information
This product is sold subject to our standard warranty conditions and is warranted against defects in workmanship for a period of two years (battery excluded). In the interest of continuing care and design, Pyronix Ltd reserves the right to amend specifications, without giving prior notice. Please see the control panel programming manuals for further information or visit: www.pyronix.com/uk/terms-conditions-sales/...