Advertisement
Quick Links
10
11
10
11
SAFETY WARNING: DO NOT LAUNCH A PLANE WITH A POINTED NOSE AND DO NOT AIM THE LAUNCHER AT ANOTHER
PERSON.
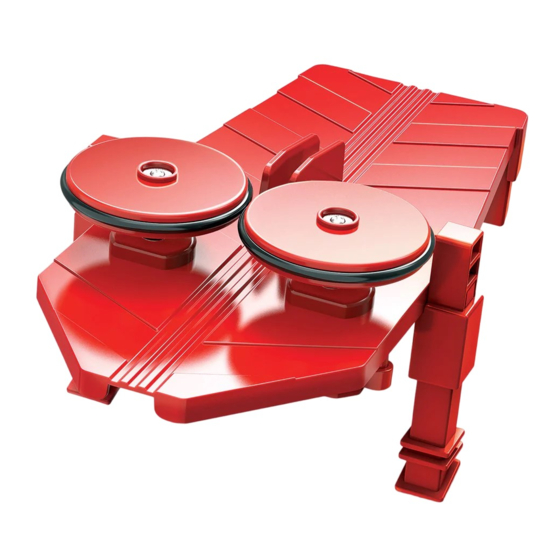
10. Operation: Switch on the plane launcher. Place the plane on the plane holder and slowly push the plane into the pulleys. Let go of the
plane as soon as the wheels grip it. The plane will be pulled through the wheels and launched at high speed. Watch the plane fly! Note:
You can adjust the height of the legs to launch the plane at different angles. If necessary use the adhesive tab (part N) to fix the launcher
to the table – this will make the launcher more stable.
11. If you find the wheels are too close to each other, making the motor turn slowly, you can increase the distance between them with the
adjustor bar. To do this: screw the adjuster screw in to make the base bend slightly. The distance between the wheels should be about 1
mm.
E. WHAT NEXT?
Try out some different paper plane designs. You might get some ideas from books or the internet. Which designs fly furthest? Which
designs stay in the air the longest? Can you make an acrobatic paper plane?
Note: The paper plane must have a vertical fuselage for the launcher to grip. For paper plane designs with a flat base you can attach a
separate 'launch strip' with adhesive tape. Design your own paper plane graphics.
F. HOW DOES IT WORK?
The plane launcher uses two rotating wheels. A lot of energy is stored in these wheels when they are spinning. When you slip a paper
plane in between, some of the energy is transferred to it and the plane is thrown out at high speed. Ball launchers for tennis and cricket
practice work in the same way except the gap between the wheels is much greater.
G. TROUBLESHOOTING
If you are having problems launching planes at high speed, check that gap between the wheels is correct:
1. If you find the wheels are too close you can adjust the gap with the adjustor bar.
2. Don't make the gap between the pulley too large as the wheels will not be able to grip the plane. It may take a few practice launches to
get the gap just right.
3. Make sure you allow a few seconds for the wheels to get up to speed before launching a plane.
If your planes don't launch properly:
1. Check that the wires are connected correctly so that the motors are spinning in opposite directions.
2. Check that you are using fresh batteries.
3. Check if the motors are spinning in the correct directions, i.e. when you place the launcher facing out and you look at the motors from
the top, the right motor should be spinning clockwise and the left motor should be spinning anticlockwise. If not, refer to step 3 and
reconnect the wires following the diagram.
H. FUN FACTS
1. Your plane launcher has been designed to launch paper planes at high speed. With your launcher you can try out different paper plane
designs to see which one flies furthest or does the best acrobatics.
2. The plane launcher can throw a paper plane much faster than you can by hand. If you scaled the plane up to, it would be flying faster
than a real plane!
3. Paper has been made for over 500 years and is now one of the most common and inexpensive materials. But many trees are needed
each year just to supply one family with all the paper it needs.
4. Professional engineers take part in world-wide competitions to design and fly paper. Many engineers claim to have made the perfect
plane, but can you do better – and prove it?
QUESTION AND COMMENTS
We treasure you as a customer and your satisfaction with this product is important to us. In case you have any comments or questions, or you find any
parts of this kit missing or defective, please do not hesitate to contact our distributor in your country, whose address is printed on the package. You are
also welcome to contact our marketing support team at Email: infodesk@4M-IND.com, Fax (852) 25911566, Tel (852) 28936241, Web site: WWW.4M-
IND.COM
©2022 4M INDUSTRIAL DEVELOPMENT LIMITED. ALL RIGHTS RESERVED.
ELECTRIC PLANE
LAUNCHER
A. SAFETY MESSAGES
1. This is not a toy. This is an educational aid product designed to demonstrate some scientific concepts taught in the school curriculum.
Assembly and use should be carried out and supervised by adults or by children aged over 14. Read through the instructions before use.
Misuse of contents may cause safety hazards. 2. To prevent possible short circuits, never touch the contacts inside the battery case. 3.
For safety, do not launch planes with sharp, pointed noses from the electric plane launcher. 4. Do not aim at eyes or face. Do not
Content
discharge an object other than recommended. 5. Do not touch the wheels while they are rotating in high speed. 6. Do not allow your
clothes or hair to get close to the wheels.
A
B. USE OF BATTERIES:
1. Requires three 1.5V AAA batteries (not included). 2. For best results always use fresh batteries. 3. Make sure you insert the batteries
with the correct polarities. 4. Remove the batteries from the kit when not in use. 5. Replace exhausted batteries straight away to avoid
possible damage to the kit. 6. Rechargeable batteries must be removed from the kit before recharging. 7. Rechargeable batteries must be
recharged under adult supervision. 8. Make sure that the supply terminals in the battery case are not short circuited. 9. Do not attempt to
recharge non-rechargeable batteries. 10. Do not mix old and new batteries. 11. Do not mix alkaline, standard (carbon-zinc), or
Content
rechargeable batteries.
C. CONTENTS
A
C
C
E
F
E
F
Part A: Base, Part B: Plain templates for folding the paper planes x 2, Part C: Pulley wheels x 2, Part D: Motors x 2, Part E: Plane holder,
Part F: Legs x 2, Part G: Adjuster bar, Part H: Motor covers x 2, Part I: Battery cover, Part J: Screws x 7, Part K: Terminal caps x 2, Part
L: Washer screws x 2, Part M: Adjuster screw, Part N: Adhesive tab. Also required but not included in the kit: 3 x 1.5V AAA batteries, a
small crosshead screwdriver and adhesive tape.
PLEASE SCAN THE QR CODE TO VIEW MULTI-LANGUAGE INSTRUCTIONS
B
B
D
D
G
H
I
J
G
H
K
L
M
N
I
J
K
L
M
N
2x2R
2x2R
Advertisement

Summary of Contents for 4M Electric Plane Launcher
- Page 1 Misuse of contents may cause safety hazards. 2. To prevent possible short circuits, never touch the contacts inside the battery case. 3. For safety, do not launch planes with sharp, pointed noses from the electric plane launcher. 4. Do not aim at eyes or face. Do not...
- Page 2 D. INSTRUCTIONS 1. Insert the two motors (part D) into the underside of the base (part A). 7. Insert the batteries as shown. Add the battery cover (part I) and secure it with a screw. 2. Install the two motor covers (part H) and secure them with 4 screws (part J). 8.