Advertisement
Quick Links
Installation Instructions
87750
87751
92-87750-02
WARRANTY:
Warranty information can be found at:
www.wolverinebrass.com
NEED HELP?
For additional assistance or service please contact:
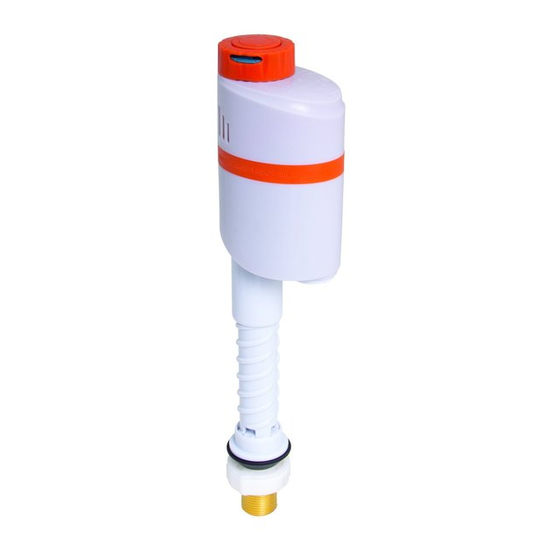
Unscrew and remove the Quick Connect
2
Mounting Nut (1). Connect the Refill Tube to the
Fill Valve prior to installation (2).
The Fill Valve is factory set to the lowest water level possible.
6
To increase water level, turn the Rotating Dial counterclockwise (1) while holding the body of the Fill Valve
to prevent any unnecessary movement.
• There are 24 marked dots on the Rotating Dial. Each dot represents a level of adjustment in regards to the
water level in tank.
TOOLS AND SUPPLIES NEEDED
Adjustable
Wrench
IMPORTANT
• Be sure to read instructions thoroughly before
beginning installation.
• Inspect all connections after installation.
• NOTE: This installation manual covers several
models of the Toilet Fill Valve. While the
appearance of your Toilet Fill Valve may differ
from those shown, the installation method is the
same.
SAFETY TIPS:
• Cover your drain to prevent loss of parts.
800-944-9292
www.wolverinebrass.com
FILL VALVE INSTALLATION
Insert the Fill Valve (1) into the mounting hole
3
located at the bottom of the tank.
• From below, install the Quick Connect Nut.
The Quick Connect Nut can be easily installed by
sliding the Quick Connect Nut upwards until it
makes contact, then rotating clockwise to hand
tighten (2).
• NOTE: Do not over-tighten any connections or
damage may occur.
WATER LEVEL ADJUSTMENT
NOTE
• When installing the fill valve, the critical level on
the fill valve (identified on the valve marked "CL ")
should be at least 1" (25.4mm) above the top of the
overflow pipe of the flush valve. This will ensure code
compliance.
• Do not install this product using any additional
sealants.
• Water Temperature: 2°F to 45°F
• Fill valve operating pressure range: 30-120psi
Connect the Refill Tube (1) to the overflow outlet
4
of the flush valve.
• NOTE: Make sure the Refill Tube is above
water surface.
REFILL
TUBE
x
WATER
LEVEL
To decrease water level, turn the Rotating Dial clockwise (1).
7
!
WARNING
DO NOT OVER-TIGHTEN
CONNECTIONS OR
DAMAGE MAY OCCUR.
DO NOT USE CHLORINE OR
ANY CHEMICALLY RELATED
COMPONENTS AS THIS
WILL RESULT IN DAMAGE
TO TANK COMPONENTS
AND MAY CAUSE
FLOODING AND PROPERTY
DAMAGE.
USE OF CHLORINE OR
CHEMICALLY RELATED
COMPONENTS WILL VOID
WARRANTY.
PREPARING INSTALLATION
1
• Turn OFF water supplies.
• Drain Toilet Tank completely.
• Remove existing Fill Valve.
• Remove any debris and
thoroughly clean mating
surfaces.
Install Water Supply Line (1) (not supplied) to the
5
Shank of the Fill Valve. Take care to not
over-tighten or damage may occur. Turn ON
water supplies and check for leaks.
Advertisement

Summary of Contents for Wolverine Brass 87750
- Page 1 CONNECTIONS OR Installation Instructions TOOLS AND SUPPLIES NEEDED NOTE DAMAGE MAY OCCUR. 87750 • When installing the fill valve, the critical level on DO NOT USE CHLORINE OR 87751 Adjustable the fill valve (identified on the valve marked "CL ")
- Page 2 Issue: Inlet Valve does not turn off Cause: Refill Tube wasn’t installed properly. Solution: Re-install the Refill Tube by following Step 4 of the “Fill Valve Install” section. 87750 / 87751 ROUGH-IN DIAGRAM COMPLIANCE: " ASME A112.18.1 77mm "...