Advertisement
Quick Links
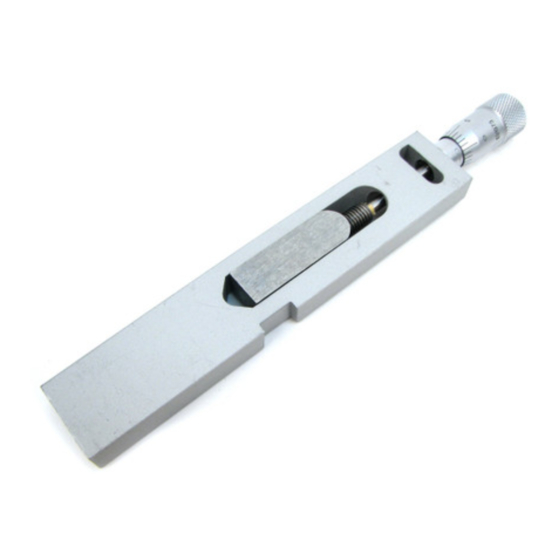
Micrometer Powder Bar Kit
For the Dillon Auto Powder Measure *
Thank you for buying the UniqueTek Micrometer
™
Powder Bar Kit
for your Dillon Precision Auto Powder
Measure. This kit includes everything you need to
convert your Powder Bar to a Micrometer Powder Bar.
This conversion kit is compatible with all Dillon Powder
Bars (Extra Small, Small, Large, Magnum, Belted
Magnum* plus the SL 900 Shot Bar*).
* The Belted Magnum powder bar and SL900 Shot Bar require minor
modification. See Note in Step 4 of instructions.
If you have any questions about installation, operation or experience any problem with your micrometer, please call
me first. I can often resolve the problem over the phone (480-216-2041 cell). – Lee
Step 1: Place an Index Mark on Powder Bar
The Auto Powder Measure is oriented differently on each Dillon press. Before
removing the powder bar, decide from which side you will want to view the
micrometer when adjusting the powder charge. As you are facing the press, you will
typically adjust the micrometer from the side shown below.
• Square Deal B – Left Side
• RL 550B – Right Side
Mark a line on that side of the powder bar, near the adjustment screw, with a pencil,
white crayon or other marker that is easily visible but removable. This line will be
used later to orient the micrometer index mark for easy reading. On the XL 650 and
Square Deal B you will notice that the micrometer numbers will be upside-down. But
this orientation will be much easier to see during adjustment than if it was oriented
on the opposite side of the powder bar as with the other presses.
Step 2: Remove Powder Bar
Remove the Powder Bar from the Powder Measure. (Refer to Auto Powder Measure instruction manual for details.)
Step 3: Disassemble the Powder Bar
NOTE: Before disassembly, look closely at the Powder Bar and note that Powder Bar Inserts (Ex-Small, Small and
Large) and some Powder Bars (Small and Large) have a flat side and a side with a cavity. The cavities must always
be on the bottom side of the Powder Bar.
a. Remove the Powder Bar Post. Press the bolt head against a
hard surface to compress the spring washer while pulling out
the Powder Bar Post. The Belted Magnum powder bar and
SL900 Shot Bar have a 3/8" set screw instead of a powder bar
post. Remove the set screw using a 3/16" hex key.
b. Remove the Powder Bar Adjustment Screw.
c. Set aside the Powder Bar Adjustment Screw, spring washer
and flat washer. They will no longer be used.
Step 4: Prepare the Powder Bar for Installation **
The Teflon coating must be completely removed from the hole in the end of the powder bar where the adjustment
screw was removed. Use a round file or rolled up sandpaper to scrape away the Teflon coating, leaving a fresh bare
metal surface for the LocTite to achieve a good bond. Clean the hole with rubbing alcohol to remove any residue.
Note: If you happen to have a 7mm thread tap, it does a quick job of cutting through the Teflon coating and exposing clean bare metal for the
Loctite to achieve a solid bond. Only a 7mm tap is the correct size. Do not substitute any other size metric or SAE tap.
** The Belted Magnum powder bar and SL900 Shot Bar adjustment screw hole is smaller than on the other powder bars and must be
enlarged using a 17/64" drill bit before installing the micrometer. Some older Small and Large powder bars may also require enlarging.
UniqueTek Inc.
Phone: 480-507-0866
Fax: 480-507-0867
™
• XL 650 – Left Side
• SL 900 – Right Side • AT 500 – Right Side
540 W. Iron Ave., Suite 118
Mesa, AZ 85210
- 1 -
Before beginning installation, it is recommended that
you read these instructions completely at least twice. It
is also recommended that you review the factory
instructions and exploded parts diagram for your Dillon
Precision Auto Powder Measure. If you do not have
the instruction manual for your press, manuals are
available for download at the Dillon Precision web site.
(www.dillonprecision.com)
* Dillon Precision does not authorize the Micrometer Powder Bar Kit™
for use on any of its reloading presses and its use may void
manufacturer or dealer warrantees.
• Super 1050 – Left Side
Applying index mark (XL-650 shown)
web:
www.uniquetek.com
e-mail:
info@uniquetek.com
Rev. 20 04/15
Advertisement

Summary of Contents for UniqueTek Micrometer Powder Bar Kit
- Page 1 (www.dillonprecision.com) * The Belted Magnum powder bar and SL900 Shot Bar require minor * Dillon Precision does not authorize the Micrometer Powder Bar Kit™ modification. See Note in Step 4 of instructions. for use on any of its reloading presses and its use may void manufacturer or dealer warrantees.
- Page 2 Step 8: Install Micrometer Powder Bar in your Powder Measure. Install the Micrometer Powder Bar in the Powder Measure by following in reverse the procedures used to disassemble in Step 2. That is it! UniqueTek, Inc. 540 W. Iron Ave., Suite 118 web: www.uniquetek.com...
- Page 3 This will get you very close to the desired charge weight on the first attempt, greatly minimizing the time needed to “dial in” the exact charge weight. You can download a copy of the Calibration Curve Spreadsheet from the Micrometer Powder Bar Kit™ page on our web site at http://www.uniquetek.com/site/696296/product/T1231.
- Page 4 Micrometer Powder Bar. Disclaimer: UniqueTek, Inc. is not liable for damages or personal injury that may be incurred as a result of using this product in an improper way or in a reloading press that has been improperly maintained or operated. It is your responsibility to ensure that your reloading equipment is properly assembled, is maintained in proper working condition, and is used according to the manufacturer’s instructions and safe reloading practices.