Advertisement
Quick Links
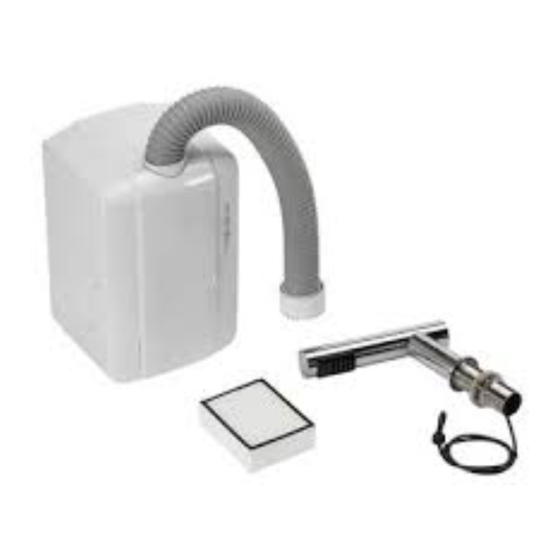
Install Method
Install air tap
•
Insert the threaded end of the air tap into the mounting hole on the
platform or basin, put in rubber gasket, Wave washer, Positioning
gasket, Fasten screw nut, tighten the nut after adjusting the position.
Disassemble the cover
•
First pull the HEPA rack out, use a Phillips screwdriver to loosen the
screws that secure the cover, then turn the lower part of the cover
outward, heard a "click", indicating that the upper buckle has been
disengaged and remove the cover.
Install the mounting plate
e
The air pump can be installed on the wall or placed directly. If you
choose to place directly it, skip to step 5.
•
If the mounting surface is a woodbased panel, it can be directly fixed
with self-tapping screw if not, please press the image on the right.
•
According to the installation position, put the mounting plate with one
hand gently holding in the place which the machine will be installed.
Then use the other hand to draw the positions of mounting holes with
pencil.
In accordance with the drawn holes position, drill four holes 6 mm in
•
diameter and press the expansion pipes into four holes.
Install air pump
Hook the hook slot on the air pump into the hook on the mounting
•
plate, press down it until the safety crew holes on machine and
mounting plate are aligned, Screw in the safety screw and tighten.
Install Hose assembly
•
Push the induction line down into the hose assembly then screw the large
nut on the top of the hose to the air tap to prevent air leaks, the nut must
be tightened. then, the limit ring on the induction line is snapped into the
limit slot on the hose connector, and it must be stuck in place if there is
not carded in place, air leakage may occur.
•
Adjust the relative position of the two mounting holes under the hose
connector to the mounting holes on the air pump to align them, screw in
the fixing screw to secure the hose assembly to the air pump, the screws
need to be tightened to prevent air leaks.
•
Connect the connection plug on the Touch cable to the connection
socket on the air pump.
Install cover and HEPA rack
e
Insert the two slots on the top of the cover into the two buckles on the
air pump, push the lower part inward, and fix it with the fixing screws.
e
Push the HEPA rack into the air pump as shown.
Test Run
Air tap
Shake the machine gently The machine is installed
Seal ring
Rubber gasket
Confirm the power and
Wave washer
2
voltage
Positioning gasket
Fasten screw nut
Switch on the power
3
Slide hands under hand
Air pump
dryer at correct distance
4
to dry optimally
Cover
Fixing screws
Function introduction
There are three touch buttons on the air pump, which are power switch, heating switch and air speed switch.
• Power button(Child lock): The machine enters the standby state after power-on. In the standby state, it will enter
to 'Child lock' mode if it doesn't operate within one minute. Meanwhile, the gear indicator lamp dimmed. Long
press and hold for 3 seconds to unlock. When the 'Child lock' is unlocked, short press the power button to turn
off the machine and then short press the power button again to enter standby.
• Speed button: The factory default is one gear, which lights up one light.When pressed the button, it turns into two
gears, which lights up two lights. And press it again to change to the third gear to light up three lights, and then
press it again to change to the fourth gear (high speed) with four lights. Fully lit, press it again to turn into a gear,
turn on a light, and so on.
• Heating button:The default setting of heating mode is intelligent heating.It doesn't heating at room temperature
above 25 degrees and the heating is automatically turned on when room temperature is below 25 degrees. After
pressing the heating button in smart mode, the indicator of the gear changed from Blue to yellow, the heating
mode changes from intelligent heating to forced heating. Otherwise, the indicator light changes from yellow to
blue, and the heating mode changes from forced heating to intelligent heating.
Expansion pipe
Daily Use and Maintenance
External maintenance
•
Best cleaned with a soft dry cloth and neutral detergent. Do not use
organic solvents, acid or alkaline toilet cleaner, cleaning brush, etc.
•
Please turn off the power when removing dirt from the touch switch.
0
Otherwise, it will destroy the machines surface finish and/or produce
discoloration.
Air tap
O
If using a chemical cloth, be sure to read the directions first.
HEPA and filter cleaning
Touch cable
•
HEPA and filter are cleaned once every 2-3 month according to the
Connection
usage. It can be washed directly with water, and it must be dried
plug
before use.
Hose
assembly
Connection
Optimal Air Tap Method
socket
Air pump
- � : ::. : ·· · i
./
'I"<)- - ·
Air pump
Slowly move back of
Cover
hands under air outlet
Fixing screws
Steps
Confirm information
Check & Notice
If not installed correctly, the
unit will shake and make noise
firmly without shaking
during operation
Incorrect voltage may burn out
Please use the rated voltage
machines or cause accidents
if the power use is incorrect
Make sure power cord is
Please check power flow when
correctly wired
the indicator light is not bright
The airfow should blow out
Confirm whether your hands
are at the correct distance
when the hand is placed
underneath
from the Inductor if it does
not blow out
Flip hands over so that
Rub hands together under
palms are facing the
hand dryer to remove any
hand dryer
remaining water
Tapillo Single Air Tap Hand Dryer
@J
@
@
User Manual
info
Advertisement


