Advertisement
Quick Links
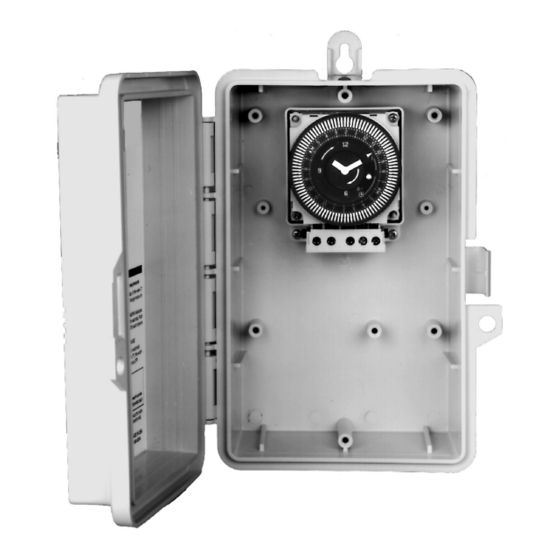
GMX Series Time Controls
APPLICATION
The GMX Series are universal electromechanical time switches
within UL TYPE 1 indoor enclosures or UL TYPE 3R outdoor
enclosures intended for the control of lighting, heating, air
conditioning, pumps, motors, or general electrical circuits in
residential, commercial, industrial and agricultural facilities.
Basic models are:
GMX ST
SPDT 24 hour synchronous drive
GMX SW
SPDT 7 day synchronous drive
GMX QT
SPDT 24 hour quartz drive
GMX QW
SPDT 7 day quartz drive
SPECIFICATIONS
Switch Rating: SPDT Switch
21A Resistive @ 125/250 VAC
1 HP @ 125 VAC
2 HP @ 240 VAC
1350W Tungsten @ 240 VAC
675W Tungsten @ 120 VAC
ENVIRONMENTAL RATINGS
Ambient Temperature: –40°F to 131°F synchronous drive
–4°F to 131°F quartz drive
Humidity: 0-95% RH, Non-condensing
WIRING CONNECTIONS
Screw clamp terminals for up to AWG #10 wires.
Agency Approvals: UL Listed
INSTALLATION
1. Select knockouts to be used. Remove the inner (1/2")
knockout by inserting a screwdriver in the slot and carefully
punch knockout loose. Remove slug. If the 3/4" knockout is
required, remove the outer ring with pliers after removing the
1/2" knockout. Smooth edges with a knife if necessary.
2. Place enclosure in desired mounting location and mark the
three mounting holes.
3. Drill holes for #10 screws, start screws in holes.
4. Place enclosure over screws and tighten screws.
5. Connect conduit hubs to conduit before connecting the
hubs to the enclosure. After inserting hubs into enclosure,
carefully tighten hub lock nut. Do not over-torque.
6. Wire in accordance with National and Local Codes.
GROUNDING: This enclosure is of plastic construction and
does not require a ground connection and does not require
bonding in pool applications.
This enclosure does not provide grounding between conduits.
When using non-metallic conduit or cable, connect the ground
wires of all cables together with a twist on wire connector.
When metallic conduit is used, use grounding type bushings
and a jumper wire between each conduit.
Programming Instructions
SETTING THE TIME: TO SET THE CURRENT TIME
(AND DAY OF WEEK ON 7 DAY UNITS), TURN THE
MINUTE HAND CLOCKWISE. DO NOT SET THE TIME BY
ROTATING "OUTER" DIAL.
PROGRAMMING: The 24 hour model has trippers of 15
minute increments, and a AM/PM indication on the outer dial.
The 7 day model has trippers of 2 hour increments, and the
outer dial shows the 7 days of the week and AM/PM for each
day. Push the captive trippers outward for the time period(s) that
the load is to be on (Normally open contacts closed).
Manual Override: With the manual switch in the middle
position, the time switch is in automatic mode and will switch
at the programmed times. In the upper position "I", the load
is permanently ON. In the lower position, "O", the load is
permanently OFF.
BATTERY POWERED RESERVE (Quartz Models): In case
of power failure, the built-in nickel-cadmium battery maintains
the time of day for a minimum of 7 days.
GMXST-I-120
Advertisement

Related Manuals for Intermatic TimeMaster GMX Series


Summary of Contents for Intermatic TimeMaster GMX Series
- Page 1 GMX Series Time Controls APPLICATION The GMX Series are universal electromechanical time switches within UL TYPE 1 indoor enclosures or UL TYPE 3R outdoor enclosures intended for the control of lighting, heating, air conditioning, pumps, motors, or general electrical circuits in residential, commercial, industrial and agricultural facilities.
- Page 2 TO LOAD TO LOAD TO TO 120V LINE Enclosure Dimensions 120V Timer, 24V, 120V, or 240V Load TIMER LOAD TO 120V LINE TO 24-240V LINE 120V Two Speed Fan TIMER HIGH TO 120V LINE INTERMATIC INCORPORATED Libertyville, IL 60048 www.intermatic.com...