Advertisement
Quick Links
Item No. CH1B/CH1S
Installation Guide
5.04" - 8.27"
11.22" - 20.16"
33 lbs
128 - 210 mm
285 - 512 mm
15 kg
Package Included
(A) Parts Included
Under surface mount 1 PC
CPU holder frame 1 PC
Installation Steps
Step 1
Install the under surface mount to the back of desktop.
3.15"
(80 mm)
6.81" (173 mm)
Note:
Please keep the CPU fully
under the desktop while you
Mark the holes under desktop surface
install the under-surface mount.
Step 2
Adjust the screw on the top of the holder frame for a better installation.
(B) Attachment Screw Set
1
2
St4.8 x 20 mm
Ø5
(4 PCS)
(4 PCS)
0.79" (20 mm)
0.08" (2 mm)
2
1
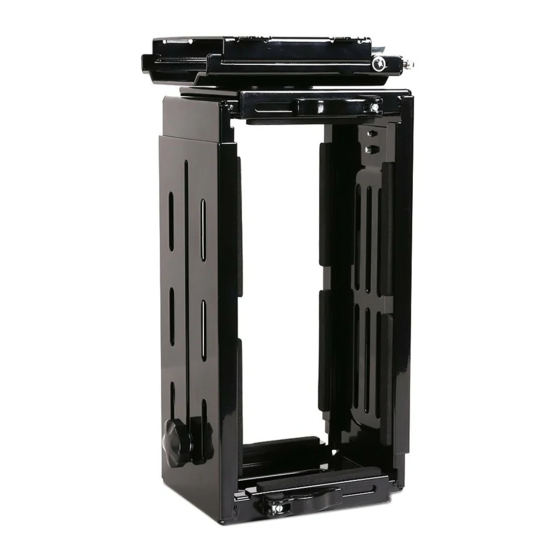
Step 3
1. Adjust the screw so that the handle bar is easy to pull out.
2. Loosen the knob and adjust the holder extension to the maximum height and tighten the knob.
3. Adjust the width of the holder to install the CPU by adjusting the handle bar.
4. Install the CPU and lock the handle bar.
5. Adjust the height of the holder frame by loosening and tightening the knob to fit the CPU better.
3
1
Handle bar
Adjustable knob
2
Step 4
Put the holder with the CPU on the under surface mount and lock it firmly by pulling out the handle
on the bottom of the holder.
1. Lock the holder to the under desk surface mount.
2. Lock the holder firmly to the under surface mount by tightening the screw.
1
Hook the
end of the
mount.
This product contains small items that could be a choking hazard if swallowed. Keep these items
away from children.
1. Read the entire instructional manual before you start installation and assembly. If you have any
questions regarding any of the instructions or warnings, please contact us or a professional.
2. Please check screw connections regularly to ensure the CPU is safe.
3. Using this with products heavier than the rated weight limits may result in injury due to instability.
4
Handle bar
CPU
5
180°
180-degree
swivel mount.
2
Warning
Tighten screws
in clockwise
direction after
finishing
installation.
Advertisement

Summary of Contents for Flexispot CH1B
- Page 1 2. Loosen the knob and adjust the holder extension to the maximum height and tighten the knob. 3. Adjust the width of the holder to install the CPU by adjusting the handle bar. Item No. CH1B/CH1S 4. Install the CPU and lock the handle bar.
- Page 2 FlexiSpot may elect to refund the purchase price in exchange for the return of the product. In the rare event that your FlexiSpot product is defective, we will provide you with a This Warranty shall be governed by the laws of the State of California, USA, without giving replacement item shipped at no cost to you within the continental United States.