Table of Contents
Advertisement
Advertisement
Table of Contents

Related Manuals for Philips AJ290/12


Summary of Contents for Philips AJ290/12
- Page 1 Register your product and get support at AJ290 User manual...
-
Page 2: Important Safety Instructions
English Important Safety Important Safety Instructions Read these instructions. Keep these instructions. Heed all warnings. Follow all instructions. Do not use this apparatus near water. Clean only with dry cloth. Do not block any ventilation openings. Install in accordance with the manufacturer’s instructions. Do not install near any heat sources such as radiators, heat registers, stoves, or other apparatus (including amplifiers) that produce heat. - Page 3 when moving the cart/apparatus combination to avoid injury from tip-over. Unplug this apparatus during lightning storms or when unused for long periods of time. Refer all servicing to qualified service personnel. Servicing is required when the apparatus has been damaged in any way, such as power-supply cord or plug is damaged, liquid has been spilled or objects have fallen into the apparatus, the apparatus has been exposed to rain or moisture, does not...
- Page 4 Ensure that you always have easy access to the power cord, plug or adaptor to disconnect the apparatus from the power. Notice Any changes or modifications made to this device that are not expressly approved by Philips Consumer Lifestyle may void the user’s authority to operate the equipment. Recycling Your product is designed and manufactured with high quality materials and components, which can be recycled and reused.
- Page 5 Please observe the local regulations regarding the disposal of packaging materials, exhausted batteries and old equipment. Your weather alarm clock Congratulations on your purchase, and welcome to Philips! To fully benefit from the support that Philips offers, register your product at www.philips.com/welcome. Introduction With this unit, you can: •...
-
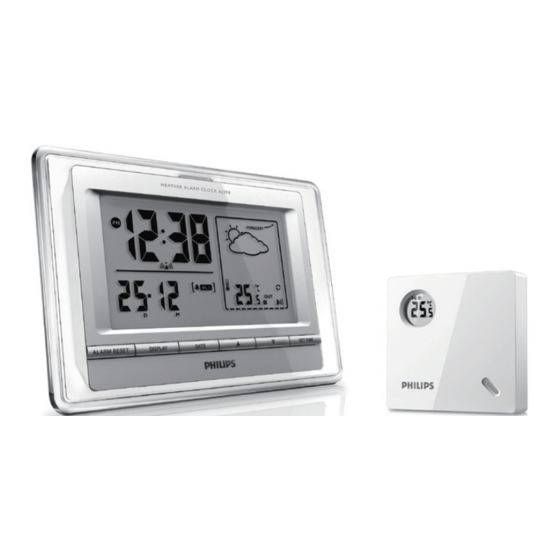
Page 6: What's In The Box
• set an alarm timer to wake you up • know the outdoor weather condition • know the indoor temperature and humidity. What’s in the box Check and identify the contents of your package: • Main unit • Power adaptor •... - Page 7 DISPLAY • Toggle between outdoor temperature, indoor temperature, and indoor humidity. DATE • Toggle between month, day, alarm 1 and 2. • Receive transmission from the sensor. • Adjust clock/alarm time. SET TIME • Set clock/date. • Activate RCC (Radio Control Clock) reception. Display panel •...
- Page 8 RESET • Reset to start transmission. • Reset the unit when it hangs up. AL 1/2 • Turn on/off alarm 1/2. • Confirm alarm setting. REPEAT ALARM/BRIGHTNESS CONTROL • Repeat the alarms. • Adjust brightness of the display panel. Overview of the sensor Display panel •...
-
Page 9: Get Started
Always follow the instructions in this chapter in sequence. If you contact Philips, you will be asked for the model and serial number of this apparatus. The model number and serial number are on the bottom of the apparatus. Write the numbers here: Model No. - Page 10 To install batteries into the main unit Open the battery compartment. Insert 4 AAA batteries (not supplied) with correct polarity (+/-) as indicated. Close the battery compartment. To install batteries into the sensor Open the battery compartment. Insert 2 AA batteries (not supplied) with correct polarity (+/-) as indicated.
-
Page 11: Mount On Wall
Note • Batteries contain chemical substances, so they should be disposed of properly. Mount on wall You can also mount the main unit on a wall. Choose a location on the wall. Clinch two screws into the wall. 48 mm (1.89") Hook the main unit on the wall. -
Page 12: Install The Stand
Install the stand The battery compartment cover can be installed with the inside out to support the unit. Connect power Caution • Risk of product damage! Ensure that the power voltage corresponds to the voltage printed on the back or underside of the apparatus. •... - Page 13 Connect the sensor to the main unit Note • Ensure the sensor is loaded with batteries. Place the sensor to a desired location, within 10 meters away from the main unit. • For first time use, press sensor. The main unit starts to receive transmission from the sensor. »...
-
Page 14: Set Date And Time Manually
Set date and time automatically Press and hold SET TIME for 2 seconds. The clock automatically synchronizes the current Central » European time and date. Set date and time manually Press SET TIME. Year digits begin to blink. » Press to set year. -
Page 15: Repeat Alarm
to set the minute, then press AL 1/AL 2 to confirm. Press Repeat alarm When the alarm rings, press REPEAT ALARM/BRIGHTNESS CONTROL. The alarm repeats ringing 9 minutes later. » Turn on/off the alarm timer Note • Ensure that you already set the alarms successfully. Press AL 1/AL 2 repeatedly to turn on or off the alarm timer. -
Page 16: Weather Forecast
• If channel is swifted,you need to unplug the adaptor and connect power again. Adjust display infomation Press DISPLAY repeatedly to toggle between outdoor temperature, indoor temperature and humidity. Weather forecast The unit predicts weather for an area of 50 km in the next 12 or 24 hours. Symbol Weather Sunny... -
Page 17: Adjust Display Brightness
Symbol • When the main unit is powered by battery, the light turns on for 10 seconds after any operation. • When powered by AC mains supply, the light always turns on. • To activate the auto dim function, press and hold BRIGHTNESS CONTROL for 10 seconds. -
Page 18: General Information
If you encounter problems when using this apparatus, check the following points before requesting service. If the problem remains unsolved, go to the Philips web site (www.philips.com/welcome). When you contact Philips, ensure that the apparatus is nearby and the model number and serial number are available. No power •... - Page 19 • Insert the batteries with their polarities (+/– signs) aligned as indicated. • Replace the battery. Timer does not work • Set the clock correctly. • Switch on the timer. Clock/timer setting erased • Replace the exhausted battery. • Reset the clock/timer. Display does not function properly./No reaction to any operation of the controls.
- Page 20 © 2009 Koninklijke Philips Electronics N.V. All rights reserved. AJ290_12_UM_V1.3...