Advertisement
Quick Links
Instruction Manual
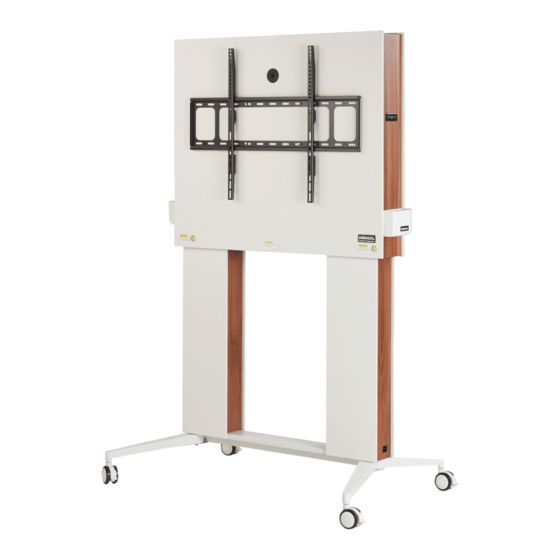
Professional electric height adjustable Display-Trolley
Adjust-32100M - 74cm
Technical data
100KG
Maximum load capacity
1080-1820mm
Height Range
32"-100"
Applicable Dimensions for TV
Component list
1. Product (Electric Collaborative Media Wall) (x1)
2. Top cover (x1)
3. Storage box (x2)
4. TV panel (x1)
5. TV plate (x2)
6. Rotary Knob (x2)
Accessory list
Attention: The drawings below are only for reference which might be
slightly different from the actual object, please in kind prevail. Any tools
missing or installation problems, please contact the customer service
firstly.
No.
Image
Spec
A
M4x12mm
B
M6x25mm
C
M8x25mm
D
M8x16&M8X36
E
Stuck Metal Sheet
F
Magnetic Level
G
Gasket
H
Washer
2
3
1
4
5
6
STEP 1
Removal of corner guards on both
sides of the foot of packaging.
Qty
2
4
4
4+4
4
STEP 2
Open up the legs
1
4
4+4
Open up the legs according to the directions shown on the picture, and when you hear
"Pah" the foot seeting is finished.
STEP 3
Remove top metal plate and then install top covers
Use a screwdriver to remove the corners on both sides of the product.
The removed parts are no longer used.
Figure A
Screw Driver
1
Put the product up side down. Remove the corner guards on both sides of
the bottom foot of the product with a screwdriver (Fig. A). Then install the
screw on the bottom foot on the threaded hole of sheet metal (Fig. B).
Click
Screw Driver
Install top shield plate with rotary knob.
Figure B
Click
6
2
Advertisement

Summary of Contents for Celexon Adjust-32100M
- Page 1 Instruction Manual Professional electric height adjustable Display-Trolley Adjust-32100M - 74cm STEP 1 Removal of corner guards on both sides of the foot of packaging. Figure B Figure A Accessory list Screw Driver Attention: The drawings below are only for reference which might be slightly different from the actual object, please in kind prevail.
- Page 2 STEP 4 STEP 7 Connecting cables Firstly, install the storage box on the Television axle, then press it down slightly. Remove orifice plug and install storage box First attach the thumb screw (A) to the Threading sleeve threaded hole of the plug and then pull it together.
- Page 3 The tests were carried out in normal mode and refer to the tested device and the specifically executed tests! This certificate relates exclusively to on the model of the device provided for testing. A copy of the EU Declaration of Conformity can be found at https://uk.celexon.com/certificates. The symbol indicates separate collection of electrical and electronic equipment in EU countries there.