Advertisement
Quick Links
PRE-FLIGHT CHECKS
● Check/adjust servo centering, in order to adjust the control surface better.
● Double-check the spinning direction of motor at first usage, and sure it's suitable for your model.
● Set the center of gravity (CG) at the position that manual already marked out. If necessary, add weight to the nose or tail
to ensure the best flight performance.
● Double-check the inside of the fuselage, make sure all the equipments are correctly connected; Check the heat-shrink
covering material's surface, Make certain all screws, bolts, cabin and canopy remain secure.
● Take great care when connecting/disconnecting the battery, pls replace the battery immediately once found low voltage
or damage to battery.
● The way the internal devices of the fuselage are connected will be related to your transmitter-receiver device. For those
transmitter-receiver devices with more functions, you can simplify the connection of the internal devices of the fuselage.
Check your device for details to see if it meets the features you need.
● When the power system and transmitter-receiver device are paired for the first time, you may need to set the maximum
stroke of the throttle. Please set it yourself.
SAFETY PRECAUTIONS
●
This product should not be considered a toy, but rather a complicated and sophisticated flying model. Your safety depends
on how you use and fly it, If not correctly operated, could cause injury to you or your family members. Children must be
accompanied by an adult at all times if operating this product. Not suitable for children under the age of 14. THIS IS NOT A
TOY.
● Do not fly around some restricted location like airports, military bases, residential areas, etc.
● You will need to range check the transmitter to be sure you are not experiencing any interference.
● Always turn on the receiver last after turning on the transmitter and shut off the receiver first before turning off the transmitter.
● If you are only a beginner to the radio control model flying, do not attempt to fly your model without any assistance or advice from
advanced expert fliers.
● Keep relevant items out of reach of children.
● This product has been flight tested to meet or exceed our rigid performance and reliability standards in normal use,if you plan to perform
any high-stress flying, you are solely responsible for taking any and all necessary steps to control movement range and reinforce the body
strength.
● This product may include some fiberglass and carbon-fiber reinforced plastic parts,which may cause eye and skin discomfort,pls wear the
goggles or dust-proof clothes when needed.
● Due to air traffic safety control, the products you receive may not have the glue that appears in the list. Please understand and purchase the
glue you need at your local stationery store.
http://www.dwhobby.com/
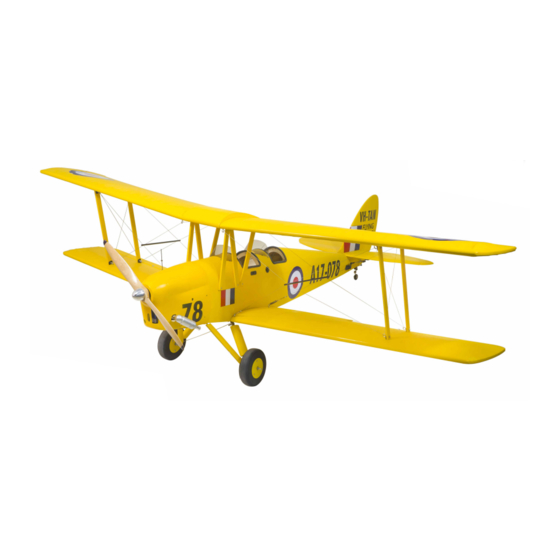
Balsawood Scale Airplane
Historical Background
The de Havilland DH.82 Tiger Moth is a 1930s British biplane designed by Geoffrey de Havilland and built by the de
Havilland Aircraft Company. It was operated by the Royal Air Force (RAF) and many other operators as a primary trainer
aircraft. In addition to the type's principal use for ab-initio training, the Second World War saw RAF Tiger Moths operating
in other capacities, including maritime surveillance and defensive anti-invasion preparations; some aircraft were even
outfitted to function as armed light bombers.
From the outset the Tiger Moth proved to be an ideal trainer, simple and cheap to own and maintain, although control
movements required a positive and sure hand as there was a slowness to control inputs. Some instructors preferred these
flight characteristics because of the effect of "weeding out" the inept student pilot.
Specification
Suggested Equipment
Oil engine:
Wingspan:2150mm (85inch)
Fuselage Length:1920mm (75inch)
Fly weight:≈8KG (About 280pound)
Electric motor:
Tools Needed
SCG29
2-stroke DLE/RCGF 35CC
4-stroke NGH GF38
20*8 inch
Motor :ECO5330CKV 205KV
BATT
:37V 10S LIPO
ESC
: 100A
Prop
: 20.5*12WE
Servo: 37g*6pcs
Y wire 1pcs
30cm extended wire 4pcs
Advertisement

Related Manuals for Dancing Wings Hobby Tiger Moth DH82 2.15M

Summary of Contents for Dancing Wings Hobby Tiger Moth DH82 2.15M
- Page 1 Balsawood Scale Airplane SCG29 PRE-FLIGHT CHECKS ● Check/adjust servo centering, in order to adjust the control surface better. ● Double-check the spinning direction of motor at first usage, and sure it’s suitable for your model. ● Set the center of gravity (CG) at the position that manual already marked out. If necessary, add weight to the nose or tail to ensure the best flight performance.
- Page 2 Assemble the Landing Gear Photos shown here just for reference, the product you received maybe slightly differ from the photos due to continuous improvement on products. M3*18mm 01-1 01-2 A: Fuselage B1-2: Upper Wing and Lower Wing C: Horizontal Tail D: Vertical Tail E: Wing Connectors F1-4: Holder...
- Page 3 02-4 01-6 01-7 lubricating oil Add some lubricating oil in the joint ? of needle type hinge.(Avoid the glue stuck dead.) Before install and fasten needle type hinge, please confirm the surface can swing freely in advance. Self-locking nut Assemble the Wing Epoxy glue Install the round servo plate Please don't fasten...
- Page 4 F4 long 02-15 02-10 02-11 F4 short Mark Mark M3*18mm+ Self-lock nut F4 short F4 long Preassemble "X01" on the fuselage, fasten with screw as picture shown. Then mark along the edge.Take out after mark. 02-12 02-13 Carbon tube 10*280mm Carbon tube 16*590mm Epoxy glue...
- Page 5 Tail wing installation 02-18 02-19 Screw for the ring 03-1 Lubricant oil Self-locking nut Add some lubricating oil in the joint of needle type hinge.(Avoid the glue Screw for stuck dead.) the ring Before install and fasten needle type Note the ring's hinge with epoxide-resin glue , Self-locking nut direction.
- Page 6 05-3 05-4 Tail wheel installation 04-1 04-2 04-3 M2.5 铝扣 Epoxy glue 04-4 Install the round servo plate on the rudder arm, install rudder arm Add a little CA glue into the screw hole, tighten on the servo of fuselage inside. screws after the glue dries.
- Page 7 Instrument panel installation display Installation for servo arm and link rod, please refer to steps 02-6. M3*18mm+Self-lock nut 06-3 Here engine installation only for referance.You can adjust your installation details according to your engine. Cowling and propeller installation display Engine installation display You may need to open hole on the cowling according to your engine size.
- Page 8 Setting and adjustment Display the C.G Control Directions Tests When using an oil-powered engine, it maybe necessary to counterweight the head of the airplane, and the oil tank is placed at the center of gravity. ≈110mm When using the electric motor,the center of gravity can be adjusted by adjusting the position of the battery.