Advertisement
Available languages
Available languages
Quick Links
DECORATOR IN-WALL SPRING WOUND TIMER
CONTENTS
A
B
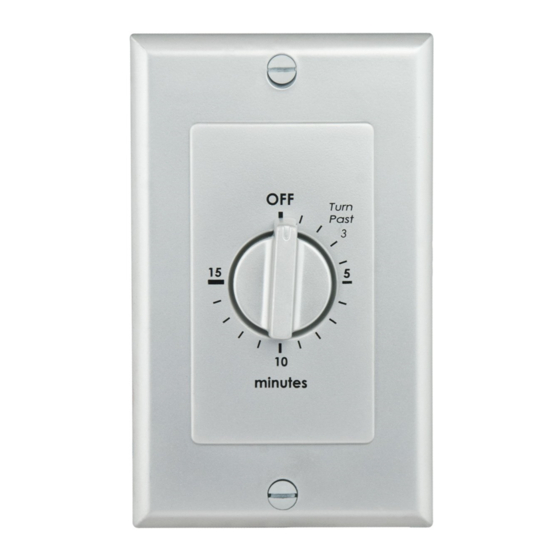
OFF
Turn
Past
10
Wire nuts
60
20
Timer
50
30
40
minutes
WB015 / WB030 / WB060
SAFETY INFORMATION
To avoid fire, shock, or death, turn off power at circuit breaker and test that power is off before wiring.
Please read and understand this entire manual before attempting to assemble, operate or install the product.
CAUTION
Installation by a licensed electrician is recommended. Installation and use of this equipment should be in accordance with
provisions of the U.S. National Electrical Code, applicable local codes and pertinent industry standards. These timers are
not to be used in precision timing applications when inaccurate timing could have dangerous consequences such as with
sun lamps or in tanning booths.
• Do not use to control receptacles.
• For indoor use only unless installed in a, NEMA type 3R enclosure.
• Use only copper wire.
• High Voltage – Disconnect power supply before servicing.
• The device is to be used in conjunction with a UL Listed Cover Plate for field installation.
•
Store indoors in dry location.
WB015/WB030/WB060
Rating: 20 A, 125 V general use
10 A, 250 V general use
10 A, 277 V general use
125VAC,1,875 W tungsten, 15 A resistive
1 HP, 125 V AC
2 HP, 250 V AC
125 VAC, 500 W electronic ballast
C
Mounting screws
(Wall box - 0.748 in.)
D
Mounting screws
(Wall plate - 0.33 in.)
INSTRUCTIONS
1. Assembly layout
STANDARD JUNCTION BOX
SCREW (C)
2. Installation
1. Turn OFF power at the main in-wall junction box.
2. Remove current wall plate and current switch from vertically installed wall box.
3. Using the provided wire nuts (B), connect each line coming out of the timer to the wires coming out from the in-wall junction
box. Connect the black wire to the power-in wire and the red wire to the power-out wire.
4. Insert timer into the wall box being careful not to pinch any wires. Be sure the Arrow (indicated on front of timer) is facing up.
Fasten the timer to the wall box using the provided screws (C).
5. Place provided wall plate and time dial plate on timer referring to the appropriate diagram above.
6. Carefully screw on the provided nut.
7. Push timer knob onto knob extension. Be sure the pointer is lined up with "OFF" on dial plate.
8. Use the provided screws (D) to secure the wall plate.
9. Turn power on at the circuit breaker or fuse box.
3. Set the countdown time
1. Turn the knob switch clockwise until the slot of knob aligns with dial mark of cover plate.
2. Turn on the main power.
You may turn OFF the load at any time while it is ON by simply moving the knob switch counterclockwise to the OFF.
To turn the load ON again, just turn switch to the desired time.
The timer may be reset at any time by turning the load OFF and back the desired time.
SAVE THESE INSTRUCTIONS!
SCREW (D)
TIMER
TIME DIAL PLATE
NUT
KNOB
WALL PLATE
Advertisement

Summary of Contents for Reliance Controls WB015
- Page 1 Fasten the timer to the wall box using the provided screws (C). 5. Place provided wall plate and time dial plate on timer referring to the appropriate diagram above. WB015 / WB030 / WB060 Mounting screws 6. Carefully screw on the provided nut.
- Page 2 (Placa para pared - 0.33 in.) WB015 / WB030 / WB060 6. Enroscar con cuidado la tuerca provista. 7. Empuje la perilla del temporizador en la extensión perilla. Asegúrese de que el puntero está alineado con "OFF" en la placa INFORMACIÓN SOBRE SEGURIDAD...