Advertisement
Quick Links
Indoor Drop Ceiling
Camera
Quick Start Guide
C6022-APW
model no:
C6022-FPW
8 6 ° /
3 5 0 °
9 0 °
4 9 . 2 ° ~ 1 0 . 5 2 °
Please carefully read these instructions before using this product.
Save this document for future use.
35241AA
1. General Specifications
Model No.
C6022
FPW
APW
Image Sensor
Sony 1/2.8" CMOS
IP Rating
N/A (Indoor)
Wide Dynamic Range
True WDR
Minimum Illumination @ 50 IRE
Color: 4.0 Lux @ F1.6
Color : 4.6 Lux @ F3.5
B/W: 0.8 Lux @ F1.6
B/W : 1.5 Lux @ F3.5
Minimum Illumination @ 30 IRE
Color: 2.4 Lux @ F1.6
Color : 2.8 Lux @ F3.5
B/W: 0.5 Lux @ F1.6
B/W : 0.9 Lux @ F3.5
Day / Night
True Day / Night
Resolution
1080p (2 MP)
Focal Length
5 ~ 25 mm (5x zoom)
4 mm (86° FoV)
(49.2° ~ 105.2° FoV)
Iris Control
F 2.0 Fixed
F3.5 ~ F3.7
Video Output
1.0Vpp 75Ω BNC Unbalanced
White Balance
Auto, Manual, Preset
Auto White Balance Range
2000K ~ 11000K
Backlight Compensation
Yes
Auto Gain Control
Yes
Operating Temperature
14°F (-10°C) ~ 122°F (50°C)
Power Consumption
8.2W Max
9W Max
Rated Amperage
0.68A
0.75A
Imput Voltage
Power over Ethernet / 12vDC
Weight
0.78 lb (354 g)
0.93 lb (422 g)
Dimensions
(W x H): 4.375" x 5.875" (111 mm x 149 mm)
Housing / Dome Cover
White / Clear
2. Products and
Accessories
APW
FPW
Camera
Camera
Audio, Alarm Cable
Power Cable
Quick Start Guide
Dome Cover
Screw & Plastic
Anchor - 2pcs
Template Sheet
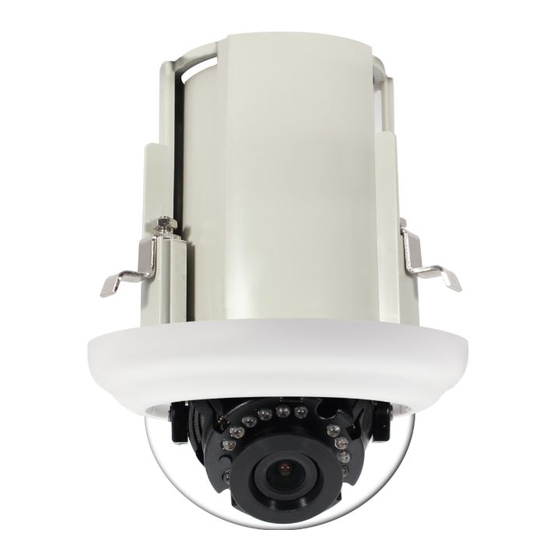
3. Product Overview
FPW
APW
A
B
C C
C D
A - Lens
B - Body
C - Magnetic Plate
D - Flush Mounting Bracket
4. Before Installation
Before installing your camera, read the following precautions:
1. Determine if the site of installation can bear a minimum of five
times the camera weight.
2. Ensure that all cable runs are secure and meet local fire codes.
3. When installing your camera, be sure the installation site is clear of
unnecessary personnel and debris.
Reset to Factory Default:
Press the Reset button for 5 seconds to
return the setup to the factory default.
Warning:
If you press the Reset button, you will
lose all settings.
Reset Button
To access the restart button, detach the body
from the flush mount bracket.
1. Turn the body counter-clockwise and pull.
Advertisement

Summary of Contents for avertX C6022-APW
- Page 1 IP Rating N/A (Indoor) Quick Start Guide Wide Dynamic Range True WDR C6022-APW model no: Minimum Illumination @ 50 IRE Color: 4.0 Lux @ F1.6 Color : 4.6 Lux @ F3.5 Reset to Factory Default: C6022-FPW B/W: 0.8 Lux @ F1.6...
- Page 2 DHCP. If a DHCP server like a router is not part of your Disassemble the camera. See ‘4. Before Installation.’ To access the camera setup menu, you need to install the AvertX without a PoE cable. network, all cameras will have the default IP address 192.168.0.250.