Advertisement
Quick Links
Thank you for purchasing a Team Orion Brushless ESC. This ESC features the latest brushless technologies so that you can experience
ultimate performance. Please read these instructions thoroughly before using the ESC.
FEATURES
• Specifically designed for RC boats using LiPo batteries
• Outstanding startup, acceleration and throttle control
• Highly efficient water cooling system
• Forward only or forward/reverse running modes
• Adjustable motor timing for extended motor compatibility
• Multiple protection systems: battery low voltage cut-off, overheating, radio signal loss, etc.
• Programmable using the optional ORI65150 DSB-R programming box
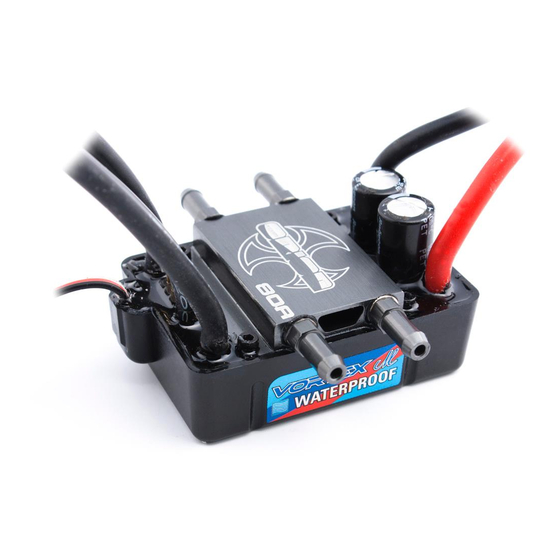
ESC CONNECTION (see image)
The A-B-C wire order is not important, if the motor spins in the wrong direction, simply reverse two of the wires.
ESC CALIBRATION
In order to ensure proper function, the ESC must be calibrated to your transmitter inputs. It is recommended to center the trims and reset all settings
inside the transmitter before proceeding to the calibration. For FUTABA radio systems, you must set the throttle channel on reverse mode.
Follow this procedure below to calibrate your ESC.
A) Switch on your transmitter.
B) Move the throttle the maximum throttle position and connect the battery to the ESC. After two seconds the motor will emit two beep tones, this
means that the maximum throttle position is memorized.
C) Release the throttle to the idle position, the motor will emit a beep tone indicating that the idle position is memorized.
Note: if you do not use the reverse function, you can move the throttle all the way down and use the whole throttle range for forward motion only.
STANDARD POWER ON PROCEDURE
A) Switch on your transmitter.
B) Make sure that the throttle stick/trigger is on the idle position.
C) Connect the battery to the ESC.
D) The motor will emit a number of beep tones in relation to the number of cells of the battery.
E) ESC is ready for use.
ADVANCED SETUP
You can adjust several parameters of the ESC by following the four step procedure below.
Step 1: enter programming mode
Move the throttle stick/trigger to the maximum throttle position and connect the battery to the ESC. After two seconds the motor will emit two beep
tones, keep holding the throttle and wait another five seconds, the motor emits a specific tone.
This means that the ESC has entered programming mode.
Step 2: select the parameter you wish to modify
The motor will emit beep tones repeatedly, the number of beep tones indicates the actual parameter (one beep = running mode, two beep = number
of cells, etc.). Select the actual parameter by releasing the throttle or moving it to reverse.
Step 3: modifying the parameters
The motor will emit beep tones, cycling through the various available settings. To select the actual setting, place the throttle on the full throttle
position, the motor emits a specific tone and the setting is saved. By holding the throttle at the full throttle position, you will be able to select another
parameter. If you release the throttle, the ESC will exit programming mode after two seconds.
Step 4 : exit programming mode
There are two methods to exit programming mode.
1. During step 3, release the throttle and after two seconds the ESC will exit programming mode.
2. Disconnect the battery from the ESC.
Tone
1 short Beep
2 short Beeps
Parameter
Running mode
Forward Only Forward & reverse
LiPo Cells
Auto selection
2 Cells
Low Voltage
2.8V/Cell
3.0V/Cell
Cutoff Threshold
Timing
0°
3.75°
PARAMETERS
1. Running mode
Forward only means that the boat can only go forward, forward and reverse means that the boat can go forward and also in reverse. Before
enabling reverse, you must make sure that your boat is also designed to go in reverse.
2.LiPo cells
Sets the number of cells inside the battery to allow correct function of the low voltage cut-off system. With the automatic selection mode, if the
battery is not fully charged the wrong setting could be used. Therefore it is recommended to use a manual setting to make sure that the correct
setting is used. When the ESC is powered on, the motor will emit one beep for each cell, make sure the number of beeps relates to the number
of cells of the battery.
3. Low voltage cut-off threshold
Sets the minimum cell voltage before the low voltage cut-off system is activated. This system helps to prevent damage to LiPo batteries from
over-discharge. When the battery voltage goes below this limit for two seconds, the system activates, the power is cut and the user must release
the throttle. After throttle has been released, 50% power will be available to bring the boat back to shore. If you keep on running the boat after the
system has activated, you risk damaging your batteries.
4. Timing
This setting adjusts the timing applied to the motor. More timing usually increases performance but can also cause overheating. Adjust carefully,
in relation to the motor type.
OPTIONAL PROGRAM BOX CONNECTION
The optional ORI65150 DSB-R programming box allows you to easily modify the ESC settings. The box connects to the ESC via a male/male JR
extension cable. Looking at the ESC from the 3 pin connector side, the positive + red connector is in the center and the negative – black connector
is on the right. Connect the program box to the ESC and then power on the ESC. Follow the on screen information to modify the settings.
For the program box to work with your boat ESC, you need to update the original program box software by using the PC software. You
can download the software from our website www.teamorion.com.
WARNINGS
• Inspect the ESC and the other components (battery, motor, connectors, etc.) before use.
• If any components appear damaged, do not use.
• Do not let children use this product without the supervision of an adult.
• Never leave the ESC unsupervised while it is powered on.
• The ESC might get hot during use, be careful when handling it.
• Always disconnect the battery after use, do not store with the battery connected.
• Do not use near flammable materials.
• Do not expose to water or humidity.
• If the ESC has suspicious reactions, immediately disconnect the battery and discontinue use.
• Incorrect use of the ESC can cause personal injury or property damage.
WARRANTY
Team Orion guarantees this product to be free from manufacturing and workmanship defects. The warranty does not cover incorrect installation,
components worn by use, or any other problem resulting from incorrect use or handling of the product. No liability will be accepted for any damage
resulting from the use of this product. By the act of connecting and operating this product, the user accepts all resulting liability.
Is considered incorrect use:
• Failure to follow instructions.
• Improper use of the product (abusive use, out of spec, etc.).
• Failure to adapt settings for proper function (improper connections, wrong gearing, installation, setup, etc.).
• Overload, overheating (desoldering, melting, etc.).
• Running in inadequate conditions (damage or rust from rain, humidity, etc.).
• Improper maintenance (presence of dirt, etc.).
• Disassembly, modification by the user (modifying original connectors, wires, components, etc.).
• Mechanical damage due to external causes.
SPECIFICATIONS
Model
ORI65117
Motor type
Brushless sensorless
Brushless sensorless
Input
2-4S LiPo
Rated current
80A
BEC
6V/3A
Resistance
0.0007Ohm
0.0004Ohm
TROUBLESHOOTING
Issue
Motor not working, no beep tone
Motor not working, two beep tones
Motor not working, one beep tone
Motor spins in wrong direction
No reverse
Motor does not work, special tone
is heard after two beeps
Motor suddenly slowing down
Copyright 2012 © Team Orion • www.teamorion.com
3 short
4 short
1 long
1 long
1 long
1 long
Beeps
Beeps
Beep
1 short
2 short
3 short
3 Cells
4 Cells
5 Cells
6 Cells
3.2V/Cell
3.4V/Cell
7.5°
11.25°
15°
18.75°
22.5°
26.25°
ORI65118
2-6S LiPo
120A
6V/3A
Possible cause
Solution
Battery empty or connection problem
Check battery and connections
Check battery voltage
Input voltage too high or too low
Check receiver and transmitter
Radio signal problem
Reversed motor wires
Swap two of the three wires
Forward/reverse mode disabled
Change ESC setup
ESC calibration issue
Re-calibrate ESC
Throttle channel is reversed, ESC has
Change reverse setting of throttle channel
entered programming mode
Low voltage cut-off system activated
Replace battery
ESC overheating
Let cool down
Vielen Dank für den Kauf eines Team Orion Brushless Fahrtenreglers. Dieser Regler ist mit der neusten Brushless Technologie
ausgestattet, damit Sie die maximale Leistungsentfaltung eines Brushless-Motors geniessen können. Bitte lessen Sie diese Anweisungen
aufmerksam durch, bevor Sie den Fahrtenregler zum ersten mal brauchen.
EIGENSCHAFTEN
• Speziell für RC Boote mit LiPo Akkus entwickelt
• Hervorragendes Anfahr-, Beschleunigungs- und Fahrverhalten
• Hocheffizientes Wasserkühlungssystem
• Vorwärts/rückwärts oder nur vorwärts Fahrmodi
• Einstellbares Motortiming für gesteigerte Motoren-Kompatibilität
• Multi-Sicherheitssystem: Schutz vor Akku-Tiefspannung, Überhitzung, Fernsteuerungs-Signalverlust
• Programmierbar mit der Programmierbox ORI65150 DSB-R
ANSCHLUSS DES REGLERS (siehe Illustration)
Die A-B-C Kabel können beliebig eingesteckt werden. Falls sich der Motor in die falsche Richtung dreht, vertauschen Sie einfach zwei beliebige
Motoranschlusskabel.
ESC KALIBRIERUNG
Um eine korrekte Funktion zu ermöglichen, muss der Regler auf den Sender abgestimmt werden. Es wird empfohlen, alle Trimmungen zu
zentrieren und alle Einstellungen am Sender zurückzusetzen, bevor Sie mit der Kalibrierung beginnen. Bei Futaba Fernsteuerungen müssen Sie
den Gas-Kanal umkehren (REVERSE).
Befolgen Sie diese Schritte:
A) Schalten Sie Ihren Sender ein
B) Bewegen Sie den Gasknüppel auf Maximalposition und verbinden Sie den Regler mit einem Akku. Nach zwei Sekunden wird der Motor mit
zwei Piepstönen bestätigen, dass die Maximalposition gespeichert worden ist.
C) Lassen Sie den Gasknüppel los (Neutralposition). Der Motor piepst ein Mal. Die Neutralposition ist gespeichert.
Bemerkung: Wenn Sie die Rückwärts-Funktion nicht verwenden, können Sie den Gasknüppel ganz nach unten bewegen, um den gesamten
Weg für die Vorwärtsfunktion zu verwenden.
INBETRIEBNAHME
A) Sender einschalten
B) Stellen Sie sicher, dass der Gasknüppel auf neutral/kein Gas steht
C) Verbinden Sie den Regler mit einem Akku
D) Der Motor piepst so oft wie der Akku Zellen hat.
E) Der Regler ist einsatzbereit.
ERWEITERTES SETUP
Sie können erweiterte Einstellungen an Ihrem Regler vornehmen. Befolgen Sie hierzu die folgenden vier Schritte:
Schritt 1: Programmiermodus starten
Bewegen Sie den Gasknüppel auf Maximalposition und verbinden Sie danach den Regler mit einem Akku. Nach zwei Sekunden piepst der
Motor zwei mal. Halten Sie den Knüppel weiterhin auf Maximalposition. Nach weiteren fünf Sekunden ertönt ein weiterer Ton. Sie sind jetzt im
Programmiermodus.
Schritt 2: Parameter auswählen
Der Motor piepst wiederholt und gibt damit die Nummer des Parameters an (ein Mal = Running Mode, zwei Mal = Anzahl Zellen etc.). Wählen Sie
den Parameter, indem Sie den Gasknüppel loslassen oder auf Rückwärtsposition stellen.
Schritt 3: Parameter ändern
Der Motor piepst. Er zeigt nacheinander die verfügbaren Einstellungen an. Um eine Einstellung zu speichern, bewegen Sie den Gasknüppel
auf Maximalposition. Der Motor piepst mit einem Ton und zeigt damit an, dass der Wert gespeichert worden ist. Wenn Sie den Gasknüppel
auf Vollausschlag lassen, können Sie einen anderen Parameter auswählen. Wenn Sie den Gasknüppel loslassen, beendet der Regler den
Programmiermodus nach zwei Sekunden.
Schritt 4 : Programmiermodus beenden
Es gibt zwei Möglichkeiten, den Programmiermodus zu beenden:
1. Bei Schritt 3, Gasknüppel loslassen und nach zwei Sekunden wird der Programmiermodus beendet.
2. Den Regler und Akku trennen.
Töne
1 kurzer
2 kurze
3 kurze
Parameter
Piepston
Piepstöne
Piepstöne
Vorwärts &
Running mode
Nur vorwärts
rückwärts
LiPo Cells
Auto
2 Zellen
3 Zellen
Low Voltage
2.8V/Zelle
3.0V/ Zelle 3.2V/ Zelle 3.4V/ Zelle
Cutoff Threshold
Timing
0°
3.75°
7.5°
PARAMETER
1. Running mode
Bitte stellen Sie sicher, dass das Boot für die Rückwärtsfahrt geeignet ist, bevor Sie "Vorwärts & rückwärts" auswählen.
2.LiPo cells
Zeigt die Anzahl Zellen des Akkus an, um die korrekte Funktion der automatischen Abschaltfunktion zu ermöglichen (Low Voltage Cutoff Threshold).
Im Auto-Modus könnte die falsche Zellenzahl erkannt werden, falls der Akku nicht voll geladen ist. Deshalb wird es empfohlen, die Zellenzahl
manuell festzulegen. Beim Einschalten des Reglers piepst der Motor so oft, wie es Zellen hat. Stellen Sie sicher, dass die Anzahl Piepstöne mit
der Anzahl Zellen übereinstimmt.
3. Low voltage cut-off threshold
Dies ist die Minimalspannung. Wird diese für zwei Sekunden oder mehr unterschreitet, wird das automatische Abschaltsystem aktiviert und die
Fahrt gestoppt. Dies schützt den Akku vor Tiefentladung und Beschädigung. Nachdem das Boot gestoppt worden ist, müssen Sie den Gasknüppel
loslassen. Danach steht Ihnen 50% der Power zur Verfügung, um das Boot zurückzufahren. Wenn Sie das Boot nach aktivierter Abschaltung
weiterhin für längere Zeit fahren, kann der Akku beschädigt werden.
4. Timing
Einstellung des Timings des Motors. Mehr Timing ergibt üblicherweise mehr Leistung, kann jedoch ein Überhitzen verursachen. Seien Sie mit
dieser Einstellung vorsichtig und passen Sie diese an den Motor an.
OPTIONALE PROGRAMM-BOX
Mit der optionalen Programmierbox ORI65150 DSB-R können Sie die Einstellungen auf einfache Weise vornehmen. Die Box wird über ein JR-
Adapterkabel angeschlossen. Wenn Sie den Regler von der Seite des 3-Pin Anschlusses anschauen, befindet sich der positive, rote Anschluss in
der Mitte und der negative, schwarze rechts. Verbinden Sie die Programmierbox mit dem Regler und schalten Sie den Regler danach ein. Folgen
Sie den Informationen auf dem Bildschirm, um die Einstellungen vorzunehmen.
Um die Programmierbox für diesen Regler verwenden zu können, müssen Sie die Software der Programmierbox zuerst aktualisieren. Sie
finden die neuste Software auf www.teamorion.com
WARNUNGEN
• Prüfen Sie den Regler und die anderen Komponenten (Akku, Motor, Stecker etc.) bevor Sie diese gebrauchen.
• Verwenden Sie keine beschädigten Komponenten
• Kinder müssen beim Gebrauch beaufsichtigt werden
• Lassen Sie den Regler nie unbeaufsichtigt, während er eingeschaltet ist
• Der Regler kann sehr heiss werden. Seien Sie vorsichtig!
• Nach dem Gebrauch muss der Akku immer vom Regler getrennt werden. Lagern Sie das Boot nie mit eingestecktem Akku.
• Verwenden Sie den Regler nicht in der Nähe von entflammbaren Materialien.
• Nicht Feuchtigkeit oder Wasser aussetzen
• Wenn der Regler merkwürdige Reaktionen zeigt, Akku sofort ausziehen und Regler nicht mehr verwenden.
• Nicht korrektes Verwenden des Reglers kann zu Verletzungen von Personen oder Beschädigungen führen.
GARANTIE
Team Orion garantiert, dass dieses Produkt frei ist von Herstellungsfehlern. Die Garantie deckt keine Beschädigung durch falsche Installation,
Schäden durch Gebrauchsabnützung oder andere Probleme durch nicht korrekte Bedienung oder nicht korrekten Gebrauch des Geräts. Team
Orion trägt keine Verantwortung für Schäden, die durch den Gebrauch dieses Geräts entstehen. Mit dem Gebrauch dieses Geräts übernimmt der
Benutzer jegliche Verantwortung.
• Nicht korrekte Bedienung sind:
• Nichbefolgen der Anleitung
• Unsachgemässer Einsatz des Produkts
• Gebrauch falsche Einstellungen
• Überladung, Überhitzen
• Gebrauch in nicht adäquater Umgebung (Regen, Hitze etc.)
• Demontieren und Abändern des Geräts (Ändern der Originalanschlüsse, Kabel, Komponenten etc.)
• Mechanische Schäden durch äussere Einwirkung
TECHNISCHE DATEN
Modell
ORI65117
Motor Typ
Brushless Sensorless
Brushless Sensorless
Eingang
2-4S LiPo
Dauerstrom
80A
BEC
6V/3A
Innenwiderstand
0.0007Ohm
FEHLERBEHEBUNG
Problem
Mögliche Ursache
Motor funktioniert nicht, kein Piepston
Akku leer oder Verbindungsproblem
Motor funktioniert nicht, zwei Piepstöne
Eingangsspannung zu hoch oder tief
Motor funktioniert nicht, ein Piepston
Motor dreht in falsche Richtung
Motorkabel vertauscht
Vorwärts/rückwärts-Modus deaktiviert
Kein Rückwärtsgang
Regler nicht korrekt kalibriert
Motor funktioniert nicht, ein spezieller Ton
Gas-Kanal ist in REVERSE Modus.
ertönt nach zwei Piepstönen
Regler hat Programmiermodus gestartet
Abschaltfunktion ist aktiviert
Motor verlangsamt plötzlich
MADE FOR
4 kurze
1 langer
1 lang
1 lang
1 lang
Piepstöne
Piepston
1 kurz
2 kurz
3 kurz
4 Zellen
5 Zellen 6 Zellen
11.25°
15°
18.75°
22.5°
26.25°
ORI65118
2-6S LiPo
120A
6V/3A
0.0004Ohm
Lösung
Akku und Anschlüsse prüfen
Akku-Spannung prüfen
Signalstörung
Empfänger und Sender prüfen
Zwei beliebige Motorkabel tauschen
Regler-Einstellungen ändern
Regler neu kalibrieren
Stellen Sie die Umkehrfunktion des Gas-Kanals um
Akku laden/wechseln
Regler überhitzt
Regler abkühlen lassen
Lipo
Advertisement

Related Manuals for Team Orion Vortex M


Summary of Contents for Team Orion Vortex M
- Page 1 Lipo Thank you for purchasing a Team Orion Brushless ESC. This ESC features the latest brushless technologies so that you can experience Vielen Dank für den Kauf eines Team Orion Brushless Fahrtenreglers. Dieser Regler ist mit der neusten Brushless Technologie ultimate performance.
- Page 2 MADE FOR Lipo Nous vous félicitons pour l’achat d’un régulateur brushless Team Orion. Ce régulateur est équipé des technologies les plus récentes afin チームオリオンブラシレスESCをお買い上げ頂きありがとうございます。本製品は最新のブラスレスESCを使用しております。このESCご使用の que vous puissiez bénéficier des performances les plus élevées qui soit. Veuillez lire attentivement ce mode d’emploi avant d’utiliser le 前にこの取扱説明書をよくお読み下さい。...