Advertisement
Quick Links
General Description
Camden Lazerpoint™ Radio Controls comprise the following models:
CM-TX-9 Wall switch ready transmitter
CM-RX-91 Basic Receiver
CM-RX-92 Full function (dual relay) Receiver.
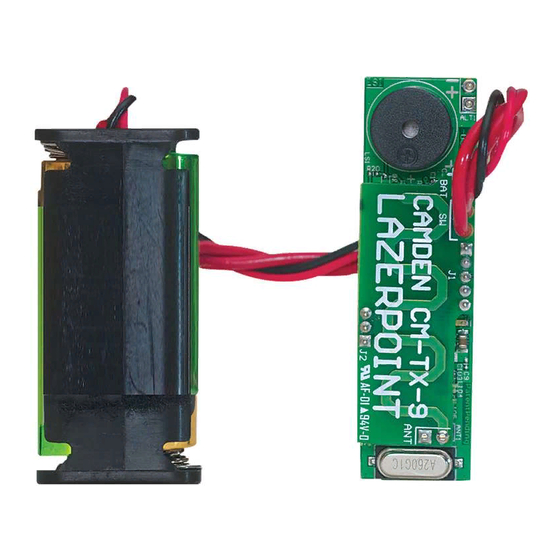
TX-9 transmitters utilize readily available AAA batteries, and
special circuitry to assure long life.
A proprietary piezo sounder is used to annunciate low battery,
battery level, and "stuck switch" conditions.
These instructions cover the TX-9 transmitter.
Mounting
The TX-9 is designed to mount behind a switch in a wall-box, post,
or other suitable enclosure. Double sided tape is used to attach
the circuit board and battery holder securely to the enclosure.
Even though the circuit board is conformal coated, care should
be taken to ensure the transmitter does not get wet.
Wiring
Refer to the TX-9 Installation Drawing (see reverse side) for the
following connections:
Connect the transmitter wires to the activating switch (N.O.
momentary dry contacts). Insert 2 fresh AAA alkaline batteries
(provided) into the battery holder (observe proper polarity). Press
the switch and observe the red LED to ensure proper transmission.
Test the transmitter by pressing and holding the switch for 5
seconds. The piezo speaker should sound 5 beeps, meaning the
batteries are at full capacity. This is the Battery Gauge™ feature.
If the piezo beeps only 1 - 3 times, you should change the batteries
for fresh (new) ones.
Now press and hold the switch for 15 seconds. The piezo should
now make a distinctive hi-low sound. This signal will sound for
6 seconds, then turn off for a minute, then sound again.
This is the "stuck switch indicator" feature.
Learning the Transmitter(s) to the Receiver
To learn the transmitter into the receiver, press the PB1
(or PB2) button on the Receiver using a small blunt object such
Lazerpoint
Installation Instructions
as a small blade screwdriver or similar. Within 10 seconds,
press the switch connected to the TX-9 transmitter. The Green
LED Array will flash once to confirm enrolment. Repeat with
any additional transmitters. Pressing the learned transmitter
again will signal the receiver that you are finished programming
and LED's 1 & 2 will flash, in an alternating sequence.
Pressing the transmitter a third time will activate the relay and
corresponding LED, and also the device connected to the relay
contacts.
If you wait longer than the 10 second period, the receiver will
time out of Learn Mode and revert back to standby. The LED
will then flash to indicate the number of transmitters learned
into the receiver.
Technical Data
Model
TX-9 Transmitter
Frequency:
Operates in the 902 – 928 MHz
ISM Band
Codes
1 million (20 bit) codes
Size
2 ¼" L x 5/8" W x 3/8" H
Mounting
Double sided foam tape
Switch Connection
2 x 10" leads with ¼" quick
disconnect terminations
Built-in Piezo sounder
Used for Low Battery status,
Battery Gauge™, and Stuck
Switch indicator.
Power
2 x AAA alkaline batteries
Battery life
Minimum 500,000 operations
Range
Over 500 ft (open area)
Temperature rating
-40
Warranty
Camden Door Controls guarantees the Lazerpoint™ RF
(TX-9, RX-91,or RX-92 models) to be free from manufacturing
defects for 3 years from date of sale. If during the first 3
years a Lazerpoint RF component fails to perform correctly,
it may be returned to our factory where it will be repaired or
replaced (at our discretion) without charge. Except as stated
herein, Camden extends no warranties expressed or implied
regarding function, performance or service.
NOTE: Batteries are exempt from this warranty!
RF TX-9
TM
Transmitter
Ver. 1.01
to 185
F (-40
to +85
C)
o
o
o
o
Page 1 of 3
Advertisement

Related Manuals for CAMDEN Lazerpoint CM-TX-9

Summary of Contents for CAMDEN Lazerpoint CM-TX-9
- Page 1 TX-9 transmitter. The Green LED Array will flash once to confirm enrolment. Repeat with Camden Lazerpoint™ Radio Controls comprise the following models: any additional transmitters. Pressing the learned transmitter CM-TX-9 Wall switch ready transmitter...
- Page 2 Lazerpoint™ RF TX-9 Transmitter Installation Instructions Part # 40-82B120 Page 2 of 3...
- Page 3 —Connect the equipment into an outlet on a circuit different from that to which the receiver is connected. —Consult the dealer or an experienced radio/TV technician for help. Changes or modifications made to this equipment not expressly approved by Camden Door Control could void the user’s authority to operate the equipment. OEM Labeling Requirements WARNING: The Original Equipment Manufacturer (OEM) must ensure that FCC labeling requirements are met.