Advertisement
Quick Links
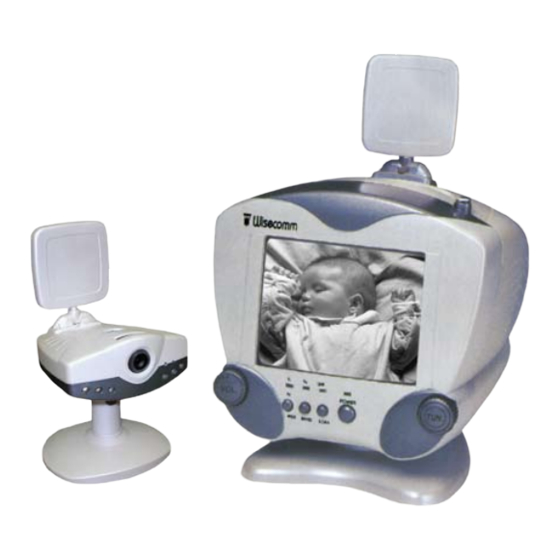
I.
Receiver (WW3000R)
1. Components
① Channel /Scanning Selection Button
② Power Button
③ Channel Indicator Lamp
④ Scanning Interval Time Indicator Lamp
⑤ Scanning Indicator Lamp
⑥ Infrared Emitting Window
⑦ Rectangle Antenna
⑧ Pull-shaft Antenna
⑨ IR Jack
⑩ Audio Left Output Jack
○
Video Output Jack
11
○
Audio Right Output Jack
12
○
Power Input Jack
13
○
Power Indicator Lamp
14
○
Infrared Emitting Window
15
Fro nt
Rea r
Rem ote Controlle r
Advertisement

Related Manuals for Clover WW2000


Summary of Contents for Clover WW2000
- Page 1 Receiver (WW3000R) 1. Components ① Channel /Scanning Selection Button ② Power Button ③ Channel Indicator Lamp ④ Scanning Interval Time Indicator Lamp ⑤ Scanning Indicator Lamp ⑥ Infrared Emitting Window ⑦ Rectangle Antenna ⑧ Pull-shaft Antenna ⑨ IR Jack ⑩ Audio Left Output Jack ○...
- Page 2 II. Transmitter --- Camera (WW2000) 1. Component ① Power Button ② Focus Adjustor ③ Camera Lens ④ Infrared Emitting Tube ⑤ Indicator Lamp 6.Crophone 7. Rectangle Antenna 8. Input Jack of Power DC 12V 9. Channel Selector 1) Use the pin of power line with adaptor to insert into the jack ⑧, and plug the power supply to connect the camera.
- Page 3 afterward do not need to re-adjust it). 6) Place the camera in the far site, and synchronously adjust its antenna ⑦ and monitorˊs to get the clearest image. 7) You can also adjust the direction and the up-angle of camera when you need. 1) Connect the Video Output Jack ○...