
Related Manuals for Garde 181BRGPR14

Summary of Contents for Garde 181BRGPR14
- Page 1 USER MANUAL Burger Presses Item Item Item #181BRGPR14 #181BRGPR13 #181BRGPR12 1/3 LB 1/2 LB 1/4 LB Item Item Item #181BRGSL2 #181BRGSL3 #181BRGPBASE 2 OZ 3 OZ BASE ONLY 07/2021...
-
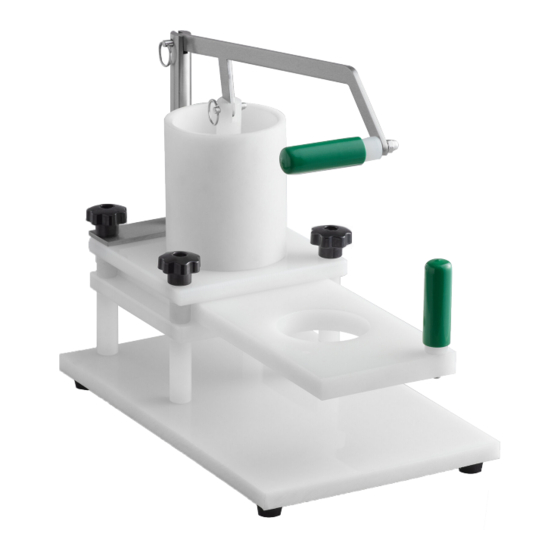
Page 2: Assembly Chart
ASSEMBLY CHART Semi-Finished Finished Product will arrive semi-assembled. Step 1: Unfasten knobs and lift top plate assembly. Ensure bumpers are on each of the 4 threads. Slide burger press tray in between bumpers and then place top plate assembly through threads. Place the ring pin with plastic stopper through the center of the burger press tray. Thread hopper onto top plate assembly. -
Page 3: Safety Instructions
Please read and comply with the instructions listed on this document. To get the best service life and performance from your machine, clean it thoroughly before and after each use by following the instructions listed below. Safety Instructions Burger press should only be operated by trained individuals. Be sure to read the operation, assembly, and cleaning guides before using. -
Page 4: Replacement Parts
Replacement Parts #181BPTR212' #181PRTR234 #181BPTR41 #181BPTR412 2 oz. Slider Tray 3 oz. Slider Tray 1/2 lb. Burger Tray 1/4 lb. Burger Tray #181PRTR512 #181BPBMPER12 #181BPBMPER34 #181BPBMPER1 1/3 lb. Burger Tray 1/2" Bumper 3/4" Bumper 1" Bumper 4 pc Set 4 pc Set 4 pc Set #181BPACORN #181BPRINGPIK... - Page 5 EQUIPMENT LIMITED WARRANTY Garde XL warrants its equipment to be free from defects in material and workmanship for a period of 2 years. This is the sole and exclusive warranty made by Garde XL covering your Garde XL brand equipment. A claim under this warranty must be made within 2 years from the date of purchase of the equipment.