Advertisement
Quick Links
HYPERTorch
®
HYPERTorch
A2000PZ
®
English
GB
Français
FR
اللغة العربية
AR
Ελληνικά
GR
Pусский
RU
Fig. 1
1
Fig. 2
A
5
2
4
Fig. 3b
Fig. 3a
Fig. 3c
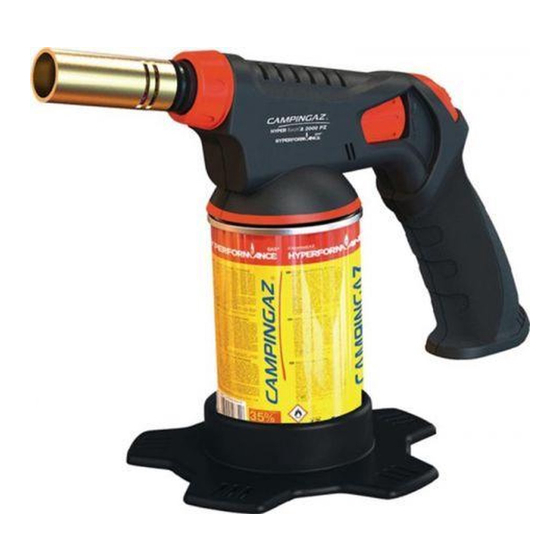
Instructions for use
Campingaz
A2000
Consumption: 160 g/h (2.24 kW)
- Injector Ø0.26 Campingaz
Category: direct pressure butane/propane mixture.
Thank you for choosing this Campingaz
A - IMPORTANT: YOU ARE USING GAS, BE VERY CAREFUL!
The purpose of these instructions is to enable you to use your Campingaz
A2000PZ blowtorch correctly and in complete safety.
Please read them carefully to familiarize yourself with the blowtorch prior to assembling the gas container.
Keep these instructions in a safe place so that you can refer to them if needed.
Please observe these instructions and the safety measures printed on the Campingaz
/ CG 3500HY Hyperformance Gas cartridges. Failure to observe these instructions may result in
the user and people in the immediate vicinity being put at risk.
This blowtorch must be used exclusively with Campingaz
Gas cartridges. Using other gas containers may be dangerous or at least might negatively impact
the performance of your blowtorch.
The Société Application Des Gaz accepts no responsibility where cartridges of any other make
are used.
This blowtorch must only be used in adequately ventilated areas (minimum 2 m
distance from any flammable material.
Do not use blowtorch blowtorches which leak, function incorrectly or are damaged. Return it to your retailer
who will inform you of your nearest after-sales service.
Never modify this blowtorch or use it for purposes for which it is not intended.
B - PREPARATION FOR OPERATION
Installing a CAMPINGAZ
(When the existing cartridge is empty, read paragraph D: "Removing the cartridge")
To install or remove a cartridge, always work in a well-ventilated area, preferably outside and never in the
presence of a flame, heat source or spark (lit cigarette, electrical blowtorch, etc.) at a good distance from
other people and flammable material.
AS CAMPINGAZ
4010051131 (ECN20054953-01)
VALVE-OPERATED, THEY CAN BE DETACHED FROM THE BLOwTORCH, EASILY TRANSPORTED,
EVEN wHEN NOT EMPTY.
- Check that the blowtorch O-ring seal (1) is in good condition and properly positioned (Fig. 1). Check
this every time you install a cartridge. If the O-ring is damaged or worn, return the blowtorch to your
retailer, who will replace the seal.
- Check that the control knob (2) is closed (turned fully clockwise).
- Insert the cartridge in the stabilizer (4) supplied with the blowtorch (Fig. 2).
- Place the blowtorch upright on the top of the cartridge, as shown in Fig. 2.
- Gently screw the blowtorch onto the cartridge. Check that the assembly threads are properly engaged.
- Only tighten by hand. Excessive force could damage the threads on the cartridge.
- The blowtorch is now ready to operate.
In case of leakage (gas smell before opening the valve), put immediately the blowtorch outside, in a
well-ventilated area, without inflammation source, where it will be possible to locate and stop the leak. If
you wish to check the tightness of the blowtorch, do it outside. Do not try to locate a leak with a flame, use
gas leak detection liquid.
C - OPERATING THE BLOwTORCH
Lighting your blowtorch HYPERTorch
- Hold a flame in front of the nozzle and slowly turn the control knob (2) in the direction of the " +'' arrow (Fig. 2).
- Once lit, open the gas to a medium setting by turning the control knob (2) around 1/4 turn in the direction of
the " + '' arrow.
- Wait about 2 minutes before moving the blowtorch to stabilize the flame and prevent the appearance of large
yellow flames.
Lighting up your blowtorch HYPERTorch
- Use the following when igniting at low temperatures or when the cartridge is near empty: Pinch the 2 flaps of
the Campingaz
(Fig. 3a) are closed.
- The Campingaz
- Open the gas to a medium setting by turning the control knob (2) around 1/4 turn in the direction of the "+ " arrow.
- Press the button (3) (Fig. 2) once or as many times as necessary to light up the burner.
- As soon as the burner is ignited, Pinch the 2 flaps of the Campingaz
ensure the air holes are fully opened (Fig. 3c).
- Wait about 5 seconds before moving the blowtorch to stabilize the flame and prevent the appearance of large
yellow flames.
NOTE: Move the Campingaz
3
too hot to be touched without gloves.
Extinguishing
- Turn the control knob (2) fully clockwise (towards the "-" arrow Fig. 2).
Important recommendations:
Always use the blowtorch with extreme care, well away from flammable substances.
while the blowtorch is in operation and afterwards, some of the components are extremely hot
(particularly the burner nozzle and Campingaz® air flow control). Do not touch these elements
without suitable protection.
Do not misuse your blowtorch or use it for applications for which it was not designed.
Handle the blowtorch very carefully. Take care not to drop it.
Never leave an ignited blowtorch unattended.
Do not inhale the combustion gases emitted during utilization (burnt paint, brazing, etc.).
Respect the environment: deposit empty cartridges in an appropriate place.
If you use this blowtorch indoors, the area must observe elementary ventilation conditions enabling the
supply of air required for combustion and avoiding any build-up of non-burned gas (2 m
D - REMOVING A CAMPINGAZ
Always change the cartridge outdoors and well away from any source of ignition.
Campingaz
®
- Completely close the control knob (turn fully towards the " - '' arrow Fig. 2).
air flow
- Before disconnecting the cartridge, check that the blowtorch flame is out and that the blowtorch is outdoors,
well away from any other flame and any other person.
control
- Separate the cartridge from the nozzle by unscrewing it. Replace the O-ring seal (1) if it is split or worn.
- Place the blowtorch upright on the cartridge to ensure that the threads are properly engaged, and screw
on gently by hand.
- Check that there are no leaks on the assembly, as described in Section B.
E - REPLACING THE NOZZLE
Your blowtorch is supplied equipped with a nozzle that can be changed or replaced by another type of
nozzle, which may be purchased separately (see www.campingaz.com).
- Allow the nozzle to cool completely.
- Unscrew the nozzle by hand, in the direction of the arrow A (Fig. 2).
- Screw the new Campingaz
chased as an accessory).
F - STORAGE AND TROUBLESHOOTING
when your blowtorch is completely cool:
- Always unscrew the cartridge from the blowtorch when the blowtorch is not being used. Store these ele-
ments in cool, dry and well ventilated place. The blowtorch and cartridge should be protected from direct
sunlight and temperatures exceeding 50°C while being stored.
- Regularly check the blowtorch O-ring seal (1). Check that it is properly positioned and in good condition
(Fig. 1). Have it replaced if it is damaged or worn.
- The blowtorch should give years of trouble-free service. However, if the gas pressure falls or you are
unable to light the gas, check whether the cartridge (5) is empty. If the cartridge still contains gas, the
injector is probably blocked.
- If the injector is blocked (i.e. the cartridge contains gas but you cannot light the blowtorch), do not try to
unblock it, it must be replaced: take the blowtorch to your retailer (The blowtorch may only be disassem-
bled by an approved service agent).
- If large yellow flames appear when the nozzle is facing downwards (non-vaporised, liquid gas feeds the
nozzle), turn the blowtorch round and observe the pre-heating time mentioned in C.
G - OTHER NOZZLES AND ACCESSORIES AVAILABLE
The blowtorch must be hold manually when used with accessories sold separately.
www.campingaz.com
warranty Period
Years
HYPERTorch
A2000/ A2000PZ
®
®
®
HYPERTorch
®
A2000/A2000PZ
HYPERTorch
A2000 / A2000PZ blowtorch.
®
®
®
CG 1750HY or CG 3500HY Hyperformance
®
cartridge CG 1750HY or CG 3500HY Hyperformance Gas
®
CG 1750HY OR CG 3500HY HYPERFORMANCE GAS CARTRIDGES ARE
®
A2000
®
A2000PZ
®
air flow control and slide it frontward to ensure the air holes
®
air flow control is in right position when the first row of air holes is closed (Fig. 3b).
®
air flow control and slide it backward to
®
®
air flow control only in the first 2 minutes after the ignition, or it would become
HYPERFORMANCE GAS CARTRIDGE CG 1750HY or CG 3500HY
®
nozzle in place by hand, replacing the worn nozzle (or a different type, pur-
®
2
Mode d'emploi
GB
Campingaz
HYPERTorch
®
Débit: 160 g/h (2,24 kW)
- injecteur Ø0.26 Campingaz
®
HYPERTorch
Catégorie: pression directe mélange butane/propane
Merci d'avoir choisi ce chalumeau Campingaz
A - IMPORTANT: VOUS UTILISEZ DU GAZ, SOYEZ PRUDENT !
HYPERTorch
A2000 /
Ces instructions doivent vous permettre d'utiliser votre chalumeau Campingaz
®
A2000PZ correctement en toute sécurité.
Veuillez les lire attentivement pour vous familiariser avec le chalumeau avant de monter la cartouche
de gaz. Conservez ces instructions dans un endroit sûr pour vous y reporter le cas échéant. Veuillez
CG 1750HY
respecter ces instructions ainsi que les mesures de sécurité imprimées sur les cartouches de gaz
®
CAMPINGAZ
HYPERFORMANCE GAS
®
tions peut être dangereux pour l'utilisateur et son entourage.
Ce chalumeau doit uniquement être utilisé avec les cartouches de gaz CAMPINGAZ
GAS
CG 1750HY ou CG 3500HY. L'utilisation d'autres cartouches de gaz peut s'avérer dangereuse ou
®
pourrait tout au moins avoir un impact négatif sur la performance de votre chalumeau.
La Société Application Des Gaz décline toute responsabilité en cas d'utilisation d'une cartouche
de toute autre marque.
/h/kW) and at a good
Ce chalumeau doit uniquement être utilisé dans des zones correctement ventilées (minimum de 2 m
3
et à bonne distance de tout matériau inflammable.
Ne pas utiliser un chalumeau qui fuirait, ne fonctionnerait pas correctement ou serait endommagé.
Rapportez-le à votre revendeur qui vous indiquera le service après-vente le plus proche de chez vous.
Ne transformez jamais ce chalumeau ou ne l'utilisez jamais dans un but autre que celui pour lequel il est prévu.
B - MISE EN SERVICE
Installation d'une cartouche de gaz CAMPINGAZ
(Lorsque la cartouche en place est vide, lisez le paragraphe D intitulé «Retrait de la cartouche»)
Pour la mise en place ou le changement d'une cartouche, opérer toujours à l'extérieur et jamais en
présence d'une flamme, source de chaleur ou étincelle (cigarette allumée, chalumeau électrique, etc.) loin
d'autres personnes et de matériaux inflammables.
COMME LES CARTOUCHES DE GAZ CAMPINGAZ
FONCTIONNENT AVEC UNE VALVE, ELLES PEUVENT SE DéTACHER DU CHALUMEAU, ELLES SE
TRANSPORTENT FACILEMENT, MêME LORSqU'ELLES NE SONT PAS VIDES.
- Vérifiez que le joint torique du chalumeau (1) est en bon état et bien placé (Fig. 1). Vérifiez cela à
chaque installation de cartouche. Si le joint torique est endommagé ou usé, renvoyez le chalumeau
à votre revendeur qui remplacera le joint.
- Vérifiez que le bouton de commande (2) est fermé (complètement tourné dans le sens des aiguilles d'une montre).
- Insérez la cartouche dans le stabilisateur (4) fourni avec le chalumeau (fig. 2).
- Placez le chalumeau droit au dessus de la cartouche, comme le montre la fig. 2.
- Vissez doucement le chalumeau sur la cartouche. Vérifiez que le pas de vis de l'ensemble est bien engagé
- Ne serrer qu'à la main:ne pas serrer de manière excessive pour ne pas endommager le filetage de la cartouche.
- Le chalumeau peut maintenant être utilisé.
En cas de fuite (odeur de gaz avant d'ouvrir la valve), sortez immédiatement le chalumeau à l'extérieur, dans
une zone bien ventilée, sans source d'inflammation, là où il sera possible de localiser la fuite et de l'arrêter.
Si vous souhaitez vérifier que le chalumeau est bien serré, faites le dehors. N'essayez pas de localiser une
fuite avec une flamme, utilisez un liquide de détection de fuite de gaz.
C - FONCTIONNEMENT DU CHALUMEAU
Allumage de votre chalumeau CAMPINGAZ
- Tenez une flamme devant le bec et tournez lentement le bouton de commande (2) dans la direction de la flèche ''+'' (fig. 2).
- Une fois allumé, ouvrez le gaz sur le réglage moyen en tournant le bouton de commande (2) d'un quart de
tour dans le sens de la flèche ''+''.
- Attendez environ 2 minutes avant de bouger le chalumeau pour stabiliser la flamme et éviter l'apparition de
grandes flammes jaunes.
Allumage de votre chalumeau CAMPINGAZ
- Utilisez les éléments suivants lorsque vous allumez l'appareil à basses températures ou si la cartouche est
presque vide : pincez les deux pattes de la commande de flux d'air Campingaz
dernière vers l'avant pour fermer les orifices d'air (Fig. 3a).
- La commande de flux d'air Campingaz
fermé (Fig. 3b).
- Ouvrez le gaz sur le réglage moyen en tournant le bouton de commande (2) d'un quart de tour dans le sens
de la flèche ''+''.
- Appuyez une fois sur le bouton (3) (Fig. 2) ou autant de fois que nécessaires pour allumer le bec.
- Dès que le brûleur est allumé, pincez les deux pattes de la commande de flux d'air Campingaz
glisser cette dernière vers l'arrière pour ouvrir les orifices d'air (Fig. 3c).
- Attendez environ 5 secondes avant de bouger le chalumeau pour stabiliser la flamme et éviter l'apparition de
grandes flammes jaunes.
REMARqUE: Déplacez le contrôle du flux d'air Campingaz
l'allumage, ou il deviendrait trop chaud pour être touché sans gants.
Extinction
- Tournez le bouton de commande (2) complètement dans le sens des aiguilles d'une montre (vers la flèche ''-'', Fig. 2).
quelques conseils supplémentaires:
Utilisez toujours le chalumeau avec une extrême précaution, en le tenant éloigné de matières
inflammables.
Lorsque le chalumeau est utilisé, certains composants sont brûlants (en particulier le bec du brûleur
et la commande de flux d'air Campingaz
N'utilisez pas votre chalumeau de manière erronée ou pour des applications pour lesquelles il n'est pas conçu.
Manipulez le chalumeau avec soin. Veillez à ne pas le laisser tomber.
Ne laissez jamais le chalumeau allumé sans surveillance.
N'inhalez pas les gaz de combustion générés pendant l'utilisation (peinture brûlée, brasure, etc.).
Respectez l'environnement: déposer vos cartouches vides dans un endroit approprié.
Si vous utilisez ce chalumeau à l'intérieur, le local doit être ventilé de manière à fournir l'air requis
par la combustion et à éviter l'accumulation de gaz non brûlés (2 m
/h/kw minimum).
3
D - RETRAIT D'UNE CARTOUCHE DE GAZ CAMPINGAZ
Effectuez toujours l'opération de changement de cartouche à l'extérieur et à une bonne distance de
toute source d'ignition.
- Fermez complètement le bouton de commande (tournez complètement vers la flèche ''-'', fig. 2).
- Avant de déconnecter la cartouche, vérifiez que la flamme du chalumeau est éteinte et que le chalumeau
est dehors, éloigné de toute autre flamme ou d'une personne.
- Séparez la cartouche du bec en le dévissant. Remplacez le joint torique (1) s'il est cassé ou usé.
- Mettez le chalumeau droit sur la cartouche pour s'assurer que le pas de vis est bien engagé et vissez-le
doucement à la main.
- Vérifiez l'absence de fuite sur l'ensemble, conformément à la description dans la section B.
E - REMPLACEMENT DU BEC
Votre chalumeau est équipé d'un bec qui peut être changé ou remplacé par un autre type de bec vendu
séparément (visitez www.campingaz.com).
- Laissez le bec refroidir complètement.
- Dévissez le bec à la main dans le sens de la flèche A (fig. 2).
- Mettez le nouveau bec Campingaz
en mettre un différent, acheté comme accessoire).
F - STOCKAGE ET ANOMALIES DE FONCTIONNEMENT
Lorsque votre chalumeau est complètement refroidi :
- Dévissez toujours la cartouche du chalumeau lorsque vous ne l'utilisez pas. Stockez ces éléments dans un
endroit frais, sec et bien ventilé. Lorsqu'ils sont stockés, le chalumeau et la cartouche doivent être protégés
de la lumière directe et de températures au-dessus de 50°C.
- Vérifiez régulièrement le joint torique du chalumeau (1). Vérifiez qu'il est bien placé et en bon état (fig. 1).
Faites-le remplacer s'il est endommagé ou abimé.
- Le chalumeau devrait fonctionner des années sans problème. Si cependant la pression du gaz baisse
ou que le gaz ne s'allume pas, vérifier qu'il reste du gaz dans la cartouche (5). Sil en reste, l'injecteur est
probablement bouché.
- Si l'injecteur est bouché (c-à-d. que la cartouche contient du gaz mais vous ne pouvez pas allumer le
chalumeau), n'essayez pas de le déboucher, il doit être remplacé : amenez le chalumeau à votre revendeur
(le chalumeau peut être démonté uniquement par un agent de service après-vente agréé).
- En cas de grandes flammes jaunes lorsque le bec est dirigé vers le bas (du gaz liquide, non vaporisé alimente
le bec), retournez le chalumeau et observez le temps de préchauffage mentionné en C.
G - AUTRES BECS ET ACCESSOIRES DISPONIBLES
Le chalumeau doit être tenu à la main lorsqu'il est utilisé avec des accessoires vendus séparément.
www.campingaz.com
Période de garantie
Ans
2
FR
A2000/ A2000PZ
®
®
A2000 / A2000PZ
HYPERTorch
A2000 / A2000PZ.
®
®
HYPERTorch
A2000 /
®
®
CG 1750 HY / CG 3500HY. Le non respect de ces instruc-
®
HYPERFORMANCE
®
/h/kw)
3
HYPERFORMANCE
CG 1750HY ou CG 3500HY
®
®
HYPERFORMANCE
CG 1750HY OU CG 3500HY
®
®
®
HYPERTorch
®
A2000
HYPERTorch
A2000PZ
®
®
®
puis faites-glisser cette
est en position correcte lorsque le premier rang des orifices d'air est
®
®
puis faites
seulement dans les 2 premières minutes après
®
). Ne touchez pas ces éléments sans protection appropriée.
®
/h/kw minimum).
3
HYPERFORMANCE GAS
CG 1750HY ou CG 3500HY
®
®
en place en le vissant à la main, pour remplacer l'ancien bec (ou pour
®
Advertisement

Related Manuals for Campingaz HYPERTorch A2000


Summary of Contents for Campingaz HYPERTorch A2000
- Page 1 - Open the gas to a medium setting by turning the control knob (2) around 1/4 turn in the direction of the “+ ” arrow. - Dès que le brûleur est allumé, pincez les deux pattes de la commande de flux d’air Campingaz ®...
- Page 2 - Ο έλεγχος ροής αέρα το Campingaz είναι στη σωστή θέση όταν είναι κλειστή η πρώτη σειρά των οπών (Εικ .3β). ً ® في الوضعية الصحيحة عندما يكون الصف األول من ثقوب الهواء مغلق اCampingaz - تكون أداة ضبط تدفق الهواء في شعلة ®...