Advertisement
Quick Links
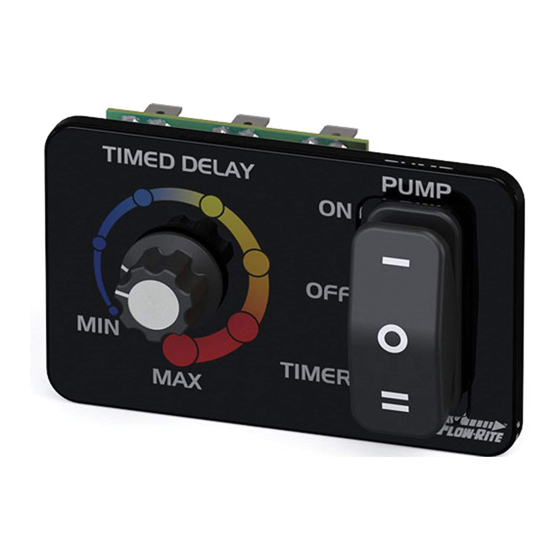
ProTimer
Congratulations on your purchase of the Flow-Rite ProTimer™. The ProTimer is designed to be used with a three position master
switch to select either ON, OFF or TIMER mode. The ProTimer is offered in two versions. The base ProTimer is for use with an
existing switch in your boat and the ProTimerPlus+ includes this switch as an integral part of the panel.
Installation
When locating the ProTimer, keep in mind that the ProTimers are weather resistant for the marine environment, but are not
submersible. The maximum thickness of the mounting surface 3/4" (19 mm).
1
Do not remove the protective covering
from the adhesive back at this time.
Use the actual panel as a template to
locate and mark the rotary timer switch
and master switch mounting hole.
4
Install the timer switch from the back
side and secure with the hex nuts.
Snap in the master switch when using
the ProTimer Plus+ as shown.
ProTimer
TM
Installation and Operation Instructions
ProTimer Plus+
2
3/8" hole
(9.53 mm)
Drill a 3/8" (9.53 mm) hole for the
timer and, if installing the ProTimer
Plus+, cut the switch hole 1/8" (3.18
mm) larger than the scribed line for
clearance for the snap in master switch
mounting tabs.
5
Turn the rotary knob stem all the way
to the left (counter-clockwise) until it
stops. Place the knob onto the stem
with the white indicator pointing to
"MIN". Tighten the set screw.
/ ProTimer Plus+
Cut Here
Pencil line
TIMED DELAY
MIN
MAX
TM
3
Once the holes are marked, drilled and
cut, remove the adhesive backing cover
sheet from the ProTimer panel and
carefully align and mount the panel in
place using firm pressure.
6
Pump
12v
Grnd
3
2
1
Connect 12v power
supply using supplied
female connector.
note:
Power supply should be
Connect brown wire with
properly protected with a
supplied female connector
5 amp inline fuse or
breaker.
to male connector (supplied)
from Pump.
Attach wires as shown in the wiring
diagram on the next page.
Connect black wire to
ground using supplied
female connector.
Advertisement

Summary of Contents for Flow-Rite ProTimer
- Page 1 Congratulations on your purchase of the Flow-Rite ProTimer™. The ProTimer is designed to be used with a three position master switch to select either ON, OFF or TIMER mode. The ProTimer is offered in two versions. The base ProTimer is for use with an existing switch in your boat and the ProTimerPlus+ includes this switch as an integral part of the panel.
- Page 2 MAX will turn the pump off TIMER - Set the switch in this position to for approximately 12 minutes. activate and use the “Timed Delay” feature. Flow-Rite Controls USA: 616-583-1700 ~ Australia: +61 (0) 73299 3007 ~ www.flow-rite.com 033111...