Advertisement
Available languages
Available languages
Quick Links
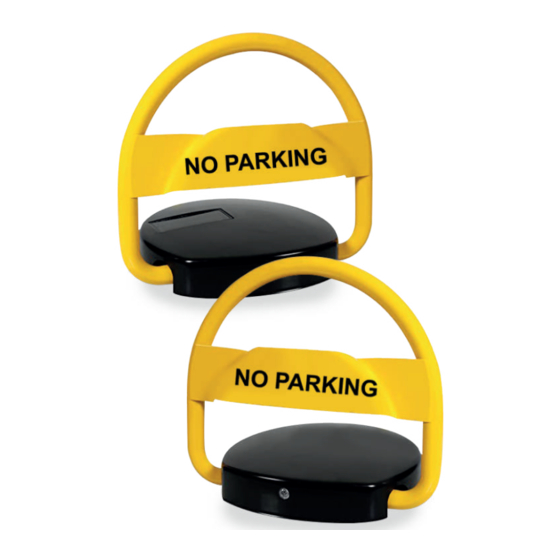
BARRIÈRE
DE PARKING
ELECTRONIQUE
ELECTRONIC PARKING LOCK
CERCA ELECTRÓNICO ESTACIONAMIENTO
ZAUN ELEKTRONIK PARKEN
RECINZIONE ELETTRONICO PARCHEGGIO
HEK ELEKTRONISCH PARKEREN
CERCA ELETRÔNICO ESTACIONAMENTO
Ref: HL102
BARRIÈRE
DE PARKING
SOLAIRE
SOLAR PARKING LOCK
BARRERA DE ESTACIONAMIENTO SOLAR
SOLARPARKBARRIERE
BARRIERA SOLARE PER PARCHEGGI
SOLAR PARKEERBARRIÈRE
BARREIRA SOLAR DE ESTACIONAMENTO
Ref: HL101
Advertisement

Summary of Contents for Beeper HL101
- Page 1 DE PARKING SOLAIRE SOLAR PARKING LOCK BARRERA DE ESTACIONAMIENTO SOLAR SOLARPARKBARRIERE BARRIERA SOLARE PER PARCHEGGI SOLAR PARKEERBARRIÈRE BARREIRA SOLAR DE ESTACIONAMENTO Ref: HL101 BARRIÈRE DE PARKING ELECTRONIQUE ELECTRONIC PARKING LOCK CERCA ELECTRÓNICO ESTACIONAMIENTO ZAUN ELEKTRONIK PARKEN RECINZIONE ELETTRONICO PARCHEGGIO HEK ELEKTRONISCH PARKEREN CERCA ELETRÔNICO ESTACIONAMENTO...
-
Page 2: Precautions D'utilisation
NOTICE D’INSTALLATION & D’UTILISATION 3. UTILISATION 1. PRECAUTIONS D’UTILISATION Pour lever ou baisser la barrière, cliquez sur les boutons “cadenas • Veuillez lire ce manuel avant l’installation et avant toute • ouvert ou fermé”. utilisation. • • La barrière émet une alerte sonore en cas d’abaissement forcé. Ce produit n’est pas un jouet. -
Page 3: Troubleshooting
If the barrier is deprogrammed, follow the procedure below: 5. DONNÉES TECHNIQUES - Open the black cover of the barrier using the key provided; - Locate the small push button on the electronic card after removing the card cover; Tension nominale : DC 6V - Press the button until the light diode of the barrier lights up;... -
Page 4: Solución De Problemas
4. SOLUCIÓN DE PROBLEMAS D. Positionieren Sie dann die Barriere an der gewünschten Stelle, En caso de problema o no funcionamiento, compruebe: nachdem Sie die obere Abdeckung geöffnet haben. - Que la batería no esté defectuosa; E. Bohren Sie 3 Löcher (das Loch sollte einen Durchmesser von 12 - Que la batería esté... -
Page 5: Installazione
INSTALLAZIONE E MANUALE D'USO 5. DATI TECNICI Tensione nominale: DC 6 V. Consumo in standby: <1 mA 1. PRECAUZIONI D'USO Consumo in esercizio: <1.2A • Leggere questo manuale prima dell'installazione e prima dell'uso. Tempo apertura / chiusura barriera: <4 secondi Questo prodotto non è... - Page 6 Para levantar ou baixar a barreira, clique nos botões “cadeado • IXIT Beeper aberto ou fechado”. • A barreira emite um alerta sonoro em caso de abaixamento Parc d’activité des Grillons, 228 rue de l’Ancienne forçado. Distillerie 69400 Gleizé, FRANCE contact@beeper.fr • www.beeper.fr Feito na China...