Advertisement
Quick Links
This repair will require removal of the unit from it's mounting hardware and repairs made on a bench or floor. Refer to your
Owners Manual and/or Installation Poster for proper assembly and carefully read and understand all warnings and cautions
pertaining to your unit.
WARNING
!
BE SURE ELECTRICAL POWER HAS BEEN DISCONNECTED FROM THE INPUT POWER LINES PRIOR TO REMOVING THE
MOTOR COVER.
WARNING
!
ANY AND ALL REPAIRS MADE TO THIS UNIT MUST BE PERFORMED WITH THE DOOR DISCONNECTED FROM THE
OPENER AND IN THE CLOSED POSITION.
1. Pull Emergency Release Cord on Carriage to disengage Opener to close door if necessary. (If unable to lower door
using Opener, use extreme caution manually closing door. Before pulling Emergency Release Cord, make certain
people and objects are clear of door opening.)
2. Unplug Opener Power Cord from power receptacle.
3. Open Lens Cover by pressing middle tab inward and remove Light Bulbs. FIG. 1. (See reverse side)
4. Remove Wall Control and Safe-T-Beam wires from Terminal Block located on side of Opener FIG. 2. Use small
common screwdriver to press in on orange tabs while gently pulling wires from block. Mark wires to help facili-
tate replacement.
5. Remove Network and Battery Backup Harnesses from front of Opener (if applicable).
6. Remove the Cotter Pin & Clevis from Door Arm to separate door from Opener. FIG. 3.
7. Remove Motor Head and Rail Assembly from mounting brackets and set on a clean work surface or floor.
NOTE: Be aware of the Motion Detector Bulb on bottom of Powerhead Cover. Do not set operator weight on this bulb
FIG. 4.
8. Remove the 6-7/16" self tapping bolts from the Rail/Motor mounting straps and pull Rail from Motor Head.
FIG.4.
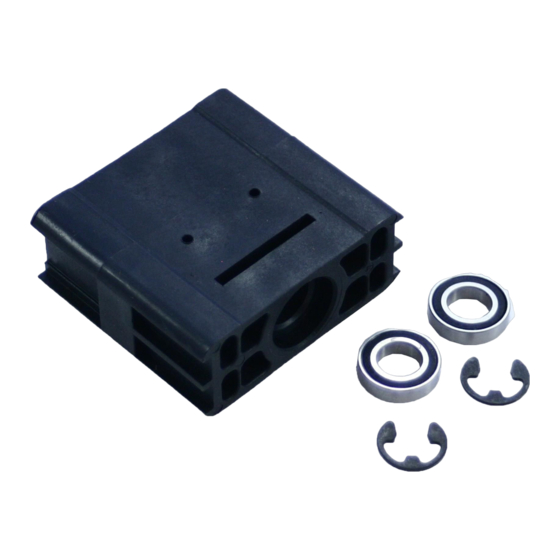
9. Using a small common screwdriver, remove E-ring at Motor end of Bearing Block.
10. Slide Bearing Block towards Motor end of Rail to remove.
11. Remove second E-ring.
12. Install replacement forward (door end) E-ring.
13. Slide replacement Bearing into forward (door end) side of Block and slide into place against E-ring.
14. Install Motor end Bearing and secure assembly with e-ring.
NOTE: The Slotted side of the Bearing Block MUST face the top and Motor end of rail. This is the slot for the Mount-
ing Flange that holds the Rail to the Motor head.
15. Install Rail to Motor Head Assembly using Coupler, Mounting Flange and 6-7/16" self tapping screws. FIG. 4.
16. Reinstall Opener Assembly in reverse order as removed. Reference your Owners Manual and Installation Poster.
17. Install Wall Control and Safe-T-Beam wires. Install Battery Backup and/or Network Harnesses if applicable.
18. Install Light Bulbs and close Lens Cover.
19. Install Clevis & Cotter Pins from Door Arms to Shuttle.
20. Move disconnect lever on Shuttle to the upwards position and operate Door until Shuttle connects with Carriage
inside rail. These two will lock together.
21. Plug Opener in.
22. Clear and reprogram Limit Controls per Owners Manual.
37867502192, 09/11/2013
37844R
Bearing Block Replacement
Printed in the USA
Advertisement

Summary of Contents for Genie 37844R Series
- Page 1 37844R Bearing Block Replacement This repair will require removal of the unit from it’s mounting hardware and repairs made on a bench or floor. Refer to your Owners Manual and/or Installation Poster for proper assembly and carefully read and understand all warnings and cautions pertaining to your unit.
- Page 2 FIG. 1. FROM STBs FIG. 2. FROM WALL CONSOLE USED USED USED USED Network/ Motion Detector Battery Backup Bulb Ports FIG. 3. FIG. 4. Mounting Flange CLEVIS PIN COTTER PIN COUPLER Top of Rail Motor End FIG. 5. BEARING THIS SLOT MUST BLOCK FACE TOP OF RAIL ASSEMBLY OPEN SIDE OF RAIL...


