Advertisement
Available languages
Available languages
Quick Links
Voltage Detector
Art.no 36-5736
Model GK16
Please read the entire instruction manual before using the product and
then save it for future reference. We reserve the right for any errors in text
or images and any necessary changes made to technical data. If you
have any questions concerning technical problems please contact our
Customer Services.
Safety
Warning!
• Contact with live conductors can lead to electric shocks with serious
consequences.
• Never use the voltage detector whilst your hands are wet.
• Never measure voltages over 1000 V AC or under 5 V AC.
Never measure V DC.
• Never use the voltage detector if any of its parts are missing, if it has any
visible defects or if it is not working properly.
• Do not disassemble the voltage detector. It contains no user-serviceable
or adjustable parts.
• Do not expose the voltage detector to extreme temperature or humidity.
• To avoid electric shock, NEVER hold the part of the voltage detector in
front of the finger guard when testing voltage.
• The voltage detector is not designed for testing shielded cables/
components.
• If the Phase (Live) and Neutral conductors are close to each other,
it might be impossible to determine which of them is which.
• The sensitivity of voltage detector can be adjusted which can mean that
voltages might not be indicated, depending on the sensitivity setting.
• If there are several cables and 2-phase or 3-phase cables are close to
one another, try to separate them and measure each cable individually.
Explanation of the TEST BEFORE USING warning
on the product
The voltage detector should always be tested on a conductor which
is known to be live before it is used to test an unknown power source.
NEVER use the voltage detector to test for an unknown voltage across
a component if the voltage detector did not indicate the presence of voltage
on a known power source.
Care and maintenance
Clean the voltage detector using a soft, moist cloth.
Only use a mild detergent; never use solvents or strong, abrasive cleaning
agents for cleaning as these can damage the voltage detector.
Disposal
This product should be disposed of in accordance with local regulations.
If you are unsure how to proceed, contact your local council.
GREAT BRITAIN • customer service tel: 0845 300 9799 e-mail: customerservice@clasohlson.co.uk internet: www.clasohlson.com/uk
Description
• The voltage detector is designed to indicate whether or not a test object
is conducting electricity.
• When it detects a voltage, the red LED indicator will flash and the built-in
buzzer will sound.
• This is a non-contact voltage tester for detecting 50/60 Hz AC voltage in
the range: 5–1000 V.
• It is suitable for checking fuses/circuit breakers in consumer units and
electrical sockets, indicating breaks in cables and finding which one of
the bulbs has blown in a string of fairy lights connected in series.
• Built-in LED light with on/off switch.
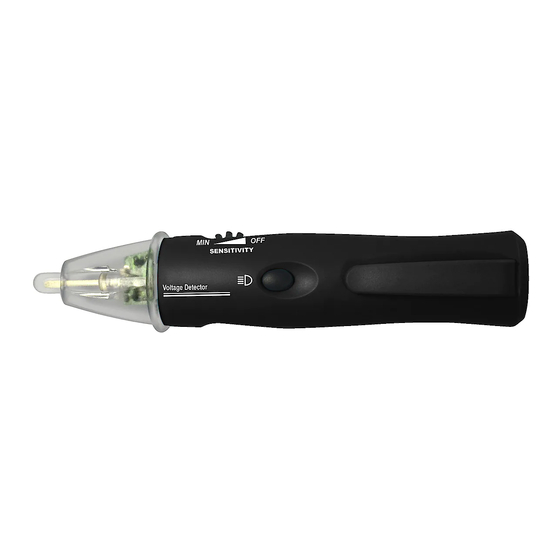
1
2
3
4
7
6
1. Test probe
2. LED light
3. Finger guard – to avoid electric shock, never hold onto the part of
the voltage detector in front of the finger guard when testing voltage.
4. Power switch/sensitivity dial – roll the knob backwards to switch
the voltage detector off and forwards to switch the voltage detector on.
The dial also adjusts the sensitivity – decrease the sensitivity by rolling
the dial forwards, increase it by rolling the dial backwards.
5. Pocket clip
6. Switch – Press this button to turn the LED light on.
7. LED indicator – this red LED will flash at short intervals (and a buzzer
will sound) when AC is detected, the LED will flash at longer intervals to
indicate that the voltage detector is switched on.
Changing the battery
• When the voltage detector is switched on the LED indicator will flash
twice in quick succession if the battery is charged. If there is no initial
2-flash indication when the voltage detector is switched on you should
change the batteries.
• Always change both batteries at the same time.
1. Switch the voltage detector off using the power switch/sensitivity dial.
2. Carefully push the battery cover in the direction of the arrow until it is
released.
3. Remove the old batteries and insert two new (LR03) batteries,
observing the correct polarity.
4. Push the battery cover back on until it locks into place.
Operating instructions
Note: Before the voltage detector is used, it should first be tested on
a conductor which is known to be live.
1. Switch the voltage detector on using the power switch/sensitivity dial
– the indicator light will flash twice to show that the voltage detector is
working. Thereafter the indicator light will flash at a few seconds interval
to show that the voltage detector is switched on.
2. Place the test probe close to the object to be tested (such as a wire or
socket). Move it along the length of the object. Adjust the sensitivity by
rolling the dial to suit the test object.
3. When voltage is detected, the buzzer will sound and the red LED
indicator will flash in quick succession.
5
4. Remember to switch the voltage detector off after testing to save
the battery.
Note:
• If testing a multi-core cable – move the test probe along the cable, don't
just test one point; the voltage detector indicates phase and the wires
in the cable might be twisted. The voltage detector cannot be used
on shielded cable, cable in trunking or cable behind panels or metallic
surfaces.
• Do not rub the end of the test probe before use; this can cause
the voltage detector to indicate static electricity generated by the rubbing.
• When testing for breaks in a cable – move the test probe along the cable
for as long as the buzzer sounds. The place where the buzzer stops is
probably a break in the cable.
• False indications could occur if the test probe is held too close to objects
which are statically charged or if the probe is held close to ferrous
objects close to AC lines.
Adjusting the sensitivity setting
1. Turn the voltage detector on using the power switch/sensitivity dial.
2. The sensitivity is adjusted by rolling the sensitivity dial – the higher
the sensitivity, the greater the detection range (distance), but the higher
the sensitivity, the more susceptible the detector is to electromagnetic
interference.
3. It is recommended that you begin on a low sensitivity setting and
gradually increase it to the desired level according to the task at hand.
Specifications
Safety category
Voltage range
Frequency range
Operating environment
Size
Weight
Batteries
CAT IV 1000 V
5–1000 V AC
50–400 Hz
Temperature
0–40 °C
Relative humidity < 85 %, indoor use
154 × 32 × 28 mm
50 g (including battery)
2 × AAA/LR03 (sold separately)
Advertisement

Related Manuals for Clas Ohlson GK16

Summary of Contents for Clas Ohlson GK16
- Page 1 • The voltage detector is designed to indicate whether or not a test object Note: Before the voltage detector is used, it should first be tested on Art.no 36-5736 Model GK16 is conducting electricity. a conductor which is known to be live. • When it detects a voltage, the red LED indicator will flash and the built-in 1.
- Page 2 • Spänningsindikatorn är avsedd för att indikera om mätobjektet är Obs! Testa först spänningsdetektorn på en känd spännings förande komponent. Art.nr 36-5736 Modell GK16 spänningsförande. 1. Slå på spänningstestaren med strömbrytaren, indikatorlampan blinkar • Indikering med blinkande röd lysdiod och summer om spänning finns snabbt 2 gånger vid start och visar därmed att spänningstestaren...
- Page 3 Bruk • Spenningsdetektoren er beregnet for indikering av måleobjektet er Obs! Spenningsdetektoren må testes på en kjent spenningsførende Art. nr. 36-5736 Modell GK16 strømførende. komponent. • Hvis det er spenning i måleobjektet indikeres det med blinkende rød 1. Skru på spenningstesteren med strømbryteren og indikatorlampen lysdiode og summer.
- Page 4 Kuvaus Käyttö • Jännitteenilmaisin on tarkoitettu ilmaisemaan, onko mitattavassa Huom.! Testaa jännitteenilmaisimen toiminta ensin kohteella, jossa on Tuotenro 36-5736 Malli GK16 kohteessa jännitettä. varmasti jännite. • Se ilmoittaa vilkkuvalla punaisella merkkivalolla ja merkkiäänellä, jos 1. Kytke jännitteenilmaisin päälle virtakytkimestä. Merkkivalo vilkkuu mitattavassa kohteessa on jännite.
- Page 5 Benutzung • Der Spannungsdetektor ist zum Anzeigen von Spannung an einem Hinweis: Den Spannungsdetektor zunächst an einer bekannten spannungs- Art.Nr. 36-5736 Modell GK16 Messobjekt vorgesehen. führenden Komponente testen. • Anliegende Spannung wird mit einer blinkenden roten Leuchtdiode und 1. Das Gerät am Ein-/Ausschalter einschalten. Die Indikator-LED blinkt einem Summer angegeben.