Advertisement
Quick Links
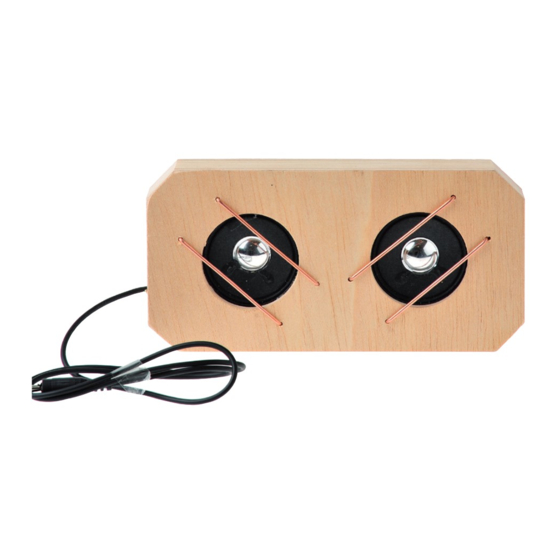
109.999/110.349/ 110.350/ 110.361
- S t e r e o l o u d s p e a k e r
PARTS LIST
110.349 Craft pack-Wood version
Plywood
110.361 Craft pack-Acrylic version
Acrylic transparent
110350 Craft pack- metal version
Aluminium
109999 Basic Loudspeaker
Wood strip
Loudspeaker
Dowel
Welding rod
Connection cable
Connection plug 3,5mm stereo
Self tapping screws
E110350#1
M P 3 - P l a y e r
Please Note
The OPITEC range of projects is not
intended as play toys for young
children.They are teaching aids for
young people learning the skills of
Craft, Design and Technolo- gy.
These projects should only be un-
dertaken and tested with the
guidance of a fully qualified adult.
The finished projects are not suitab-
le to give to children under 3 years
old. Some parts can be swallowed.
Dan- ger of suffocation!
1
1
1
3
2
1
2
1
1
20
Necessary tools:
Fretsaw
All purpose glue
File, sandpaper
Drills 3mm& 5mm diameter
Screwdriver slot and cross
Pliers
Metal cutters or hacksaw
Soldering iron etc
Wood glue
Machine vice
Metal shears
Description
300x210x4
Base + Lid
300x210x2
Base + Lid
200x200x0,8
Base + Lid
200x20x20
Side walls
ø 57
Loudspeaker
100x20
Holder
200x 2
Speaker protection
500
Connection
1000
Connection
2,9x10
Fixing
1
Advertisement

Summary of Contents for Opitec 109.999
- Page 1 M P 3 - P l a y e r - S t e r e o l o u d s p e a k e r Please Note Necessary tools: The OPITEC range of projects is not Fretsaw intended as play toys for young All purpose glue children.They are teaching aids for...
- Page 2 INSTRUCTIONS General: These instructions show you how to house the speakers.There is an opportunityto use the materials and develop your own design. 1. Mark and saw out the shape according to plan (Side 5) ( Use Acrylic,metal or wood ) Saw out the 50mm dia holes for the loudspeakers with a fretsaw and sand to finish.
- Page 3 INSTRUCTIONS 5. Glue the top, with loudspeakers on to the frame using a hot glue gun or all and all purpose glue. Make sure that the cable hole in the frame lines up with the connectors on the speaker. Glue lid in place Speaker con- nectors 6.
- Page 4 INSTRUCTIONS 8. Lay the back in place and screw it in position on the frame.Sand to finish 9. From the dowel cut 4 pieces 10mm wide. Sand the sawn faces. 10. Place the discs in a machine vice and drill the 2mm hole as shown. 2mm-hole 11.
- Page 5 INSTRUCTIONS Bemaßung Deckel u. Bodenplatte M 1:2 Bemaßung Seitenteile M1:2 stumpf Gehrung stumpf Gehrung 45° E110350#1...