Advertisement
Quick Links
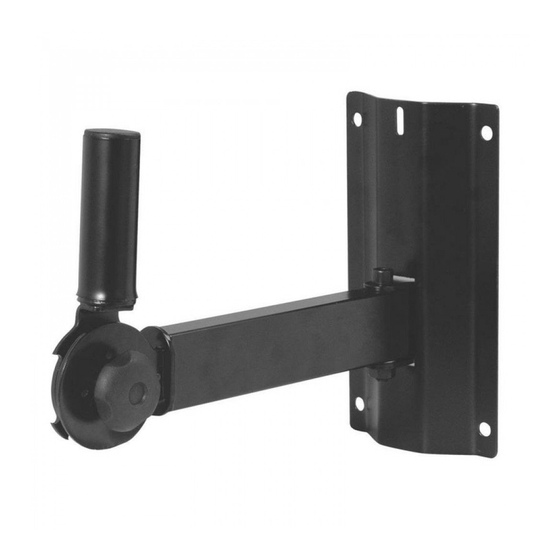
INSTALLATION INSTRUCTIONS
Congratulations on your purchase of your speaker bracket. Please read the following
assembly instructions carefully. We hope you enjoy your new purchase!
Required Tools: socket or hand wrench, drill,
drill bit, stud finder, pencil, level, tape
measure, (4) 3/8" x 4" lag bolts
Step #1: Remove brackets from box.
Step #2:
Installation for SS7322B or SS7323
(using Swivel feature only): Perform a
Swivel test (see sidebar: "Swivel Test").
Installation for SS7321 Corner unit only,
or SS7322 and SS7323 (when NOT using
the swivel feature): Check for stud location
with a stud finder and place speaker bracket in
desired location.
Step #3: Test that the bracket plate is level
and mark the hole locations on the wall using
the holes from bracket backer plate as a
template.
Step #4: Drill proper mounting hole (smaller
than outer thread diameter of your lag bolts)
through wall into wood studs or concrete
block. Hole depth should be properly drilled so
that your lag bolt can go through the sheet
rock and 2" into the stud.
Step #5: Place speaker bracket on wall and
install 3/8" lag bolts (recommended) in the
upper location. Securing tightly until the head
of the lag bolt is firmly against the bracket.
Repeat for bottom location.
Step #6: Before placing the speaker cabinet
on the bracket, test installation by confirming
the bracket will hold the weight of your
speaker. If desired, tilt the angle of the bracket
downward to the desired angle and tighten the
bolts to lock in place.
Step #7: Place the speaker on the cabinet by inserting the vertical sleeve into the
speaker cabinet's internal adapter. Be sure the speaker is secure before releasing it.
Test installation with speaker in vertical and tilted positions to be sure the bracket stays
firmly against the wall.
SS7321, SS7322, SS7323
Swivel Test
Use stud finder to find a stud
and place bracket plate against
wall at desired stud location.
Mark the location with pencil.
Set bracket aside. Place
speaker on floor upside down
in front of pencil marking. Place
bracket plate flat on wall in
stud location and insert into
the speaker cabinets internal
mounting adapter. Swivel
speaker to the desired angle
(see below for ideal
positioning) and lock the swivel
position on the bracket. Set
bracket aside. Walk tape
measure up wall from pencil
marking to desired height.
stud
Ideal listening
location
stud
Advertisement

Summary of Contents for on stage SS7321
- Page 1 Place Swivel test (see sidebar: “Swivel Test”). bracket plate flat on wall in stud location and insert into Installation for SS7321 Corner unit only, the speaker cabinets internal or SS7322 and SS7323 (when NOT using mounting adapter. Swivel...
- Page 2 SS7321, SS7322, SS7323 Product Specifications: Models: SS7322 and SS7321 Ergonomic 2” knob adjusts tilt angle from 90° to 30° A) 90 Interlocking teeth mesh together to form a solid adjustable pivot point for tilting your speakers. B) Added solid-steel pin serves as a safety-stop.