Table of Contents
Advertisement
........................................................
....................................................
...........................................
.......................................
.....................................
.........................................
instruction manual for user - ENGLISH
page 4
page 5
page 7
page 8
page 9
page 15
TOUCH
Advertisement
Chapters
Table of Contents

Summary of Contents for MCE Touch AEP Series
-
Page 1: Table Of Contents
..........page 2 General instructions Introduction ............page 3 Accessories ............page 4 Water softener ............ page 5 Cleaning ............page 6 Service and maintenance ........page 7 How to serve a good coffee ........page 8 List of hazards ............ -
Page 2: General Instructions
General instructions Please read the instructions carefully before using the machine! The espresso coffee machine that you have purchased has been designed and manufactured with innovative methods and technology which ensure long lasting quality and reliability. This booklet will guide you in discovering the advantages of purchasing this machine. You will find notes on how to get the best out of your machine, how to always keep it efficient and what to do if you come up against any difficulties. -
Page 3: Introduction
• When using the electrical appliance several safety standards must be observed : do not touch the appliance when hands or feet are wet or damp; do not use the appliance in bare feet; do not use extensions in rooms where there are showers or baths; do not pull on the power cord to disconnect the appliance from the power outlet;... -
Page 4: Accessories
Accessories Cappuccino maker (optional) • Put the silicon immersion tube in the milk; • Place the jug under the spout of the cappuccino maker; • Turn the steam tap counter-clockwise; upon reaching the desired amount, close the steam tap; • Pour the foamed milk into the cups with coffee. -
Page 5: Water Softener
Water softener Mains water contains insoluble salts, which cause the build-up of lime scale deposits in the boiler and in other parts of the machine. The softener makes it possible to eliminate or substantially reduce the presence of these mineral salts. The resin softener has the property of retaining the calcium contained in the water. -
Page 6: Cleaning
Cleaning For perfect cleaning and efficiency of the appliance, several simple cleaning operations are necessary on the functional parts and accessories as well as the body panels. The indications given here are applicable for normal use of the coffee machine. If the machine is heavily used then cleaning should be performed more frequently. Filter and filter-holder The filters and the relative filter-holders must be cleaned daily in hot water. -
Page 7: Service And Maintenance
Cappuccino maker Use special care in cleaning the cappuccino maker, following these procedures: • Initially wash it by placing the immersion tube in water and run a delivery for a few seconds; • Turn the rotating body (1) 90° to pos.B (milk outlet tube closed); •... -
Page 8: How To Serve A Good Coffee
How to serve a good coffee To obtain a high-quality coffee, it is important that the hardness of the water used does not exceed 4-5 °F (French degrees). If the water hardness exceeds these values, it is advisable to use a water softener. Avoid using a water softener if water hardness is less than 4 °F. -
Page 9: Touch Aep - Sae
TOUCH AEP - SAE page 10 Machine description ......... Touch pad ........... page 10 Preparation of the machine ......page 11 Putting the machine into operation ..... page 11 Grinding and dosing ........ page 11 ........page 12 Preparing coffee 7. -
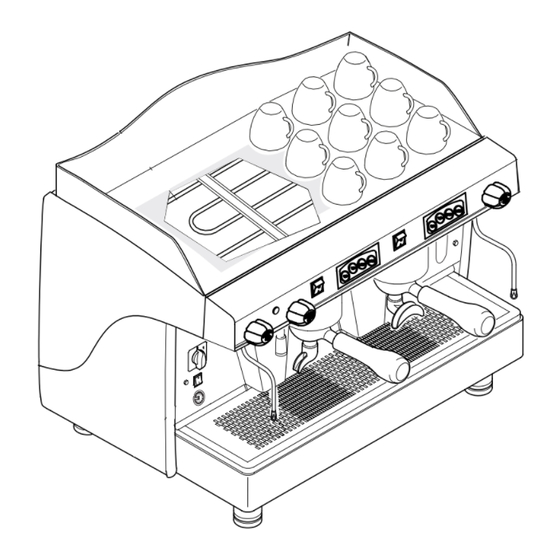
Page 10: Machine Description
1. Machine description Cup heater surface Hot water nozzle Touch pad Steam knob Steam nozzle Filter holder Hot water knob Cup holding grille Boiler / pump pressure gauge Main switch Cup heater switch * Machine “ON” indication light Water level indicator Manual delivery switch Adjustable feet * Optional... -
Page 11: Preparation Of The Machine
3. Preparation of the machine The preparation of the machine and its installation must be carried out by authorized personnel. Use of the machine without all the installation operations carried by authorized personnel could seriously damage it. 4. Putting the machine into operation Before starting the machine, make sure that the level of water in the boiler is higher than the minimum level on the level-check window (1). -
Page 12: Preparing Coffee
6. Preparing coffee 6.1 AEP version • Put the coffee cup under the dispensing spout; • Press the desired delivery switch. You will have the delivery which can be stopped by means of the same switch once the desired amount of coffee in the cup is obtained. 6.2 SAE version COFFEE DELIVERY •... -
Page 13: Automatic Washing Cycle
Automatic washing cycle • This coffee machine is suited with an automatic washing cycle. To complete this function, proceed as follows: Replace the normal filter of the filter-holder with a blind one; • • Pour a teaspoon of a suitable detergent powder on the blind filter; •... - Page 14 SAE version To enable, disable or adjust the cup heater proceed as follows: • Hold down the dose keys from the right group touch pad, until all the led’s stop from blinking; If the red led from the key dose (1 espresso) is on, the heating device is switched off;...
-
Page 15: Touch Sae Display
TOUCH ELECTRONIC WITH DISPLAY ........... page 16 Machine description Touch pad............... page 16 Display ..............page 16 Preparation of the machine.......... page 17 Putting the machine into operation ....... page 17 Grinding and dosing ..........page 18 Preparing hot drinks ............ page 18 Automatic wahing cycle .......... -
Page 16: Machine Description
Machine description Cup heater surface Display Touch pad Steam knob Steam nozzle Filter holder Hot water knob Hot water nozzle Pump pressure gauge Main switch Cup holding grille Water level indicator Adjustable feet 2. Touch pad 1 Espresso coffee 2 Espresso coffees 1 Long coffee 2 Long coffees Display... -
Page 17: Preparation Of The Machine
Preparation of the machine The preparation of the machine and its installation must be carried out by authorized personnel. Use of the machine without all the installation operations carried by authorized personnel could seriously damage it. Putting the machine into operation Before starting the machine, make sure that the level of water in the boiler is higher than the minimum level on the level-check window . -
Page 18: Grinding And Dosing
Grinding and dosing Place the grinder-doser in a convenient place near the machine. Grinding and dosing coffee must take place in accordance with the instructions of the manufacturer of the grinder-doser. To obtain a high quality espresso coffee we suggest the following: •... -
Page 19: Automatic Wahing Cycle
Automatic washing cycle • This coffee machine is suited with an automatic washing cycle. To complete this function, proceed as follows: • Replace the normal filter of the filter-holder with a blind one; • Pour a teaspoon of a suitable detergent powder on the blind filter; •... -
Page 20: User's Programming Machine's Parameters
User’s programming machine’s parameters In order to enter the programming menu, simultaneously press the keys “ ” and “ ” until on display will appear the message “Password”. Press the key “M” to enter into the user’s programming menu. Use the increase “ ” and decrease “ ”... - Page 21 10.1 Clock setup When the machine is prefigured with this option, in order to modify the date, hour and day shown on display, proceed as follows: Enter into the programming menu Hour/Date Scroll the menu until reaching the desired submenu to be modified Confirm in order to enter the designated submenu Clock setup...
- Page 22 If the working mode is set as TIMER, is possible programming the machine’s working periods for that day. The keys “ ” and “ ” allow modifying the hours and minutes, taking into consideration the following situations: •If Start hour is equal with Stop hour, the machine will be switched on all day; •If Start hour is smaller than Stop hour, the machine will automatically start at the time set as Start and stop at the time set as Stop;...
- Page 23 10.4 Cup heater This submenu allows enabling/disabling the cup heater system, so as setting its temperature. When the machine is prefigured with this “supplement”, proceed as follows: Enter into the programming menu Cup heater Scroll the menu until reaching the desired submenu to be modified Confirm in order to enter the designated submenu Set the cup heater’s working mode...
- Page 24 10.6 Count-down coffee counter The submenu allows viewing the number of coffees set the machine to function. When the machine is prefigured with this option, proceed as follows: Enter into the programming menu Credit Scroll the menu until reaching the desired submenu to be viewed Confirm in order to enter the designated submenu On display will be shown the left numbers of coffee to be...
-
Page 25: Administrator's Programming Machine's Parameters
10.8 Language programming Proceed as follows: Enter into the programming menu Language Scroll the menu until reaching the desired submenu Confirm in order to enter the designated submenu Language Scroll the submenu until reaching the desired language to Italian be set English Confirm the set programming language. - Page 26 ADMINISTRATOR’S PROGRAMMING MENU The following submenus can be visualized and/or modified by means of the display: Hour/Date Working days Reg. softener Cup heater* Total counts Single count Prog. doses Credit* Cred. preal.* Doser alarms Language Unlock Setup Mod. password The areas designated with (*) are accessible only when the machine is prefigured with the appropriate functions.
- Page 27 11.2 Working days This submenu allows setting the machine’s working mode in automatic manner: switch on/off hour of the machine on each day of the weak, separately. For the coffee machine, the day starts at 00:00 and finishes at 23:59. Proceed as follows: Enter into the programming menu Working days...
- Page 28 11.3 Water softener regeneration In order to set the liters of water after which is indicated to make the softener regeneration, proceed as follows : Enter into the programming menu Reg. softener Scroll the menu until reaching the submenu wanted to be modified Confirm in order to enter the designated submenu Set the consumed liter’s number after which is indicated to...
- Page 29 11.4 Cup heater This submenu allows enabling/disabling the cup heater system, so as setting its temperature. When the machine is prefigured with the cup heater “supplement”, proceed as follows: Enter into the programming menu Cup heater Scroll the menu until reaching the desired submenu to be modified Confirm in order to enter the designated submenu Set the cup heater’s working mode...
- Page 30 11.6 Single coffee counters This submenu allows to view and reset the number of selections made by a certain dose of the touch pad. Proceed as follows: Enter into the programming menu Single count Scroll the menu until reaching the desired submenu Confirm in order to enter the designated submenu.
- Page 31 11.8 Count-down coffee counter programming When the machine is prefigured with the function, this submenu allows viewing and setting the number of coffees to be prepared with the machine. Proceed as follows: Enter into the programming menu Credit Scroll the menu until reaching the “Credit” submenu Credit Confirm in order to enter the designated submenu CCCCCC:...
- Page 32 When the “Thres.” value is set to zero, the prealarm is disabled. If the prealarm is greater than the count-down coffee counter value and different than zero, the set value will not be saved and on display will appear the following message: *Value error If the prealarm value is different than zero, when pressing the “M”...
- Page 33 11.10 Doser alarms This submenu allows viewing and resetting the number of flow meter alarms. The 4 values shown on display are relevant to th brewing groups, the number one group being the right side one. Proceed as follows: Enter into the programming menu Scroll the menu until reaching the “Doser alarm”...
- Page 34 11.13 Setup This submeniu allows to enable/disable and modify certain functions. Proceed as follows: Enter into the programming menu Setup Scroll the menu until reaching the “Setup” submenu Clock Confirm in order to enter the designated submenu Cup heater Credit Scroll the submeniu until reaching the desired function to be modify Fluxing...
-
Page 35: Malfunctions And Corresponding Solutions
The machine’s preset correction factor is set to zero. TIMER SET •When the “Timer set.” function is disabled, the user will be able only to view the “Working days” submenu. •In case the function is enabled, the user has the possibility of modifying the machine’s working mode in automatic manner 11.14 Modify password In order to set a new password for the administrator’s menu, proceed as follows: Enter into the programming menu... - Page 36 Indication Eventualy Cause Solution The delivery group is dirty. Wash the group’s inside parts with the solid filter. COFFEE GROUNDS 2) The delivery group is too cold. 2) Wait for group to heat up completely. ARE WET 3) Coffee is ground too finely. 3) Adjust the grinding of the coffee.
- Page 37 Indication Eventualy Cause Solution ON DISPLAY BLINKS THE ALARM: has consumed the water quantit y The machine Inform the authorized personnel. 1.1 bar set as “ 120°C Preal.” 09:16 10-05-09 ON DISPLAY REMAINS FIX THE ALARM: has consumed the water quantit y The machine Request assistance from authorized personnel in 1.1 bar...
Need help?
Do you have a question about the Touch AEP Series and is the answer not in the manual?
Questions and answers