Advertisement
Quick Links
C Power Filter
Instruction Manual
Quick Start Guide
1
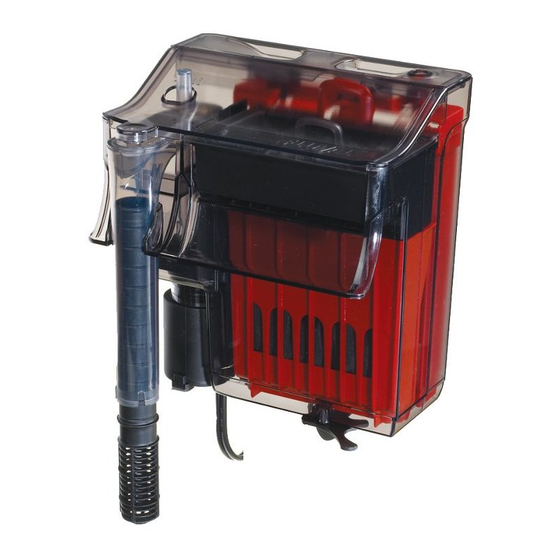
PACKING LIST
Congratulations on the purchase of your new Fluval C Power Filter. Please allow
approximately 15-20 minutes for the complete installation of filter parts and
inserts. Inspect the filter for any visible signs of shipping damage, and verify
that the motor is securely fastened to the filter case. The following parts should
be included in your package.
Filter Cover
Bio-Screen
Filter Case
Mechanical Frame
Leveling
Device
C-Nodes
Chemical Basket
"U" Tube
Telescopic Intake Tube
Impeller Cover Assembly
09601000 11B10
4
INSTALLING FILTER INSERTS
After preparing filter inserts, first slide the mechanical cartridge frame into the rear
of filter case with the cleaning indicator to the right. Then slide the chemical basket
and Trickle Chamber into the filter case.
2
FLUVAL POLY/FOAM PAD
Slide the mechanical frame out of the filter body and rinse under tap water to remove
Biological Trickle chamber
with cover
any debris caused during shipment. Check to make sure the Poly/Foam pad is inserted
correctly, with the dense polyester side facing the grid on the frame.
Poly/Foam Pad
FLUVAL BIO-SCREEN
Rinse Bio-Screen under tap water, and place into Trickle Chamber cover.
Note: The side with the large holes must face upwards.
Activated Carbon
FILTER INSERTS MAINTENANCE
NOTE: Regular replacement of Fluval filter inserts is essential to ensure optimum filter performance.
The Fluval Poly/Foam Pad, Activated Carbon, Bio Screen and C-Nodes should be changed alternately in order to maintain continuous biological activity. To enhance bacterial action, pour a dose
of Nutrafin Cycle Biological Aquarium Supplement onto your filter inserts each time you change the media. Follow individual packaging instructions for recommended replacement intervals.
Impeller
Motor Unit with Seal Ring
5
ATTACHING LEVELING DEVICE
To ensure optimal operating performance, the Fluval C Power Filter must be level.
1. Insert leveller into bottom of filter case.
2. Mount Power Filter onto rear of aquarium, and adjust leveller by turning it to the
required setting so that the filter sits perfectly in vertical position.
PREPARING FILTER INSERTS.
All filters must be rinsed thoroughly.
FLUVAL ACTIVATED CARBON
Remove Activated Carbon insert from its plastic shipping bag, and rinse pouch under tap
water to remove any dust particles. Place pouch loosely into the chemical media basket.
(Do not remove carbon from porous bag).
FLUVAL C-NODES
Open poly bag and spread them evenly in the Trickle Chamber, then rinse under tap water.
(Aquarium water is preferable if the aquarium is already established). Replace Trickle
Chamber cover. Note: Ensure C-Nodes are well positioned inside the chamber so that the
cover closes perfectly.
6
POWER FILTER START-UP
1. With the cover removed, fill the Power Filter case completely with water
and replace cover.
2. For the initial start-up and for a faster priming of the filter, adjust water flow control
lever on the intake "U" tube to its minimum position.
3. Plug power cord into electrical outlet. Allow a few seconds for priming
Advertisement

Related Manuals for Fluval C Series


Summary of Contents for Fluval C Series
- Page 1 NOTE: Regular replacement of Fluval filter inserts is essential to ensure optimum filter performance. The Fluval Poly/Foam Pad, Activated Carbon, Bio Screen and C-Nodes should be changed alternately in order to maintain continuous biological activity. To enhance bacterial action, pour a dose of Nutrafin Cycle Biological Aquarium Supplement onto your filter inserts each time you change the media.
- Page 2 NOTE: Regular replacement of Fluval filter inserts is essential to ensure optimum filter performanc The Fluval Poly/Foam Pad, Activated Carbon, Bio Screen and C-Nodes should be changed alternately in o of Nutrafin Cycle Biological Aquarium Supplement onto your filter inserts each time you change the media “U”...
-
Page 3: Replacement Parts
For each of the following situations, do not attempt repairs yourself; 3. Plug power cord into electrical outlet. Allow a few seconds for priming return the Fluval Power Filter for repair to an authorized service facility for service or discard the (air being expelled from the “U” tube.) appliance. - Page 4 CALL US ON OUR TOLL-FREE NUMBER: Canada only: 1-800-554-2436 between 9:00 a.m. and 4:30 p.m. maintenance schedule will result in a healthier aquarium, and extend the life of the filter. Fluval C Power large amounts of surface area for adsorption Eastern Standard Time.
- Page 5 Pull impeller out of the impeller well, and rinse to remove accumulated with new insert. For best slime deposits. If the impeller well needs cleaning, scrub it gently with a Fluval Cleaning Brush (sold separately). results, replace every 2-4 A cotton swab or impeller well brush (not supplied) can be used to remove more stubborn deposits.
-
Page 6: Troubleshooting And Faqs
Rinse thoroughly afterward to eliminate acid residue. Following a routine Premium research grade carbon provides maintenance schedule will result in a healthier aquarium, and extend the life of the filter. Fluval C Power large amounts of surface area for adsorption Filters have been designed to facilitate these tasks, as they can be done within a matter of minutes.