Table of Contents

Related Manuals for Samsung HT-WP38


Summary of Contents for Samsung HT-WP38
-
Page 1: Instruction Manual
DIGITAL HOME THEATER SYSTEM HT-WP38 SAMSUNG ELECTRONICS AMERICA, INC. SERVICE DIVISION 400 Valley Road, Suite 201 Mount Arlington, NJ 07856 1-800-SAMSUNG (1-800-726-7864) www.samsung.com Instruction Manual COMPACT AH68-01713R DIGITAL AUDIO V I D E O... -
Page 2: Safety Warnings
(furniture), with enough space around it for ventilation (3~4inches). Make sure the ventilation slots are not covered. Do not stack anything on top of the player. Do not place the player on amplifiers or other equipment which may become hot. -
Page 3: Safety Instructions
The openings should never be blocked Use only with a cart, stand, tripod, bracket, by placing the video product on a bed, sofa, rug, or other similar surface. This video product or table recommended by the manufacturer, should never be placed near or over a radiator or or sold with the video product. -
Page 4: Table Of Contents
MP3 players, USB flash memory, etc. using the Home Theater's USB HOST function. Dolby Pro Logic II Dolby Pro Logic II is a new form of multi-channel audio signal decoding technology that improves upon existing Dolby Pro Logic. DTS (Digital Theater Systems) DTS is an audio compression format developed by Digital Theater Systems Inc. -
Page 5: Notes On Discs
Only CD-R discs with MP3 files in ISO 9660 or Joliet format can be played. Max. Playing Time • MP3 file names should be 8 characters or less in length and contain no blank spaces or special characters (. / = +). Approx. 240 min. (single-sided) •... -
Page 6: Description
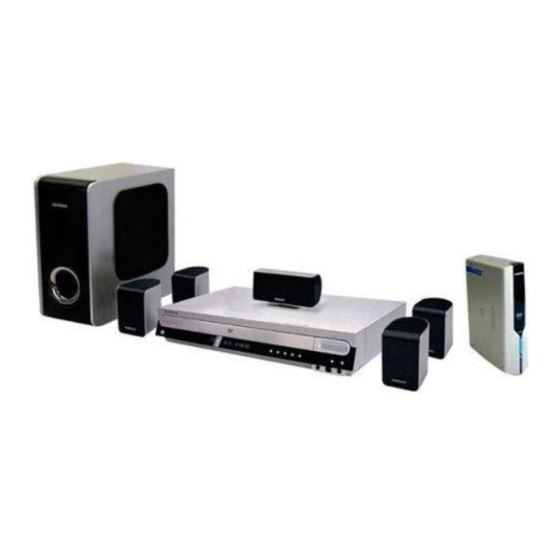
S-Video Output Connector If the TV is equipped with an S-Video input connector (S-VIDEO IN), connect it to the player's S-Video output. Accessories * The wireless receiving antenna is built into the wireless rear amplifier. Remote Control Video Cable (AH59-01506D) (AH39-40001V) -
Page 7: Remote Control
MUTE button TEST TONE button The remote control can be used up to approximately 23 feet/7 meters in a straight line. It can also be operated at a horizontal angle of up to 30° from the remote control sensor. SOUND EDIT button... -
Page 8: Connecting The Speakers
Connecting the Speakers Before moving or installing the product, be sure to turn off the power and disconnect the power cord. Wireless receiver Position of the Home Theater Selecting the Listening Position • Place it on a stand, cabinet shelf, or under the The listening position should be located about 2.5 to 3... -
Page 9: Connecting Wireless Rear Speakers
Caution • Do not connect the wireless rear speakers to the speaker outputs on the back of the main unit. Malfunction may result. • The wireless receiving antenna is built into the wireless receiver module. Keep the unit away from water and moisture. -
Page 10: Connecting The Video Out To Tv
To set P.Scan mode for DivX discs, press the P.SCAN button on the remote control for more than 5 seconds with no disc in the unit (“'NO DISC" on the display), then load the DivX disc and play. What is Progressive (or Non-Interlaced) Scanning? -
Page 11: Connecting External Components
AUX 1 even when you select DIGITAL IN. • If you have connected Audio In (L, R) to 1, connect Video In to 1 as well, and if you have connected Audio In (L, R) to 2, connect Video In to 2 also. -
Page 12: Before Using Your Home Theater
Before Using Your Home Theater Your Home Theater is capable of playing DVD, CD, MP3, DivX and JPEG discs.Depending on the disc you are using, these instructions may vary slightly. Read the instructions carefully before using. Plug the main unit's... -
Page 13: Disc Playback
Depending on the recording mode, some MP3-CDs cannot be played. • Table of contents of a MP3-CD varies depending on the MP3 track format recorded on the disc. Selecting a Disc in the Disc changer The DVD/CD function is automatically selected when Disc Skip is pushed. -
Page 14: Mp3-Cd Playback
Note • Depending on the recording mode, some MP3-CDs may not play. • Table of contents of a MP3-CD varies depending on the MP3 track format recorded on the disc. • MP3 file support: MPEG1 LAYER3 (BITRATE : 128KBPS~320KBPS , SAMPLING FREQ.: 32K/44.1K/48KHz) -
Page 15: Jpeg File Playback
JPEG File Playback Images captured with a digital camera or camcorder, or JPEG files on a PC can be stored on a CD and then played back with this Home Theater. Slide Mode Place the JPEG disc on the disc tray. -
Page 16: Divx Playback
You must have some experience with video extraction and editing in order to use this feature properly. • To use the caption function, save the caption file (*.smi) in the same file name as that of the DivX media file (*.avi) within the same folder. -
Page 17: Playing Media Files Using The Usb Host Feature
Playing Media Files using the USB HOST feature You can connect and play files from external USB storage devices such as MP3 players, USB flash memory, etc. using the Home Theater's USB HOST function. Press the FUNCTION button on the main... -
Page 18: Checking The Remaining Time
Skipping Scenes/Songs Briefly press • Each time the button is pressed briefly during playback, the previous or next chapter, track, or directory (file) will be played. • You cannot skip chapters consecutively. TITLE 01/05 CHAPTER 002/040... -
Page 19: Repeat Playback
Repeat Playback Repeat playback allows you to repeatedly play a chapter, title, track (song), or directory (MP3 file). JPEG Press REPEAT button. • Each time the button is pressed during playback, the repeat playback mode changes as follows: DVD- DVD-... -
Page 20: Step Function
Note • This function will not work if the DVD is recorded with multi-camera angle format. • Black bars may not disappear because some DVD discs have a built-in horizontal to vertical ratio. Press Cursor Press ENTER buttons to move to the area button. -
Page 21: Bonus Group / Navigating Pages
BONUS GROUP KEY NUMBER : Note • If you eject the disc, switch the power off, or unplug the player, you will need to re-enter the key number. Navigating Pages During playback, press the TUNING/CH button on the remote control. -
Page 22: Moving Directly To A Scene/Song
To move a folder, press (Stop) and then press Using Disc Menu You can use the menus for the audio language, subtitle language, profile, etc. DVD menu contents differ from disc to disc. Moving to a Chapter In Stop mode,... -
Page 23: Setting The Language
In Stop mode, press MENU button. Note • To select another language, select OTHER and enter the language code of your country. (See page 72 for language codes) AUDIO, SUB TITLE and DISC MENU language can be selected. Press Cursor Select ‘Language’... -
Page 24: Setting Tv Screen Type
Press Cursor button to move to The horizontal to vertical screen size ratio of conventional TVs is 4:3, while that of widescreen and high ‘Setup’ and then definition TVs is 16:9. This ratio is called the aspect ratio. When playing DVDs recorded in different screen size, you should adjust the aspect ratio to fit your TV or monitor. -
Page 25: Setting Parental Controls (Rating Level)
Setting Parental Controls (Rating Level) Use this to restrict playback of adult or violent DVDs you do not want children to view. In Stop mode, press MENU button. Press Cursor Press Cursor , button button to move to to select the desired rating ‘PARENTAL’... -
Page 26: Setting The Wallpaper
Setting the Wallpaper While watching a DVD or JPEG CD, you can set the image you like as background wallpaper. Setting the Wallpaper During playback, press Press LOGO PLAY/PAUSE button button. when an image you like appears. • “COPY LOGO DATA” will be displayed on the TV screen. -
Page 27: Dvd Audio Disc Playback Mode
DVD Audio Disc Playback Mode Some DVD-Audio discs contain DVD-Video as well as DVD-Audio. To play back the DVD-Video portion of the DVD-Audio disc, set the unit to DVD-Video mode. Press the MENU button while the disc tray is open. -
Page 28: Setting The Delay Time
Setting the Delay Time If the speakers cannot be placed at equal distances from the listening position, you can adjust the delay time of the audio signals from the center and rear speakers. In Stop mode, press MENU button. Setting up the Speaker Delay Time When 5.1CH Surround Sound is played, you can enjoy the best sound if... -
Page 29: Setting The Test Tone
Multi-Channel Pro Logic Mode Start Setting the DRC (Dynamic Range Compression) You can use this function to enjoy Dolby Digital sound when watching movies at low volume at night. In Stop or no disc mode, press MENU button. Press Cursor... -
Page 30: Setting The Audio
• The volume level can be adjusted in steps from +6dB to –6dB. • The sound gets louder as you move closer to +6dB and quieter as you get closer to -6dB. Adjusting Rear Speaker Balance Adjusting Center Speaker Level... -
Page 31: Av Sync Setup
Press MENU button to exit the setup screen. Sound Field (DSP)/EQ Function DSP(Digital Signal Processor) DSP modes have been designed to simulate different acoustic environments. EQ: You can select ROCK, POP, or CLASSIC to optimize the sound for the genre of music you are playing buttons buttons POP, JAZZ, ROCK: Depending on the genre of music, you can select POP, JAZZ, and ROCK. -
Page 32: Dolby Pro Logic Ii Mode
• CINEMA: Adds realism to the movie soundtrack. • PRO LOGIC: You will experience a realistic multi-channel effect, as if using five speakers, while using just the front left and right speakers. • MATRIX: You will hear 5.1 channel surround sound. -
Page 33: Listening To Radio
Listening to Radio You can listen to the chosen band (FM, AM broadcast stations) by using either the automatic or manual tuning operation. Remote Control Unit Tune in to the Press TUNER desired station. button. • Automatic Tuning 1 When... -
Page 34: Convenient Functions
To cancel the sleep timer, press SLEEP button until OFF appears on the display. Adjusting Display Brightness You can adjust the brightness of the display on the main unit so it won't interfere with your movie viewing. Press DIMMER button. -
Page 35: Operating A Tv With The Remote Control
The remote control may not work on some brands of TVs. Also some operations may not be possible depending on your brand of TV. • If you do not set the remote control with the code for your brand of TV, the remote control will work on a Samsung TV by default. TV Brand Code List... -
Page 36: Before Calling For Service
Before Calling for Service Refer to the chart below when this unit does not function properly. If the problem you are experiencing is not listed below or if the instruction below does not help, turn off the unit, disconnect the power cord, and contact the nearest authorized dealer or Samsung Electronics Service Center. -
Page 37: Cautions On Handling And Storing Discs
Cautions on Handling and Storing Discs Small scratches on the disc may reduce sound and picture quality or cause skipping. Be especially careful not to scratch discs when handling them. Handling discs Do not touch the playback side of the disc. Hold the disc by the edges so that fingerprints will not get on the surface. -
Page 38: Specifications
This limited warranty begins on the original date of purchase, and is valid only on products purchased and used in the United States. To receive warranty service, the purchaser must contact SAMSUNG for problem determination and service procedures. Warranty service can only be performed by a SAMSUNG authorized service center.