Table of Contents
Advertisement
Advertisement
Table of Contents

Related Manuals for LG LH-W360SE


Summary of Contents for LG LH-W360SE
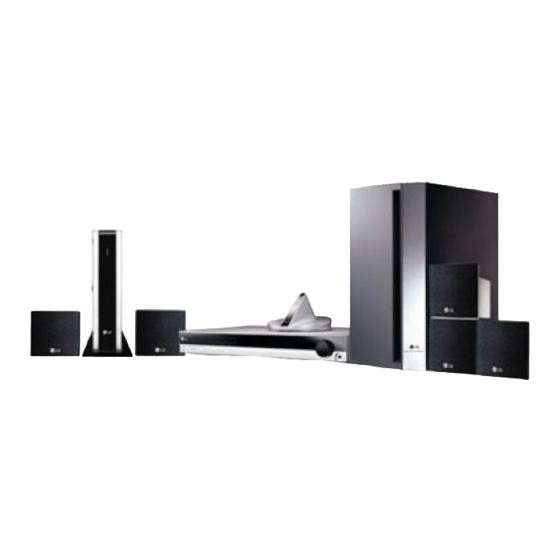
- Page 1 LH-W3600SE_JA6PLLD_ENG WIRELESS DVD RECEIVER SYSTEM MODEL: LH-W360SE (Main Unit: LH-W360 Speakers: LHS-36SES, LHS-36SEW ACC36R, ACC36T) Before connecting up, operating or repairing this product, please read this instruction booklet carefully and completely.
- Page 2 CAUTION: The apparatus should not be exposed to water CAUTION (dripping or splashing) and no objects filled with liquids, such RISK OF ELECTRIC SHOCK as vases, should be placed on the apparatus. DO NOT OPEN CAUTION concerning the Power Cord Most appliances recommend they be placed upon CAUTION: TO REDUCE THE RISK OF ELECTRIC SHOCK...
-
Page 3: Table Of Contents
Introduction Maintenance and Service Maintenance and Service ....3 Before use ......4 Refer to the information in this chapter before Front Panel/Rear Panel . -
Page 4: Before Use
Introduction Types of Playable Discs Before use To ensure proper use of this product, please read this (8 cm / 12 cm disc) owner’s manual carefully and retain for future reference. Video CD (VCD) (8 cm / 12 cm disc) This manual provides information on the operation Audio CD and maintenance of your DVD/CD Receiver. -
Page 5: Front Panel/Rear Panel
Front Panel/Rear Panel PHONES connector STANDBY/ON DISC Tray FUNC./PLAY STANDBY indicator Press and hold down this button about 3 OPEN/CLOSE button seconds, then press repeatedly to select Lights red when the other function. receiver is in Standby mode (off). VOLUME controller DISPLAY Window Remote sensor TUNING(-/+) -
Page 6: Remote Control
Remote Control OPEN/CLOSE (Z Z ) Opens and closes the disc tray. Selects input source. POWER To enjoy the multimedia files. Select the output source (CD/DVD) SLEEP BAND Set the System to turn off automatical- Select the System’s tuner (FM and AM ly at a specified time. -
Page 7: Installation And Setup
Installation and Setup TV Connections Make one of the following connections, depending on SCART connection the capabilities of your existing equipment. Connect the EURO AV OUTPUT (TO TV) socket on the DVD/CD Receiver to the corresponding in jacks Tips: on the TV using the scart cable (T). Depending on your TV and other equipment you If your television is a high-definition or “digital wish to connect, there are various ways you could... -
Page 8: Optional Equipment Connections
Optional Equipment Connections Aerial Connections Connect the supplied FM/AM aerial for listening to the 1. Connect a VCR to the AUX IN connectors. radio. 2. Connect the USB port of a USB Memory (or MP3 Connect the AM Loop aerial to the AM aerial player, etc.) to the USB port on the front of the unit. -
Page 9: Speaker System Connection
Speaker System Connection Notes: Optimum performance can be implemented only when the Connect the speakers to the front (right, left) or Wireless TX and the Wireless RX within distance of 2m to center speaker connectors at the main set. 10m is used since communication failure may occur if Connect the subwoofer to the woofer connector. -
Page 10: Setup The Wireless System
Setup the Wiress System Note: If you operate main unit then wireless speakers (rear Note: speakers) sound within a few seconds in standby If there is a product with a strong electromagnetic field mode nearby, interference may occur. (Ex : Micro wave oven) Wireless TX DC IN connector ID/CHANNEL (ID./CH.) - Page 11 Changing a channel of Wireless Setting an ID of Wireless TX and TX and Wireless RX Wireless RX If there is a similar wireless product nearby, When the unit is manufactured, the ID is already set. interference may occur. In this case, change to If an interference occurs or you use a new Wireless another channel using RX, an ID is set again.
-
Page 12: Displaying Disc Information On-Screen
Displaying Disc Information Initial Settings on-screen By using the Setup menu, you can make various You can display various information about the disc adjustments to items such as picture and sound. You loaded on-screen. can also set a language for the subtitles and the Setup menu, among other things. -
Page 13: Display
DISPLAY DISPLAY 16 : 9 TV Aspect Widescreen Display Mode Move Select TV Aspect 4:3 – Select when a standard 4:3 TV is connected. 16:9 – Select when a 16:9 wide TV is connected. Display Mode Display Mode setting works only when the TV Aspect mode is set to “4:3”. -
Page 14: Audio
AUDIO 5.1 Speaker Setup Make the following settings for the built-in 5.1 channel Each DVD disc has a variety of audio output options. surround decoder. Set the receiver’s AUDIO options according to the type of audio system you use. 1. Press ENTER and 5.1 Speaker Setup menu appears. -
Page 15: Lock (Parental Control)
Area Code LOCK (Parental Control) Enter the code of the area whose standards were LOCK used to rate the DVD video disc, based on the list on Rating Unlock page 24. Password **** Area Code 1. Select “Area Code” on the LOCK menu then press B. -
Page 16: Operation
Operation General features Buttons Operations Discs Z (OPEN / CLOSE) Opens or closes the disc tray. X (PAUSE) During playback, press X to pause playback. Press X repeatedly to play Frame-by-Frame. DivX SKIP (. / >) During playback, press SKIP (. or >) to go to the next chapter/track or to return to the beginning of the current chapter/track. -
Page 17: Additional Features
Notes on general features: Last Scene Memory If you press SKIP (>) once during Repeat This receiver memorizes last scene from the last disc Chapter (Track) playback, the repeat playback that is viewed. The last scene remains in memory cancels. even if you remove the disc from the receiver or Zoom may not work on some DVDs. -
Page 18: Playing An Audio Cd Or Mp3/Wma File
Playing an Audio CD or MP3/WMA file Programmed Playback This unit can play Audio CDs or MP3/WMA files The program function enables you to store your recorded media. favorite tracks from any disc in the receiver memory. A program can contain 300 tracks. MP3/ WMA/ Audio CD Once you insert an MP3/WMA files recorded media or 1. -
Page 19: Viewing A Jpeg File
Zoom Viewing a JPEG file JPEG Each time press ZOOM the setting change in the This unit can play discs with JPEG files. following order. Before playing JPEG recordings, read the notes on Zoom on y Zoom off JPEG Recordings on right. Press v/ /M to enlage the video image. -
Page 20: Playing A Divx Movie File
Playing a DivX Movie file DivX disc compatibility with this player is limited as follows: Using this DVD/CD Receiver you can play DivX disc. • Available resolution size of the DivX file is under 1. Insert a disc and close the tray. The MOVIE menu 800x600 (W x H) pixel. -
Page 21: Presetting The Radio Stations
Presetting the Radio Stations Listening to the Radio You can preset 50 stations for FM and AM (MW). Preset radio stations in the DVD/CD Receiver’s Before tuning, make sure that you have turned down memory first (see “Presetting radio stations” on the the volume. -
Page 22: Rds Operation
RDS Operation Programme Search (PTY) A major benefit of RDS is its ability to encode This unit is equipped with RDS (Radio Data System), broadcasts with Programme Type (PTY) codes that which brings a wide range of information to FM radio. indicate the type of material being broadcast. -
Page 23: Sleep Timer Setting
The SLEEP indicator and sleep time appears in the display window. XTS-P ON The unique sound quality of the LG Technology 2. Each time you press SLEEP the setting creates the optimum sound for you to play the changes in the following order. -
Page 24: Language Codes
Language Codes Use this list to input your desired language for the following initial settings: Disc Audio, Disc Subtitle, Disc Menu. Language Code Language Code Language Code Language Code Abkhazian 6566 Fiji 7074 Lingala 7678 Singhalese 8373 Afar 6565 Finnish 7073 Lithuanian 7684... -
Page 25: Troubleshooting
Troubleshooting Check the following guide for the possible cause of a problem before contacting service. Correction Symptom Cause • Plug the power cord securely into the No power. • The power cord is disconnected. wall outlet. • Insert a disc. (Check that the DVD or, •... - Page 26 Cause Correction Symptom • The antenna is positioned or connected • Connect the antenna securely. Radio stations cannot poorly. be tuned in. • Adjust the antennas and connect an external antenna if necessary. • The signal strength of the stations is too •...
-
Page 27: Specifications
Specifications Power supply Refer to main label Power consumption Refer to main label Net Weight 3.9 kg External dimensions (W x H x D) 430 x 57 x 295 mm Operating conditions Temperature: 5°C to 35°C, Operation status: Horizontal Operating humidity 5% to 85% Laser Semiconductor laser, wavelength 650 nm... - Page 28 P/NO : 3834RH0138G...