
Related Manuals for JVC KT-HDP1


Summary of Contents for JVC KT-HDP1
- Page 1 High Definition Radio Plug & Play Model: KT-HDP1 Installation & User Guide 2007 May...
-
Page 2: Warning And Safety Information
Warning and Safety Information FCC Warning This equipment may generate or use radio frequency energy. Changes or modifications to this equipment may cause harmful interference unless the modifications are expressly approved in this user guide. The user could lose the authority to operate this equipment if an unauthorized change or modification is made. -
Page 3: General Precautions
General Precautions Liquid Crystal Precautions If the LCD screen on the receiver is damaged, do not to touch the liquid crystal fluid. If any of the following situations happen, take the action indicated: ․ If the liquid crystal fluid comes in contact with your skin, wipe the skin area with a cloth and then wash the skin thoroughly with soap and running water. -
Page 4: Cleaning And Maintenance
on again. The installation and use suggestions contained in this manual are subject to any restrictions or limitations that may be imposed by applicable law. The purchaser should check applicable law for any restrictions or limitations before installing and/or operating this unit. Warnings Operating Temperature The receiver is designed to operate between –20... -
Page 5: Package Contents
Package Contents HD Radio Receiver Remote Controller Car Cradle Relay Box... -
Page 6: Installation
Installation Professional installation provides an experienced technician to install this product in your vehicle, advice for selecting a suitable mounting location, installation of the antenna, and routing all the necessary wires and cables. If the FM reception within your vehicle proves to be poor, an installer will have the necessary accessories to install an optional FM Relay Switch, or an audio cable, to connect the audio output of the dock directly to your vehicle’s audio system. -
Page 7: Getting Started
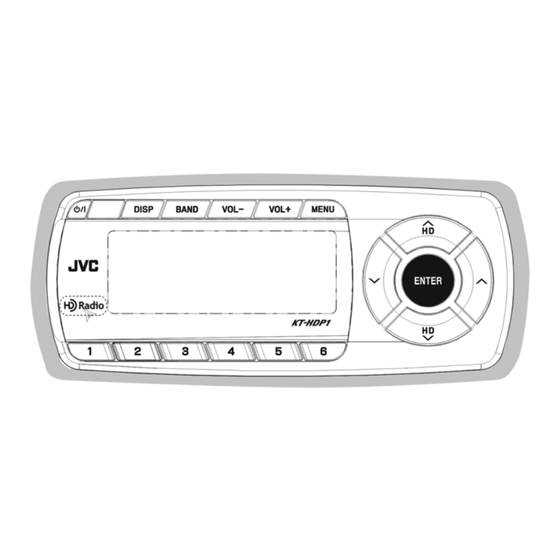
Getting Started Controls 1. POWER Button : Turns the receiver On or Off. 2. DISP (Display) Button : Switches multi-lie and single line in HD frequency mode(call sign). Pressing and holding switches the display to the multicast channels. BAND Button : Switches FM1, FM2, FM3, AM. -
Page 8: Menu Options
Operation Display Screen Information Menu Options To enter the Menu Options page of the receiver, press the MENU button. The Menu Options list will be displayed. To select a menu option, use the HD Radio up and down buttons to highlight the option you wish to adjust. - Page 9 option also allows you to turn the FM transmitter On and Off . Display Options The receiver’s display screen can be adjusted for brightness, contrast and LCD type using the Display Options. Brightness adjusts the overall intensity of the LCD display to help with viewing in different lighting conditions.
- Page 10 Audio Control The Audio Level setting adjusts the level of the audio output of the receiver. To adjust the audio level, use the Seek lbuttons to change the audio level. The bar graph will move to indicate the change. The Audio Level setting can also set Equalizer, Base and Balance.
- Page 11 Software Version The latest software version will be indicated in this option. Factory Default The Factory Default option will restore most every feature of the receiver to the original factory settings. A pop-up message “ Restore Settings? ” displayed. Use the HD Radio buttons to select Yes to restore all settings to the settings from the factory, or select No to leave them as present and return to the Menu Options menu.